
| DATOS TÉCNICOS (Stirling Mk. I) |
TECHNICAL DATA (Stirling Mk. I) |
| TIPO:Bombardero pesado. | TYPE:Heavy bomber. |
| TRIPULANTES:7 | CREW:7 |
| ENVERGADURA:30,20 m. | SPAN:99.1 ft. |
| LONGITUD:26,59 m. | LENGTH:87.3 ft. |
| ALTURA:6,93 m. | HEIGHT:22.9 ft. |
| SUPERFICIE ALAR:136 m². | WING AREA:1,460 ft². |
| PESO EN VACÍO:22.498 kg. | EMPTY WEIGHT:49,600 lb. |
| MOTOR:Cuatro motores radiales de 14 cilindros Bristol Hercules XI de 1.500 hp. (1.100 kW) con hélices de tres palas de paso constante. | ENGINE:Four Bristol Hercules XI 14-cylinder air-cooled sleeve-valve radial piston engines developing 1,500 hp (1,100 kW) each with three-bladed constant-speed propellers. |
ARMAMENTO:
|
ARMAMENT:
|
| VELOCIDAD MÁX.:454 km/h. a 3.800 m. | MAX. SPEED:282 mph. at 12,500 ft. |
| TECHO:5.000 m. | CEILING:16,500 ft. |
| ALCANCE:3.750 km. | RANGE:2,330 ml. |
| PRIMER VUELO:14 de mayo de 1939. | FIRST FLIGHT:14 May 1939. |
| VERSIONES:6 | VERSIONS:6 |
| CONSTRUIDOS:2.371 | BUILT:2,371 |
En 1935, el Ministerio del Aire Británico emitió una solicitud designada B.1/35, especificando un nuevo bombardero bimotor para la Royal Air Force (RAF). Varios fabricantes presentaron propuestas, y la firma Vickers recibió el contrato por el que surgiría el Warwick algunos años más tarde. El Warwick conduciría al Wellington, de menor tamaño. Handley-Page había presentado un diseño con la designación propia de HP 55 para la solicitud B.1/35, pero al año siguiente, 1936, el Ministerio del Aire emitió dos nuevas solicitudes de bombarderos, B.12/36 y B.13/36. dando lugar a cambios en los planes de la empresa.
El requisito B.13/36 conduciría, de manera un tanto indirecta, al Avro Lancaster y al Handley-Page Halifax. En cuanto al requisito B.12/36, sus especificaciones eran exigentes, se trataba de un bombardero de cuatro motores con una carga máxima de bombas de 6450 kg. con una autonomía de 3.220 km.; o bien una carga de 3.630 kg. con una autonomía de 4.800 km.; una velocidad de crucero de 370 km/h. a una altitud de 4.600 m. (15,000 pies) y torretas para la defensa.
La especificación también establecía restricciones en el tamaño de los subconjuntos de la estructura del avión, para permitir transportarlos fácilmente por ferrocarril. Varios fabricantes de aviones británicos presentaron propuestas, y el Ministerio del Aire quedó muy impresionado con el diseño de Supermarine, el Tipo 317, y se ordenaron dos prototipos en enero de 1937. El Ministerio del Aire encontró la presentación de Short Brothers, el S.29, de diseño más conservador, pero por esa razón decidió apoyar su desarrollo como un plan de respaldo, sugiriendo cambios a la firma y luego ordenando prototipos en octubre de 1937.
Al final resultó que, Supermarine terminaría preocupado por construir el caza Spitfire, y el Tipo 317 nunca volaría. Mientras tanto, Short siguió adelante con el S.29, construyendo inicialmente una versión de madera a media escala, el S.31, como demostración. El S.31 estaba propulsado por cuatro motores radiales Pobjoy Niagara III de siete cilindros refrigerados por aire que proporcionaban 67 kW (90 hp.) cada uno, con asientos para un piloto y un observador en tándem; la longitud era de 13,3 m. y la envergadura de 15,1 m. Las fotos sugieren que el tren principal era retráctil; no está claro si también la rueda de cola.
El S.31 realizó su vuelo inicial el 19 de septiembre de 1938, con el piloto de pruebas jefe de Short, Lankester Parker, a los mandos. El demostrador voló bien, aunque la carrera de despegue se consideró excesiva, por lo que sólo se necesitaba cambiar el ángulo de incidencia del ala, pero dadas las limitaciones de tiempo, era más simple alargar las patas del tren de aterrizaje principal para proporcionar un morro más alto y acortar la carrera de despegue. Eso funcionó, pero significó problemas a largo plazo por el tren de aterrizaje debilitado y el limitado campo de visión desde la cabina. Posteriormente, el demostrador se actualizó con motores Niagara IV de 85 kW (115 hp.) cada uno, y se usó para varias pruebas. Finalmente fue desechado, tras un accidente de despegue, a principios de 1944.
El primer prototipo S.29, ahora con el nombre de servicio Stirling en honor a la ciudad escocesa del mismo nombre, realizó su vuelo inicial el 14 de mayo de 1939, propulsado por cuatro motores radiales Bristol Hercules II de 14 cilindros en dos filas refrigerados por aire de 1.025 kW (1.375 hp.) cada uno. Uno de los frenos de la rueda principal se bloqueó al aterrizar, lo que provocó el colapso del tren de aterrizaje y la aeronave se inclinó sobre la pista. Nadie resultó gravemente herido, pero el prototipo resultó dañado más allá de una reparación razonable.
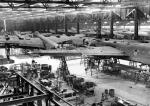
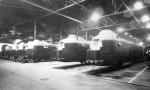
El segundo prototipo voló siete meses después, el 3 de diciembre de 1939, tras el estallido de la Segunda Guerra Mundial, lo que llevó al vuelo inicial de la primera serie del modelo Stirling Mark I el 7 de mayo de 1940, propulsado por radiales Hércules XI de 1.190 kW (1.595 hp) cada uno. La producción inicial fue de la planta de Short en Rochester en Inglaterra, y posteriormente la planta de Short & Harland en Belfast, Irlanda del Norte, también comenzó a fabricarlo. Se inició más producción en Inglaterra en la planta de Austin Motors en Longbridge y la planta de Rootes en Stoke-on-Kent. Al final, veinte plantas diferentes producirían el Stirling.
Las entregas comenzaron en agosto de 1940, aunque la producción se vio obstaculizada por la Batalla de Inglaterra, tanto por la prioridad que se dio a la producción de cazas como por la destrucción causada por las incursiones de la Luftwaffe en Rochester y Belfast durante agosto. La incursión en Belfast fue un poco impactante, ya que se suponía que estaba fuera del alcance de los bombarderos alemanes. A pesar de las dificultades, los Stirling realizaron su primera misión operativa en la noche del 10 al 11 de febrero de 1941, con tres Stirling de la Escuadrilla N.º 7 del Mando de Bombarderos lanzando bombas en tanques de almacenamiento de petróleo en Rotterdam, Países Bajos. Cada avión llevaba 16 bombas de 225 kg.
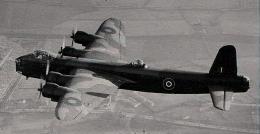
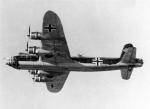
El Stirling Mark I sirve como base para describir este avión. El Stirling le debe mucho al trabajo de Short en grandes hidroaviones. El bombardero era un avión de aspecto cuadrado, con un ala montada en el medio y una disposición de cola convencional, propulsado por cuatro motores Bristol Hercules XI que impulsaban hélices de paso variable de tres palas, aparentemente algunas máquinas de producción temprana conservaron la variante Hércules II utilizada en los prototipos.
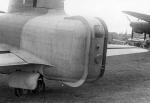
El Stirling tenía un tren de aterrizaje con arrastre de cola, todos los conjuntos de engranajes eran retráctiles, cada tren principal tenía una sola rueda y se retraía hacia atrás en la góndola del motor, la parte inferior de los neumáticos permanecía visible después de la retracción y el conjunto de la rueda de cola tenía dos ruedas. Las patas tipo yugo para el tren principal eran muy largas para darle al bombardero un alto ángulo de ataque y ayudar en despegues cortos. Como se ha mencionado, el engranaje principal resultaría problemático. La cabina elevada añadía dificultad a los despegues, aunque el Stirling se manejaba bastante bien una vez que despegaba. Sin embargo, una de sus idiosincrasias era que los motores Hércules tenían controles de aceleración hidráulicos, lo que les daba una respuesta lenta a la entrada del acelerador, y no era una característica atractiva en caso de emergencia. En compensación, el Stirling era robusto y capaz de absorber una buena cantidad de daño en combate.
Las superficies de control de vuelo eran convencionales, con una gran aleta de una pieza y un alerón en cada ala, además de elevadores y timón en la cola. El ala tenía largueros gemelos y era gruesa, estaba cargada con tanques de combustible. Cada ala presentaba cuatro tanques entre los largueros, dos detrás del larguero trasero y uno en el borde de ataque del ala frente al larguero delantero. Todos los tanques de combustible eran autosellantes, excepto los tanques del borde de ataque de las alas, que solo se usaban para misiones de largo alcance y se vaciaban primero después del despegue. La capacidad total de combustible fijo era de 10.247 litros.
La envergadura era de menos de 100 pies, lo que le daba al Stirling una gran carga alar y limitaba su techo; en el lado positivo, la alta carga alar lo hacía sorprendentemente ágil para un avión de su tamaño, con una buena velocidad de giro y una rápida velocidad de balanceo. Existe la historia de que el ala de envergadura corta se debió a un requisito para que el avión encajara en los hangares, pero esa historia es discutida. Otras fuentes afirman que la envergadura corta fue simplemente para reducir el peso. En cualquier caso, tenía una envergadura que resultaría inadecuada.
El Stirling tenía una bodega de bombas poco profunda de 12,8 m. de largo, dividida en tres «celdas» paralelas, cada una de solo 48,3 cm., lo que era una limitación a medida que avanzaba la guerra, ya que el Stirling nunca podría transportar las bombas de gran tamaño de alta capacidad o «blockbuster«. No podía manejar bombas de uso general de más de 225 kg. Junto con la bodega de bombas principal, había bodegas de bombas entre los motores principales, aunque los dibujos sugieren que generalmente se usaban para acomodar depósitos de largo alcance. La carga máxima de bombas era de unos impresionantes 6.350 kg., pero solo podía transportarse a una distancia relativamente corta; para misiones de largo alcance, la carga típica de bombas era una cuarta parte de ese peso, 1.590 kg.
Al principio, el armamento defensivo consistía en una torreta de morro Frazier-Nash (FN) Mark 5, con dos ametralladoras Browning gemelas de 7,7 mm. y una torreta de cola FN Mark 20A con cuatro ametralladoras de 7,7 mm. Las fuentes dicen que los primeros Stirling de serie presentaban una posición ventral retráctil con dos ametralladoras de 7,7 mm., pero que funcionó mal y se eliminó por un arma montada a cada lado del fuselaje trasero. Es difícil encontrar detalles sobre este asunto. También había una torreta dorsal Boulton-Paul con ametralladoras gemelas de 7,7 mm., pero las fotos muestran que no se instaló en todos los Stirling Mark I, parece haber sido introducida después de la producción inicial, una vez que se abandonó el armamento ventral.
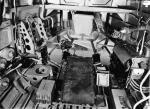
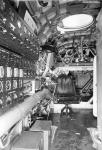
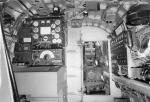
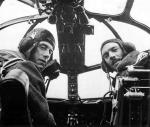
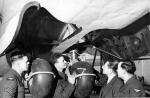
El fuselaje se construyó en cuatro módulos separados que luego se ensamblaban. La tripulación incluía un artillero en el morro, piloto y copiloto en la cabina de vuelo, navegante, operador de radio e ingeniero de vuelo en el espacio detrás y debajo de la cabina de vuelo. El navegante se duplicaba como bombardero, o «apuntador de bombas», como los llamó la RAF. Había también un artillero dorsal y un artillero trasero. El navegante tenía un astrodomo en la parte superior de la aeronave detrás de la cabina a la derecha, con una antena direccional en la parte trasera del astrodomo en la línea central. Había una escotilla de escape en la parte inferior del morro, otra encima del fuselaje, tras las alas, y una tercera debajo del fuselaje trasero. Había una puerta para la tripulación en el fuselaje trasero izquierdo, colocada en ángulo sesgado conforme a la posición del Stirling en tierra.
Las botellas de oxígeno de repuesto se guardaban sobre la sección central del ala, mientras que las bengalas de iluminación y los flotadores de bengalas se guardaron en la parte trasera del fuselaje. Los tubos de lanzamiento se soltaban junto con la escotilla trasera. Había una litera de descanso en el espacio entre la sección central del ala y la bodega de bombas, un baño primitivo en la parte trasera y un bote inflable de rescate debajo de un panel en cada ala en la parte trasera del motor interior. Los esquemas de pintura típicos de Stirling, una vez que el avión alcanzó su ritmo de operaciones, eran un camuflaje disruptivo en la parte superior y negro en la parte inferior.
Aunque la propaganda británica de principios de la guerra pregonaba que el Stirling era capaz de llevar la guerra a los alemanes «de día o de noche», cuando el Stirling entró en funcionamiento, las incursiones del Mando de Bombarderos de la RAF contra Alemania se llevaban a cabo estrictamente de noche, y solo se realizaban incursiones diurnas. contra objetivos lo suficientemente cerca del Reino Unido para permitir la escolta de cazas. Los británicos habían aprendido desde el principio de la guerra que los bombarderos sin escolta que realizaban incursiones a la luz del día eran muy vulnerables a los cazas enemigos y que persistir en ello resultaría en la aniquilación completa del Mando de Bombarderos. El Stirling participó en incursiones diurnas escoltadas, pero estaba más comprometido en las incursiones nocturnas.
Las operaciones nocturnas tampoco fueron tan agradables, ya que la Luftwaffe alemana construyó una fuerza de caza nocturna guiada por radar letalmente efectiva, basada principalmente en el Messerschmitt Bf 110, junto con el Junkers Ju 88. Al principio, el Stirling a menudo podía afrontar a los cazas nocturnos de la Luftwaffe, dotados de radar y cañones pesados, asegurando que no fueran mucho más rápidos que los bombarderos que estaban tratando de derribar. Si el artillero de cola de un Stirling veía a un caza nocturno alemán tratando de acercarse sigilosamente al bombardero, el piloto de Stirling podría realizar una maniobra de «sacacorchos» que alejaría fácilmente al atacante. El artillero de cola, por supuesto, también podría disparar. Las ametralladoras de 7,7 mm. no eran potentes, pero podían confundir los ataques de los cazas nocturnos de la Luftwaffe. Con balas pequeñas o no, a nadie le gusta que le arrojen una lluvia de plomo en la cara, y en ocasiones estas armas también derribaron a sus perseguidores.
La producción de Stirling tardó en recuperarse, en parte debido a los daños causados por los ataques aéreos de la Luftwaffe contra el Reino Unido, once Stirling fueron destruidos en tierra antes de ser entregados. A fines de 1941, se habían entregado aproximadamente 150 Stirling. La producción era de Short en Belfast e Inglaterra, y varias empresas auxiliares en Inglaterra, principalmente Austin Motors.
Hubo un plan para producir un Stirling Mark II en Canadá, dotado con radiales de nueve cilindros Wright Cyclone R-2600-A5B de 1,195 kW (1.600 hp.) cada uno. Dos Stirling Mark I se convirtieron a esta configuración y se construyeron tres máquinas de preproducción. El plan fracasó y la mayoría o la totalidad de estos cinco aviones se convirtieron a la configuración Mark I. El Mark II nunca entró en servicio operativo. Se produjeron un total de 712 Mark I, sin contar los dos prototipos y los once bombarderos perdidos en los bombardeos de la Luftwaffe antes de la entrega, pero incluidos los Mark II.
Short consideró configuraciones del Stirling muy mejoradas, incluidos el S.34 y el S.36 Súper Stirling, con características como un ala de mayor envergadura, motores más potentes y armamento defensivo más pesado. Finalmente se tomó la decisión de que no tenía sentido refinar el Stirling, dado que el Avro Lancaster estaba en producción. Sin embargo, se consideró que tenía suficientes virtudes para justificar la producción continua, y por ello se introdujo el Stirling Mark III a partir de 1942. El cambio principal fue la introducción de radiales Hércules XVI más potentes de 1220 kW (1.635 hp.) cada uno, y góndolas motoras visiblemente modificadas con tomas superiores más prominentes.
El Mark III también presentaba una torreta dorsal FN Mark 50 de bajo perfil con ametralladoras gemelas de 7,7 mm., como los instalados en el Lancaster y algunos Stirling Mark I de producción tardía. También llevaba tanques de combustible más grandes y un interior modificado, con menos ventanas en el fuselaje trasero. En ese momento, la ofensiva nocturna del Mando de Bombarderos contra Alemania estaba en pleno apogeo, con las denominadas «incursiones de mil bombarderos» arrojando bombas sobre las ciudades alemanas.
Se ha debatido la efectividad de la guerra de bombarderos de Gran Bretaña contra Alemania, ya que la precisión de los bombardeos fue baja, irremediablemente baja al principio, aunque mejoró un poco con el tiempo, y los alemanes demostraron ser resistentes al dispersar la producción de armas. Sin embargo, el bombardeo fue ciertamente disruptivo y problemático para la producción de guerra alemana, y también obligó al Reich a dedicar considerables recursos militares a la defensa interna que, de otro modo, se habrían utilizado para operaciones ofensivas.
Esas defensas infligieron un daño considerable al mando de Bombarderos, mientras los dos bandos se enzarzaban en una carrera a muerte para obtener mejores medidas y contramedidas. Un truco que se le ocurrió a la Luftwaffe fue instalar un cañón fijo que disparara hacia arriba en la parte trasera de los cazas nocturnos. El montaje se denominó «Música de jazz«. El caza nocturno se acercaría sigilosamente al punto ciego del bombardero desde abajo y luego lo derribaría. En respuesta, el Stirling fue dotado de una única ametralladora móvil de 7,7 mm., o una Browning de 12,7 mm. que hacía fuego a través del piso.
El arma ventral parece haber sido un ajuste realizado sobre el terreno. Se ha argumentado que la torreta superior de los bombarderos de la RAF era más problemática de lo que valía para el combate nocturno, proporcionando poca utilidad defensiva, mientras reducía la velocidad por el peso y particularmente la resistencia. Dado que un caza nocturno de la Luftwaffe no tenía mucha ventaja en rendimiento sobre un bombardero de la RAF, el aumento en la velocidad de un bombardero podría haber marcado una diferencia significativa.
Muchos bombarderos Mark III estaban equipados con un radar de mapeo terrestre H2S en un radomo en el vientre. Algunos Stirling equipados con radar operaron en la Fuerza de Rastreo del Mando de Bombarderos, que marcaban objetivos para los ataques de la RAF lanzando bengalas de gran tamaño para dar a los bombarderos algo a lo que apuntar.
Se construyeron un total de 1.047 bombarderos Stirling Mark III, sin contar algunas conversiones del Mark I, lo que la convierte en la variante más común. Mientras los Halifax y Lancaster llevaban cada vez más la peor parte de la ofensiva nocturna, el Stirling pronto se consideró demasiado vulnerable. Es difícil afirmar que el Stirling no podía defenderse tan bien como el Lancaster, dada su agilidad de maniobra, pero también es cierto que el techo más bajo del Stirling facilitaba la interceptación de los cazas nocturnos de la Luftwaffe. La incapacidad del Stirling para transportar bombas de gran peso también jugó en su contra, por lo que se tomó la decisión de retirarlo de la ofensiva nocturna.
Los bombarderos Stirling asumieron funciones secundarias, como la colocación de minas marítimas, una misión curiosamente conocida como «Jardinería»; o convertirse en plataformas de contramedidas de radio (RCM) agregando equipo de contramedidas. Estos Stirling participaron en el elaborado esfuerzo de engaño electrónico realizado en apoyo del desembarco de Normandía en junio de 1944, ayudando a crear flotas navales «fantasmas» lanzando paquetes de lo que denominaron «ventanas», lo que hoy llamaríamos señuelos, aunque ese término tenía un significado ligeramente diferente en esos días, para engañar a los radares alemanes. Algunos también se utilizaron para lanzamientos de agentes y suministros en paracaídas durante las operaciones secretas del Mando de Operaciones Especiales británico.
A pesar de la eliminación del Stirling de la ofensiva de bombarderos nocturnos, todavía se consideraba lo suficientemente útil como para permanecer en producción, aunque en las funciones de transporte de paracaidistas y, en particular, de remolcador de planeadores, donde sus limitaciones de techo y carga de bombas eran intrascendentes. Dos bombarderos Mark III se convirtieron a la configuración Stirling Mark IV en 1943, con entregas de producción en el último trimestre de ese año.
El fuselaje del Mark IV era efectivamente el del Mark III, pero se eliminaron las torretas de morro y dorsal, y se reemplazó la delantera por un puesto acristalado con plexiglás para el navegante, suprimiéndose la torreta superior. La torreta de cola también se eliminó a veces. Los remolcadores de planeadores Mark IV presentaban equipo de remolque debajo de la cola, pudiendo tirar de un planeador Hamilcar grande o dos o más planeadores Horsa más pequeños. En la configuración de transporte de paracaidistas, los paracaidistas saltaban por una escotilla en el piso.
Se construyó un total de 450 Stirling Mark IV, todas en Belfast, con al menos 21 Mark III también convertidos a la configuración Mark IV. El Stirling Mark IV participó en la operación de Normandía; la nefasta operación contra Arnhem en los Países Bajos durante septiembre de 1944; y la operación aerotransportada masiva en apoyo de los cruces del Rhin en marzo de 1945.
El Mark IV tampoco fue el último modelo fabricado, ya que hubo un transporte puro Stirling Mark V desarrollado en 1944 y puesto en servicio a principios de 1945. El Mark V no tenía armamento. Presentaba un morro extendido, llegando la longitud del avión a 27,6 m., que se abría con bisagras, y una gran puerta de carga en el fuselaje trasero derecho, que se cargaba a través de rampas que se colocaban manualmente. Podía transportar 40 pasajeros, ; o 20 paracaidistas; o 12 camillas más asientos para 14 heridos sentados y asistentes; o cargas como dos jeeps con remolques, o un jeep con un cañón de campaña ligero. Hubo también planes para desarrollar el modelo S.37 como avión de pasajeros civil para la posguerra, pero se cancelaron.
Se construyó un total de 160 transportes Stirling Mark V, todos en la planta de Belfast. El Mark V estaba destinado al servicio en el Lejano Oriente, aunque el final abrupto de la guerra allí en agosto significó que nunca sirvieron en ese papel. Mientras que los últimos Stirling fueron retirados del Mando de Transporte de la RAF en 1946, una docena de ellos se convirtieron en aviones de pasajeros similares al S.37 y se vendieron al operador belga Trans-Air en 1947, para ser utilizados para vuelos al Lejano Oriente durante un número de años. Eran los únicos Stirling formalmente a cargo de un operador extranjero, además del servicio en las fuerzas de la Commonwealth británica bajo el paraguas de la RAF. Un Stirling realizó un aterrizaje forzoso en los Países Bajos en agosto de 1942 y los alemanes lo evaluaron, pero no está claro si la Luftwaffe lo utilizó en alguna misión operativa.
El Stirling tiende a ser considerado inadecuado en las historia aeronáutica, pero fue un excelente avión para los estándares de su época, simplemente fue eclipsado por los aviones mejores que lo siguieron. Después de todo, todavía estaba en producción en 1945, lo que difícilmente lo hace parecer un fracaso. El Stirling sirvió con un total de once escuadrillas de bombarderos y realizó decenas de miles de salidas, con casi un tercio de ellos derribados, dañados en combate sin posibilidad de reparación o perdidos en accidentes operativos.


In 1935, the British Air Ministry issued a request designated B.1/35, specifying a new twin-engine bomber for the Royal Air Force (RAF). A number of manufacturers submitted proposals, with the Vickers firm being awarded the contract for what would emerge as the Warwick some years later, the Warwick leading to the smaller Wellington. Handley-Page had submitted a design with the company designation of HP 55 for B.1/35, but the next year, 1936, the Air Ministry issued two new requests for bombers, B.12/36 and B.13/36, leading to changes in company plans.
The B.13/36 requirement would lead, somewhat indirectly, to the Avro Lancaster and Handley-Page Halifax. As for the B.12/36 requirement, its specifications were aggressive, with the four-engine bomber to feature a maximum bombload of 6,450 kg. (14,000 lb.) over a range of 3,220 km. (2,000 ml.); or a bombload of 3,630 kg. (8,000 lb.) over a range of 4,800 km. (3,000 ml.); a cruise speed of 370 km/h. (230 mph.) at an altitude of 4,600 m. (15,000 ft.) and gun turrets for defense.
The spec also set restrictions on the size of airframe subassemblies, to allow them to be easily transported by rail. Proposals were submitted by a number of British aircraft manufacturers, with the Air Ministry being most impressed by the Supermarine design, the Type 317, with two prototypes being ordered in January 1937. The Air Ministry found the Short Brothers submission, the S.29, more conservative in design, but for that reason decided to support development of it as a backup plan, suggesting changes to the firm, then ordering prototypes in October 1937.
As it turned out, Supermarine would end up preoccupied with building the Spitfire fighter, and the Type 317 would never fly. In the meantime, Short went forward on the S.29, initially building a wooden half-scale version, the S.31, as a demonstrator. The S.31 was powered by four Pobjoy Niagara III seven-cylinder air-cooled radial engines providing 67 kW (90 hp.) each, with seating for a pilot and observer in tandem; length was 13.3 m. (44.8 ft.) and span was 15.1 m. (5.6 ft.). Photos suggest the main gear was retractable; it is unclear if the tailwheel was.
The S.31 performed its initial flight on 19 September 1938, with Short chief test pilot Lankester Parker at the controls. The demonstrator flew well, though the take-off run was seen as excessive; changing the angle of incidence of the wing would take care of that, but given time constraints, it was simpler to lengthen the main landing gear struts to provide a more «nose up» attitude, and shorten the take-off run. That worked, but it meant problems over the long run with weakened landing gear, and degraded field of view on the ground from the cockpit. The demonstrator was later upgraded to Niagara IV engines with 85 kW (115 hp.) each, and used for various trials. It was finally scrapped, following a take-off accident, in early 1944.
The first prototype S.29, now given the service name Stirling after the Scots city of that name, performed its initial flight on 14 May 1939, being powered by four Bristol Hercules II 14-cylinder two-row air-cooled radial engines with 1,025 kW (1,375 hp.) each. One of the mainwheel brakes locked up on landing, leading to collapse of the landing gear and the aircraft bellying in on the runway. Nobody was seriously hurt, but the prototype was damaged beyond reasonable repair.
The second prototype flew seven months later, on 3 December 1939, after the outbreak of World War II, leading to the initial flight of the first production Stirling Mark I on 7 May 1940, being powered by Hercules XI radials with 1,190 kW (1,595 hp.) each. Initial production was from the Short plant at Rochester in England, with the Short & Harland plant in Belfast, Northern Ireland, then beginning production. Further production was initiated in England at the Austin Motors plant in Longbridge and the Rootes plant at Stoke-on-Kent. Ultimately, twenty different plants would turn out Stirlings.
Service deliveries began in August 1940, though production was hampered by the Battle of Britain, both because of priority being given to fighter production, and because of destruction caused by Luftwaffe raids on Rochester and Belfast during August. The raid on Belfast was a bit of a shock, since it was assumed out of range of German bombers. In spite of the difficulties, Stirlings performed their first operational mission on the night of 10-11 February 1941, with three Stirlings of Bomber Command Number 7 Squadron dropping bombs on oil-storage tanks at Rotterdam in the Netherlands, each aircraft carrying 16 225-kg. (500-lb.) bombs.
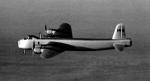
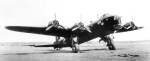
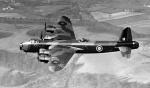
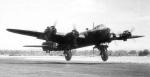
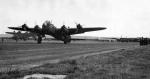
The Stirling Mark I provides a baseline for the type. The Stirling owed much to Short work on big flying boats. The bomber was a boxy-looking aircraft, with a mid-mounted wing and a conventional tail arrangement, being powered by four Bristol Hercules XI engines driving three-bladed variable-pitch propellers, apparently some early production machines retained the Hercules II variant used on the prototypes.
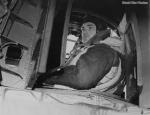
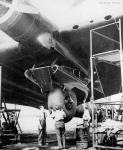
The Stirling had taildragger landing gear, all gear assemblies being retractable, each main gear having a single wheel and retracting backward into the inboard engine nacelle, the bottom of the tires remaining visible after retraction, and the tailwheel assembly having two wheels. The yoke-type struts for the main gear were very long to give the bomber a high angle of attack for help with short take-offs; as mentioned, the main gear would prove troublesome. The high-perched cockpit added difficulty to take-offs, though the Stirling handled well enough once it got off the ground. However, one of its idiosyncrasies was that the Hercules engines had hydraulic throttle controls, which gave them slow response to throttle input, not an attractive feature in an emergency. In compensation, the Stirling was sturdy and able to soak up a fair amount of battle damage.
Flight control surfaces were conventional, with a large one-piece flap and an aileron on each wing, plus elevators and rudder on the tail. The wing had twin spars and was thick, being loaded up with fuel tanks: each wing featured four tanks between the spars, two behind the rear spar, and one in the wing leading edge in front of the forward spar. All fuel tanks were self-sealing, except for the wing leading-edge tanks, which were only used for long-range missions, and were emptied first after take-off. Total fixed fuel capacity was 10,247 liters (2,704 US gallons).
The wingspan was less than 100 ft., giving the Stirling high wing loading and limiting its ceiling; on the plus side, the high wing loading made it surprisingly agile for an aircraft of its size, with a good turn rate and a snappy roll rate. There is a tale that the short span wing was due to a requirement that the aircraft fit into hangars, but that story is disputed, other sources claiming the short span was simply to reduce weight. Enough to say that it had a wingspan that would prove inadequate in significant ways.
The Stirling had a shallow bomb-bay 12.8 m. (42 ft.) long, divided into three parallel «cells», each only 48.3 cm. (19 in.), which would prove a limitation as the war went on, since the Stirling would never be able to carry the oversized high capacity or «blockbuster» bombs; it couldn’t handle general-purpose bombs bigger than 225 kg. (500 lb.). Along with the main bomb bay, there were bomb-bays in the wings inboard of the main engines, though drawings suggest they were generally used to accommodate long-range tanks. Maximum bomb load was an impressive 6,350 kg. (14,000 lb.), but that load could only be hauled for a relatively short distance; for long-range missions, the typical bombload was a quarter of that weight, 1,590 kg. (3,500 lb.).
At the outset, defensive armament consisted of a Frazier-Nash (FN) Mark 5 nose turret, with twin 7.7-mm. (0.303-cal.) Browning machine guns, and an FN Mark 20A tail turret with four 7.7-mm. guns. Sources say that early production Stirlings featured a retractable ventral position with two 7.7-mm. guns, but that it worked poorly and was deleted, with a gun then mounted in a flexible position on each side of the rear fuselage; it is difficult to find specifics on this matter. There was also a Boulton-Paul dorsal turret with twin 7.7-mm. guns, but photos show that it wasn’t fitted to all Stirling Mark Is, it appears to have been introduced after initial production, once the ventral armament was given up.
The fuselage was built as four separate modules, then bolted together. Crew included a nose gunner; pilot and copilot in the flight deck; navigator, radio operator, and flight engineer in the space behind and below the flight deck, with the navigator doubling as the bombardier, or «bomb aimer» as the RAF called them; plus dorsal gunner and rear gunner. The navigator had an astrodome on the top of the aircraft behind the cockpit and to the right, with a directional antenna to the rear of the astrodome on the centerline. There was an escape hatch on the bottom of the nose; on top of the fuselage, at the rear of the wings; and under the rear fuselage. There was a crew door on the left rear fuselage, set at a skewed angle in reflection of the Stirling’s parked attitude.
Spare oxygen bottles were stowed above the wing center section, while illumination flares and flare floats were stowed in the rear fuselage, being dropped out launch tubes next to the rear belly hatch. There was a rest bunk in the space between the wing center section and the bomb bay, a primitive lavatory in the rear, and an inflatable rescue dinghy under a panel in each wing to the rear of the inboard engine. Typical Stirling paint schemes, once the aircraft reached its stride of operations, were disruptive camouflage on top and black on the bottom.
Although early war British propaganda trumpeted the Stirling as able to carry the war to the Germans «day or night», by the time the Stirling went into operation, RAF Bomber Command raids against Germany were strictly carried out at night, with daylight raids only performed against targets near enough to the UK to permit fighter escort. The British had learned early on the war that unescorted bombers performing raids in daylight were so vulnerable to enemy fighters that persisting in such would result in the complete annihilation of Bomber Command. The Stirling did participate in escorted daylight raids, but it was more heavily committed to the Bomber Command effort to bring the war home to Germany through night raids.
Night operations weren’t all that pleasant either, with the German Luftwaffe building up a lethally effective radar-guided night fighter force, primarily based on the Messerschmitt Bf 110, along with the Junkers Ju 88. At the outset, the Stirling could often hold its own against Luftwaffe night fighters, which were loaded down with radar and heavy cannon, ensuring they weren’t much faster than the bombers they were trying to shoot down. If the tail gunner of a Stirling spotted a German night fighter trying to sneak up on the bomber, the Stirling pilot could perform a «corkscrew» maneuver that would easily shake the attacker. The tail gunner could of course shoot back as well; the 7.7-mm. guns didn’t have a lot of hitting power, but they could confound attacks by Luftwaffe night fighters, small bullets or not, nobody likes having a rain of lead thrown in his face, and did score their kills on occasion.
Stirling production took time to get up to stride, partly due to damage caused by Luftwaffe air raids against the UK, eleven Stirlings being destroyed on the ground before delivery by German bombs. By the end of 1941, roughly 150 Stirlings had been delivered, production being from Short in Belfast and England, and a number of second-source firms in England, most prominently Austin Motors.
There was a plan to produce a Stirling Mark II in Canada, to be powered by Wright Cyclone R-2600-A5B nine-cylinder radials with 1,195 kW (1,600 hp.) each; two Stirling Mark Is were converted to this configuration, and three pre-production machines were built. The plan fell through, and most or all of these five aircraft were converted to Mark I configuration; the Mark II never entered operational service. A total of 712 Mark Is was produced, not counting the two prototypes and the eleven bombers lost in Luftwaffe bomb raids before delivery, but including the Mark IIs.
Short considered a considerably enhanced Stirling configurations, including the S.34 and the S.36 Super Stirling, with features such as a longer-span wing, more powerful engines, and heavier defensive armament. The decision was finally made that there was no sense in refining the Stirling, given that the Avro Lancaster was in production. However, the Stirling was seen as having enough virtues to justify continued production, with a Stirling Mark III introduced into production from 1942. The major change was introduction of more powerful Hercules XVI radials with 1,220 kW (1,635 hp.) each, in visibly modified engine nacelles featuring more prominent top scoops.
The Mark III also featured a low-profile FN Mark 50 dorsal turret with twin 7.7-mm. guns, as fitted to the Lancaster and some late-production Stirling Mark Is; larger fuel tanks; and a revised interior, with fewer windows on the rear fuselage. By that time, Bomber Command’s night offensive against Germany was in full stride, with «thousand bomber raids» pouring bombs onto German cities.
The effectiveness of Britain’s bomber war against Germany has been debated, since bombing accuracy was low, hopelessly low at the outset, though it did improve somewhat over time, and the Germans proved resilient at dispersing arms production. However, the bombing was certainly disruptive and problematic for German war production, and also forced the Reich to devote considerable military resources to home defense that would have otherwise been used for offensive operations.
Those defenses inflicted considerable pain on Bomber Command, with the two sides engaged in a death race to obtain better measures and countermeasures. One trick the Luftwaffe came up with was to install fixed upward-firing cannon on the back of night fighters, the arrangement being known as «Jazz Music»; the night fighter would sneak up into the bomber’s blind spot from below and then hammer it out of the sky. In response, Stirlings acquired a single flexibly-mounted 7.7-mm. or 12.7-mm. (0.50-cal.) Browning gun firing out the floor hatch, with the gunner keeping a lookout and hopefully giving pause to the pilot of a night fighter trying to get into position for a kill.
The belly gun appears to have been a field fit. Incidentally, it has been argued that the top turret on RAF bombers was more trouble than it was worth for night combat, providing little defensive utility, while cutting speed through weight and particularly drag. Given that a Luftwaffe night fighter didn’t have much of a performance edge on an RAF bomber, the incremental increase in speed of a bomber might have made a significant difference.
Many Mark III bombers were fitted with H2S ground-mapping radar in a belly radome, with some radar-equipped Stirlings operating in the Bomber Command Pathfinder Force, which marked targets for RAF bomber streams by dropping oversized flares to give bombardiers something to aim at.
A total of 1,047 Stirling Mark III bombers was built, not counting some conversions of Mark Is, making it the most common variant. With the Halifax and Lancaster increasingly bearing the brunt of the night offensive, the Stirling was soon seen as overly vulnerable. It’s hard to say the Stirling couldn’t take care of itself as well, or given the Stirling’s agility better, than the Lancaster, but the Stirling’s lower ceiling made it easier for Luftwaffe night fighter to intercept. The inability of the Stirling to carry HC bombs also worked against it, and so the decision was made to drop it from the night offensive.
Stirling bombers took over secondary roles, such as maritime minelaying, a mission quaintly referred to as «Gardening»; or being converted to radio countermeasures (RCM) platforms by adding countermeasures gear. RCM Stirlings participated in the elaborate electronic deception effort conducted in support of the Normandy landings in June 1944, helping create «ghost» naval fleets by dropping well-timed bundles of «window», what we’d call «chaff» today, though that term had a slightly different meaning in those days, to deceive German radars. Some were also used for agent drops and parachute supply of British Special Operation Executive covert operations.
Despite the removal of the Stirling from the night bomber offensive, it was still seen as useful enough to remain in production, though in the roles of paratroop transport and particularly glider tug, where its ceiling and bombload limitations were inconsequential. Two Mark III bombers were converted to the appropriate Stirling Mark IV configuration in 1943, with production deliveries in the last quarter of that year.
The Mark IV’s airframe was effectively that of the Mark III, but the nose and dorsal turrets were deleted, with the nose turret replaced by a plexiglas viewing position for the navigator, and the top turret position faired over. The tail turret was also sometimes deleted as well. Glider tug Mark IVs featured tow gear under the tail, being able to pull one big Hamilcar glider or two or more smaller Horsa gliders. In paratroop transport configuration, paratroopers jumped out a hatch in the floor.
A total of 450 Stirling Mark IV machines was built, all at Belfast, with at least 21 Mark IIIs also converted to Mark IV configuration. The Stirling Mark IV participated in the Normandy operation; the ill-fated operation against Arnhem in the Netherlands during September 1944; and the massive airborne operation in support of the Rhine crossings in March 1945.
The Mark IV wasn’t the end of the line either, with a Stirling Mark V pure transport developed in 1944 and introduced to service in early 1945. The Mark V had no armament; it featured an extended nose, stretching the length of the aircraft to 27.6 m. (90.7 ft.), that hinged open, and a large cargo door on the right rear fuselage, which was loaded via ramps that were manually set in place. It could carry 40 passengers; or 20 paratroops; or 12 stretchers plus seating for 14 sitting casualties and attendants; or loads such as two jeeps with trailers, or a jeep with a light field gun. There was further consideration of an S.37 civil airliner for postwar production, but it didn’t happen.
A total of 160 Stirling Mark V transports was built, all by the Belfast plant. The Mark V was intended for service in the Far East, though the abrupt end of the war there in August meant they never served in that role. While the last Stirlings were removed from RAF Transport Command roles in 1946, a dozen Stirlings were converted to an S.37-like airliner configuration and sold to the Belgian operator Trans-Air in 1947, to be used for flights to the Far East for a number of years. They were the only Stirlings formally on charge with a foreign operator, aside from service with British Commonwealth forces under the RAF umbrella. One Stirling force-landed in the Netherlands in August 1942 and was flown for evaluation by the Germans, but it’s unclear if it was used in any operational missions by the Luftwaffe.
The Stirling tends to be slighted in aircraft histories as inadequate, but it was an excellent aircraft by the standards of its time, simply being overshadowed by better aircraft that followed it. After all, it was still in production in 1945, which hardly makes it sound like a failure. The Stirling served with a total of eleven bomber squadrons and performed tens of thousands of sorties, with almost a third of them being shot down, damaged in combat beyond repair, or lost in operational accidents.
FUENTES Y REFERENCIA – SOURCES & REFERENCE
airvectors.net
Ugolok Neba
worldwarphotos.info
©jmodels.net


Debe estar conectado para enviar un comentario.