
De un vistazo – Quick look
MATERIAL Y PIEZAS
MEDIA & PARTS:
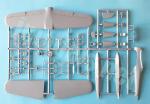
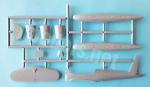
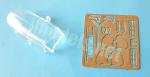
- Plástico inyectado (56 piezas), plástico transparente (1 pieza), fotograbado (16 piezas).
- Injected plastic (56 parts), clear plastic (1 part), PE (16 parts).
CALCAS – DECALS:
- Cruces alemanas, matrículas, esvásticas en dos partes y dos estarcidos. Aparentemente finas y con buena saturación de color. Película de soporte un poco excesiva.
- German crosses, registers, swastikas in two pieces and two stencils. Apparently thin and color-saturated. A bit of surplus carrier film.
OPCIONES – OPTIONS:
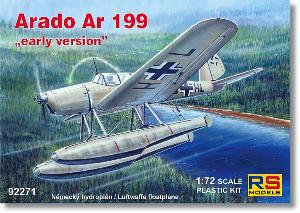
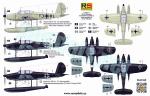
- Arado Ar 199 V3. 10. Seenotstaffel. Seenotbereichskommando IX. Lago Urdozero (Russia). Agosto 1942.
- Arado Ar 199 V4. Seenotkommando 22. Bergen (Noruega).
- Arado Ar 199 V1. 10. Seenotstaffel. Seenotbereichskommando IX. Kemi (Finlandia). 1943.
INSTRUCCIONES – INSTRUCTIONS:
- Folleto de tamaño A5 de 4 páginas impreso en blanco y negro. Contiene una breve referencia histórica sobre el avión, un plano numerado de piezas y 14 secuencias de construcción. La cara trasera de la caja muestra perfiles en color y una lista de colores en código RLM. Claras.
- 4-page A5 brochure printed in black and white. It contains a short historical reference about the aircraft, a numbered parts diagram and 14 construction stages. The back side of the box shows profiles in color and a list of colors in RLM code. Clear.
LO MEJOR – THE BEST:
- Avión inusual. Molde limpio. Detalle interior decente.
- Unusual aircraft. Clean tooling. Decent cockpit detail.
LO PEOR – THE WORST:
- Varios errores en las instrucciones (ver texto). Cubierta de la carlinga de una pieza.
- A few mistakes in the instructions (see text). One-piece canopy.
VALORACIÓN – CONCLUSION:
- Única maqueta de plástico por ahora. Posee un detalle general decente y un montaje aparentemente sin demasiadas complicaciones en una edición de tirada limitada. Para modelistas con experiencia.
- Only kit in plastic of this aircraft today. It has an overall decent detail and assembly should not have most of the usual difficulties found in a short-run release. For experienced modellers.

La maqueta
El Ar 199 es un avión bastante inusual, por ello no extraña que hasta el momento de aparecer esta maqueta solo hubiese ediciones de resina. La propia RS Models sacó dos ediciones en dicho material mucho tiempo antes de lanzar este nuevo molde, primero de plástico en cualquier escala. Por ahora el fabricante tiene tres cajas de este hidroavión. La segunda caja incluye el modelo de preserie (Ar 199 V-0) y la última únicamente el prototipo V-5, que tenía ciertas características distintivas respecto a los cuatro anteriores.
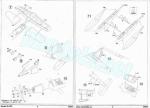
La maqueta está bien embalada, con los fotograbados en su propia bolsa separada y protegida de posibles deformaciones por un respaldo de cartón. Las piezas se reparten en dos bastidores y presentan buen moldeado, casi sin rebabas ni líneas de molde. También carecen de marcas de eyector en lugares visibles, si bien la mitad inferior de las alas necesita la eliminación de un par de marcas positivas que tal vez impidan la unión con la mitad superior.
La maqueta reproduce tres prototipos de este hidroavión (V-1, V-3 y V-4), del que la Luftwaffe fabricó tan solo 26 aparatos de preserie. Entre los prototipos V-1 al V-4, el prototipo V-5 y los aviones de preserie hay varias diferencias en la combinación del tipo de buje de la hélice, así como en la forma y disposición de los escapes. Las piezas de la maqueta son idénticas en las tres cajas que he mencionado, cubriendo así cualquiera de estas posibilidades, pero el fabricante ha cometido varios errores en las instrucciones que mencionaré más abajo.
Las opciones de montaje incluyen dos bujes para la hélice y alternativas de fotograbado para la escalera de acceso y los timones de los flotadores.
Carlinga
Los lados de la carlinga son lisos y poseen escaso detalle, tan solo un par de instrumentos más bien sugeridos a cada banda, localizados en la zona anterior. El suelo de los dos habitáculos es común y lleva los pedales moldeados en la parte anterior. Esta zona contiene dos buenos asientos, detallados en el respaldo y provistos de cinturones de fotograbado, los controles bien perfilados, el panel con los instrumentos en relieve, más un mamparo situado por delante de la carlinga.
La zona trasera contiene un panel con consolas de instrumentos separadas, dos paneles laterales bien perfilados y un par de asientos simples limitados por un panel intermedio, cuando en realidad debería haber un único asiento posterior para el operador de radio. La parte posterior de la carlinga lleva otro panel semicircular, colocado casi horizontalmente, que tapa el hueco del fuselaje.
La amplia cubierta de la carlinga está representada en una pieza algo gruesa, pero es transparente, no tiene deformaciones y los montantes de la estructura poseen finura y nitidez. La pieza está detallada con un fino mástil de antena.
En conjunto, la carlinga anda un poco escasa de detalle, especialmente visible por la falta de cualquier detalle de la estructura tubular a los lados. De no ser tan evidente debido a la anchura y tamaño de la cubierta, el detalle no sería tan importante.
Fuselaje y motor
El fuselaje está reproducido en dos mitades moldeadas sin el capó del motor, las dos caras de la aleta de cola unidas a la mitad de babor, y una sección de la raíz de las alas. Las líneas de panel no son profusas, pero están bien grabadas y muestran finura. La única pieza que debe colocarse sobre el fuselaje está situada en la parte trasera inferior. Se trata de una pieza fina de fotograbado en forma de trípode que simula algún dispositivo que no he logrado explicarme.
El cubremotor está separado en tres piezas. La pieza inferior que procede emplear en este caso es la que tiene dos huecos para los escapes a los lados en la parte trasera. La pieza incluye también una toma de aire en la zona central. Los escapes vienen separados, ambos moldeados con un vástago intermedio para colocarlos correctamente. Las instrucciones son erróneas al indicar que debemos usar la pieza alternativa con dos hileras de pequeños escapes, propios de los aviones de preserie, como demuestran las pocas fotos de este avión. Del motor se ha incluido apenas lo necesario para que el hueco de la toma frontal no se vea vacío. Hay una pequeña pieza vertical que tapa la cavidad, unida a otras dos piezas moldeadas con parte de los cilindros del motor.
También hay un error en la selección de la cara frontal del motor. La necesaria en los prototipos de esta caja no es la que posee la toma rectangular, sino la que muestra la toma con forma ligeramente más ancha por abajo que por arriba, según certifican las fotos de nuevo. La pieza contiene también las dos pequeñas aberturas laterales, que en los aviones de serie era algo más grande y con un suave carenado en la entrada.
La hélice es de una pieza, las palas son finas y están bien perfiladas. El eje es demasiado corto y es conveniente reemplazarlo. Las instrucciones señalan un tipo de buje con aletas de control de paso para el V-3 y 4, y un buje liso y pronunciado para el V-1. Desgraciadamente, se trata de otro error, pues los cuatro primeros prototipos llevaban el buje liso, y solo el V-5 lo tenía con aletas como el resto de aviones de preserie.
Alas y cola
Las alas están separadas en tres piezas, dos de ellas pertenecen a las superficies superiores. Los paneles y las superficies de control son finos, algo más tenues en las caras de arriba, mientras que las de abajo muestran gran profusión de registros y accesos, además de más detalle en los flaps y alerones, que cuentan con pequeños contrapesos. También hay una pieza fina para el tubo Pitot.
El timón de cola es una pieza aparte. En esta ocasión parece que las instrucciones aciertan con el correcto, aunque las piezas son similares y difieren únicamente en el actuador. La reproducción del entelado es suave y está bien plasmada. Las superficies horizontales están moldeadas en una pieza con el timón texturizado y un pequeño actuador en la cara superior.
Tren de amerizaje
Los flotadores tienen la base separada con buen perfil en las quillas. La parte superior también está adecuadamente reproducida y el detalle tiene un nítido relieve. Las instrucciones solo indican el empleo de los timones de fotograbado, pero también los tenemos de plástico, aunque con menos detalle y algo más gruesos de lo debido, por ello conviene afinarlos un poco si se usan.
Hay dos piezas para los soportes, ambas finas y que necesitan cierto cuidado al pegarlas. Aunque frágiles, parecen lo bastante rígidas para sostener el peso liviano de la maqueta. Los soportes anteriores llevan dos largueros separados y moldeados con pequeños escalones de acceso. La parte posterior también cuenta con una escala que tiene alternativa de fotograbado. Al contrario que en el caso de los flotadores, esta vez la pieza de fotograbado sale perdiendo a causa de su planitud respecto a la de plástico.
Calcas
La hoja está impresa por el propio fabricante. Contiene cruces alemanas, matrículas, esvásticas en dos partes y dos estarcidos. Los motivos son aparentemente finos y parecen poseer buena saturación de color. La película de soporte es ligeramente excesiva.
Las matrículas son todas de aviones militares operativos y ninguna de ellas corresponden a las que estos tres prototipos llevaron en las pruebas.
Instrucciones
Están impresas en un folleto de tamaño A5 que tiene 4 páginas en blanco y negro. En ellas hay una breve referencia histórica sobre el avión, un plano numerado de piezas y 14 secuencias de ensamblaje. La cara trasera de la caja muestra perfiles en color y una lista de colores en código RLM. Con la excepción de los errores mencionados más arriba, los pasos de montaje son claros.
Valoración
Esta es la única maqueta de plástico del Arado Ar 199 y casi con toda seguridad seguirá siendo así por cierto tiempo. El molde que RS Models ha producido es bastante limpio y el detalle general me parece decente, sin llegar a notable debido a una cierta parquedad en los lados de la carlinga, muy visible a través de la cubierta.
El armado no aparenta ser lo difícil que puede resultar en otras maquetas de este tipo, salvando el montaje de los flotadores, que con seguridad necesitará de más tiento y experiencia que en el resto del avión.
Desgraciadamente, RS suele cometer muchos errores en sus instrucciones últimamente. El fabricante debería ponerle remedio y más empeño al asunto, sobre todo porque el modelista que busca este tipo de maquetas lo último que desea es que le compliquen más las cosas a causa de errores que la marca puede evitar fácilmente.
Imagino que no deben quedar demasiados aviones de la Luftwaffe que no hayan pasado de la resina al plástico a estas alturas, así que los aficionados a este tema con al menos cierta experiencia tienen otro modelo de la familia de los inusuales.◊


The kit
The Ar 199 is an unusual aircraft, so it is not surprising that it had only been kitted in resin, and twice by RS Models, until this kit was released a couple of years ago. It is the first one made of plastic in any scale. The manufacturer has produced three boxes of this floatplane. The second box includes the pre-series variant (Ar 199 V-0) and the last only the V-5 prototype, which had certain distinctive features compared to the first four aircraft.
The kit is well packaged, with the photo-etched parts in their own separate bag and protected from damage by a cardboard backing. Pieces are molded in two sprues and do not show very evident flash or seam lines. They also have no marks on visible places, although the lower wing half needs the removal of a couple of positive marks that may affect the upper half join.
The kit reproduces three prototypes of the aircraft (V-1, V-3 and V-4), of which the Luftwaffe manufactured only 26 pre-series machines. The V-1 through V-4 prototypes, the V-5 prototype and the pre-series aircraft had several differences in the propeller hub, as well as in the shape and arrangement of the exhausts. The kit parts are the same in the three boxes mentioned, thus covering any of these possibilities, but the manufacturer has made several mistakes in the instructions that I will explain below.
Assembly choices include two propeller hubs and photo-etched alternatives for the access ladder and float rudders.
Cockpit
The cockpit sidewalls are flat and have little detail, only a couple of instruments on each front side. The floor of the two cabins is common and has the pedals molded on the front. The pilot cockpit contains two good seats, detailed on the backrest and provided with photo-etched belts, well defined control horns, the panel with raised instruments, plus a front bulkhead.
The rear cockpit is provided with a panel with separate instrument consoles, two well-profiled side panels and a pair of simple seats molded with a panel between them, but in fact there shoul be only one seat for the radio operator. Behind the rear cockpit is another semicircular panel covering the fuselage rear gap.
The large canopy comes in a somewhat thick piece, but it is transparent, has no distortion and the raised structural frame is fine. The piece is detailed with a thin antenna mast.
Overall, the cockpit lacks a bit of extra detail, especially in the tubular structure on the sides. If it were not so obvious due to the width and size of the canopy, this might not be so important.
Fuselage and engine
The fuselage is molded in two halves without the engine cowling, the tail fin attached to the left half, and a section of the wing roots. Panel lines are not abundant, but they are thin and well engraved. The only part to add to the fuselage is located near the lower tail cone. It is a thin photo-etched piece in the shape of a tripod rendering a device that I do not know.
The engine cowling is separated into three pieces. The lower piece to use in this case has two holes for the exhausts on the rear sides. The piece also includes the lower air intake. The exhausts are joined by a plastic rod for correct placement. The instructions are wrong in indicating that we must use the part with two rows of small exhausts, which is only correct for pre-series aircraft as seen in the few photos we have of the Ar 199. The engine is only rendered in two pieces with the cylinders molded on and a vertical bulkhead behind them.
There is also a mistake in the selection of the front engine side. The piece for the prototypes is not the one with the rectangular intake, but rather the one having a slightly wider shape at the bottom, as pictures once again show. The piece also contains two small side openings, which were a bit larger in production aircraft.
The propeller comes in one piece with thin and well profiled blades. The shaft is too short and should be replaced. Instructions call for a hub molded with pitch control vanes for the V-3 and 4, and a smooth hub for the V-1. Unfortunately, this is another mistake, since the first four prototypes had a smooth hub, and only the V-5 had the vanes on the hub, like the rest of the pre-series aircraft.
Wings and tail
The wings are separated into three pieces, two of them for the upper sides. Panel lines are thin but a bit faint on the upper faces, while the lower ones show plenty of registers and accesses, as well as more detail in the flaps and ailerons. These are provided with small mass balances. There is also a thin piece for the Pitot tube.
The vertical rudder comes separately. This time the instructions show the correct alternative piece, although the parts are quite similar and only differ in the hinge. The canvas texture is smooth and nicely rendered. The horizontal surfaces are molded in one piece with the rudder textured and a small hinge on the top side.
Floats
The floats have separate lower sides with good profile in the stepped keels. The upper parts are also nicely reproduced and the detail is sharply raised. The instructions only indicate the use of photo-etched rudders, but we also have them in plastic pieces, though they show less detail and are a little thicker than they should, so it is advisable to thin them a little if they are used.
There are two pieces for the float supports, both are thin and need some care to position them correctly. Although a bit fragile, they seem stiff enough to hold the light weight of fuselage and wings. There are two extra supports molded with small access steps. Finally, we are provided with a ladder that has a photo-etched alternative part. Unlike the rudders, the photo-etched piece looks worse than the plastic one as it is too flat.
Decals
The sheet is printed by the manufacturer. It contains German crosses, registers, swastikas in two pieces and two stencils. Decals are apparently thin and seem to have good color saturation. There is a little surplus carrier film.
Registers belong to operational aircraft and none of them correspond to those the three prototypes carried in tests.
Instructions
They are printed on an A5 booklet which has 4 black and white pages. These show a short historical reference about the aircraft, a numbered parts plan and 14 assembly chapters. The back of the box shows color profiles and a list of colors in RLM code. Except for the mistakes mentioned above, assembly steps are clear.
Conclusion
This is the only plastic kit of the Arado Ar 199 by now and will almost certainly remain so for some time. The new tooling RS Models have produced is quite clean and general detail seems decent, without being outstanding as the cockpit, quite visible through the canopy, should have included a bit more structural detail.
Assembly does not look as difficult as in most short-run kits, except for the float construction, which will surely need more care and experience than the rest of the kit.
Unfortunately, RS tend to make a lot of mistakes in their instructions lately. The manufacturer should not overlook this, especially because the last thing the modeller wants is to have things more complicated because of misleading indications the manufacturer can easily avoid.
I imagine there must not be too many Luftwaffe aircraft left that have not been copied from resin to plastic, and this one is another from the family of unusual birds that experienced modellers can enjoy now.◊
Publicado – Published: 4 / 2024
©www.jmodels.net

Debe estar conectado para enviar un comentario.