
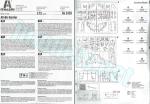
De un vistazo – Quick look
MATERIAL Y PIEZAS
MEDIA & PARTS:
- Plástico inyectado (75 piezas), plástico transparente (3 piezas).
- Injected plastic (75 parts), clear plastic (3 parts).
CALCAS – DECALS:
- Impresas por Zanchetti. Escarapelas norteamericanas, españolas y tailandesas, numerales, matrículas, insignias de unidad, panel de instrumentos y consolas, arneses y numerosos estarcidos específicos y comunes. Aspecto fino y brillante. Nítidas, con buen registro y saturación de color. Sin exceso de soporte.
- Printed by Zanchetti. US, Spanish and Thai markings, numbers, registers, unit badges, instrument panel and consoles, harnesses and plenty of stencils both common and specific. Thin and glossy appearance. Sharp, with good register and color saturation. No excess of carrier film.
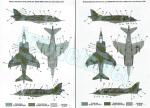
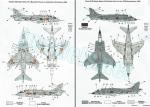
OPCIONES – OPTIONS:
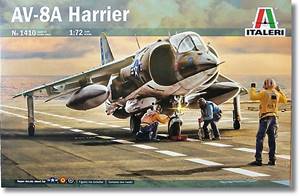
- McDonnell Douglas AV-8A. US Marines. VMA-513. M.C.A.S. Yuma (Arizona), 1976.
- McDonnell Douglas AV-8A. US Marines. VMA-231. M.C.A.S. Cherry Point (North Carolina), 1976.
- McDonnell Douglas VA-1 Matador. Armada Española. 8ª Escuadrilla. Base Aeronaval de Rota (España), 1980.
- McDonnell Douglas AV-8A. Royal Thai Navy. HTMS Chakri Naruebet, 1998.
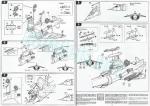
INSTRUCCIONES – INSTRUCTIONS:
- Folleto doblado de 10 páginas impresas en blanco y negro. Contiene una breve historia del avión, un plano numerado de piezas, una lista de colores con equivalencias en Federal Standard y de pinturas acrílicas de Italeri, 9 pasos de montaje y 4 páginas de perfiles en color. La cara trasera de la caja contiene perfiles y una lista de pinturas en color.
- 10-page folded leaflet printed in black and white. It contains a short history about the aircraft, a numbered parts plan, a list of colors with matches in Federal Standard and Italeri acrylics paints, 9 assembly steps and 4 pages of profiles in color. The back side of the box also shows profiles and a list of paints.
LO MEJOR – THE BEST:
- Buen panelado. Detalle decente en general. Cubierta de la carlinga en dos piezas. Terminaciones de pintura variadas.
- Nicely panelled. Overall decent detail. Two-piece canopy. Varied paint finishes.
LO PEOR – THE WORST:
- Marcas de eyector en diversas zonas.
- Ejector pin marks on different spots.
VALORACIÓN – CONCLUSION:
- Detalle decente para esta escala y muy bueno en los detalles externos del fuselaje y alas. Sería aún más sencilla de montar de no ser por las marcas en diferentes lugares. La variedad de terminaciones, que Italeri ha ampliado respecto a la maqueta original de ESCI, es otra ventaja.
- Decently detailed for this size and very good external detail on fuselage and wings. It woud be even easier to build if Italeri had not left so many pin marks on different parts. Varied paint finishes, which Italeri have widened from the original ESCI kit, is another asset.

La maqueta
Como tantas otras maquetas de Italeri esta procede de un molde original de ESCI a la que Italeri le hizo ligeros cambios y volvió a sacar hace algunos años. ESCI fue en ciertos aspectos una marca pionera en el modelismo europeo y gracias a Italeri hoy seguimos teniendo gran parte de su buen trabajo de hace décadas. También tenemos el malo, porque otros moldes no tienen el aliciente de este, desde luego.
Esta maqueta tiene otras versiones con el sello de Italeri que comparten idéntico molde. Hay un FRS.1 de la Royal Navy y también un GR. 1 de la RAF.
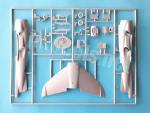
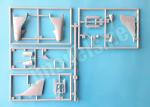
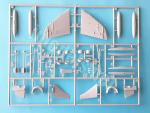
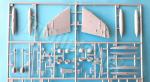
La caja trae tres bastidores de piezas grises, un bastidor transparente, las calcas y las instrucciones. El plástico tiene dureza y flexibilidad media. Las piezas no tienen rebabas ni deformaciones y solo algunas tienen líneas de molde sencillas de eliminar. Lo que tenemos en abundancia son marcas de eyector de distinto tamaño en varios lugares. Ralentizarán el montaje pero no deben ser especialmente difíciles de cubrir. El molde presenta un aspecto limpio, con paneles muy finos y bien grabados. La definición de los detalles es notable sin llegar a excepcional.
Respecto a la maqueta de ESCI, esta incluye dos versiones adicionales; una de los Marines norteamericanos y otra tailandesa, cuya Marina probablemente no poseía los Harrier cuando ESCI hizo su maqueta en los años 80.
Carlinga
El suelo está moldeado en una pieza con los pedales y las consolas laterales. El panel y la palanca de control vienen separados. También el asiento, que tiene marcas. Los instrumentos del panel, las consolas y los arneses está reproducidos en calcas.
Las mitades del fuselaje que contienen la carlinga están separadas del resto del fuselaje y muestran algunas marcas de eyector negativas. Las piezas incluyen la cubierta del panel de instrumentos y el visualizador superior separado.
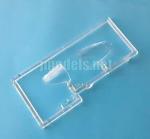
La cubierta transparente está separada en dos piezas para poder mostrar el interior. Ambas partes son razonablemente finas y tienen buen detalle. La pieza posterior, por ejemplo, muestra dos rebajes para no interferir con las aletas de las antenas del buscador UHF situadas tras ella.
En general, la carlinga tienen un detalle suficiente. Su mayor defecto son las múltiples marcas de eyector y su gran ventaja es que la cubierta pueda ponerse abierta.
Fuselaje
Está dividido en mitades y seccionado en tres tramos. El primero de ellos es el morro, que incluye el tubo Pitot, el segundo es la carlinga y el tercero el resto del fuselaje hasta el puro de cola. El montaje tiene algunas alternativas que iré describiendo en su lugar.
La sección de la carlinga tiene en su interior una pieza en mitades que simula el pozo de la rueda delantera. El interior está liso y no tiene detalle. Tras él hay otra pieza pegada a los lados internos del fuselaje que muestra los álabes de la turbina del motor bien moldeados y finos.
Siguiendo en la parte interna del fuselaje, también hay que pegar el tren de aterrizaje trasero en su pozo y, más atrás, el fondo del freno neumático ventral detallado en relieve. Todas estas piezas deben instalarse antes de pegar las mitades del fuselaje, para después añadir el morro y la carlinga.
El detalle externo de las tres secciones del fuselaje me parece muy bueno. Los paneles y tapas de accesos son finos y están bien grabados. Además hay detalles bien conseguidos, como el radar IFF en el puro de cola.
La parte anterior del fuselaje tras la carlinga está detallada con un par de pequeñas tomas en la zona superior y a los lados con la parte externa de las tomas principales en piezas aparte. Estas tomas son finas y muestran las puertas de succión con una suave inclinación hacia el interior. Sobre la toma de babor podemos añadir como opción la sonda de repostaje en vuelo, que es una pieza delgada bien reproducida pero con una ligera línea de molde en casi todo su contorno.
La parte superior del fuselaje cuenta con varias aletas, una de ellas es opcional para el aparato español y tailandés y debe fabricarla el modelista junto con su base siguiendo las dimensiones a tamaño real presentes en las instrucciones.
Las toberas laterales están separadas en dos piezas con las aletas de salida en una de ellas. Las toberas pueden colocarse en posición vertical u horizontal. Las traseras cuentan también con paneles laterales del fuselaje bien texturizados.
La parte inferior del fuselaje lleva lo que parece un soporte ventral, la pequeña aleta del altímetro y los cañones separados en mitades, bien panelados y con la abertura del armamento. Los cañones puede reemplazarse con dos aletas finas y alargadas opcionalmente. Por último, hay que añadir el aerofreno ventral, que viene en una pieza, también con una marca en el lado interno, y cuenta con el gato de apertura.
Alas y cola
Al contrario que en los aviones de configuraciones alares medias o bajas respecto del fuselaje, esta maqueta tiene las alas divididas en una mitad superior y dos inferiores. En la mitad superior las alas están unidas a la zona dorsal del fuselaje, lo que permite darle a las alas el diedro negativo adecuado.
Los paneles, el pequeño alambrado y los diminutos abultamientos de los bordes de ataque están muy bien representados. También destacan en la parte superior del fuselaje la luz anticolisión y las salidas de ventilación de la unidad de potencia auxiliar sobre el motor.
Las superficies de control están finamente marcadas y en las caras inferiores detalladas con capotajes para las bisagras. Igualmente son de destacar los carenados de las ruedas de balancín en las puntas de las alas, abiertos en sus lados inferiores.
La carga subalar no es opcional en principio porque los agujeros para situar el armamento y los depósitos auxiliares ya vienen abiertos. Las torres y el lanzador de misiles son todos de una pieza, bien panelados y detallados con calcas.
El armamento subalar consiste en dos misiles Sidewinder de una pieza con aletas de grosor aceptable para los que hay calcas. Los depósitos de combustible también llevan calcas y están separados en mitades.
Las superficies de cola está divididas en piezas muy finas que muestran buen panelado. Las verticales tienen doble opción, una de ellas detallada con la antena VHF que emplean el aparto de la Armada española y el tailandés. Los estabilizadores están moldeados con lengüetas para pegarlos al fuselaje que poseen el diedro adecuado, lo que facilita el montaje.
Tren de aterrizaje
La pata y la rueda delantera están unidas en una pieza. En general, el detalle está bien definido, pero el neumático tiene una marca de eyector en uno de sus lados. Otro ligero defecto es que la pieza muestra finas líneas de molde en todo su contorno. Ambas cosas no serán muy difíciles de remediar. Las tapas del pozo vienen unidas en una pieza y hay que cortarlas por la mitad para pegarlas.
El tren posterior presenta mejor detalle, comenzando porque las ruedas vienen por separado. También hay marcas en los neumáticos y en uno de los lados de la pata. La amortiguación tiene nitidez, al igual que el lado externo de las llantas. En este caso la tapa del pozo está moldeada con la pata. Los neumáticos muestran ligeras líneas de molde en la banda de rodadura.
Las ruedas de balancín están unidas a las patas y los brazos de retracción, que aparecen en posición abierta. El detalle de estas piezas es destacable, pero al igual que en los casos anteriores, hay pequeñas marcas negativas en el lado interno de la amortiguación.
Calcas
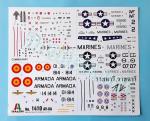
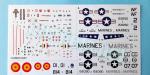
La hoja está impresa por Zanchetti. Contiene escarapelas norteamericanas, españolas y tailandesas, numerales, matrículas, insignias de unidad, el panel de instrumentos y las consolas, arneses y numerosos estarcidos específicos y comunes. Tienen aspecto fino y brillante, son nítidas y poseen buen registro y saturación de color. Los motivos carecen de exceso de soporte.
Instrucciones
Consisten en un folleto doblado de diez páginas impresas en blanco y negro que muestra una breve historia del avión, un plano numerado de piezas, una lista de colores con equivalencias en códigos Federal Standard y pinturas acrílicas de Italeri, nueve pasos de montaje y cuatro páginas de perfiles a color. La cara trasera de la caja contiene perfiles y una lista de pinturas.
Las terminaciones de pintura poseen la diferencia suficiente para contentar a modelistas con distintos niveles de habilidad. Las dos primeras corresponden a aparatos de los Marines norteamericanos con diferencias en las insignias, normales o de baja visibilidad. Otra versión pertenece a un VA-1 Matador (AV-8S) integrado en la 8ª Escuadrilla de la Armada española con base en Rota y el último es un aparato tailandés, precisamente de los vendidos por España a este país tras ser dados de baja.
Valoración
Esta es una maqueta con un detalle en general decente para la escala, adornada además con una reproducción destacable en los paneles y elementos externos de las diferentes superficies. El despiece está pensado para conseguir montarla sin demasiadas dificultades, lo malo es que las múltiples marcas de eyector en diferentes zonas no harán el armado tan ágil como en principio parece. Las opciones de montaje también son un activo que tener en cuenta en esta edición.
Las terminaciones de pintura proporcionan suficiente variedad dentro de los usuarios de esta versión del Harrier. Como señalé al inicio, la versión tailandesa y una de las norteamericanas no estaban incluidas en la maqueta original de ESCI, y se agradece que Italeri haya ampliado su número.◊


The kit
Like so many other Italeri kits, this one comes from an original ESCI tooling to which Italeri made slight changes and released again a few years ago. ESCI was in certain aspects a pioneer brand in European modeling and thanks to Italeri today we still have much of their good work from decades ago. We also have the bad one, because other kits do not have the incentive of this one, of course.
This release has other versions with the Italeri name sharing the same tool. There is a Royal Navy FRS.1 and also a RAF GR.1.
The box has three sprues of grey pieces, a clear sprue, the decals and the instructions. Plastic has medium hardness and flexibility. Parts have no blemishes or warping and only some have seam lines that are easy to remove. What we do have are ejector pin marks of different sizes in several places. They will slow down assembly but should not be especially difficult to fill. The tooling has a clean appearance, with very fine and well engraved panels. The definition of details is high without being exceptional.
Compared with the ESCI kit, this Harrier includes two additional versions; one from the US Marines and another from Thailand, whose Navy probably did not operate Harriers when ESCI made their kit back in the 1980s.
Cockpit
The floor is molded in one piece with the pedals and side consoles. The panel and control stick come separately. Also the seat, which has marks. The panel instruments, consoles and harnesses are provided in decals.
The fuselage halves containing the cockpit are separate from the rest of the fuselage and show some negative ejector marks. Parts include the instrument panel cover and a separate overhead display.
The canopy is molded in two pieces to show the interior. Both parts are reasonably thin and have good detail. The rear piece, for example, shows two recesses so as not to interfere with the fins of the UHF seeker antennas located behind it.
In general, the cockpit has enough detail, the biggest drawback being the multiple ejector marks and the advantage is that the canopy can be showed open.
Fuselage
It is divided in halves and sectioned into three lengths. The first of them is the nose, which includes the Pitot tube, the second is the cockpit and the third is the rest of the fuselage up to the tail cone. Assembly has some alternatives that I will describe where appropiate.
The cockpit section has a gap below that simulate the front wheel well. The interior is smooth and has no detail. Behind there is another piece glued to the inner fuselage sides showing well molded and thin turbine blades.
Moving on to the inner fuselage, we must also glue the rear landing gear in the well and, further back, the bottom of the ventral air brake molded withh raised detail. All of these pieces must be installed before gluing the fuselage halves, and then adding the nose and cockpit.
The external detail of the three fuselage sections looks very good. The access panels and covers are fine and well engraved. There are also nicely rendered devices, such as the IFF radar on the tail tip.
The fuselage front behind the cockpit is detailed with a couple of small intakes and on the sides with the main intakes in separate pieces. These are fine and show the suction doors sloping gently inward. On the port intake we can add as an option the in-flight refueling probe, which is thin but has a slight seam line around it.
The upper fuselage has several antenna fins, one of them is optional for the Spanish and Thai aircraft and must be scratchbuilt by the modeller along with the base following the actual size dimensions present in the instructions.
The side exhaust nozzles are separated into two pieces with the outlet fins in one of them. The nozzles can be placed in a vertical or horizontal position. The rear ones also have well-textured nozzle blast shields.
The lower fuselage has what seems to be a ventral support, the small altimeter fin and the cannons separated in halves, well paneled and with hollowed muzzles. The guns can be replaced with two thin and long fins optionally. Finally, we must add the ventral airbrake, which comes in one piece, also with a mark on the internal side, and has a separate opening jack.
Wings and tail
Unlike aircraft with mid- or low-wing configurations, the kit has the wings divided into an upper half and two lower ones. In the upper half, the wings are attached to the dorsal fuselage, which allows molding the wings with the appropriate negative dihedral.
The panels, small fences and tiny leading edge bulges are very well represented. Also notable on the upper fuselage are the anticollision light and the ventilation outlets of the auxiliary power unit above the engine.
The control surfaces are finely marked and on the undersides detailed with faired hinges. Also nice are the fairings of the outrigger wheels, which are open on the lower sides.
The underwing load is not optional in principle because the holes to place the weapons and auxiliary tanks are already open. The pylons are all one piece, well paneled and detailed with decals.
The underwing armament consists of two one-piece Sidewinder missiles with fins of acceptable thickness and provided with decals. The fuel tanks also have decals and are separated in halves.
Tail surfaces are divided into very thin pieces that show nice engraved panels. The vertical fin and rudder have a double option, one of them detailed with the VHF antenna used by the Spanish and Thai Navy Harrier. Stabilizers are molded with tabs for fuselage attachment and again have the proper dihedral to ease construction.
Undercarriage
The leg and front wheel are molded in one piece. Overall, detail is well defined, but the tire has an ejector mark on one side. Another slight flaw is that the piece shows thin seam lines all around. Both things will not be very difficult to remedy. The well covers come in one piece and must be cut in half.
The rear undercarriage has better detail, starting with the fact that the wheels come separately. There are also marks on the tires and on one side of the leg. The oleo struts as well as the tire rims are nice. The tires show slight seam lines on the tread. In this case the cover is molded with the leg.
The outrigger wheels are molded with the legs and retraction jack, which appear in the open position. Detail on these pieces is fine, but as in the previous cases, there are small negative marks on the inner side of the struts.
Decals
The sheet is printed by Zanchetti. It contains US, Spanish and Thai cockades, numbers, registers, unit badges, the instrument panel and consoles, harnesses and plenty of specific and common stencils. They have a thin and shiny appearance, are sharp and have good register and color saturation. They don’t show too much carrier film.
Instructions
They consist of a ten-page booklet printed in black and white showing a brief history of the aircraft, a numbered parts plan, a color list with matches in Federal Standard codes and Italeri acrylic paints, nine assembly steps, and four pages of color profiles. The back of the box shows profiles and a list of paints.
Paint finishes are different enough to satisfy modellers with different skill levels. The first two correspond to North American Marine Harriers with differences in the markings, standard or low visibility. Another choice is a VA-1 Matador (AV-8S) from the 8th Squadron of the Spanish Navy based in Rota and the last one is a Thai aircarft, precisely one of those sold by Spain after decommission.
Conclusion
This is a kit with generally decent detail for the scale and also with a remarkable rendition on the panels and external elements of the different surfaces. Parts breakup is designed to build it without too many difficulties, the bad thing is that the ejector marks in different areas will not make assembly as fast as it initially seems. Assembly choices are also an asset to consider in this release.
Paint finishes provide enough variety within the operators of this Harrier version. As noted at the beginning, the Thai version and one of the North American versions were not included in the original ESCI kit, and it is nice that Italeri have expanded their number.◊
Publicado – Published: 2 / 2024
©www.jmodels.net

Debe estar conectado para enviar un comentario.