
De un vistazo – Quick look
MATERIAL Y PIEZAS
MEDIA & PARTS:
- Plástico inyectado (T-34A: 36 piezas; tractor: 28 piezas), plástico transparente (5 piezas). Incluye 3 figuras.
- Injected plastic (T-34A: 36 parts; tractor: 28 parts), clear plastic (5 parts). Includes three figures.
CALCAS – DECALS:
- Escarapelas japonesas y norteamericanas, insignias de unidad, matrículas, líneas de pisado y algunos estarcidos. Poco finas, aparentemente saturadas, con un poco de exceso de soporte.
- Japanese and U.S. markings, unit markings, registrations, wing walks and some stencils. Not very thin, apparently saturated, a bit excess of carrier film.
OPCIONES – OPTIONS:
- Fuji T-3 (Beechcraft T-34A). JASDF. JG 0503. Aircraft assigned to Iwanuma Air Base, 1956.
- Fuji T-3 (Beechcraft T-34A). JASDF. 41-0321. 11th Training Group. Shizuama Base, 1960.
- Fuji T-3 (Beechcraft T-34A). JASDF. 41-0306. 12th Training Group. Bofu Base, 1960.
- Fuji T-3 (Beechcraft T-34A). JASDF. 61-0406. Air Force Rescue Group. Hamamatsu Minami Air Base, 1970.
- Beechcraft T-34A. U.S. Air Force. 33309. 1954.
- Beechcraft T-34A. U.S. Navy. 2S 0808. [Sin calcas. No decals provided]
INSTRUCCIONES – INSTRUCTIONS:
- Dos hojas de formato A4 impresas en blanco y negro. Contienen un sumario histórico y técnico del avión, un plano de piezas numerado, una lista numerada de piezas, 6 etapas de montaje y una página de perfiles. Las referencias de color son genéricas, salvo algunas en el código Federal Standard.
- Two A4 sheets printed in black and white. It shows a historical and technical summary about the aircraft, a numbered arts list, 6 assembly chapters and a page of profiles. Color references are generic, except some in the Federal Standard code.
LO MEJOR – THE BEST:
- Montaje sencillo. Incluye tractor de remolque.
- Ease of assembly. Includes a tow tractor.
LO PEOR – THE WORST:
- Molde antiguo con líneas de panel en relieve. Cabina insuficiente y parcialmente sobreescalada. Calcas no fiables.
- Old tooling with raised panel lines. Poor cockpit with overscaled parts. Unreliable decals.
VALORACIÓN – CONCLUSION:
- Aún es el único molde asequible del T-34A. Aunque es sencilla de montar de caja, necesita claras mejoras en el interior y en los paneles.
- The kit is still the only available offer of a T-34A. Though easy to build, it clearly needs improvementes inside the cockpit and panel lines.

La maqueta
Gracias a su popularidad y escaso porte, el T-34 Mentor está representado bastante bien en varias escalas. En la escala 1/72, sin embargo, el modelo inicial sin motor turbo sólo tiene como referencia la vieja maqueta de Hasegawa de los años 70 y resulta extraño que otras marcas no la tengan en su catálogo pese a que no es un avión complejo y que ha tenido muchos países usuarios en todo el mundo.
Como suele suceder, la falta de variedad en las maquetas las suplen parcialmente las calcas de distintos fabricantes, con una nutrida representación de hojas de países de Hispanoamérica (Argentina, Bolivia, Uruguay, Méjico o Ecuador). Para el Mentor español hay una antigua hoja de Hobby-Calcas y otras dos actualmente en venta de LF Models. Desgraciadamente, la marca Series Españolas no tiene aún nada para este avión, más allá de una versátil hoja de escarapelas.
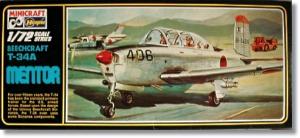
La maqueta objeto de este artículo es una reedición de la norteamericana Minicraft, compañía que distribuyó las maquetas de Hasegawa con su sello en los EE. UU. desde la década de 1970 hasta la mitad de los años 80, si la datación de Scalemates es correcta.
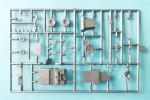
La caja incluye un tractor de pista Toyota con su conductor que complementa bien al avión y permite representar una pequeña escena de cualquier base aérea. Dentro de ella encontramos dos bastidores de piezas para el avión y un bastidor para el tractor, un bastidor transparente, la hoja de calcas y las instrucciones. Las piezas tienen un buen moldeado y no presentan rebabas ni marcas evidentes, salvo un par de ellas en la carlinga y los pozos. Por el contrario, sí vamos a encontrar líneas de molde muy finas. Las líneas de paneles del fuselaje y las alas están simuladas en un finísimo relieve, algo normal hace medio siglo. Estas delgadas líneas plantearán al modelista el dilema de si dejarlas tal cual o grabarlas. Creo que la respuesta está en la pericia que cada cual considere tener para el menester. En mi opinión, y considerando la vetustez de la maqueta, los paneles son tan delgados que no debe ser sencillo rehacerlos con la misma anchura y sin profundizar mucho.
El montaje del Mentor no tiene aparente complicación en una maqueta con escasas piezas debido en parte a su parco interior. Comparativamente, el tractor, que tampoco presenta dificultades especiales a primera vista, parece más entretenido de construir.
Revisión
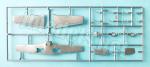
La carlinga está muy simplificada. Los lados de la carlinga son lisos y traen una gran marca de eyector, aunque poco profunda, entre los dos puestos de pilotaje. El suelo contiene los pedales y las bases de los asientos. No hay palancas de control y tanto los asientos como los paneles están claramente sobredimensionados a un tamaño más propio de la escala 1/48. Los paneles muestran el instrumental muy nítido en relieve. El panel delantero va unido a los lados de la carlinga, mientras que el trasero se añade a un panel situado entre los dos puestos de pilotaje. Hay también un mamparo trasero tras el cual va pegada la brújula y su pequeña cubierta transparente. La cubierta de la carlinga es de una pieza. El grosor no es exagerado y la estructura se ha grabado con finura.
Para rellenar el vacío interior hay un par de figuras idénticas en traje de vuelo que no están del todo mal, aunque el tamaño también parece algo más grande del que pide la escala. La pose, sujetando una palanca inexistente y los pies torcidos, es decepcionante.
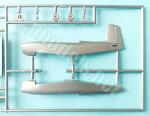
Las mitades del fuselaje están detalladas con líneas muy finas para simular los paneles y accesos. Las piezas incluyen las superficies verticales de cola y el filete situado por delante de la deriva en una de las piezas. El modelista no debe olvidar añadir bastante peso dentro del morro antes de cerrar el fuselaje, dato importante que no está indicado en las instrucciones. El detalle externo del fuselaje comprende las asas laterales de acceso moldeadas sin definición y una antena separada en la zona dorsal. La pieza frontal del motor está bien copiada y muestra las diversas tomas perfiladas y con cierta profundidad para simular la oquedad, salvo en la situada justo por debajo de la hélice, que no está horadada. La hélice viene separada del buje y sus palas son finas y tienen un giro correcto.
Las alas constan de tres piezas. Las superficies inferiores encajan en las superiores dejando las puntas y las superficies de control moldeadas en estas últimas. Los paneles no son profusos y los reproducen de nuevo líneas en relieve muy delgado. Los alerones, flaps y las aletas están muy bien marcados y las superficies presentan finas líneas en relieve para plasmar la estructura. Los faros de aterrizaje de los bordes de ataque vienen en dos pequeñas piezas transparentes. Las luces de las puntas son demasiado prominentes y estrechas. La pieza inferior incluye una sección ventral del fuselaje que presenta los escapes con las salidas horadadas sin profundidad y además no tienen las salidas bajo el fuselaje definidas. La maqueta incluye una bomba bajo el ala izquierda y lo que parece un depósito en la derecha, pero ambos se pueden desechar, ya que no era nada habitual emplearlos.
La cola tiene los estabilizadores separados provistos de aletas para pegarlos. El detalle de todo el empenaje es similar al de las alas, con estructura realizada a base de líneas delgadas y superficies de control y aletas grabadas con profundidad.
La rueda delantera y su pata están moldeadas en una pieza, pese a ello el detalle está muy bien definido. Las tapas del pozo son igualmente finas y tienen un perfil conveniente, adaptado al morro como en la realidad.
Las patas del tren principal están bien reproducidas en dos piezas esbeltas con el sistema de plegado correctamente definido. Los brazos de plegado son muy finos y delicados. Las ruedas poseen una leve línea de molde en el borde de la banda de rodadura, que está representada mediante líneas en relieve. Las llantas tienen detalle definido en ambas caras. Las instrucciones indican que hay que montar las patas haciéndolas pasar por el hueco de los pozos antes de pegar las mitades de las alas, pero se pueden añadir posteriormente, como es más habitual y sencillo.
Las tapas de los pozos vienen unidas en posición de cierre. Las ilustraciones no lo muestran pero la descripción del proceso de montaje indica que hay que separarlas, ya que una de las tapas del avión permanecía cerrada mientras las ruedas estaban bajadas. Justo por debajo de la tapa cerrada hay una marca de eyector en el fondo de cada pozo que es parcialmente visible. Ambas caras de las tapas están bastante bien detalladas y solamente el pequeño abultamiento exterior de las tapas internas parece un poco elevado.
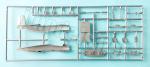
El tractor de arrastre tiene la carrocería despiezada en cuatro elementos básicos que comprenden una base, la parte superior sin el capó separado, el frontal y el lado trasero. La parte superior incluye los asientos con respaldos aparte y los pedales. Tras los asientos hay un panel, la placa de matrícula, una luz trasera y el gancho de remolque, todo ello en piezas separadas.
El capó está detallado con las bisagras de apertura y las rejillas laterales e incluye el salpicadero con un par de indicadores en relieve y el soporte donde colocar la columna de dirección y el volante. El detalle separado comprende una barra transversal y dos retrovisores. El frontal lleva moldeados la rejilla frontal del motor, los faros y dos ganchos. Completan el vehículo en la parte superior la barra de remolque en posición plegada. Hay también una pieza que simula una barra alargada para enganchar el avión al tractor. Esta pieza no aparece representada en las instrucciones.
Las ruedas son de una pieza. Los lados de los neumáticos y las llantas están detallados con nitidez, pero las bandas de rodadura son lisas y tienen delgadas líneas de molde en el contorno. El conductor es una figura de una pieza que viste un sencillo mono, botas y gorra. El detalle tiene poca nitidez y hay líneas de molde a los lados.
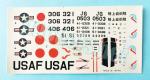
La hoja de calcas contiene escarapelas japonesas y norteamericanas, insignias de unidad, matrículas, líneas de pisado y algunos estarcidos. Todas ellas no parecen muy finas, pero tienen saturación. Alrededor de los motivos hay un ligero exceso de soporte. Extrañamente, la hoja no incluye las calcas de la versión de la Marina norteamericana, que por el código de la cola pertenece a la escuadrilla VT-1.
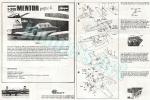
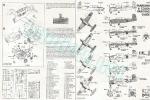
Las instrucciones constan de dos hojas separadas de formato A4 impresas en blanco y negro que contienen un sumario histórico y técnico del avión, un plano de piezas numerado, una lista numerada de piezas, seis etapas de montaje y una página de perfiles. Las referencias de color son genéricas, salvo algunas en el código Federal Standard. El montaje cuenta con la ayuda de cuatro fotografías de muy escasa nitidez que retratan el aspecto general del avión, así como parte de la carlinga, uno de los pozos principales y el empenaje.
Las posibilidades de acabado son idénticas a las de las primeras ediciones de Hasegawa salvo una. En su mayoría son aviones pertenecientes a unidades de las Fuerzas Aéreas de Autodefensa de Japón con libreas diferentes y dos versiones norteamericanas, una de la USAF y otra de la Marina sin calcas, como he dicho.
Valoración
Hace medio siglo maquetas como esta eran claramente de lo mejor que las marcas podían producir. Sin embargo, hoy ha quedado muy desactualizada y es raro que el molde de Hasegawa sea todavía el único asequible del T-34A.
Aunque la maqueta se puede hacer de caja sin problemas, salvo en el resultado que puedan dar las calcas, está claro que el modelista exigente tendrá que hacer mejoras tanto en la carlinga como en el panelado externo. Desgraciadamente, ya no podemos contar ni siquiera con el pequeño fotograbado de Eduard que mejoraba parcialmente el interior y que el fabricante ya no produce.
Al menos hay mejores noticias en lo referente a las calcas, ya que contamos con diferentes hojas en el mercado para suplir las que ofrece la maqueta, que no serán muy de fiar a menos que consigamos hacernos con una edición más reciente que Hasegawa ofrece como Fuji T-3.◊


The kit
Thanks to its popularity and small size, the T-34 Mentor is fairly well represented in various scales. In the 1/72 scale, however, the reference kit for the early model with a piston engine is still the old Hasegawa offer from the 1970s. It seems strange that other companies don’t have it in their catalog, despite the fact that it’s not a large bulky aircraft and has been used by many countries around the world.
As is often the case, the lack kits is partially balanced by decals produced by some manufacturers, with a bunch of sheets including markings from several Latin American countries (Argentina, Bolivia, Uruguay, Mexico, and Ecuador). For the Spanish Mentor, there is an old sheet from Hobby-Calcas and two further sheets currently on sale from LF Models. Unfortunately, the Series Españolas brand has nothing for this aircraft yet, beyond a versatile sheet of roundels.
The kit reviewed in this article is a release from Minicraft, a company that reboxed Hasegawa kits with their own label in the USA from the early 1970s until the mid-1980s, if the Scalemates website dating is correct.
The release includes a Toyota tow tractor and its driver, which complements the aircraft well and allows for a small airbase scene. Inside the box we find two sprues of parts for the aircraft and one for the tractor, a clear sprue, the decal sheet, and the instructions. Parts are well molded and have no flash or marks, except for a few inside the cockpit and wheel wells. However, we do find very thin seam lines. Panel lines on the fuselage and wings are rendered in thin raised lines, something common in kits from half a century ago. The modeler will have to decide whether to leave them as they are or engrave them. I think the answer lies in the skill one considers necessary for the task. The lines are so thin that it shouldn’t be easy to engrave them with the same width and not too deeply.
Assembling the Mentor looks quite easy in a kit with few parts, partly due to the sparse cockpit. In comparison, the tractor, which also shows no particular difficulties at first sight, seems a longer build.
Review
The cockpit is very simplified. The sides are smooth and feature two large, though shallow, ejector marks between the two cockpits. The floor contains the pedals and seat bases. There are no control columns, and both the seats and instrument panels are clearly oversized looking those of a 1/48 kit. The panels show sharp raised gadgets. The front panel is attached to the cockpit sides, while the rear panel is added to a bulkhead between the two cockpits. A rear bulkhead has the compass and the small clear cover behind it. The canopy is a single piece that is not too thick with the frame finely engraved.
Filling the interior gap are a pair of identical figures in flight suits, which are not too bad, although they look a bit larger for the scale. The pose, holding a nonexistent stick and with their feet twisted, is disappointing. The fuselage halves are detailed with very fine lines to simulate the panels and access covers. The vertical tail surfaces and the fillet forward of the fin are molded on one of the halves. A ballast is quite necessary inside the nose before closing the fuselage, an important detail not indicated in the instructions. The fuselage external detail shows poorly defined side access handles and a separate antenna behind the cockpit. The front engine piece has several hollowed intakes, except for the round one located just below the propeller. The propeller is separated from the hub and the blades are thin and look correctly twisted.
The wings consist of three pieces. The lower piece fits into the upper ones with the tips and control surfaces molded on these. The panels are sparse and again feature very thin raised lines. The ailerons, flaps, and fins are very well defined and the structure is rendered in thin lines. The landing lights on the leading edges come in two small clear pieces. The wingtip lights are too prominent and narrow. The lower wing piece includes a ventral fuselage section showing the exhausts with hollowed tailpipes and no defined outlets on the fuselage surface. The kit includes a bomb under the left wing and what seems to be an auxiliary tank on the right, but both pieces can be discarded, as they were not normally used.
The tail has separate stabilizers provided with tabs for attachment. Surface detail is similar to that on the wings, with a structure rendered in thin lines and deeply engraved control surfaces.
The nose wheel and the strut are molded in one piece, though they are well defined. The well covers are also thin and have a curved realistic profile.
The main landing gear legs are well reproduced in two fine pieces with the folding gear well defined. The arms are very thin and delicate. The wheels have slight seam lines on the tread edges and thin lines reproduce the pattern. The hubs have defined detail on both sides. The instructions indicate that the legs are assembled by passing them through the well gaps before attaching the wing halves, but they can be added later, as in most kits.
The well covers are provided as one piece. The assembly description indicates that the piece is cut off in the middle though the exploded views don’t show this. The inner cover is attached closed when the wheels are down. Just below each closed cover, there is an ejector mark on the well bottom which is partially visible. Both sides of the covers are fairly well detailed, and only the small outer bulge on the inner covers looks too small and prominent.
The tow tractor’s body is broken down into four basic elements, comprising a base, the upper part without the separate hood, the front, and the rear sides. The upper part is molded with the seats provided with separate backrests and the pedals. Behind the seats are a bulkhead, the license plate, a tail light, and the tow hook, all in separate parts.
The hood is detailed with the hinges and side grilles, and includes the dashboard with a pair of raised dials and the bracket for the steering column and wheel. The separate detail comprises a crossbar and two mirrors. The front piece features a molded-on engine grille, the headlights, two hooks plus a tow bar in the folded position. Also included is a further long piece for attaching the aircraft to the tractor that is not shown in the instructions.
The wheels tires and hubs are sharply detailed, but the treads are smooth and have thin seam lines around them. The driver is a one-piece figure wearing simple overalls, boots, and a cap. Detail is poor and there are seam lines along the sides.
The decal sheet contains Japanese and American markings, unit badges, license plates, wing walk lines, and some stencils. All of these don’t look very fine, but they are saturated. There is a slight excess of carrier around the decals. Strangely, the sheet doesn’t include decals for the US Navy aircraft, which belonged to the VT-1 squadron according to the tail code.
The instructions consist of two separate A4 sheets printed in black and white containing a historical and technical summary of the aircraft, a numbered parts plan, a numbered parts list, six assembly steps, and a page of profiles. Color references are generic, except for some in the Federal Standard code. Assembly is aided by four poor-quality photographs showing the general appearance of the aircraft, as well as part of the cockpit, one of the main wells, and the tail.
Paint finishes are identical to those in the first Hasegawa boxings, except for the addition of two US Mentors. They are mostly aircraft belonging to JASDF units with different liveries, plus a USAF alternative and a Navy aircraft without decals, as mentioned.
Conclusion
Half a century ago, kits like this were clearly among the best that manufacturers could produce. However, today they have become quite outdated, and it’s strange that the Hasegawa offer is still the only available T-34A kit.
Although the kit can be built straight from the box, except for the results the decals can have, it’s clear that the experienced modeler will have to improve both the cockpit and the panels for a more realistic look. Unfortunately, we can no longer count on the small Eduard photo-etched cockpit set which the manufacturer no longer produces.
At least there’s better news regarding decals, as we have various sheets on the market to replace those offered by the kit, which won’t be very reliable unless we get a more recent release that Hasegawa sell as the Fuji T-3.◊
Publicado – Published: 10 / 2025
©www.jmodels.net

Debe estar conectado para enviar un comentario.