
De un vistazo – Quick look
MATERIAL Y PIEZAS
MEDIA & PARTS:
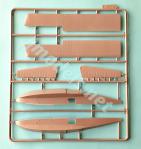
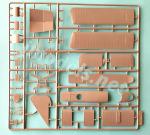
- Plástico inyectado (299 piezas), plástico transparente (3 piezas).
- Injected plastic (299 parts), clear plastic (3 parts).
CALCAS – DECALS:
- Escarapelas, marcas de cola y numerales. Apariencia fina y brillante. Sin exceso de soporte. Bien impresas.
- British roundels, tail markings and registers. Thin and glossy appearance. Not too much carrier. Well printed.
OPCIONES – OPTIONS:
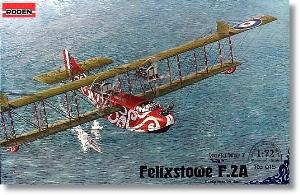
- Felixstowe F.2A (inicial). Nº de serie N4283. Pilotado por el Cte. de Vuelo G. E Livock y R. Leckie. Felixstowe (Gran Bretaña), 1918.
- Felixstowe F.2A (inicial). N.º de serie N4512. Great Yarmouth (Gran Bretaña), Junio de 1918.
- Felixstowe F.2A )inicial). N.º de serie y base desconocidos. 1918.
- Felixstowe F.2A (inicial). N.º de serie N4300. Felixstowe (Gran Bretaña), otoño de 1918.
- Felixstowe F.2A (early). s/n N4283. Flown by Flight Commander G. E. Livock and R. Leckie. Felixstowe (Great Britain), 1918.
- Felixstowe F.2A (early). s/n N4512. Great Yarmouth )Great Britain), June 1918.
- Felixstowe F.2A (early). s/s and home base unknown. 1918.
- Felixstowe F.2A (early). s/n N4300. Felixstowe (Great Britain), autumn 1918.
INSTRUCCIONES – INSTRUCTIONS:
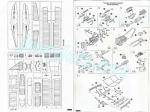
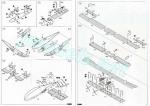
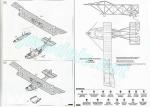
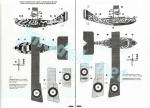
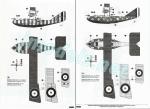
- Folleto de tamaño A4 de 12 páginas impreso en blanco y negro. Muestra una historia del hidroavión con datos técnicos, un plano numerado de piezas, 23 secuencias de montaje, una lista de colores con equivalencias de pinturas esmalte de Humbrol, una guía para arriostrar el modelo y 4 páginas de perfiles. Claras y bien impresas.
- 16-page A4 brochure printed in black and white. It shows a history of the flying boat with technical data, a numbered parts plan, 23 assembly chapters, a list of colors with matches in Humbrol enamels, a guide to rig the model and 4 pages of profiles. Clear and well printed.
LO MEJOR – THE BEST:
- Motores y armamento. Patrones de pintura atractivos y variados.
- Engines and armament. Attractive and varied paint schemes.
LO PEOR – THE WORST:
- Rebabas en algunas piezas. No es sencilla de armar ni pintar.
- Flash present on some parts. Not easy to build or paint.
VALORACIÓN – CONCLUSION:
- Requiere tiempo, habilidad y no es apta para el modelista inexperto, pero el veterano puede sacar gran partido de esta maqueta.
- It needs time, skill and it is not suitable for the newbie, but the experienced modeller can turn it into a very nice piece.

La maqueta
El Felixstowe F.2 es una de las maquetas más clásicas de Roden en esta escala y, pese a que lleva mucho tiempo en el mercado, no deja de tener interés para los aficionados a la Gran Guerra. La prueba es que la marca la suele reeditar con cierta frecuencia. Las tres cajas que tiene Roden salidas del mismo molde representan respectivamente un modelo inicial, otro final y una versión con un puesto artillero en la parte superior de las alas. Una de las diferencias entre estos modelos está en la presencia de parabrisas o cubierta semicerrada en la carlinga.
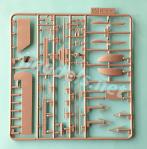
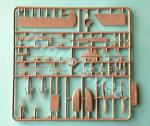
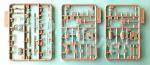
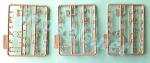
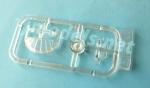
La maqueta posee alrededor de 300 piezas repartidas en once bastidores, uno de ellos transparente. Las calcas y las instrucciones completan el contenido de la caja. El plástico no tiene deformaciones. El moldeado es bueno, pero hay rebabas en algunas piezas y marcas de eyector poco visibles en los lados de la carlinga y en la parte inferior de la plataforma de varada.
El montaje de esta hidrocanoa biplana llevará su tiempo y el modelista habrà de planteárselo como un proyecto con margen amplio, dado el número de piezas y la necesidad de tener una mínimas habilidades modelísticas para completar la maqueta y su arriostraje con éxito.
Los esquemas de pintura son muy atractivos, pero no sencillos de realizar, ni siquiera en los acabados más sencillos a priori, ya que hay que tirar de cinta de enmascarar y paciencia.
A juzgar por las piezas que no emplearemos en esta maqueta, las diferencias entre el Felixstowe F.2A inicial y el posterior estaban en la forma y dimensiones de los alerones y en el acristalamiento de la carlinga. El F.2 fue empleado con éxito por los británicos como hidrocanoa de patrulla en el Mar del Norte con la misión de localizar y destruir sumergibles alemanes y, secundariamente, para interceptar zepelines. Durante el periodo de la guerra el diseño evolucionó en los modelos F.3 y F.5, pero ambos eran más grandes y pesados al par que menos maniobrables que el F.2.
Carlinga
Los lados del fuselaje están moldeados con parte del entramado de madera en relieve., aunque la parte delantera tiene una marca a cada banda que afecta ligeramente al detalle. El suelo es de una pieza para todo el interior y está liso, pero no posee marcas.
El puesto artillero proel lleva dos cargadores de munición en un lado y el asiento del artillero. Los elementos de la carlinga me parecen un poco sobredimensionados. Comprenden dos asientos, con soporte separado, los controles, los pedales y el panel con los instrumentos en relieve.
La zona escalonada trasera cuenta con una pieza en su mitad que semeja un extintor. Más atrás hay varios contenedores situados sobe el suelo. Los puestos artillados laterales están abiertos en el fuselaje y hay dos ametralladoras con sus afustes más el panel deslizante que cierra cada puesto pegado por fuera. Las instrucciones no son demasiado concretas en este punto y conviene tener referencias para situar las piezas correctamente. Las ametralladoras están reproducidas bastante bien, con las miras definidas y los tambores de munición separados. Emplearemos hasta siete de ellas repartidas por todo el modelo.
La cubierta de la carlinga, que en este modelo inicial cierra casi por completo la carlinga, es fina y su marco en relieve está bien reproducido. Sobre el lado izquierdo hay una ametralladora adicional, que en la mayoría de fotos no se ve emplazada porque parece tratarse de un montaje experimental.
Fuselaje
El fuselaje está repartido en cuatro piezas. El techo de la hidrocanoa tiene dos tramos pegados a la cubierta transparente. Los lados muestran algunas rebabas en los bordes y cuentan con algún detalle en relieve a los lados, como los estribos de acceso. El perfil delantero de la quilla y la forma escalonada a popa están bien conseguidos y muestran pequeños timones moldeados en los dos piezas y perfiles en V para detallar la cortadura escalonada.
La cubierta delantera lleva un anillo Scarff con su afuste, alzas y dos ametralladoras, al igual que la cubierta trasera. Por delante del anillo trasero hay varias piezas pequeñas añadidas y dos soportes para el plano superior de las alas. Los laterales tienen muescas para introducir la sección intermedia del plano inferior de las alas, separado en dos superficies unidas con varillas para salvar el fuselaje. Bajo las superficies también hay dos soportes para reforzar la sustentación.
Las instrucciones indican que debemos construir completamente las dos alas, incluidos los soportes y los motores antes de unir toda la estructura al fuselaje. Sin embargo, parece más práctico pegar el plano inferior al fuselaje y seguir el montaje de abajo hacia arriba.
Alas, motores y cola
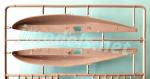
Los planos inferiores están divididos en tres secciones, mientras que los superiores tienen cinco, si contamos los alerones separados. Todas las superficies muestran un sutil relieve estructural diferente en las caras superiores e inferiores. Las piezas están bien moldeadas y apenas tienen rebabas en los bordes, que son bastante finos.
Los planos superiores llevan dos timones transversales en la zona externa y los inferiores están detallados con dos flotadores en las puntas para equilibrar el avión sobre el agua y dos bombas, que poseen las aletas y los soportes por separado.
Entre las alas hay ocho soportes por lado, más los correspondientes a los motores. Están bien perfilados y muestran los refuerzas definidos, aunque algunos muestran rebabas que limpiar.
Los motores muestran un detalle excelente, lo que no es una sorpresa para quienes conozcan ya otras maquetas de Roden. El bloque está dividido en mitades con los cilindros encima. La parte delantera lleva la caja de engranajes aparte, atravesada por el eje de la hélice, que posee un tope ahuecado. Si no lo pegamos al bloque del motor, podremos hacer que la hélice gire. Los cilindros están detallados con diversos colectores y válvulas. La parte anterior lleva el radiador y en la parte trasera hay varias piezas más pequeñas. Los finos escapes van añadidos a los colectores. El soporte del motor está separado y en su parte trasera muestra lo que parece un depósito de combustible de forma triangular.
Las hélices van unidas en forma de aspa y muestran buen perfil en los bordes, pero algunas presentan ligeras rebabas en ellos.
Los planos verticales de cola son de una pieza, mientras que los horizontales tienen los timones separados. El detalle de las superficies es igual de bueno que en las alas. Cuatro soportes por lado dan firmeza a los estabilizadores.
Plataforma de varada
La plataforma está compuesta de un suelo en V adaptado a la quilla que tiene varias marcas de eyector en el lado inferior y la superficie lisa, un bastidor adaptado a la plataforma con barandillas a los lados y soportes en forma de varillas, un eje con dos ruedas debajo y ruedas giratorias en la parte delantera y trasera. Aunque no viene representada en las instrucciones, también encontramos una escalera de acceso entre las piezas de la maqueta, como puede verse en algunas imágenes de época del Felixstowe.
Comparada con las muchas fotos que hay de este soporte móvil, lo único que parece mal reproducido es la tablazón de madera del suelo que seguramente llevaba, así como los robustos maderos laterales de refuerzo, que Roden ha representado con finas varillas nada parecidas.
Calcas
La amplia hoja que Roden ha incluido en esta maqueta contiene escarapelas, marcas de cola y numerales con apariencia fina y brillante, buen registro y adecuada saturación de color. No tienen exceso de soporte.
Instrucciones
Están impresas en un folleto de tamaño A4 de 12 páginas en blanco y negro. Muestra una historia del avión con datos técnicos, un plano numerado de piezas, 23 secuencias de montaje, una lista de colores con equivalencias de pinturas esmalte de Humbrol, una guía para arriostrar el modelo y cuatro páginas de perfiles. En general, los pasos de montaje son claros, aunque algunos necesitarán comprobar detalles para situar correctamente las piezas.
En el folleto se echa en falta que Roden no haya mostrado el complejo arriostrado del modelo completo, por ello nos remite a la ilustración de la caja para compensar los detalles que faltan.
Los acabados de pintura son realmente atractivos y variados, pero no sencillos de realizar. Solo una de las opciones lleva un camuflaje disruptivo más común con bandas rojiblancas verticales. El modelista con la suficiente habilidad lo tiene realmente difícil para elegir uno.
Valoración
Roden se arriesgó al sacar esta maqueta en un momento en el que no era tan común como hoy ver este tipo de aviones de la Gran Guerra a ninguna escala. El tiempo le ha dado la razón, ya que se ha reeditado sin cambios hasta hoy y no es raro verla aparecer cada cierto tiempo.
Para disfrutarla y sacarle el partido que merece, me parece evidente que la maqueta necesita tiempo y destreza tanto en el montaje como en el arriostrado y la pintura, por ello no parece adecuada para modelistas inexpertos y con habilidades básicas.◊


The kit
The Felixstowe F.2 has become one of Roden’s classics in this scale. Though it has been in the market for a long time, it is still of interest to fans of WWI. The proof is that the brand usually reissues it with some frequency. The three boxings Roden have released from the same tooling represent an early variant, a late one and a version with a machine-gun ring on the upper wings. One of the differences between the early and late models is the fitting of a windshield or a canopy in the cockpit.
The kit has around 300 pieces in eleven sprues, one of them containing the clear parts. The decals and the instructions complete the box content. Plastic has no blemishes. The level of molding is good, but there is flash on some parts and non-visible ejector pin marks on the cockpit sidewalls and the bottom side of the beaching dolly.
Assembly of this biplane flying boat will take up time and the modeler will have to consider it as a long-term project, given the number of parts and the need to have more than the standard modeling skills to successfully complete the model and the rigging.
Paint schemes are very attractive, but not easy to do, not even in the simplest finishes, and masking tape and patience will be necessary indeed.
Judging from the parts that we will not use in this kit, the differences between the initial Felixstowe F.2A and the later variant were in the shape and dimensions of the ailerons and in the cockpit canopy. The F.2 was successfully used by the British as a patrol flayng boat in the North Sea with the role of locating and destroying German submarines and, secondarily, to intercept zeppelins. During the war period the design evolved into the F.3 and F.5, but both were larger, heavier as well as less maneuverable than the F.2.
Cockpit
The fuselage sidewalls are molded with part of the raised wooden structure, although there is a pin mark on each side which slightly affects the detail. The floor is one piece for all the interior, with a smooth surface without detail, but has no ejector marks.
The bow gunner’s position has two ammo drums on one side and the gunner’s seat. The cockpit items seem a little oversized. They include two seats, with a separate support, the control wheels, the pedals and the instrument panel showing raised instruments.
The rear stepped floor has a piece in the middle that looks like a fire extinguisher. Further back there are several containers located on the floor. The gun ports are open on the fuselage sides and there are two machine guns with their mounts plus a sliding panel attached to the outside closing each position. The instructions are not very specific at this point and it is advisable to have references to attach the pieces correctly. The machine guns are really nice, with the sights defined and the ammo drums apart. We will use up to seven of them throughout the kit.
The canopy, which has an open roof in this early model, is thin and the raised frame is well done. On the left canopy side there is an additional machine gun, which is hardly seen in photos because it seems to be an experimental configuration.
Fuselage
The fuselage is divided into four pieces. The roof has two sections attached with the clear canopy in between. The fuselage sides show some flash on the edges and raised detail on the sides, such as the boarding footholds. The keel forward profile as well as the stepped shape aft are nicely molded and show small rudders molded in the two pieces and V profiles to detail the stepped ends.
The front and rear decks are provided with Scarff rings with a mount and two machine guns each. In front of the rear ring there are several small pieces and two struts for the upper wings. The sides have notches to insert the lower wing. Under the midwing sections there are also two supports as reinforcement.
According to the instructions, assembly goes on with both wings, including the struts and engines before attaching the structure to the fuselage. However, it seems more practical to glue the lower wing to the fuselage and follow the build from that point upwards.
Wings, engines and tail
The lower wing is divided into three lengths, while the upper ones have five, if we count the separate ailerons. All the surfaces show a subtle and different structural raised detail on the upper and lower sides. The pieces are well molded and have very slight flash on the edges, which are quite fine.
The upper wing has two transverse outboard rudders and the lower wing is detailed with two floats at the tips to balance the plane on water and two bombs, which have separate fins and racks.
Between the wings there are eight interplane struts per side, plus those for the engines. They are well profiled, but there is flash to clean up on some.
The engines show excellent detail, which is not a surprise for those who already know other Roden’s kits. The block is divided into halves with the cylinders on top. The front part has the separate propeller gear, with the propeller shaft through it. This has a hollowed inner tip to allow propeller turning if we don’t glue it to the engine block. The cylinders are detailed with several exhaust manifolds and valves. The engine also includes the front radiator and some connecting rods at the back. The thin exhausts are attached to the manifolds once they are in place. The engine mounts are separate and have what looks like a separate fuel tank behind.
The propellers are attached in the shape of a cross and show a good profile on the edges, but there is slight flash on some of them.
The vertical tailplanes are in one piece, while the horizontal ones have separate rudders. Detail on the surfaces is just as good as on the wings. There are also two bracing struts under each stabilizer.
Beaching dolly
The dolly comprises a V-shaped platform adapted to the keel shape. The piece has several ejector marks on the underside and a smooth surface, a frame with railings on the sides and supporting rods, an axle with two wheels underneath and caster wheels at the front and rear. Though it is not shown in the instructions, we also find an access ladder in one of the sprues, as can be seen in some images of this dolly.
Compared to the same pictures, the only thing that seems poorly rendered is the wooden floor planking that it surely had, as well as the thick side beams, which Roden have provided as thin rods that do not look the part.
Decals
The large sheet that Roden have included in this kit contains British cockades, tail markings and numbers with a thin and shiny appearance, good register and adequate color saturation. They do not have excess support.
Instructions
They are printed on a 12-page black and white A4 booklet. It shows a history of the flying boat with technical data, a numbered parts plan, 23 assembly sequences, a list of colors with Humbrol enamel paint equivalents, a guide for rigging the model and four pages of profiles. In general, assembly steps are clear, although some will need to check graphic references to attach some parts correctly.
Unfortunately, the guide Roden have included does not show all the rigging of the model and instructions suggest using the artbox to check the missing details.
Paint finishes are really attractive and varied, but not easy to do. Only one of the options has a really standard dazzle camouflage with vertical red and white bands. The skilled modeler will have a really hard choice with these bizarre camo schemes.
Conclusion
Roden took a risk by releasing this kit at a time when seeing this type of WWI aircraft at any scale was not as common as today. Time has proven the brand right, since it has been reissued without changes until today and it is not unusual to see the kit reappear from time to time.
To enjoy this kit and get the most out of it, it needs time and skill in both assembly, rigging and painting and that’s why it does not look suitable for inexperienced modellers with basic skills.◊
Publicado – Published: 5 / 2024
©www.jmodels.net

Debe estar conectado para enviar un comentario.