
De un vistazo – Quick look
MATERIAL Y PIEZAS
MEDIA & PARTS:
- Plástico inyectado (39 piezas), plástico transparente (2 piezas).
- Injected plastic (39 parts), clear plastic (2 parts).
CALCAS – DECALS:
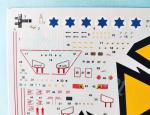
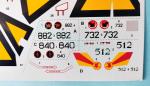
- Impresas por Zanchetti. Insignias israelíes, panel de instrumentos, arneses, insignias de escuadrón, marcas de identificación de las alas y numerosos estarcidos. Apariencia fina y brillante. Nítidas y saturadas de color. Sin soporte excedente.
- Printed by Zanchetti. Istaeli roundels, instrument panels, seat belts, squadron badges, wing and tail markings and plenty of stencils. Thin and glossy appearance. Sharp and color saturated. No surplus carrier film.
OPCIONES – OPTIONS:
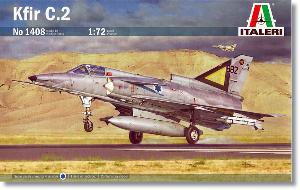
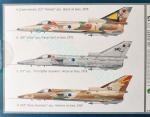
- Kfir C2-882. Israeli Air Force. 113rd Hornet Squadron. Hatzor air base, 1979.
- Kfir C2-732. Israeli Air Force. 109th Valley Squadron. Ramat David air base, 1976.
- Kfir C2-840. Israeli Air Force. 101st Squadron. Hatzor air base, 1979.
- Kfir C2-512. Israeli Air Force. 144rd Arava Guardians. Hatzerim air base, 1987.
INSTRUCCIONES – INSTRUCTIONS:
- Folleto doblado de 10 páginas en formato A5 impreso en blanco y negro. Contiene un sumario histórico sobre el avión en varios idiomas, un plano numerado de piezas, una lista de colores con referencias de pinturas en código Federal Standard y acrílicos de Italeri, 4 secuencias de montaje y 5 páginas de perfiles, una de ellas para colocar los estarcidos.
- 10-page A5 folded leaflet printed in black and white. It contains a historical summary about the aircraft in several languages, a numbered parts plan, a list of colors with matches in the Federal Standard code and Italeri acrylic paints and 5 pages of profiles, one of them to set the stencils.
LO MEJOR – THE BEST:
- Molde limpio. Sencillez de montaje aparente. Acabados atractivos y hoja de calcas algo más extensa que en ediciones anteriores.
- Clean tooling. Apparent ease of assembly. Attractive paint finishes with a more extensive decal sheet than in previous releases of the kit.
LO PEOR – THE WORST:
- Detalle en la carlinga. Aerofrenos mal posicionados. Dientes de las alas mal dimensionados. Marcas en los neumáticos.
- Sparse cockpit detail. Engraved airbrakes wrongly positioned. Oversized wing dog-teeth. Pin marks on tires.
VALORACIÓN – CONCLUSION:
- Hoy ya no es la mejor maqueta de este avión, pero sí la más asequible. De caja no debe dar problemas, aunque el modelista avanzado la encontrará deficiente, pero muy idónea para detallarla.
- Today, it’s no longer the best kit of this aircraft, but it is the most available. It shouldn’t cause any problems out of the box, although the advanced modeler will find it limited but very suitable for detailing.

La maqueta
Por el momento esta es la última entrega del Kfir de Italeri en la escala 1/72. El molde, también copiado por Revell y Tamiya, es bastante viejo, y por tanto muy conocido de los aficionados a los reactores de este tamaño. La casa italiana lo ha sacado con distintos marbetes, como Kfir C2, C7 y la versión norteamericana F-21 Lion. El otro molde tradicional en esta escala es el de Hasegawa, que pertenece a su serie más antigua y cuyo mayor inconveniente son los paneles en relieve. El último fabricante en terciar en esta competencia ha sido la china (cómo no) AvantGarde Model Kits (AMK). Juzgando por las fotos que he visto de su Kfir, la maqueta deja muy atrás a las anteriores en detalle, opciones de acabado y especialmente en armamento, y hasta aquí puedo decir sobre ella.
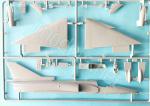
Esta caja de Italeri contiene dos bastidores de piezas grises, un bastidor transparente, la hoja de calcas y las instrucciones. Al inspeccionar el contenido, se aprecian la sencillez del despiece y la limpieza del molde, por ello creo que a Italeri le va a durar su Kfir un largo tiempo aún.
Las piezas tienen un buen nivel de moldeado, carecen de deformaciones y rebabas evidentes. Las marcas son leves y hay pocas evidentes tras montar el modelo. Los paneles están grabados con precisión y a distinto grosor según conviene. De este modo, el modelista cuenta a priori con una buena base para trabajar, tanto si desea montar este avión de caja como si prefiere añadir más detalle, que sin duda le hace falta a la maqueta.
La maqueta parece no ofrecer muchos problemas en el montaje, ya que el despiece no es abundante. En mi opinión, el olvido más evidente en las instrucciones es la adición de un contrapeso en el morro para evitar el desequilibrio de la maqueta terminada. Apenas unos gramos de lastre deben ser suficientes. La única alternativa de construcción consiste en simular el modelo en vuelo colocando las ruedas plegadas.
Por otro lado, las terminaciones de pintura están bien seleccionadas y pueden resultar muy atractivas ya que ofrecen distintos patrones y colores de los empleados por la Fuerza Aérea Israelí en los años 70 y 80.
Revisión
La carlinga tiene un detalle muy básico. Italeri la proporciona en una pieza en forma de bañera que incluye en la parte inferior el hueco de la rueda delantera. Además de los pedales moldeados en el suelo, tenemos la palanca, un asiento que parece más bien “espeso” que grueso con arneses de calca y el panel de instrumentos. Este tiene los indicadores en relieve y una calca para detallarlos. Es evidente que Italeri se ha comido las consolas laterales y la mira, por citar sólo lo más evidente. Uno de los lados de la carlinga tiene una marca de eyector ligera que debería eliminarse por precaución antes de pegar la bañera al fuselaje. El asiento debería sustituirse por algo mejor, pero, si se emplea el de la caja, hay que tapar un pequeño rechupe en su centro.
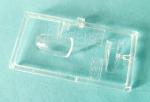
La cubierta está separada en dos piezas no muy finas que digamos, aunque ofrecen el bastidor bien marcado y la posibilidad de mostrar el exiguo interior.
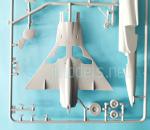
El fuselaje contiene el indicador de velocidad más la aleta de la antena VHF del morro en una de las mitades y tiene la parte anterior de las tomas de aire laterales aparte. Los paneles están grabados con finura y buena definición. El detalle superficial muestra las pequeñas aletas del morro así como las diminutas tomas y salidas de refrigeración del motor y tobera. Las dos tomas de mayor tamaño vienen separadas pero no abiertas. Las tomas principales están separadas en dos piezas, con el cuerpo semicónico en una de ellas complementado por la parte externa de la tobera, que es fina en la entrada y está correctamente grabada por fuera. Estas piezas muestran el capotaje de cada aleta canard moldeado en la pieza. Las aletas son finas y van insertadas en ranuras abiertas en las tomas.
Antes de pegar las mitades del fuselaje es conveniente añadir un poco de contrapeso en el interior del morro, detalle no indicado en las instrucciones, como he dicho, y pegar el extremo de la tobera. Este viene en una pieza simple, detallada en el interior y con acierto pasable en la definición de las aletas variables.
Las alas están separadas en tres piezas. La dos superiores van pegadas directamente al fuselaje y la inferior, que contiene la panza del fuselaje, superpuesta a las anteriores. El grabado del detalle superficial es bueno, pero tiene un error en la situación de los aerofrenos, extrañamente situados hacia el exterior de las alas y además mal orientados. A alguien se le debió ir la olla cuando los reprodujo. Los dientes de los bordes de las alas son demasiado grandes y salientes, en cambio las luces de las puntas están adecuadamente grabadas.
Las mitades superiores contienen los alerones y elevones con sus gatos moldeados parte en ellas y parte en la mitad inferior de las alas. Las piezas también incluyen el fondo de los pozos con el cableado hidráulico y eléctrico simulado más alguna marca leve que debería taparse aunque no es muy visible.
La mitad inferior contiene diferentes paneles bien reproducidos además de las troneras de los cañones, las bocas de las armas parcialmente visibles y las salidas de los eyectores de vainas. En el extremo trasero se aprecia el parachoques de cola. Los pozos no parecen tener una profundidad muy acorde a la escala, aunque son pasables, en mi opinión.
La carga suspendida es escasa y consiste en un depósito de línea central y dos misiles aire-aire. El depósito está despiezado en mitades con el soporte separado. Los misiles, parecidos a los Shafrir 2 pero sin detalle en la ojiva, vienen en una pieza con el soporte igualmente aparte.
La aleta vertical está unida a la mitad derecha del fuselaje. La parte anterior lleva en la base la carena de la toma de refrigeración sin abertura en el extremo anterior, las luces de navegación y el actuador del timón bien perfilados pero el borde de ataque carece de la pequeña antena ECM. La base tiene tanto el capotaje del paracaídas de frenado como el del cono de cola bien reproducidos en su parte trasera.
El pozo de la rueda delantera no contiene ningún detalle. La pata, el brazo de retracción, la horquilla y la rueda vienen todos juntos en una sola pieza que muestra algunas líneas de molde. La pata y el brazo muestran un detalle decente, pero no destacable. Las luces de aterrizaje se proporcionan separadas en una pieza no transparente. La tapa del pozo está dividida en tres tramos detallados en los lados interiores.
Las tapas de tren principal vienen de una pieza a la que hay que cortar los extremos para obtener los tramos que van unidos a cada pata de la rueda. Las caras internas de las tapas muestran cierto detalle grabado. Las patas no son excepcionales, sino más bien simples con la amortiguación bien definida. Los neumáticos poseen ligeras líneas de molde y dos pequeñas marcas de eyector negativas en el lado interno no muy sencillas de tapar, aunque las llantas presentan una definición aceptable.
La hoja de calcas corre a cargo del impresor Zanchetti, habitual auxiliar de Italeri. Se han impreso en ella insignias israelíes, el panel de instrumentos, los arneses, insignias de escuadrón, marcas de identificación de las alas y numerosos estarcidos que darán un aspecto más realista al modelo. Los motivos poseen una apariencia fina y brillante. Muestran nitidez y saturación de color y carecen de soporte excedente.
Las instrucciones vienen en un folleto doblado de diez páginas en formato A5 impreso en blanco y negro que contiene un sumario histórico sobre el avión en varios idiomas, un plano numerado de piezas, una lista de colores con referencias de pinturas en código Federal Standard y acrílicos de Italeri, cuatro secuencias de montaje y cinco páginas de perfiles, una de ellas para colocar los estarcidos. La cara trasera de la caja ofrece tres perfiles en color como guía para elegir los colores.
La selección de los acabados me parece muy acertada, ya que ofrece distintos patrones y combinaciones de colores atractivas de los usados por la Fuerza Aérea Israelí en los años 70 y 80.
Valoración
La maqueta no tendrá muchos problemas de construcción para el modelista que sólo pretenda hacerla de caja. Sin embargo, quienes deseen afinar más el detalle la encontrarán deficiente, especialmente en la carlinga y en algunos errores difícilmente salvables, como los aerofrenos situados en lugar erróneo y los dientes de las alas mal dimensionados.
A mi parecer hay, a la vez, dos activos claros en esta edición. El primero es que los paneles están grabados, lo que no es poco decir con respecto a la maqueta alternativa de Hasegawa, y el segundo es la variedad y atractivo en los acabados de pintura, potenciados por una hoja de calcas más extensa que en cajas anteriores de esta maqueta.◊


The kit
This is the latest release of Italeri’s Kfir in the 1/72 scale so far. The tooling, also copied by Revell and Tamiya, is quite old and therefore well known to jet enthusiasts of this scale. The Italian company has released it with different labels, such as Kfir C2, C7, and the American F-21 Lion variant. The other traditional manufacturer in this scale is Hasegawa, with a tooling belonging to their oldest series and featuring raised panel lines as its main drawback. The latest contestant to enter the competition is the Chinese AvantGarde Model Kits (AMK). Judging from the pictures I’ve seen of their Kfir, the kit far surpasses the previous ones in detail, finishing choices, and especially armament, and that’s all I can say about it.
This box contains two sprues of gray parts, a clear sprue, the decal sheet, and the instructions. Upon inspection, simple parts breakup and cleanliness of the tool are evident, so I think Italeri’s Kfir will still last a long while.
Parts are well molded, free from flash or blemishes. Pin marks are shallow, and few are evident after assembly. Panels are sharply etched and have varying thickness where appropriate. This gives the modeler a good base to work, whether they want to build this aircraft from the box or add more detail, which is a thing the kit clearly needs.
The kit doesn’t seem to pose many assembly problems, as the parts list isn’t extensive. In my opinion, the most obvious omission in the instructions is the addition of a nose counterweight, which the finished model may need. Just a few grams of ballast should be enough. The only construction alternative is to simulate the model in flight by posing the wheels folded.
On the other hand, paint finishes are well-chosen and they are very attractive indeed, offering schemes and colors from those used by the Israeli Air Force in the 1970s and 1980s.
Review
The cockpit has very basic detail. Italeri provide it in a single, tub-shaped piece that includes the front wheel well. In addition to the molded-on pedals, we have the lever, a thickish seat with decal harnesses, and the instrument panel. This has raised gadgets and a decal to detail them. Italeri have clearly left out the side consoles and the sight, to mention just the most obvious. One side of the cockpit has a light ejector mark that should be removed as a prevention before gluing the cockpit to the fuselage. The seat should be replaced with something better, but if the seat included in the box is used, this has a small sink on the base to fill.
The clear canopy is separated into two pieces that are not very thin, although they offer a well-defined frame and the possibility of showing the sparse interior.
The fuselage contains the airspeed indicator and the nose VHF antenna fin in one half and has the forward section of the side air intakes separated. Panels are finely engraved and well defined. Surface detail shows the small nose fins as well as the tiny engine and nozzle cooling inlets and outlets. The two larger intakes are separated but not hollowed. The main intakes are separated into two pieces, with the half-cone body in one of them complemented by the outer part of the intake, which has thin edges and is finely engraved on the outside. These pieces show molded-on canard roots. The canard fins are thin and are inserted into open slots in the intakes.
Before gluing the fuselage halves together, it is advisable to add some ballast to the nose, a detail not shown in the instructions, as mentioned, and to attach the nozzle. This comes in a simple piece, detailed on the inside and with passable definition on the flaps.
The wings are separated into three pieces. The two upper ones are attached to the fuselage, and the lower one, which contains the fuselage belly, is embedded on the upper pieces. Engraved surface detail is overall fine, but there is a mistake in the position of the airbrakes, which are strangely located outboard on the wings and also incorrectly aligned. Someone must have gone fishing when reproducing them. The dog-teeth on the wing leading edges are too large and protruding, while the wingtip lights are finely engraved.
The upper halves contain the ailerons and elevons with their jacks molded partly on them and partly on the lower wing halves. The pieces also include the bottom of the wells with some raised hydraulic and electrical wiring, plus some slight pin marks that should be covered, though they may not be quite evident.
The lower half contains nice engraved panels, including the gun troughs, partially visible cannon muzzles, and the ammo chutes. The rear fuselage shows the tail bumper molded in the piece. The wells don’t seem very deep for the scale, though they are passable, in my opinion.
The underwing load is sparse and consists of a centerline tank and two air-to-air missiles. The tank is cut into halves with the pylon apart. The missiles, similar to the Shafrir 2 but without detail on the warhead, come in one piece with the pylons also separated.
The vertical fin is molded with the right fuselage half. The forward fin root fairing has an intake that is not hollowed. The fin shows the navigation lights and rudder actuator, but lacks the small ECM antenna. The fin base has both the brake parachute door and the exhaust nozzle shroud included.
The front wheel well has no detail inside. The leg, retraction jack, fork, and wheel all come together in a single piece that shows some seam lines. The leg and jack show decent, but unremarkable, detail. The landing lights are supplied separately in a non-clear piece. The well cover is divided into three pieces with some raised detail on the inside.
The main gear covers come in a single piece, the ends of which are trimmed to obtain the leg doors. The inner sides of the covers show engraved detail. The legs are not exceptional, but rather simple, with well-defined torque scissor links. The tires have slight seam lines and two small negative marks on the inner side that are a bit difficult to fill, but the rims have acceptable definition.
The decal sheet is printed by Zanchetti, a regular Italeri’s partner. The sheet includes Israeli roundels, the instrument panel, harnesses, squadron badges, wing yellow markings, and numerous stencils to give the model a more realistic appearance. Decals have a thin, glossy appearance, are sharply printed and have good color saturation. There is no surplus carrier.
The instructions come in a folded, 10-page A5 leaflet printed in black and white containing a historical summary about the aircraft in several languages, a numbered parts plan, a color list with matches in Federal Standard codes and Italeri acrylics, four assembly steps, and five pages of profiles, one of which is for setting the stencils. The back of the box offers three color profiles as a guide for painting.
Paint finishes have been sensibly chosen, offering different schemes and attractive color combinations as used by the Israeli Air Force in the 1970s and 1980s.
Conclusion
The kit will not pose many construction problems for the modeler who only intends to build it from a box. However, those who wish to refine detail further will find it scanty, especially inside the cockpit. Some mistakes are difficult to mend, such as the incorrectly positioned airbrakes and the oversized wing dog-teeth, and the modeler will have to live with them.
In my opinion, there are two clear assets in this release. The first is that the panels are engraved, which is quite a difference compared to the alternative Hasegawa kit, and the second is the varied and attractive paint finishes, enhanced by a more extensive decal sheet than in previous boxings of this kit.◊
Publicado – Published: 9 / 2025
©www.jmodels.net

Debe estar conectado para enviar un comentario.