

De un vistazo – Quick look
MATERIAL Y PIEZAS
MEDIA & PARTS:
- Plástico inyectado (33 piezas), plástico transparente (4 piezas).
- Injected plastic (33 parts), clear plastic (4 parts).
CALCAS – DECALS:
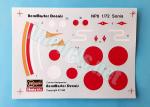
- Impresas por AeroMaster Decals. Incluye hinomarus, insignias de unidad y bandas del fuselaje. Aspecto mate y apariencia fina. Saturadas de color, sin exceso de soporte. Bien impresas.
- Printed by Aeromaster Decals. The sheet contains hinomarus, unit markings and fuselage stripes. Matt finish and apparently thin. Color-saturated without excess of carrier film. Well printed.
OPCIONES – OPTIONS:
- Mitsubishi Ki-51. 1er Chutai. 10º Sentai. Nueva Guinea, 1944.
- Mitsubishi Ki-51. 44º Sentai. China, 1940-41.
- Mitsubishi Ki-51. 1st Company, 10th Flight Regiment. New Guinea, 1944.
- Mitsubishi Ki-51. 44th Flight Regiment. China, 1940-41.
INSTRUCCIONES – INSTRUCTIONS:
- Folleto doblado formando 6 páginas impresas en blanco y negro. Contiene breve resumen histórico y técnico sobre el avión, 8 secuencias de montaje, un plano numerado de piezas y una lista de pinturas con correspondencias en pinturas de Gunze Sangyo. Claras.
- 6-page folded leaflet printed in black and white. It contains a short historical and technical summary about the aircraf, 8 assembly stages, a numbered parts plan and a list of colors with matches in Gunze Sangyo paints. Clear.
LO MEJOR – THE BEST:
- Montaje sencillo. Carlinga detallada. Calcas.
- Easy build. Detailed cockpit. Decals.
LO PEOR – THE WORST:
- Algunos detalles muy simplificados. Ruedas.
- Some simplified detail. Wheels.
VALORACIÓN – CONCLUSION:
- Continúa siendo una buena pieza para los aficionados a la aviación japonesa. Es simple de montar, aunque necesita algunas mejoras precisamente por este motivo.
- Still a nice kit for Japanese aviation fans. Construction looks straightforward but, due to simplified detail, it needs some improvements.

La maqueta
Hasegawa heredó el molde de este Ki-51, junto con algunos más muy conocidos en esta escala, como el Ki-15, Ki-27 o el Nakajima B5N, de la desaparecida marca nipona Mania en los años 70. Durante los años 90 Hasegawa incluyó calcas de Aeromaster en ciertas ediciones, como en este Sonia y también en el Ki-15, hecho que no se ha vuelto a repetir desde entonces y que les da cierta singularidad. Otras maquetas del fabricante que también llevaron estas calcas, aunque no tienen relación con Mania, son el Ki-43 Hayabusa, Ki-44 Shoki y Ki-84 Hayate. En los últimos tiempos el Sonia nos ha llegado con otras maquetas dentro de la caja. Así, en la última de este mismo año lo vemos junto al Toyota Starter Truck.
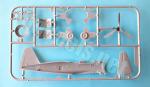
La caja contiene tres bastidores de piezas grises, un bastidor transparente, las instrucciones y un juego de calcas de AeroMaster Decals en su propia bolsa con cierre hermético. Las piezas están bien moldeadas y no tienen rebabas ni deformaciones. Hay marcas de eyector tenues y poco visibles en el interior de la carlinga que serán fáciles de eliminar. Los paneles están grabados, como de costumbre, con finura y acierto.
Como en otras maquetas, el despiece es bastante sencillo y en principio sólo el encaje entre las alas y el fuselaje así como la apertura de las ventanas del puesto trasero y bajo las alas podrían dar algún problema durante el montaje.
El Ki-51 era un avión polivalente, que el Ejército japonés empleaba tanto como bombardero de primera línea en misiones de apoyo a tierra como para el reconocimiento fotográfico. Aunque en principio se intentó diseñar una versión distinta para cada una de estas misiones, finalmente se decidió fabricar una sola, siendo las unidades destacadas en el frente las que emplearían el avión con cámaras o bombas según el caso. Hasegawa parece haber mezclado ambas versiones en esta maqueta, que posee tanto la cámara fotográfica como 12 bombas de 15 kilos bajo las alas.
Carlinga
Los lados del fuselaje carecen de detalle estructural y las ventanillas del puesto trasero están marcadas en el plástico para que sea más fácil abrirlas. Los cristales se proporcionan en piezas transparentes un poco gruesas, pero no es mucho lo que se va a ver de ellas por dentro. En el lado derecho también tenemos un estante con los cargadores de la ametralladora de popa.
El suelo es común para los dos puestos y tiene en su centro el hueco de la ventanilla ventral de observación. Los lados y la parte trasera del suelo llevan varios instrumentos simulados en forma de pequeños cubos, lo que al menos rellena la carlinga de alguna forma. El puesto delantero contiene un buen panel con los indicadores en relieve, la palanca de control y el respaldo del asiento del piloto. Los pedales están moldeados sobre el suelo. El trasero, además del asiento sobre el suelo, y un panel parecido al anterior, contiene una cámara fotográfica sin mucho detalle y la ametralladora, que es bastante simplona y está unida al soporte semicircular.
Ya unidas las mitades del fuselaje hay que incluir el reposacabezas del piloto sobre la zona que divide los dos puestos y la mira. Para poder pegarla, el parabrisas muestra una ranura demasiado grande e irreal. La cubierta es de una pieza no demasiado gruesa con el relieve de la estructura bien detallado. La sección trasera aparece abierta para situar la ametralladora. Sobre el techo va colocado el mástil de la antena.
En general, se puede decir que la carlinga viene detallada aunque no es del todo correcta y algunos detalles no están muy definidos.
Fuselaje y motor
Las mitades del fuselaje incluyen la deriva y el timón así como parte de las raíces alares, mientras que el motor viene separado. El panelado externo es bastante bueno.
El capó está separado en mitades más el anillo del carenado frontal y muestra paneles bien grabados en las aletas de refrigeración, aunque los filos son muy gruesos y deberían ser afinados. Por debajo cuenta con una toma de refrigeración abierta. Por detrás del capó aparecen los escapes, moldeados con el fuselaje, aunque son un poco cortos.
El motor incluye ambas coronas, con detalle aceptable en los cilindros y un cilindro frontal fino y separado. Va pegado sobre una pieza circular que cierra el hueco delantero del fuselaje. La hélice es fina y carece de rebabas, pero desafortunadamente está unida al buje y esto le quita cierto realismo. El buje contiene el trinquete de arranque.
Alas y cola
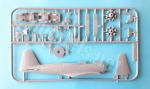
Las alas son finas y están despiezadas en tres partes. Los paneles están bien grabados y tienen más anchura en las superficies móviles, que poseen las aletas bien moldeadas. Los faros de aterrizaje y las luces de navegación están bien marcados aunque no tienen piezas transparentes para reproducirlas. También están bien marcados los paneles ranurados de los extremos de las alas. Los bordes de ataque poseen huecos para insertar las ametralladoras y el tubo Pitot.
La cara inferior muestra el hueco del panel de observación, que debe taladrarse, así como los huecos para insertar las carenas de las patas. Hay dos soportes suplementarios para pegar las pequeñas bombas de 15 kg, que vienen separadas en grupos de tres, pero no tienen mucha definición.
Como he señalado, la deriva está moldeada con el fuselaje y los estabilizadores son piezas separadas con lengüetas para fijarlos al fuselaje. Los paneles están grabados lo mismo que en las alas, e igualmente muestran buena definición en las superficies de control.
Tren de aterrizaje
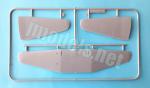
Las carenas de las ruedas están separadas en mitades con las ruedas moldeadas sobre la mitad interna de ellas. Este es uno de los detalles más simplones de la maqueta, que habría ganado bastante si las ruedas estuviesen separadas. Las carenas están bien paneladas y se insertan en los huecos de la mitad inferior de las alas. La rueda de cola está moldeada con la pata.
Calcas
Están impresas por AeroMaster Decals e incluye una hoja separada con perfiles para pintar dos versiones del avión. La hoja muestra hinomarus, insignias de unidad y bandas de color del fuselaje que tienen aspecto mate y apariencia fina. Los motivos están bien saturados de color y no poseen exceso de soporte.
Instrucciones
Vienen en el acostumbrado folleto doblado formando seis páginas impresas en blanco y negro. Contiene un breve resumen histórico y técnico sobre el avión, ocho secuencias de montaje, un plano numerado de piezas y una lista de colores con correspondencias en pinturas de Gunze Sangyo. Las vistas explosionadas son claras.
La hoja separada de AeroMaster muestra dos opciones de pintura. Una representa un aparato empleado en China antes de la Guerra Mundial pintado en el usual gris claro de los aviones japoneses del periodo, pero muestra los extremos de las superficies superiores de las alas pintados de blanco, lo que no es nada corriente. La segunda alternativa es un avión ya más tardío pintado del mismo color pero con camuflaje disruptivo de líneas verdes sinuosas en las superficies superiores.
Valoración
Aunque en esta escala ya contamos con maquetas más recientes y mejor detalladas de este avión, como la de Clear Prop, la de Hasegawa seguramente será más fácil de montar y aún tiene posibilidades si se mejoran algunos detalles que la simplifican demasiado en ciertas zonas como la carlinga, la hélice o el tren de aterrizaje.
La dificultad de la maqueta me parece baja y adecuada para modelistas de cualquier nivel de experiencia, especialmente si son seguidores de la aviación japonesa.◊


The kit
Hasegawa inherited their Ki-51, along with some other well-known kits in this scale, such as the Ki-15, Ki-27 or the Nakajima B5N, from the late Japanese brand Mania in the 1970s. During the 1990s Hasegawa included Aeromaster decals in some releases, such as in this Sonia and also in their Ki-15, a fact that has not been repeated since then and gives those boxes a certain singularity. Other Hasegawa kits, but not related to Mania, also had these decals, such as the Ki-43 Hayabusa, the Ki-44 Shoki and the Ki-84 Hayate. In recent times the Sonia has has been reboxed with other kits. The latest release, for example, comes with the elderly Toyota Starter Truck.
The box contains three frames of gray parts, a clear frame, the instructions and a decal sheet from AeroMaster Decals in their own zip-lock bag. Parts are well molded and have no blemishes or flash. There are shallow ejector marks on the cockpit sides that will be easy to clean up. Panel lines are engraved, as usual, with finesse and success.
As in other kits, parts breakup is quite simple and as far as one can guess only the fit between the wings and fuselage as well as the opening of the windows in the rear cockpit and under the wings could be troublesome during assembly.
The Ki-51 was a multipurpose aircraft the Japanese Army used both as a front-line bomber for ground support missions and for photo reconnaissance. Although an early attempt was made to design a different version for each of these roles, it was finally decided to manufacture only one, with the frontline units providing the aircraft with either cameras or bombs according to mission. Hasegawa seems to have mixed both versions in this kit, which includes both the camera and twelve 15kg bombs under the wings.
Cockpit
The fuselage sides lack the structural detail and the rear fuselage windows are engraved in the plastic to make them easier to open. The panels are provided in a bit thick clear pieces, but they will be hardly seen from outside. On the right side we also have a rack with a few magazines for the aft machine gun.
The floor is common for both cockpits and has the ventral observation window engraved to be easily cut out. The sides and rear of the floor have several simulated instruments in the shape of small cubes molded on the piece. These at least fill out the cockpit somehow. The forward cockpit contains a good instrument panel with raised gadgets, a control lever and the backrest of the pilot’s seat. The pedals are also molded on the floor. The aft cockpit includes, in addition to the seat rendered on the floor, a similar instrument panel, a camera without much detail and the machine-gun, which is quite simple and attached to the ring mount.
Once the fuselage halves are joined, the pilot’s headrest is attached on the panel separating the two cockpits. To glue the sight, the windshield shows a slot that is too large and unrealistic. The canopy comes in one piece that is not too thick and shows nice raised structural detail. The rear sliding section is open to place the machine-gun. The canopy is detailed with a thin antenna mast on top.
In general, I think the cockpit looks stuffed but with some details missing or not accurately rendered.
Fuselage and engine
The fuselage halves include the vertical stabilizer and rudder as well as part of the wing roots, while the engine comes separately. External panels are nicely engraved.
The cowling is separated in halves plus the front fairing ring and shows well-engraved lines on the cooling gills. These gills thick and should be thinned to look more realistic. The cowling has an open cooling intake below. The exhausts are molded with the fuselage sides just behind the cowling and look a bit short.
The engine includes both rows, with acceptable detail on the cylinders and a thin, separate front ring. The engine is glued on a circular piece that closes the fuselage front gap. The propeller is thin and free from flash, but unfortunately it is attached to the hub, which looks simplistic. The hub is molded with the starter dog.
Wings and tail
The wings are thin and divided into three parts with two separate upper surfaces. Panels are well engraved and have more width on the moveable surfaces, which have defined trim tabs. The landing and navigation lights are coorectly engraved although they are not rendered as clear parts. The outboard grooved panels are also nicely reproduced. The leading edges have holes to insert the machine-guns and the Pitot tube.
The underside shows a recess to open the observation window, which is a clear piece, as well as the gaps to insert the wheel spats. There are two additional underwing panels to attach the small 15kg bombs, which come separated in groups of three, but they don’t have much definition.
As noted, the fin is molded with the fuselage and the stabilizers are separate pieces with tabs for fuselage attachment. Panels are similar to those on the wings, and also show good definition on the control surfaces.
Undercarriage
Wheel spats are separated in halves with the wheels molded onto the inner half. This is one of the most oversimplified details of the kit, which would have gained a lot if the wheels were separate. The spats also show engraved lines and are inserted into the gaps on the lower wing halves. The tailwheel is one piece molded with the leg.
Decals
As said, decals are printed by AeroMaster Decals. The set includes a separate sheet with profiles for painting two versions of the aircraft. The sheet shows hinomarus, unit markings and color stripes for the fuselage that have a matte and fine appearance. Decals are well saturated with color and do not have too much carrier film.
Instructions
They come in the usual 6-page folded leaflet printed in black and white. It contains a brief historical and technical summary of the aircraft, eight assembly sequences, a numbered parts plan and a list of colors with matches in Gunze Sangyo paints. The exploded views are quite clear.
The separate AeroMaster sheet shows two paint choices. One depicts an aircraft used in China before the World War painted in the usual Japanese light gray of the period, but shows the outboard wing upper panels in white, which is not common. The second alternative is for a later aircraft painted in the same overall color with disruptive camouflage of green lines on the upper surfaces.
Conclusion
Though we already have new and much better kits of the Ki-51 released by Clear Prop in this scale, I’m sure they are not as easy to build as this one, which still has a say if some details that simplify it too much are refined or improved, as in the case of the cockpit, propeller or landing gear.
The kit looks like a suitable build for modellers of any level of experience, especially if they are Japanese aviation fans.◊
Publicado – Published: 11 / 2023
©www.jmodels.net

Debe estar conectado para enviar un comentario.