
De un vistazo – Quick look
MATERIAL Y PIEZAS
MEDIA & PARTS:
- Plástico inyectado (59 piezas), acetato (4 piezas).
- Injected plastic (59 parts), acetate (4 parts).
CALCAS – DECALS:
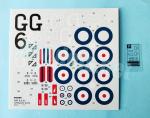
- Escarapelas británicas de varios tamaños y diseño, matrículas, marcas de cola, fuselaje y alas. Apariencia fina y brillante, muy poco exceso de soporte y buena saturación.
- British roundels in several sizes and designs, registers, tail, fuselage and wing markings. Apparently thin with glossy finish, very little surplus carrier film and good saturation.
OPCIONES – OPTIONS:
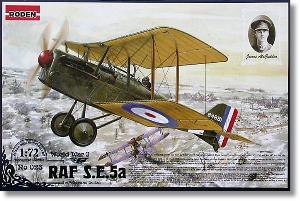
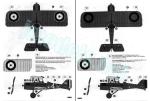
- RAF S.E.5a D3511 (Vickers-built). No. 40 Squadron RFC. Aircraft flown by Squadron Commander Major R. S. Dallas (DSO, DSC). Lille (France), May 1918.
- RAF S.E.5a B139 (Martinsyde-built). No. 111 Squadron RFC. Palestine, January 1918.
- RAF S.E.5a D’351/”4” (Vickers-built). No. 6 (Training) Squadron. Australian Flying Corps. Minchinhampton, late 1918.
- RAF S.E.5a D5995/”1” (Vickers-built). No. 143 (Home Defence) Squadron RFC. Aircraft flown by Lt. L. Lucas. London Air Defence. April/May 1918.
- RAF S.E.5a B507/”A” (Vickers-built). No. 60 Squadron RFC. Aircraft flown by Second Lt. J. J. Fitzgerald. France, October 1917.
- RAF S.E.5a B4890/”C” (RAF-built). No. 56 Squadron RFC. Aircraft flown by Second Lt. A. Dodds. France, November 1917.
- RAF S.E.5a C9626 (Vickers-built). No. 32 Squadron RFC. Aircraft flown by Capt. S. P. Simpson. France, May 1918.
- RAF S.E.5a B4863/”G” (RAF-built). No. 56 Squadron RFC. Capt. J. T. B. McCudden. France, September 1917.
INSTRUCCIONES – INSTRUCTIONS:
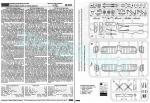
- Folleto A5 de 12 páginas impreso en blanco y negro. Contiene un sumario histórico sobre el avión, un plano numerado de piezas, 15 pasos de montaje, una lista de colores con equivalencias de esmaltes de Humbrol y 6 páginas de perfiles. La cara posterior de la caja muestra perfiles de una opción de acabado adicional y referencias de Humbrol en color.
- 12-page A5 booklet printed in black and white. It contains a historical summary about the aircraft, a numbered parts layout, 15 construction chapters, a list of colors with matches in Humbrol enamel paints and 6 pages of profiles. The back side of the box shows profiles of an additional finish and Humbrol paints in color.
LO MEJOR – THE BEST:
- Buen detalle general. Múltiples opciones de montaje y pintura.
- Nicely detailed. Plenty of possibilities to build and paint the model.
LO PEOR – THE WORST:
- Montaje profuso en la parte anterior del fuselaje y motor que requiere experiencia.
- Busy front fuselage and engine assembly that needs experiece.
VALORACIÓN – CONCLUSION:
- A Roden le ha aprovechado su buen estudio del avión y por ello su maqueta debe ser la mejor en esta escala. Además, tiene múltiples opciones de montaje que plasman varios aviones muy representativos de este modelo con motor Hispano Suiza. Muy recomendable, excepto a principiantes.
- Roden has taken advantage of their extensive study of the aircraft and the kit must therefore be the best in this scale. Also, it has multiple assembly options that capture several highly representative aircraft of this model with Hispano Suiza engine. Highly recommended, except for beginners.

La maqueta
Varios fabricantes se han ocupado a lo largo de muchas décadas de este conocido avión británico de la Gran Guerra. De ellos, la maqueta más accesible fue tal vez la de Revell, que actualmente lleva años sin reeditarse. Roden sacó sus dos maquetas a inicios de este siglo y desde entonces no ha hecho cambios de notar. Las dos ediciones representan el avión con el motor Wolseley Viper y el Hispano Suiza respectivamente.
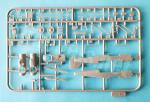
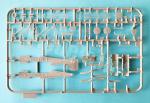
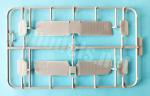
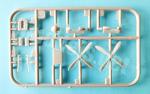
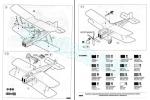
La maqueta comprende tres bastidores, una pequeña lámina de acetato, la hoja de calcas y las instrucciones. Dos de los bastidores (A y B) son idénticos en las dos maquetas de Roden y el tercero (C en esta maqueta y D en la del motor Viper), de menor tamaño, es específico para cada una de ellas. En este caso contiene dos tipos de hélices cuatripalas, la cubierta del motor, el buje de la hélice, el radiador, el motor y los escapes.
Las piezas tienen un buen moldeado, limpio en general, con ligeras rebabas en algunos bordes de las alas y dos marcas positivas pequeñas a los lados de la carlinga sin afectar al detalle.
Roden proporciona hasta nueve posibilidades para acabar la maqueta y según cada una de ellas el montaje tiene opciones en los estabilizadores, la hélice, la cubierta delantera del fuselaje, el parabrisas, los soportes de las ruedas, los escapes y un soporte con varias bombas Cooper de 25 libras. Estas opciones están relacionadas con los diversos acabados que le dieron a este famoso caza sus distintos fabricantes: Martinsyde, Vickers o la propia Royal Aircraft Factory. Con tantas opciones, el modelista puede realmente hacerse esta maqueta casi “a medida” y este es uno de los grandes activos de la caja.
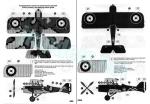
Las versiones de pintura ofrecen también varias alternativas, excepto en el color de las superficies inferiores. Hay una opción con camuflaje tricolor, otra pintada de tierra oscura mate situada en Palestina en 1918 y las demás llevan el verde más común empleado por el Royal Flying Corps.
Revisión
Los lados del fuselaje a la altura de la carlinga tienen algunos paneles en relieve y dos marcas pequeñas que eliminar, aunque seguramente no se aprecien tras cerrar el fuselaje. La carlinga está repartida entre la superficie plana de las mitades del fuselaje y la superficie central que une los planos inferiores. Como la sección del fuselaje situada sobre la carlinga y por delante de ella viene separada, parece mejor colocar el asiento y la palanca de mandos una vez unidas las mitades del fuselaje. Ignoro si el asiento es correcto, aunque es el mismo que Eduard le ha puesto a su maqueta en la escala 1/48. Los pedales, bien definidos, y un panel enmaderado van colocados entre las alas. El panel de instrumentos, sin detalle ni calca, se pega sobre un soporte horizontal de forma semicircular dentro de la cubierta de la carlinga. En su lado derecho hay una pequeña pieza separada que parece pertenecer a la ametralladora Vickers.
Hay hasta tres piezas que reproducen la cubierta del fuselaje que tienen el perfil del hueco de acceso a la carlinga y el panel de alimentación de la ametralladora Vickers diferente. Según el avión concreto que queramos hacer, debemos escoger la cubierta que nos indican los perfiles de las instrucciones. Todas las piezas tienen idéntico detalle en los soportes del parabrisas, la salida de los casquillos de la ametralladora, la tronera y el cañón de la ametralladora separado colocado sobre ella, la mira, una diminuta pieza de acetato colocada en el lado derecho para simular una pequeña ventana que iluminaba el panel y la mitad trasera de la ametralladora pegada por dentro de la salida de la cubierta. El parabrisas es de acetato y tiene tres modelos seleccionables del mismo modo que las piezas de la cubierta.
La cubierta del motor está separada en dos mitades con las tapas de los cilindros aparte también. El radiador cierra la cara delantera y tiene un detalle pasable. La pieza carece del tapón de llenado y está atravesada por el eje de la hélice. Este tiene un tope circular por detrás para poder colocar la hélice al final del montaje. Los escapes apropiados, cortos o muy largos, para cada avión, están indicados en las instrucciones. El panel inferior del capó es una pieza detallada con ranuras y pegada por delante de la parte central de los planos inferiores, que muestra el conducto semicircular de refrigeración del motor. La hélice dispone de cuatro tipos opcionales, dos bipalas y otros dos cuatripalas, todos ellos moldeados con finura y muy bien perfilados.
Sin duda una de las claves en la construcción de la maqueta es toda la parte anterior del fuselaje, que está bien detallada pero necesita de cierto tiento en el ensamblaje y alineación de varias piezas de pequeño tamaño.
Las mitades del fuselaje muestran un detalle simple, fino y delicado en la representación de las costuras del entelado. La deriva, el timón y el patín trasero aparecen unidos a la mitad izquierda del fuselaje. El relieve de las estructuras verticales es muy sutil y el timón está bien grabado. También es visible el estribo moldeado en el fuselaje. El reposacabezas del piloto y su carenado vienen en una pieza separada.
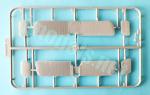
Los planos de las alas son de una pieza cada uno. Algunos bordes tienen rebabas muy leves y sencillas de limpiar. El plano superior está fabricado con diedro. La simulación del entelado es tenue pero convincente. Los alerones están bien grabados en las dos alas. Los soportes son finos y tienen puntos de unión en todos los lugares necesarios, incluidos los centrales del fuselaje.
El montaje Foster consta de dos piezas, una para el raíl de soporte y otra es la ametralladora Lewis con su tambor de munición aparte. El arma es fina y muestra muy buen detalle para su tamaño. Una de las opciones de acabado lleva un soporte con bombas Cooper de 25 libras bajo el fuselaje. Los artefactos están bien representados.
Los planos de cola tienen dos opciones a elegir según el avión. Los dos tipos se diferencian en la anchura, pero en todos la estructura está reproducida con sutileza y los timones están grabados correctamente.
El tren de aterrizaje posee dos alternativas según el avión. Cada tipo se diferencia en la forma de los soportes, mientras que las ruedas y el eje entre ellas son los mismos. Las ruedas tienen un detalle notable y muestran el neumático con nitidez, las tapas de las llantas de radios y el hueco de la válvula de llenado.
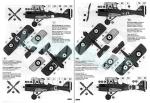
La hoja de calcas está bien impresa. Contiene escarapelas británicas de varios tamaños y diseño así como matrículas, marcas de cola, del fuselaje y las alas de apariencia fina y brillante, muy poco exceso de soporte y buena saturación.
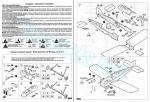
Las instrucciones consisten en un folleto de formato A5 de 12 páginas impreso en blanco y negro que contiene un sumario histórico sobre el avión, un plano numerado de piezas, 15 pasos de montaje, una lista de colores con equivalencias de esmaltes de Humbrol y seis páginas de perfiles. La cara posterior de la caja muestra en color perfiles de una opción de acabado adicional y referencias de Humbrol.
La secuencia de montaje es bastante clara y precisa por lo general, salvo en el montaje del panel de instrumentos. Las opciones están correctamente explicitadas y deben compararse con los perfiles concretos del avión que queramos reproducir para no cometer errores. Cada perfil nos informa del tipo de cubierta, hélice, tren de aterrizaje, parabrisas y demás elementos opcionales imprescindibles para plasmar cada avión concreto. Lo único que se echa de menos es un diagrama para montar los tensores de las alas.
Los acabados de pintura comprenden varios aviones muy conocidos en imágenes de época o por haber pertenecido a ases del momento, como J. T. B. McCudden o el australiano R. S. Dallas.
Valoración
Tal vez la de Roden sea por el momento la mejor maqueta de este caza famoso en la escala 1/72. No hay duda que el fabricante lo estudió a fondo antes de hacer sus maquetas y el resultado no podía concluir de manera mejor.
A mi juicio, los dos activos principales de esta edición son el detalle bien conseguido en general sumado a la importante cantidad de alternativas de construcción y pintura, que permiten reproducir muchas variaciones en los elementos incorporadas por diferentes fabricantes.
Además del montaje de las alas, como en cualquier biplano, en este caso la parte delantera del fuselaje y el motor también parecen necesitar cierta destreza para pegar las múltiples piezas que los componen. Por esto me parece que la maqueta no está indicada para modelistas novatos o con muy pocos biplanos en el zurrón.◊

The kit
Several brands have released this well-known British aircraft over the years. Perhaps Revell’s was the most available kit, but has not been reissued for years. Roden released two new-tool kits at the beginning of this century and the company has made no significant changes since. The boxings depict the aircraft with the Wolseley Viper and the Hispano Suiza engine, respectively.
The kit comprises three sprues, a small acetate sheet, the decal sheet, and the instructions. Two of the sprues (A and B) are identical in both kits, and the third (C in this box and D in the Viper engine counterpart), which is smaller, is specific to each one. In this case, sprue C contains two types of four-bladed propellers, the engine cowling, the propeller hub, the radiator, the engine, and the exhausts.
Parts are well molded and generally clean, with little flash on some wing edges and two small positive marks on the cockpit sides without affecting detail.
Roden provides up to nine finish options and these include alternative pieces for the stabilizers, propeller, the front fuselage decking, the windscreen, the undercarriage, the exhausts, and a rack for 25lb Cooper bombs. These options relate to the different finishes that several manufacturers, such as Martinsyde, Vickers, or Royal Aircraft Factory, gave to the fighter during production. With so many choices, the modeler can truly build his model «tailor-made». In my opinion, this is one of the great assets of the kit.
Paint finishes also provide several alternatives, except for the color of the lower surfaces. There is one option with a three-color camouflage, another one used in Palestine in 1918 sported a matte dark earth color, and the rest are painted the standard green used by the Royal Flying Corps.
Review
The cockpit walls have some raised panels and two small pin marks, but they will probably not be visible after the fuselage is closed. The cockpit comprise the flat bottom surface of the fuselage halves and the mid lower wing surface. Since the fuselage decking is separate, it seems best to install the seat and control column once the fuselage halves are joined. I don’t know if the seat is correct, although it looks the same Eduard include in their 1/48 kit. The well-defined pedals and a wooden panel are placed on the mid-lower wing. The instrument panel, without detail or decals, is glued on a semicircular horizontal piece inside the front deck. On the right side, there is a small separate piece that seems to belong to the Vickers machine gun. There are up to three pieces reproducing the fuselage deck, each with a different profile for the cockpit access and the Vickers machine gun feed panel. Depending on the specific aircraft we want to build, we can choose the piece indicated in the instructions. All the pieces have identical detail on the windshield base, the machine gun ammo chute, the gun trough and the separate machine gun barrel, the sight, a tiny acetate piece added on the right side to simulate a small window that illuminated the instrument panel, and the rear half of the machine gun glued behind the gun trough. The windshield is made of acetate and has three alternative pieces, just like the deck pieces.
The engine cowling is separated in two halves, with the cylinder covers also apart. The radiator closes the front side and has passable detail. This piece lacks the filler cap and the propeller shaft is inserted through it with a round back plate allowing to attach the propeller at the end of assembly. The appropriate exhausts, either short or very long, for each aircraft are indicated in the instructions. The lower cowling panel is a detailed, slotted piece glued forward of the mid lower wings showing the semicircular engine cooling duct. The propeller comes in four optional types: two two-bladed and two four-bladed pieces, all finely molded and very thin.
Unquestionably, one of the key aspects of construction is the forward fuselage, which is well detailed but needs some care in the assembly and alignment of several small parts.
The fuselage halves show simple, fine, and delicate detail in the rendition of the fabric seams. The fin, rudder, and tail skid are molded on the left fuselage piece. Raised detail on the fin and rudder is very subtle, and the rudder is cleanly engraved. The side access step is also visible. The pilot’s headrest and fairing are provided as a separate piece.
The wings are provided as a single piece each. Some edges have very slight flash easy to clean. The upper wing is molded with the dihedral. Fabric rendition is subtle but convincing. The ailerons are well engraved on both wings. The wing and cabane struts are thin and have clear attachment points drilled on the fuselage and wings.
The Foster mounting consists of two pieces: one for the rail and the other for the Lewis gun with a separate ammo drum. The weapon is fine and shows very good detail for its size. One of the finish options includes a rack for 25lb Cooper bombs under the fuselage. The bombs look quite realistic.
The tailplanes have two options depending on the aircraft. The two types differ in width, but all have a subtly reproduced structure and the elevators are well engraved.
The landing gear has two alternatives depending on the aircraft. Each type differs in the shape of the struts, while the wheels and the axle between them are the same. The wheels have remarkable detail and clearly show the tire, the spoked rim caps, and the tire valve.
The decal sheet is well printed. It contains British roundels of various sizes and types as well as registrations, tail, fuselage and wing markings with a fine and glossy appearance, very little excess carrier and good saturation.
The instructions consist of a 12-page A5 booklet printed in black and white containing a historical summary of the aircraft, a numbered parts diagram, 15 assembly steps, a color list with Humbrol enamel equivalents, and six pages of profiles. The back of the box shows color profiles of an additional finish option and Humbrol references.
The assembly sequence is generally quite clear and precise, except for the assembly of the instrument panel. The options are clearly explained and should be compared with the specific profiles of the aircraft we wish to build. Each profile lists the type of fuselage decking, propeller, landing gear, windshield, and other essential elements to capture each specific aircraft. The only thing one misses is a rigging diagram.
Paint finishes include several aircraft well known from WWI images or from those belonging to contemporary aces, such as J. T. B. McCudden or the Australian R. S. Dallas.
Conclusion
Roden’s is perhaps the best kit of this famous fighter in the 1/72 scale so far. There’s no doubt that the manufacturer studied the aircraft thoroughly before releasing the kits, and the result couldn’t have been better.
In my opinion, the two main assets of this box are the overall nice detail plus the significant number of construction and painting alternatives, which cater for the many variations made by different manufacturers.
In addition to the wing assembly, as with any biplane, the front fuselage and the engine also need some skill to fit the small parts and this does not make the kit very suitable for beginners.◊
Publicado – Published: 9 / 2025
©www.jmodels.net

Debe estar conectado para enviar un comentario.