
De un vistazo – Quick look
MATERIAL Y PIEZAS
MEDIA & PARTS:
- Plástico inyectado (51 piezas), plástico transparente (2 piezas). Incluye 2 figuras.
- Injected plastic (51 parts), clear plastic (2 parts). Two figures included.
CALCAS – DECALS:
- Dos tipos de escarapelas británicas y marcas de cola, numerales e indicadores del panel de instrumentos. Aspecto fino y brillante, buen registro y saturación de color. Sin exceso de soporte.
- Two types of British roundels and tail markings, registers and gauges for the instrument panel. Thin and glossy appearance with good register and color saturation. No excess of carrier film.
OPCIONES – OPTIONS:
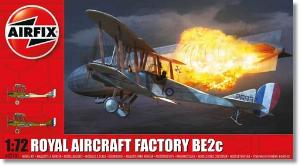
- Royal Aircraft Factory BE2c. Real Cuerpo Aéreo. Escuadrilla N.º 39 (HD). Sutton’s Farm (Inglaterra). 2-3 de septiembre de 1916. Aparato pilotado por el Tte. William Leefe Robinson (Cruz Victoria).
- Royal Aircraft Factory BE2c. Real Escuadrilla Aérea Naval East Fortune. Lothian Oriental (Escocia). Diciembre de 1916.
- Royal Aircraft Factory BE2c. Royal Flying Corp. No. 39 (HD) Squadron. Sutton’s Farm (England). September 2nd and 3rd, 1916. Aircraft flown by Lt. William Leefe Robinson (VC).
- Royal Aircraft Factory BE2c. Royal Naval Air Squadron East Fortune. East Lothian (Scotland). December 1916.
INSTRUCCIONES – INSTRUCTIONS:
- Folleto A4 de 12 páginas impreso en color. Contiene una breve historia del avión con datos técnicos, 26 secuencias de montaje, una hoja con perfiles para arriostrar el modelo y dos páginas de perfiles en color.
- 12-page A4 brochure printed in color. It contains a short history of the aircraft with technical data, 26 assembly sequences, a page of profiles to rig the model and two pages of profiles in color.
LO MEJOR – THE BEST:
- Con ciertas excepciones, buen detalle general. Incluye plantillas para montar las alas. Variedad en los acabados de pintura y calcas.
- With some exceptions, good overall detail. Jigs to build the wings included. Variety in paint finishes and markings.
LO PEOR – THE WORST:
- Detalle poco acertado en el fuselaje.
- Lack of fuselage detail.
VALORACIÓN – CONCLUSION:
- Maqueta con altibajos que no impiden lograr un modelo bastante decente de este avión. El montaje más sencillo de las alas la hacen factible también a los menos experimentados.
- A kit with a few highs and lows that will not hinder to get a nice model of this aircraft. Wing assembly being easier, it should be a nice try for the less experienced in biplanes.

La maqueta
Esta es la primera maqueta del molde nuevo que Airfix lanzó en 2016. Posteriormente ha tenido reediciones, tanto en solitario como en la serie denominada Dogfight Doubles acompañado del también nuevo Fokker E.II Eindecker, este último objeto de otra revisión en esta web.
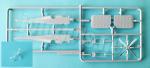
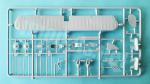
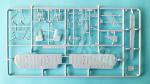
La caja contiene tres bastidores de piezas, un pequeño bastidor transparente, la hoja de calcas y las instrucciones. Como de costumbre, esta últimas vienen sueltas sin protección. El plástico está bien moldeado, carece de rebabas y las marcas negativas presentes en la carlinga no parece que se vayan a apreciar debido a su estrechez. Sólo hay nódulos del eyector en las figuras y la ametralladora.
Para los que usualmente hagan maquetas de Airfix, esta edición no les parecerá particularmente novedosa salvo por la inclusión de dos piezas que emplearemos como plantillas para situar correctamente los soportes de las alas. Además de esto, las opciones de montaje incluyen la posibilidad de emplear cohetes Le Prieur en los soportes externos de las alas y también la adición de una ametralladora Lewis en la carlinga del piloto.
El modelo representado en esta maqueta es un B.E.2c de producción estándar dotado con un motor RAF 1a de 8 cilindros y una característica muesca en el plano superior central. Los primeros ejemplares de este avión, que fue desplegado durante 1915 en Francia, llevaban un motor Renault con escapes diferentes, carecían de la abertura superior en las alas e incluso llevaban patines en el tren de aterrizaje.
Carlinga
Los lados internos del fuselaje muestran apenas un par de líneas por todo relieve estructural. La carlinga está dispuesta sobre la parte inferior del fuselaje, que está separado en tres piezas. La carlinga delantera del observador consta de una base y un asiento de buenas formas. No hay palanca de control, ya que este avión tenía un único puesto de pilotaje a popa. El panel del observador está unido en una pieza a los dos soportes intermedios delanteros de las alas.
Tras el asiento del observador hay que situar una pieza que contiene los pedales del piloto más una segunda que muestra la abertura de separación entre los dos puestos unida a la palanca de control. El asiento del piloto es diferente al anterior y parece protegido por un panel en su respaldo. Como en el caso anterior, el panel del piloto, representado por tres indicadores de calca, está unido a los soportes intermedios traseros, que ajustan entre las mitades del fuselaje.
Los parabrisas son piezas transparentes de un grosor razonable para la escala y la ametralladora opcional viene de una pieza con el afuste instalado en la cubierta frontal del piloto. El afuste Foster no va instalado fijo sobre el plano superior como en otros aviones, sino es uno más simple para que el piloto pudiese disparar hacia arriba en posición sentada, como era el caso para intentar derribar un globo o dirigible. La pieza es fina y no carece de cierto detalle en el tambor de munición y la empuñadura, aunque necesita al menos una mira de fotograbado.
Las figuras de esta maqueta, idénticas ambas, no son tan desechables como en otras ocasiones y al menos las cabezas parecen mejor logradas. Visten traje de vuelo con gafas sobre el gorro. Lástima que las poses sean tan rígidas y poco naturales, detalles que aun en la escala pequeña son muy evidentes.
Fuselaje y motor
El despiece del fuselaje no es muy convencional y consta de dos mitades más una pieza ventral ajustada entre ellas. El fuselaje carece del capó motor y los planos de cola. Los lados apenas muestran algunos detalles. Uno de ellos parece un tubo Venturi y hay también un par de balancines para controlar los timones horizontales, pero son demasiados planos y poco realistas. Desgraciadamente Airfix ha dejado los lados de la parte posterior del fuselaje vacíos sin la característica costura del entelado, muy evidente en fotos del avión real. La textura del entelado también está ausente. La estructura de la carena por detrás del piloto apenas se nota porque es demasiado tenue.
El capó está separado en mitades con un panel entre ambas situado tras el motor. Las piezas presentan algunas líneas con pequeños remaches en relieve. El motor está separado de la misma forma que el capó, con cuatro cilindros por lado unidos a los largos tubos de escape, que tienen perfiles correctos y no están ahuecados. El detalle de los cilindros es mediano. Entre las mitades hay que colocar la tapa de balancines y la cubierta del capó, que tapará gran parte del detalle interno.
La hélice está bien moldeada y limpia de rebabas. El centro viene hueco para insertar el montaje del buje unido al eje, que va unido por detrás a un engranaje pequeño. Esta pieza va pegada a la parte delantera del motor y es factible colocarla incluso tras haber pintado la maqueta.
Alas y cola
Ambos planos vienen en una sola pieza. Los inferiores está unidos por dos vástagos encajados bajo el fuselaje. El grosor de las alas me parece un poquito grueso comparado con las alas tan livianas que se aprecian en las imágenes del BE2c y además el relieve de la estructura entelada, que no es malo, no parece corresponder con la uniformidad y estrechez del real. Los timones de ambos planos están finamente grabados.
Los soportes entre los planos están bien perfilados y durante el montaje contaremos con la ventaja de tener ya instalados los soportes intermedios que habremos pegado al montar la carlinga. El soporte intermedio trasero va unido al plano superior mediante una lengüeta insertada en el ala, detalle que puede dejarnos líneas que tapar. Para conseguir el ángulo correcto del decalaje positivo de las alas, Airfix ha incluido dos útiles plantillas, una por lado, que harán el montaje más sencillo y ágil. Los planos inferiores llevan dos finas piezas en forma de U para amortiguar golpes por balanceo en el aterrizaje dada la envergadura de las alas.
Las superficies de cola verticales tienen la deriva y el timón separados. Las piezas son finas y lisas. Las bisagras del timón son muy pequeñas, pero permiten colocarlo en posición no neutra. Los planos horizontales están unidos por vástagos y encajados en el puro de cola como las alas inferiores, aunque aquí tenemos una pequeña pieza triangular por debajo que tapa la unión.
Tren de aterrizaje
El tren principal es sencillo de montar al estar separado en dos mitades con parte de los soportes en V y el eje horizontal moldeado en las piezas. Las ruedas son de una pieza con los neumáticos y los tapacubos marcados por ambos lados, aunque estos últimos algo mejor por fuera que por dentro. El tren trasero está formado por un soporte y un patín.
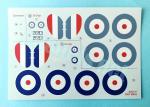
Calcas
La hoja incluye dos tipos de escarapelas británicas con variación en el color del anillo azul y el reborde blanco externo del avión basado en East Lothian, marcas de cola también de dos tipos, numerales e indicadores del panel de instrumentos, todas ellas con aspecto fino y brillante, buen registro y saturación de color. Carecen de exceso de soporte.
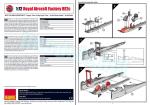
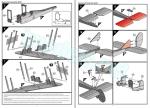
Instrucciones
Vienen en un folleto de tamaño A4 de 12 páginas impreso en color que contiene una breve historia del avión con datos técnicos, 26 secuencias de montaje, una hoja con perfiles para arriostrar el modelo paso a paso y dos páginas de perfiles en color.
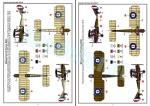
La variación de color de las dos libreas me parece suficiente y además las calcas ayudan también a marcar más la diferencia entre las dos opciones de pintura.
Una de las opciones corresponde al avión del Tte. William Leefe Robinson, primer piloto británico que derribó un dirigible alemán, el Schütte-Lanz SL 11 en un ataque nocturno sucedido en la noche del 2 al 3 de septiembre de 1916. Robinson fue galardonado con la Cruz Victoria por esta acción. La segunda alternativa es un aparato de una escuadrilla naval basada en Escocia dotado con cohetes de origen francés Le Prieur, especialmente útiles para el derribo de globos y dirigibles enemigos.
Valoración
Creo que esta maqueta es en general buena para el estándar de Airfix, aunque tiene algunos altibajos. Por un lado el detalle externo del fuselaje aparece muy simplificado. La carlinga, sin embargo, es más decente, aunque simple, y tal vez lo mejor sea, por una vez, el montaje de las alas, facilitado tanto por los puntales intermedios como por las plantillas para pegar los soportes. Por este último motivo el montaje parece más accesible a los modelistas que tengan menos experiencia armando biplanos.◊


The kit
This is the first kit from the new tool Airfix launched in 2016. It has later been reissued, both on its own and in the series called Dogfight Doubles, coupled by the also new Fokker E.II Eindecker, this being the subject of another review on this website.
The box contains three sprues of parts, a small clear sprue, the decal sheet and the instructions. As usual, the latter come loose without protection. Plastic is well moulded, free from flash and the negative marks present on the cockpit sides will not be evident as most of the interior detail. There are only ejector nodules on the figures and the machine gun.
For those who usually build Airfix kits, this release will not seem particularly unusual except for the inclusion of two jigs to correctly install the interplane struts. In addition, assembly choices include the possibility of adding Le Prieur rockets on the outer wing struts and also an additional Lewis gun in the pilot’s cockpit.
The model rendered in this kit is a standard production B.E.2c fitted with an 8-cylinder RAF 1a engine and a distinctive notch on the centre upper wing. The first examples of this aircraft, which was deployed in 1915 in France, were fitted with a Renault engine with different exhausts, lacked the upper wing notch and even had skids on the undercarriage.
Cockpit
The fuselage sides only show a couple of raised lines for any structure. The cockpit is arranged on the lower part of the fuselage, which is separated into three pieces. The forward observer’s cockpit consists of a base and a well-shaped seat. There is no control stick as this aircraft had a single pilot aft. The observer’s panel is attached in one piece to the two forward cabane struts.
Behind the observer’s seat there is a piece containing the pilot’s pedals plus a second piece showing the gap between the two cockpits attached to the control stick. The pilot’s seat is different from the previous one and seems to be protected by a panel on its back. As before, the pilot’s panel, represented by three decal gauges, is attached to the rear cabane struts fitting between the fuselage halves.
The windscreens are clear pieces of a reasonable thickness for the scale and the optional machine gun comes in one piece with the mount installed on the pilot’s front deck. The Foster mount is not the typical one found in other aircraft fixed to the upper wing, but a simpler one so that the pilot could aim upwards in a seated position, as was the case when trying to shoot down a balloon or airship. The piece is fine and does not lack some detail in the ammunition drum and the grip, although it needs at least a photo-etched sight.
The figures in this kit, both identical, do not seem as bad as on other occasions and at least the heads look better. Both goblins wear a flight suit with goggles over the cap. It is a shame that the poses are so rigid and unnatural, which is quite evident even in a small scale.
Fuselage and engine
The fuselage is not very conventional, consisting of two halves and a ventral piece fitted between them. The fuselage is molded without the engine cowling and the tailplanes. The sides show only a few details. One of them looks like a Venturi tube and there are also a pair of attachments to control the horizontal rudders, but they are too flat and unrealistic. Unfortunately, Airfix has left the rear fuselage sides without the characteristic stitching of the fabric, very evident in photos of the real aircraft. The texture of the fabric is also absent. The structure of the fairing behind the pilot is barely noticeable because it is too faint.
The cowling is separated into halves with a panel between them located behind the engine. The pieces have some lines with small raised rivets. The engine is separated in the same way as the cowling, with four cylinders per side attached to the long exhaust pipes, which have correct profiles and are not hollowed out. The detail of the cylinders is average. Between the engine halves you have to attach the rocker cover and add the cowl cover piece, which will hide much of the internal detail.
The propeller is well moulded and free from flash on the blades. The centre is hollow to insert the hub assembly molded with the shaft, which is attached to a small gear. This piece is glued to the front of the engine and can be fitted after the kit has been painted if we wish.
Wings and tail
Both wings come in one piece. The lower wings are joined by two rods and inserted under the fuselage. The wings look a tad too thick compared to the very light wings seen in pictures of the BE2c and also the raised fabric structure, which is not bad in the kit, does not seem to match the regularity and narrowness of the real one. The rudders on both wings are finely engraved.
The interplane struts are well profiled. We will have the advantage of having already installed the cabane struts in the cockpit. The rear cabane struts are joined to the upper wing by a tab inserted into the wing and this can leave gaps to fill. To get the correct angle of the positive wing stagger, Airfix has included two useful jigs, one per side, which will make assembly easier and faster. The lower wings have two thin U-shaped pieces to cushion the impacts caused by rolling on landing. The vertical tail surfaces have separate rudder and fin. The pieces are thin and smooth. The hinges are very small, but allow the rudder to be placed in a non-neutral position. The horizontal planes are joined by rods and fitted into the tail like the lower wings, although this time we have a small triangular piece underneath that hides the joint.
Undercarriage
The main gear is easy to assemble as it is separated in two halves with part of the V-struts and the horizontal axle molded on the pieces. The wheels are one piece with the tires and hubcaps nicely represented on both sides, although the latter look somewhat better on the outside. The rear undercarriage is made up of an attachment strut and a skid.
Decals
The sheet includes two types of British roundels with variation in the colour of the blue outer ring and the external white border in the East Lothian aircraft, tail markings, registers and a few gauges for the instrument panel. All of them show a thin and shiny appearance, good colour registration and saturation. They do not have excess carrier.
Instructions
They come in a 12-page A4 booklet printed in colour containing a brief history of the aircraft with technical data, 26 assembly sequences, a sheet with profiles to rig the kit step by step and two pages of colour profiles.
Colour variation of the two liveries seems enough and the decals also help to further enhance the difference between the two paint choices.
One of the options corresponds to the aircraft flown by Lt. William Leefe Robinson, the first British pilot to shoot down a German airship, the Schütte-Lanz SL 11, in a night attack that took place on the night of 2-3 September 1916. He was awarded the Victoria Cross for this action. The second alternative is an aircraft from a naval squadron based in Scotland equipped with French-made Le Prieur rockets, especially useful for shooting down enemy balloons and airships.
Conclusion
I think this kit is generally good for Airfix standards, although it has some ups and downs. On the one hand, the external fuselage detail is very simplified. The cockpit, however, is more decent, though simple, and perhaps the best thing is, for once, the wing assembly, facilitated both by the cabane struts and the jigs for gluing the supports. For this last reason, assembly will be much easier, especially for those who have less experience building biplanes.◊
Publicado – Published: 11 / 2024
©www.jmodels.net

Debe estar conectado para enviar un comentario.