
De un vistazo – Quick look
MATERIAL Y PIEZAS
MEDIA & PARTS:
- Plástico inyectado (34 piezas), fotograbado (7 piezas), resina (21 piezas), plástico transparente vacuformado (2 piezas).
- Injected plastic (34 parts), PE (7 parts), resin (21 parts), vacformed clear plastic (2 parts).
CALCAS – DECALS:
- Escarapelas británicas y australianas, marcas de cola y matrículas. Aparentemente fina y con buena saturación de color. Sin exceso de soporte.
- British and Australian roundels, tail markings and registrations. Apparently thin with good color saturation. No surplus carrier film.
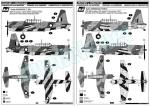
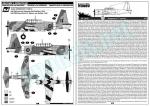
OPCIONES – OPTIONS:
- Vultee Vengeance TT. Mk.I. A27-9. RAAF. Unidad de Entrenamiento Operativo (OTU) N.º 7. Noviembre de 1944.
- Vultee Vengeance TT. Mk.IV. FD 404. Royal Navy. Escuadrilla N.º 733. Trincomalee (Sri Lanka), 1944.
- Vultee Vengeance TT. Mk.IV. HB 335. Royal Navy. Royal Naval Air Station. Belfast, 1945.
- Vultee Vengeance TT. Mk.I. A27-9. RAAF. No. 7 Operational Training Unit (OTU). November 1944.
- Vultee Vengeance TT. Mk.IV. FD 404. Royal Navy. No. 733 Squadron. Trincomalee (Sri Lanka), 1944.
- Vultee Vengeance TT. Mk.IV. HB 335. Royal Navy. Royal Naval Air Station. Belfast, 1945.
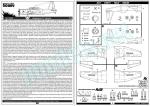
INSTRUCCIONES – INSTRUCTIONS:
- Folleto de 10 páginas impreso en blanco y negro. Contiene un sumario histórico y técnico sobre el avión en varios idiomas, un diagrama numerado de piezas, 6 capítulos de montaje, una lista de colores y perfiles. Fáciles de seguir.
- 10-page brochure printed in black and white. It contains historical and technical information about the aicraft, a numbered parts diagram, 6 main assembly sections, a list of colors and profiles. Easy to follow.
LO MEJOR – THE BEST:
- Buen detalle de los puestos de pilotaje. Motor. Opciones de montaje.
- Nicely detailed cockpit stations. Engine. Assembly options.
LO PEOR – THE WORST:
- Panelado tenue. Lados de la carlinga vacíos. Ruedas en mitades.
- Faint panel lines. Empty cockpit sides. Wheels in halves.
VALORACIÓN – CONCLUSION:
- Parece menos complicada de montar de lo que aparenta y destaca en el interior. El panelado es claramente mejorable. Para modelistas con experiencia.
- It seems less difficult to build than one can expect and the cockpit is really good. Panelling is clearly improvable. For experienced modellers.

La maqueta
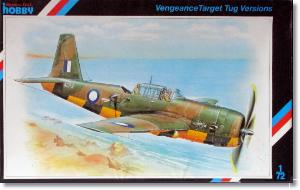
Hace ya alrededor de 20 años Special Hobby (SH) sacó nada menos que cuatro cajas del Vultee Vengeance. Esta en concreto está dedicada a humildes versiones de retaguardia en forma de remolcadores de blancos.
Si lo comparamos con las maquetas que SH produce hoy, se le notan los años a este Vengeance hasta en la caja, que es de esas que llevaban la decoración superpuesta en papel pegado por ambas caras. También se le notan en que las piezas de otros materiales vienen a ser tantas como las de plástico. La maqueta no tiene el refinado en las piezas que la marca logra hoy, pero en absoluto estamos ante una mal producto, y hasta que alguien consiga hacer otro molde mejor, esta será sin duda el que cuenta con mayor detalle.
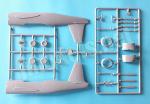
Dentro de la caja encontramos una hoja de calcas, un libreto de instrucciones, alrededor de una decena de bebederos de resina, una pequeña plancha de fotograbados, dos cubiertas vacuformadas y dos bastidores con sólo 34 piezas de plástico. El recuento basta para indicarnos que estamos ante una maqueta claramente para personal experimentado en lides modelísticas.
El plástico de las piezas es algo rígido, más mate que el actual y está bien moldeado sin marcas negativas, pero sí algunas positivas en el interior de la carlinga y las alas. Las de la carlinga estorban la colocación de las piezas internas y las de las alas impiden el ajuste de las dos caras. Muchas piezas necesitan un poco de lija en los bordes para refinarlas, ya que muestran ligeras rebabas del molde. Las líneas de panel me parecen mejores en las alas y estabilizadores que en el fuselaje, donde SH las hizo demasiado tenues, llegando a estar apenas señaladas en la panza, cosa que, por cierto, también pasa en ocasiones con Airfix. Algunos paneles están bien remachados en el fuselaje y las alas pero de forma tan tenue, que es probable que las pintura acabe tapándolos. Sin embargo, las piezas de resina muestran gran calidad, destacando la carlinga de la que hablaré más abajo.
La maqueta puede montarse como un Vengeance Mk.I australiano o un Mk.IV de la Royal Navy, por eso incluye algunas piezas opcionales según el modelo.
El Vengeance fue un bombardero en picado cuyo concepto estaba ya desfasado cuando llegó a entrar en combate en Gran Bretaña. El elevado número de aparatos solicitados a EE.UU. y su obsolescencia ya en 1942 llevó a destinarlo a unidades del Teatro del Pacífico, India y a la RAAF.
Carlinga
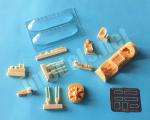
Está reproducida en resina excepto una pieza que parece simular un refuerzo posterior del asiento del piloto. Los dos puestos vienen unidos en una única pieza que incluye el instrumental y los pedales del puesto de pilotaje, ambos mamparos, así como la zona intermedia que llevaba el compartimento de la radio. En piezas separadas encontramos la palanca de control y los asientos, que son diferentes y no traen los arneses, detalle que SH pasó por alto. El del piloto va unido a un panel trasero, mientras que el segundo va pegado sobre una base en el suelo. El detalle de todo el conjunto es excelente, aunque no resulta tan cómodo de pintar como cuando las piezas están separadas. En todo esto destaca el panel de instrumentos, reproducido con los indicadores grabados y otros dispositivos en relieve.
Desgraciadamente el interior no está acompañado por algo similar a los lados del fuselaje, que están planos y vacíos. En realidad, estarán bien vacíos cuando se eliminen el par de marcas en relieve que hay a cada lado.
La cubierta es de plástico vacuformado. La pieza es fina y tiene la estructura bien reproducida. Afortunadamente SH incluyó un repuesto. Sobre el techo hay que pegar el mástil de la antena.
Fuselaje y motor
Las mitades del fuselaje tienen un grosor medio pero no excesivo. Están moldeadas con las superficies verticales de cola y no incluyen el capó separado. El panelado me parece bastante débil si bien las líneas son finas. Como he señalado en la introducción, las líneas están apenas marcadas bajo el fuselaje y creo que todas las superficies necesitan un repaso. También los diminutos remaches de algunos paneles necesitan mejor definición para que la pintura no logre borrarlos por completo.
Además de pegar la carlinga, en el interior también hay que incluir el pozo de la rueda de cola fabricado de resina. Los lados externos del fuselaje a la altura de la carlinga están detallados con dos pequeñas piezas de resina por banda situadas asimétricamente. Los puntos de unión no están marcados y las instrucciones sólo muestran claramente los de un lado, de modo que es necesario comparar con fotos del avión. El dispositivo para remolcar el blanco, con forma de hélice en posición horizontal más un soporte, va situado en lugares distintos del fuselaje de acuerdo con la opción que deseemos hacer (RAAF / Royal Navy). Debajo del fuselaje hay que colocar un segundo mástil de antena con un soporte, ambos de plástico.
El cubremotor está separado en dos mitades y la cara frontal, que tiene dos opciones, aunque en esta maqueta sólo emplearemos la que posee una toma inferior. El detalle externo del capó no es muy convincente, ya que las aletas de ventilación están muy poco marcadas y son demasiado planas. Creo que si se mejoran de alguna forma, el aspecto final del modelo ganaría bastante. El modelo Mk.IV lleva unas pequeñas aletas de fotograbado que deben colocarse abiertas en la parte inferior del morro y una toma de resina situada bajo el capó.
El motor es de resina y muestra un detalle muy bueno. Está unido a un mamparo trasero que no es necesario modificar porque encaja bastante bien dentro del capó. La hélice tiene las palas de plástico separadas. Las piezas son finas y están bien perfiladas. El cubo es de resina y tiene buena definición. Dos muescas laterales del fuselaje nos permiten colocar los escapes opcionales, de resina en ambos casos.
Alas y cola
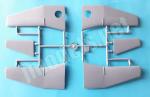
Las alas están separadas en mitades y al igual que los estabilizadores, van unidas a tope al fuselaje. Los paneles aparecen mejor marcados que en el fuselaje, especialmente en las superficies móviles. Los flaps de picado están marcados de forma pasable por ambas caras pero no son extraordinarios y lo mismo se puede decir de las luces de las puntas.
Las salidas del armamento están abiertas en los bordes de ataque, aunque en esta versión hay que taparlas con un par de piezas de resina realizadas con el perfil del borde. Las caras inferiores muestran el hueco de la rueda bien hecho pero en el interior está abierto y vacío. El tubo Pitot viene separado.
Los estabilizadores vienen en piezas finas con un panelado parecido al de las alas y los timones bien marcados. Lo mismo ocurre con la deriva y el timón vertical, que además lleva las bisagras definidas en la línea de panel.
Tren de aterrizaje
Los pozos de las patas son de resina y tienen opciones según el modelo, aunque no son muy diferentes. Las tapas son finas y del mismo material. Las patas son sencillas y llevan la amortiguación marcada, mientras que las tapas están bien perfiladas, aunque pueden afinarse un poco para conseguir más realismo. Las ruedas vienen en mitades con bujes pasables y los neumáticos lisos.
El tren de cola comprende un pozo de resina pegado en el interior del fuselaje, una tapa de plástico y la rueda, unida a la pata y al brazo de plegado. El detalle en esta zona es sencillo pero suficiente.
Calcas
La hoja está bien impresa. Contiene escarapelas británicas y australianas, marcas de cola y matrículas. Las calcas poseen apariencia fina y tienen buena saturación de color. Carecen de exceso de soporte.
Instrucciones
Están impresas en blanco y negro en un folleto de diez páginas. Contiene un sumario histórico y técnico sobre el avión en varios idiomas, un diagrama numerado de piezas, seis capítulos de montaje, perfiles y una lista de colores con códigos que son de esmaltes de Humbrol aunque no se identifican como tales. Las vistas explosionadas son en general fáciles de seguir y hay varias vistas de detalle para asegurar la alineación de algunas piezas.
Las opciones de pintura tienen ligeras variaciones de color en las tres versiones, aunque las instrucciones en blanco y negro no permiten apreciarlas a simple vista. También las bandas transversales de la parte inferior muestran ligeras diferencias en el avión australiano.
Valoración
En general, SH hizo un buen trabajo en este Vengeance. Tanto es así, que aún está por llegar una maqueta mejor a esta escala, y sobre todo que esté al alcance de las habilidades de cualquier modelista.
Para alguien con experiencia, el montaje no me parece complicado en exceso. Con un panelado mejor, especialmente en el fuselaje, la maqueta sería incluso notable por el detalle, que destaca en la carlinga.
Suponiendo que cualquiera de las otras tres cajas del fabricante andan por los mismos derroteros que he intentado describir aquí, me parecen igualmente recomendables.◊


The kit
About 20 years ago Special Hobby (SH) released no less than four boxes of the Vultee Vengeance. This one in particular is dedicated to humble rearguard versions in the form of target tugs.
If we compare it with the kits that SH release today, we can see the age of this Vengeance even in the box, with a paper artbox glued on both sides. You can also notice that pieces made in different media are as many as plastic ones. The kit does not have the refinement in the pieces that the company achieves today, but this is by no means a bad product, and until someone manages to make a better tooling, this will undoubtedly be the one with the greatest detail.
Inside the box are a sheet of decals, an instruction booklet, around a dozen resin pieces, a small photo-etched fret, two vacformed canopies and two grey frames with only 34 plastic parts. The count is enough to tell us that this is a clearly a kit for the experienced modeller.
Plastic on parts is somewhat stiff, less shiny than the one SH use today and is well molded without negative pin marks, but there are some positive ones on the cockpit sides and the inner sides of wings. Those in the cockpit hinder the placement of the internal parts and those inside the wings prevent the fitting of the two halves. Many pieces need a little sanding on the edges to refine them as they show slight flash from the injection. Panel lines look better on the wings and stabilizers than on the fuselage, where SH made them too faint, even barely noticeable on the belly. One can recall some Airfix kits with the same issue, by the way. Some panels are well riveted on the fuselage and wings but so weakly that paint is likely to cover all the detail. However, resin pieces show great quality, especially inside the cockpit, but more on this below.
The kit can be built as an Australian Vengeance Mk.I or a Royal Navy Mk.IV, so it includes some optional parts depending on the version.
The Vengeance was a dive bomber whose concept was already outdated when it operated in Great Britain. The high number of machines ordered in the US and their obsolescence already in 1942 led them to units in the Pacific Theater, India and the RAAF.
Cockpit
It is rendered in resin except for one piece that seems to be a support of the pilot’s seat. The two stations are cast in a single piece including the instruments and the pilot’s pedals, both bulkheads, as well as the middle section for the radio compartment. In separate pieces we find the control lever and the seats, which are different and do not have harnesses, a detail that SH overlooked. The pilot’s seat is attached to a rear panel in the piece, while the second one is added to a base on the cockpit floor. Detail of the entire set is excellent, although it will not be that easy to paint because pieces are not separated. The instrument panel is outstanding, rendered with recessed gauges and raised detail for other flight instruments.
Unfortunately the interior is not coupled with anything similar on the cockpit sides, which are flush and empty. In fact, they will be so until we remove a pair of raised marks on each side.
The canopy is a vacformed part. It is thin and the structural detail is correctly defined. Fortunately, SH included a spare. The piece is topped by an antenna mast.
Fuselage and engine
The fuselage halves are a bit thick but not chunky. They are molded with the fin and rudder and do not include the cowling, which is separate. Panel lines look too faint although the lines are fine. As noted in the introduction, the lines are barely engraved under the fuselage and it seems evident all surfaces need re-scribing. Also, the tiny rivets on some panels need better definition so that the paint does not blurr them completely.
In addition to attaching the cockpit, the interior also include a resin tail wheel well. The outer fuselage sides are detailed with two small resin pieces on each side. The attachment points are not marked and the instructions only clearly show those on one side, so checking pics of the real aircraft is a must. The device to tow the target, shaped like a propeller in a horizontal position, is located in different places on the fuselage according to the option we wish to build (RAAF / Royal Navy). A second antenna mast with a V strut, both made of plastic, is be placed under the fuselage.
The cowling comes in two halves and the front face, which has two options. The kit makes use of the one with a lower intake. The cowling external detail is not very convincing with the cooling gilles very poorly engraved and too flat. I think that if they are improved in some way, the final appearance of the model would gain a lot. The Mk.IV variant features small photo-etched gilles that are shown in the open position on the lower sides and a resin intake located under the cowling.
The engine is a resin piece showing very good detail. It comes attached to a rear bulkhead that does not need to be modified because it fits quite well inside the cowling. The propeller has separate plastic blades. The pieces are thin and well profiled. The hub is made of resin and has good definition. Two side notches on the cowling allow to attach the optional resin exhausts.
Wings and tail
The wings are separated in halves and, like the stabilizers, are butt-joined to the fuselage. Panel lines look much better than on the fuselage, especially on the moveable surfaces. The dive flaps are engraved in a passable way on both sides but they are not extraordinary, and the same can be said of the wingtip lights.
The gun ports are drilled on the leading edges, although in this version they are covered with a couple of resin pieces made with the profile of the edge. The undersides show wheel wells but they are open and empty inside. The Pitot tube comes separately.
Stabilizers come in thin pieces with panels on par with those on the wings and well marked rudders. The same happens with the fin and the rudder, which also shows defined hinges.
Undercarriage
The undercarriage fairings are resin pieces with options depending on the model, although they are not very different. The covers are thin and cast in the same media. The legs are simple and show defined oleo struts whilst the end of the covers are well profiled but they would look better after some thinning. The wheels come in halves with passable hubs and smooth tires.
The tail gear comprises a resin well attach inside the fuselage, a plastic cover and the wheel molded with the leg and the folding arm. Detail in this area is simple but enough.
Decals
The sheet is well printed. Contains British and Australian roundels, tail marks and codes. Decals have a thin appearance and good color saturation. They do not show surplus carrier film.
Instructions
They are printed in black and white in a ten-page booklet. It contains a historical and technical summary on the aircraft in several languages, a numbered parts diagram, six assembly chapters, profiles and a list of color codes belonging to Humbrol enamels although they are not identified as such. The exploded views are generally easy to follow and there are several inset views to ensure correct alignment of some parts.
Paint options have slight color variations in the three versions, although the black and white instructions do not allow to distinguish them. Also, the transverse bands on the undersides show small differences in the Australian aircraft.
Conclusion
Overall, SH did a good job on this Vengeance. So much so, that a better kit is yet to arrive at the scale, and especially one within the reach of the any modeller’s skills.
For someone ahead of the pack assembly does not seem too difficult. With better paneling, especially on the fuselage, the kit would even be much more than average in detail, which is only outstanding in the cockpit and engine.
Assuming that any of the other three SH releases follow the same paths I have tried to describe here, they seem equally recommended.◊
Publicado – Published: 9 / 2023
©www.jmodels.net

Debe estar conectado para enviar un comentario.