
De un vistazo – Quick look
MATERIAL Y PIEZAS
MEDIA & PARTS:
- Plástico inyectado (26 piezas), plástico transparente (3 piezas), vinilo (4 piezas).
- Injected plastic (26 parts), clear plastic (3 parts), vinyl (4 parts).
CALCAS – DECALS:
- Instrumentos del salpicadero, rótulos comerciales y matrícula. Finas, de aspecto brillante. Sin exceso de soporte.
- Dashboard instruments, trade signs and number plate. Thin with glossy appearance. No excess of carrier film.
OPCIONES – OPTIONS:
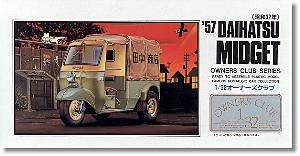
- Motocarro Daihatsu Midget modelo DKA 1957.
- Daihatsu Midget mini-truck model DKA 1957.
INSTRUCCIONES – INSTRUCTIONS:
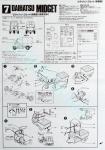
- Hoja A4 impresa en blanco y negro. Contiene un plano numerado de piezas, perfiles con códigos de pinturas de Gunze Sangyo y 7 secuencias de montaje
- A4 sheet printed in black and white containing a numbered parts plan, profiles with paint codes in Gunze Sangyo range plus 7 construction steps.
LO MEJOR – THE BEST:
- Tema inusual. Sencillez de montaje.
- Unusual topic. Ease of assembly.
LO PEOR – THE WORST:
- Marcas en la cabina. Neumáticos de vinilo.
- Ejector marks inside the cab. Vinyl tires.
VALORACIÓN – CONCLUSION:
- Una pieza inusual para la vitrina, sencillo de montar a costa del detalle más refinado, que puede añadirse sin dificultad excesiva. Apto para modelistas de cualquier nivel.
- An unusual kit for the shelf, easy to build at the expense of the finest detail, which can be added without a fuss. Suitable for modelers of any skill level.

La maqueta
Aunque Arii parece ser la marca que más ha difundido esta maqueta fuera de Japón durante más tiempo, en realidad el molde original pertenece a LS, que lo lanzó en los años 80, y ha sido reeditado en muchas ocasiones por Arii y algunos otros fabricantes.
La maqueta pertenece a una colección denominada 1/32 Owners Club compuesta de 24 entregas, en su gran mayoría automóviles utilitarios populares en Japón entre los años 50 y 90 aproximadamente. La serie incluye también algunos vehículos diferentes, como varios motocarros (denominados ahora mini-trucks por los finos) y un par furgonetas de pequeño porte (Honda T360 y Daihatsu Mira).
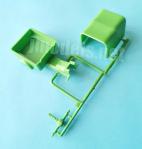
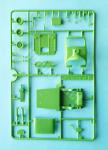
Supongo que como otras maquetas de esta colección, este Midget está despiezado para montarlo y pintarlo con brevedad, aunque para ello se sacrifican algunos detalles no demasiado esenciales como para que le reste atractivo y lo convierta en un juguete para niños. La caja contiene dos bastidores de color “verde lorito” (permítaseme la gracia, pero es tal cual y el lector me entenderá), cuatro ruedas de vinilo, la hoja de calcas y una hoja que muestra las instrucciones a un lado y al otro el catálogo completo de la colección mencionada.
Las piezas están bien moldeadas y limpias en su gran mayoría, sólo tienen rebabas en el tubo de escape y escasos cilindros de salida del eyector en unas pocas más. Encontramos marcas de eyector visibles dentro del habitáculo y el lado interno del toldo, pero si el modelista es de los que van al mínimo esfuerzo, verá que únicamente tiene que limpiar las del panel trasero de la cabina y del lado interno de la carrocería.
No hay alternativas de montaje más allá de dejar la caja de transporte descubierta sin el toldo. Las instrucciones no indican el color de la carrocería, de modo que el modelista tiene varias posibilidades de elección, algunas de las cuales describo con brevedad más abajo.
Montaje
El vehículo está dividido básicamente en dos mitades: una base que sirve de apoyo tanto a la cabina como a la caja trasera y por otro lado la cubierta del motor y la caja de transporte unida a los guardabarros de las ruedas traseras. Ambas piezas se unen con facilidad mediante pivotes, los traseros parecen simular los amortiguadores, aunque de manera un tanto chusca.
La caja posterior es demasiado gruesa, pero está detallada con líneas finas en relieve sobre el suelo y no tiene marcas. Los enganches del toldo están mal definidos y peor aún los cierres del portón trasero. La parte posterior lleva una placa de matrícula detallada con calca.
La base lleva moldeado el depósito de combustible y los soportes del eje trasero. El montaje de las piezas separadas es bastante sencillo, no hay más que añadir el eje trasero, unido al diferencial y a una sección del árbol de la transmisión, el tubo de escape moldeado con el silenciador y una pieza que parece simular un conducto en la parte trasera.
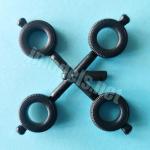
Las llantas traseras vienen separadas de los neumáticos y muestran buena definición en su detalle, especialmente en el borde exterior. Los neumáticos son todos idénticos y no están mal para ser de vinilo. La banda de rodadura lleva líneas grabadas y carecen de rebabas, pero sí hay que limpiar un cilindro del expulsor en cada una y el resultado con este material es una incógnita. Cada neumático va montado a presión en su llanta.
El montaje pasa a continuación a la parte delantera, donde hay que ensamblar la horquilla, separada en mitades, con la rueda y el neumático. La llanta es diferente a las traseras y su detalle es decente igualmente, pero en este caso hay una línea de molde en la superficie que tapa el neumático. La horquilla va introducida en un tubo corto unido a una lengüeta que se pega por debajo de la parte frontal de la cubierta del motor, dejando el hueco para introducir el manillar posteriormente.
Una vez unidas las mitades del vehículo, se añaden algunos elementos de la cabina, todos ellos en pequeñas piezas, pero bien definidas, como los pedales de arranque, freno y embrague más el freno de mano, situado en el lado izquierdo del conductor, y la palanca de marchas. El asiento viene separado sin el respaldo.
El panel frontal del vehículo incluye el marco del parabrisas y el amplio guardabarros delantero con su moldura exterior. El lado delantero del panel incluye el hueco del faro, cuya lente es una pieza transparente, una pequeña toma de ventilación y el nombre y modelo del vehículo en una calca. Los indicadores de giro están moldeados a los lados pero no son transparentes. Una vez unido el panel al extremo del vehículo siguiendo con cuidado las indicaciones de las instrucciones, se le puede pegar el parabrisas, no muy fino, el espejo retrovisor y el limpiaparabrisas por delante.
La cabina dispone de un panel delantero que sirve de base al manillar. Sobre este panel se colocan los instrumentos del salpicadero de calca y el manillar en forma de V con las empuñaduras nítidas.
Completan la cabina el techo y el panel trasero. El techo debería ser de lona plastificada o similar, pero está moldeado liso y sin textura. La parte interna tiene algunas marcas negativas aunque muy leves. Lo mismo se puede decir del panel posterior, también plastificado en el vehículo real y con un bastidor que en la maqueta se ha convertido en una pieza lisa, algo gruesa y con líneas en relieve. Incluye el respaldo del asiento en el lado de la cabina. La ventanilla es una pieza transparente que también debería ser de plástico fino.
El toldo es la única pieza moldeada con las superficies mates y texturizadas. La pieza tiene ambos extremos abiertos, el posterior con una lona enrollada y sujeta con cintas. En el interior hay algunas marcas leves en el techo solamente, pero extrañamente también una pequeña lengüeta a cada lado que debe eliminarse si se emplea la pieza.
Calcas
La hoja tiene un tamaño pequeño y proporciona los instrumentos del salpicadero, rótulos comerciales y una matrícula. Los motivos son finos, de aspecto brillante y no tienen exceso de soporte.
Instrucciones
Vienen en una simple hoja de formato A4 impresa en blanco y negro que contiene un plano numerado de piezas, perfiles con códigos de pinturas de Gunze Sangyo y siete secuencias de construcción sencillas de entender aunque las indicaciones y colores están casi en su totalidad en japonés.
Como decía arriba, la hoja no señala el color de la carrocería. La mayoría de los Midget que he visto en internet llevaban un verde muy pálido con el frontal del parabrisas y el toldo en un tono crema, pero el primer color también puede ser un azul pálido.
Valoración
Ciertamente este es un vehículo inusual en el modelismo de tema civil. La maqueta está diseñada para hacer el montaje muy sencillo y lo consigue obviando algunos detalles que pueden refinarse sin mucho esfuerzo.
La maqueta tiene posibilidades de presentación tanto si se quiere mostrarla sola como integrada en algo de mayor relevancia, como una escena. Seguro que puede convertirse en un modelo que no desentonará en la vitrina junto a otro tipo de vehículos de mayor porte o atractivo.◊


The kit
Although Arii seems to be the brand that has sold this kit outside of Japan for the longest time, the original tool actually belongs to LS, which launched it in the 1980s, and it has been reissued many times by Arii and several other manufacturers.
The kit belongs to a collection called 1/32 Owners Club, consisting of 24 boxings, mostly popular cars in Japan between the 1950s and 1990s. The series also includes a few different vehicles, such as several mini-trucks and a couple of mini-vans (the Honda T360 and the Daihatsu Mira).
I assume that, like other kits in the collection, the Midget is designed for quick assembly and painting, although some less essential details are sacrificed. This doesn’t seem to reduce its appeal and to turn it just into a children’s toy. The box contains two «parrot green» sprues (sorry for the irony, but the reader knows what I mean), four vinyl tires, the decal sheet, and a sheet showing the instructions on one side and the complete catalog of the said collection on the other.
Parts are well moulded and clean with only some flash on the exhaust pipe and a few other parts showing the ejector pips. There are visible ejector marks inside the cab and the canvas, but if the modeller is the lazy kind, he’ll find he only needs to clean them on the rear and front cab sides.
There are no assembly alternatives beyond leaving the cargo container open without the canvas. The instructions don’t specify the body color, so the modeller has several options to choose from, some of which I mention below.
Assembly
The vehicle is basically divided into two halves: a base to fit both the cab and the rear bed, and the other half moulded with the engine cover and the cargo box attached to the rear wheel fenders. Both pieces are easily joined by pins; the rear ones resemble the shock absorbers but have no definition.
The bed is too thick, but it is detailed with thin raised lines on the floor and has no marks. The canvas hooks are poorly defined, and the tailgate locks are even more so. The rear end features a license plate detailed with a decal.
The base is moulded with the fuel tank and rear axle brackets. Assembling the separate parts is fairly straightforward; all you need to do is add the rear axle, attached to the differential and a section of the driveshaft, the exhaust pipe moulded with the muffler, and a piece that seems to be a duct at the rear.
The rear rims are separated from the tires and show nice detail, especially on the outer tip. The tires are all identical and quite good for vinyl. The tread has an engraved pattern and is clean from flash, but an ejector cylinder needs to be cleaned on each one. Each tire is press-mounted onto its rim.
Assembly then moves to the front, where the fork, separated in halves, is attached to the wheel. The rim is different from the rear ones and its detail is also decent, but in this case, there is a seam line on the barrel that hides the tire. The fork is inserted into a short tube moulded with a tab that is glued under the front of the engine cover, leaving a gap for the handlebar.
Once the vehicle halves are joined, some cab elements are added, all in small but well-defined pieces, such as the starter, brake, and clutch pedals, plus the handbrake, located on the driver’s left side, and the gear lever. The seat comes separately without the backrest. The vehicle’s front panel includes the windshield frame and the wide front fender with its moulding. The front side of the panel includes the clear headlight, a small air vent, and the vehicle name and model on a decal. The turn signals are moulded on the sides and not provided as clear pieces. Once the panel is attached to the truck front, you can add the winddshield, which is not very thin, the rearview mirror, and the wiper.
The cab has a front panel to install the V-shaped handlebar, which shows sharply rendered grips, and a decal for the dashboard instruments.
The cab is finished by attaching the canvas roof and rear panel. The roof should be made of plastic-coated canvas or similar, but it is moulded smooth and untextured. The interior has some shallow negative marks not difficult to address. The same can be said of the rear panel, also made of plastic on the real vehicle and featuring a frame that in the kit is rendered as a flat, somewhat thick piece with raised lines. It includes the seat back on the cab side. The window is a thick clear piece.
The canvas is the only part showing matte and textured surfaces. It is open at both ends, the rear one with a rolled-up canvas secured with straps. Inside, there are some shallow marks on the roof only, but oddly enough, there is also a small tab on each side that need to be removed if the part is used.
Decals
The small sheet includes the dashboard instruments, commercial signs, and a license plate. The decals are thin, glossy, and have no excess of carrier film.
Instructions
They come on a A4 sheet printed in black and white containing a numbered parts drawing, profiles with Gunze Sangyo paint codes, and seven easy-to-understand construction sequences though the instructions and colors are almost entirely in Japanese.
As mentioned above, the sheet doesn’t specify the body color. Most of the Midgets I’ve seen online sported a very pale green with a cream-colored upper front body and roof, but the first color can also be a pale blue.
Conclusion
This is certainly an unusual release in the modelling of civil vehicles. The kit is designed to make assembly very simple, and it achieves this by overlooking some details that can be refined without much effort.
The kit can be displayed either alone or integrated into something more significant, such as a scene. It’s sure it can be turned into a model that won’t look out of place on a shelf next to other larger or more nice-looking vehicles.◊
Publicado – Published: 5 / 2025
©www.jmodels.net

Debe estar conectado para enviar un comentario.