
De un vistazo – Quick look
MATERIAL Y PIEZAS
MEDIA & PARTS:
- Plástico inyectado (172 piezas), plástico transparente (15 piezas), fotograbado (75 piezas), resina impresa en 3D (8 piezas). Incluye dos figuras (8 piezas).
- Injected plastic (172 parts), clear plastic (15 parts), photo-etched (75 parts), 3D printed resin (8 parts).
CALCAS – DECALS:
- Matrículas, insignias de unidad, un mapa, instrumentos del salpicadero y radios. Aspecto muy fino y brillante, excelente nitidez para el tamaño, buen registro y sin exceso de soporte.
- Plates, unit badges, dashboard gauges and radios. Very thin and glossy finish, excellent sharpness for the size, good register without excess of carrier.
OPCIONES – OPTIONS:
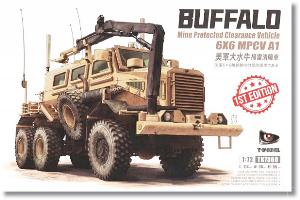
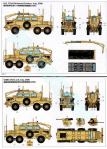
- Buffalo MPCV A1. U.S. 101st Airborne Division. Iraq, 2006.
- Buffalo MPCV A1. USMC EOD unit. Iraq, 2006.
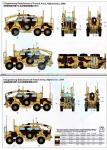
- Buffalo MPCV A1. French Army. Engineering Detachment. Afghanistan, 2008.
- Buffalo MPCV A1. French Army. Engineering Detachment. Afghanistan, 2008.
INSTRUCCIONES – INSTRUCTIONS:
- Folleto apaisado de 16 páginas impreso en color. Contiene un plano de piezas numerado, 34 secuencias de montaje, 4 páginas de perfiles y una tabla de colores con equivalencias en varias gamas de pintura.
- 16-page lanscape booklet printed in color. It contains a numbered parts plan, 34 construction chapters, 4 pages of profiles and a color chart with matches in several paint ranges.
LO MEJOR – THE BEST:
- Muy buen detalle general. Mejoras de plástico, fotograbado y 3D incluidas.
- Very nice overall detail. PE, 3D and plastic detail sets included.
LO PEOR – THE WORST:
- Lentes de los faros no separadas. Piezas pequeñas y delicadas.
- Clear lenses are not separate. Tiny brittle parts.
VALORACIÓN – CONCLUSION:
- Magnífica representación del vehículo a esta escala con multitud de detalles que no envidian nada a escalas más grandes. Sólo apta para modelista expertos.
- A very nice 1/72 rendition of the vehicle with almost all the detail of larger scales. Only suitable for experienced modellers.

La maqueta
T-Model es aún una marca joven que en apenas unos años se ha hecho con un nutrido catálogo no sólo de maquetas, sino también de accesorios y complementos en la escala 1/72 especialmente. Hace escaso tiempo la marca china lanzó este Buffalo MPCV, un vehículo popular entre los seguidores del tema desde hace unos años por las maquetas a escala 1/35 de Bronco Models y otros fabricantes. Como suele suceder, en la escala 1/72 pasamos de no tener ninguna maqueta a tener dos, ya que Vespid Models ha lanzado también una nueva recientemente.
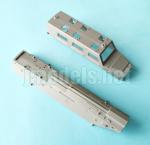
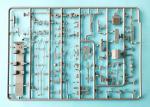
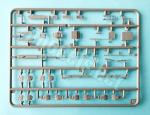
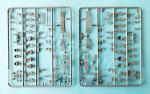
La caja de buen cartón rígido y apertura superior contiene cinco bastidores de piezas grises, uno de ellos repetido, un bastidor transparente, dos planchas de fotograbados, ocho ruedas realizadas con impresión 3D, la carrocería separada en dos piezas sueltas, la hoja de calcas y las instrucciones.
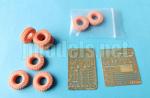
Esta primera edición contiene un juego de mejora, identificado como A72012, compuesto por un bastidor de piezas de plástico (D) más un plancha de fotograbados (Pb) para detallar el interior de la maqueta. Las instrucciones ofrecen también otros juegos diferentes, como las ruedas impresas en 3D con peso, el sistema remoto M153 CROWS II (Common Remotely Operated Weapon Station) con una ametralladora M2 o cuatro rodamientos. De ellos, las ruedas también están incluidas en esta caja.
Las piezas se caracterizan por su buen y fino moldeado, además de la carencia de rebabas. Algunas de ellas sí tienen cilindros de salida del eyector sin demasiada importancia porque son sencillos de limpiar. Por desgracia, las únicas marcas de eyector visibles han ido a parar a los respaldos de los asientos del bastidor de mejora A72012, hecho que resulta irónico. Sin embargo, las marcas son leves y no arruinan los cinturones de seguridad moldeados en las piezas.
El despiece es bastante grande para esta escala pequeña y la mayoría de elementos son delicados. Si a esto le añadimos la presencia de fotograbados minúsculos, tendremos los suficientes argumentos para afirmar que esta maqueta no está indicada para modelistas verdes o con poca experiencia.
Por otra parte, el detalle es en general muy bueno, considerando de nuevo el tamaño, y nos da una clara idea de los grandes avances que se han conseguido en esta escala durante los últimos años. Con maquetas como esta, los modelistas de la escala pequeña ya no tienen casi nada que envidiar a sus compañeros de las escalas mayores.
Transmisión y suspensión
El montaje se inicia con la colocación de las barras de acoplamiento del tren trasero y algunas piezas pequeñas a los lados de la parte inferior del casco. Posteriormente, hay que construir el tren trasero por separado. Este se compone de dos ejes unidos a los diferenciales pegados sobre la mitad trasera del árbol de la transmisión. La suspensión de estos dos ejes, compuesta por dos piezas con las ballestas y los soportes más una barra que las une, se añade por encima de los dos ejes y después el conjunto se pega sobre el vehículo. Hay cuatro diminutos fotograbados que añadir luego, que representan elementos de la suspensión de cabeceo del tren trasero. Una pequeña vista de planta del tren trasero en las instrucciones ayuda a colocar los ejes ligeramente descentrados respecto al árbol de la transmisión.
El eje delantero tiene una sección del diferencial aparte. En este caso, la mitad delantera del árbol se pega por detrás del diferencial. El eje va colocado sobre la suspensión, que comprende igualmente dos ballestas con sus soportes y dos barras de acoplamiento paralelas. Posteriormente se incluye la fina barra de la dirección. Durante el montaje de los ejes es aconsejable contrastar sobre una superficie plana si están correctamente nivelados.
Ya pegados los ejes, se observa que falta la caja de cambios auxiliar. Esto se debe a que va tapada por una cubierta blindada que tiene dos opciones. Los vehículos norteamericanos llevan dos accesos laterales atornillados, mientras que los franceses poseen los mismos paneles más un dispositivo a cada lado compuesto por brazos que soportan sendos bastidores en forma de escalera horizontal. No he conseguido saber de qué se tratan, pero parecen algún tipo de deflector de protección contra explosiones.
Ruedas
Los tambores de freno vienen separados y en su interior hay que insertar un rodamiento sin pegarlo más un disco externo sobre el que añadir el tambor de la llanta y el neumático, en el caso de las ruedas traseras. El detalle externo de las llantas, diferentes en los ejes delantero y traseros, es excelente, observándose con nitidez los tapabujes y tuercas.
El eje delantero se monta de forma análoga, excepto por la ausencia del disco externo del tambor de freno y la llanta distinta. Las llantas de las ruedas de repuesto son diferentes en sus lados traseros, ya que van pegadas directamente sobre un soporte a los lados del vehículo.
Los neumáticos son piezas impresas en 3D, seis de ellos con peso y dos de repuesto sin peso. El detalle de la banda de rodadura es muy bueno. Incluso se alcanza a leer el fabricante (Michelin) en relieve sobre los flancos empleando una lupa.
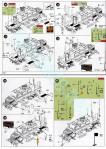
Cabina e interior
El suelo interno es de una pieza con un panel en la parte anterior y sobre él los pedales del conductor. La cabina contiene piezas para la consola frontal, el salpicadero, con instrumentos de calca, el volante y la palanca de cambios. Las instrucciones proporcionan vistas a escala real tanto del salpicadero como del volante para montarlos correctamente.
Los asientos de los seis ocupantes están moldeados en el suelo, pero del bastidor de mejora obtendremos las bases y respaldos para modificarlos cortando los respaldos y sustituyéndolos. Cada respaldo incluye el reposacabezas y los cinturones, pero también tiene un par de marcas negativas leves que limpiar, pero no afectan al detalle. El asiento situado tras el del conductor lleva la pantalla del operador del sistema CROWS II tras el respaldo. El interior incluye lo que parecen dos pequeños extintores y un panel con el equipo de comunicaciones.
La puerta trasera viene separada y su detalle incluye diminutas bisagras y el cierre más un panel externo separado. El parabrisas, moldeado con finos limpiaparabrisas, y las ventanas laterales se pegan desde fuera del habitáculo. Las piezas son finas y parecen acordes con su blindaje a esta escala.
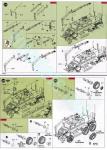
Casco (parte inferior)
La parte delantera muestra el panel blindado del radiador con las rejillas frontales reproducidas nítidamente, más algunas piezas pequeñas con enganches y placas de fotograbado. El paragolpes está separado en dos piezas, la delantera de plástico transparente con las lentes de los faros incluidas. La pieza podría haber tenido las lentes transparentes separadas y así evitar tener que enmascararlas para pintar. El paragolpes está detallado con un enganche, un estribo, una pieza colocada oblícuamente tras un faro que soporta el brazo robótico y las tapas de los faros de fotograbado. Opcionalmente se puede añadir el sistema infrarrojo Rhino para detonar explosivos improvisados, que tiene la peculiar forma de bandera que se aprecia en fotos de vehículos militares modernos.
La parte trasera lleva un enganche con su base, las luces en piezas transparentes y dos pequeñas placas de fotograbado. Una de ellas es la placa de matrícula, que tiene dos opciones con numeración distinta estampada en la pieza, un detalle insólito y sorprendente que también se puede apreciar con una lupa.
Los guardabarros son finos y tienen marcas en las caras inferiores que no serán evidentes. Todos ellos van unidos a la carrocería mediante vástagos y poseen los faldones traseros separados. Las piezas traseras están detalladas con cestas para estibar equipo y dos antenas con opción de ponerlas extendidas o no.
Casco (parte superior)
En la parte delantera el capó está detallado con la rejilla del motor bien definida y tiene la toma del filtro de aire del motor separada. Sin embargo, las cubiertas con rejillas laterales son erróneas al estar hundidas en su lugar en vez de sobresalir, un detalle fácil de apreciar a simple vista. Varias asas y otros diminutos elementos de fotograbado detallan esta zona del vehículo.
Además de los retrovisores, a los lados de la cabina hay también una de las antenas del sistema DUKE para interferir explosivos improvisados radiocontrolados y otra antena aplanada sobre la ventanilla del conductor. Las ruedas de repuesto llevan sus fijaciones sobre los laterales del casco. Ambas cuentan con las pequeñas poleas de fotograbado usadas para bajar o subir las ruedas. El cable debe proporcionarlo el modelista. Las instrucciones sólo indican la instalación de la polea del lado derecho, pero la operación hay que repetirla en el opuesto. En el lado derecho encontramos el tubo de escape de una pieza moldeado con el silenciador y su protector de fotograbado.
El techo posee seis escotillas con las tapas separadas y moldeadas con los cierres. Una de ellas se puede sustituir por el sistema CROWS II, cuyo montaje también muestran las instrucciones, pero no está incluido en la maqueta. El detalle incluye dos balizas transparentes con las luces incluidas en las bases. Seguramente, deben representar las antenas GPS o SATCOM.
La parte posterior del vehículo, tras el habitáculo contiene un par de cajas de estiba, la escalera posterior con las barandillas emplazadas en una base exenta y la opción de montar dos antenas del sistema DUKE, o bien dos antenas de látigo de fotograbado con sus bases separadas.
El brazo robótico se compone de la pluma en dos secciones y el brazo propiamente dicho con la garra. Los cilindros hidráulicos vienen aparte. La garra dispone de diminutos fotograbados para perfilar las uñas y puede pegarse plegada o no. Aunque las instrucciones no lo indican, el brazo puede colocarse en posición operativa o estibado sobre su soporte lateral. Todo el detalle es fino y nítido.
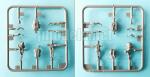
Figuras
En un pequeño bastidor encontramos nueve piezas para montar dos figuras sentadas, que corresponden al conductor y al operador del sistema CROWS II. Deduzco que este último debe ser el que tiene uno de los brazos moldeados con el tronco, ya que el sistema de fuego remoto se puede controlar con tan solo una palanca de mando (joystick) .
El conductor tiene los brazos separados para colocarlos en el volante. La figura está muy bien moldeada y muestra notable definición en el uniforme y equipo para su tamaño. Así, puede apreciarse tanto el casco, las botas, las rodilleras del uniforme, el chaleco y las cartucheras.
El operador del sistema remoto tiene la cabeza separada, un despiece que a esta escala me parece rizar el rizo, ya que no mejora en nada el detalle y dificulta el montaje. Como he dicho, la figura sólo tiene un brazo separado y los pies en una posición muy natural y relajada, descansando uno sobre el otro. El detalle de su equipo y uniforme es idéntico e incluso mejor que el de su compañero, ya que se aprecia hasta una cantimplora.
Ambas figuras cuentan también con sendas mochilas moldeadas con una definición excelente en los bolsillos y correajes, aunque dudo que se puedan emplear con las figuras sentadas al ser tan voluminosas.
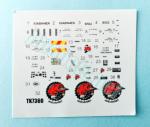
Calcas
La pequeña hoja de calcas contiene matrículas, insignias de unidad, un mapa, instrumentos del salpicadero y los sistemas de comunicación que muestran un aspecto muy fino y brillante, buen registro y carecen de exceso de soporte. La nitidez es magnífica, con una lupa pueden leerse tanto los números más pequeños, como el apodo Bonecrusher del vehículo de los Marines norteamericanos.
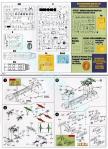
Instrucciones
Se incluyen en un folleto apaisado de 16 páginas impreso en color que contiene un plano de piezas numerado, 34 secuencias de montaje, cuatro páginas de perfiles y una tabla de colores con equivalencias de pinturas de VIC Hobby, Vallejo, AMMO MIG, Tamiya, Mr Hobby y en los códigos RAL y Federal Standard.
Los pasos de montaje distinguen con claridad mediante colores las piezas que proceden de los bastidores de mejoras añadidos en esta edición. Con todo, el folleto requiere un estudio previo en profundidad por el número y tamaño de las piezas.
Las páginas de perfiles muestran cuatro vehículos, pero en realidad sólo hay dos opciones de pintura, ya que los vehículos norteamericanos van pintados de color arena y los franceses igual, pero con manchas de color rojizo oscuro.
Valoración
Está claro que las maquetas de vehículos militares modernos, al menos a tamaño menor, atraviesan una época de esplendor. T-Model ha hecho un trabajo excelente en este Buffalo MPCV, aún más si consideramos el tamaño. El detalle es excelente e incluso llega a sorprender que se puedan troquelar las placas de matrícula, por ejemplo. Gracias a las mejoras que se han incluido el modelista tiene prácticamente todo lo necesario para plasmar el vehículo con gran realismo, salvo el sistema CROWS II, que en la realidad no va instalado de serie.
La construcción del modelo no es sencilla por la cantidad de piezas, su tamaño y delicadeza en muchas ocasiones. Requiere tiento y experiencia, por eso no parece indicada a quienes no posean las habilidades que da la práctica.
En mi parecer, no hay nada muy importante que achacarle a la maqueta, salvo acaso el error de las rejillas laterales del capó. Por lo demás, el despiece de una de las figuras con la cabeza minúscula separada, además de las lentes de los faros incluidos en piezas transparentes, en lugar de venir separadas, sólo indican que los diseñadores de la maqueta se pasaron un tanto con el despiece. Tal vez llegaron a gustarse demasiado y no supieron parar a tiempo.◊

The kit
T-Model is still a young brand that in just a few years have built up a substantial catalog not only of kits but also of accessories and aftermarkets, especially in the 1/72 scale. A few months ago, the Chinese brand released this Buffalo MPCV, a vehicle that has been popular among fans of the subject for a few years thanks to the 1/35 scale kits from Bronco Models and other manufacturers. As is often the case, in this scale we have moved from having no kits at all to having two, as Vespid Models have also released their own tool.
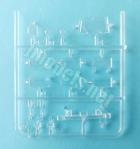
The top-opening, rigid cardboard box contains five sprues of gray parts, one of them doubled, a clear sprue, two photo-etched frets, eight 3D-printed wheels, a separate two-piece hull, the decal sheet and the instructions.
This first edition contains an upgrade kit, identified as A72012, consisting of a sprue of plastic parts (D) plus a photo-etched fret (Pb) for detailing the interior. The instructions also offer other aftermarkets for this release, such as weighted 3D-printed wheels, the M153 CROWS II (Common Remotely Operated Weapon Station) remote system with an M2 machine gun, and four bearings. Of these, only the wheels are also included in this box.
Parts have a fine molding and are free from flash. Some of them have ejector pips but are not too significant because they are easy to clean. Unfortunately, the only visible ejector marks are on the seat backs of the A72012 upgrade frame, which is ironic. However, the marks are shallow and do not affect the seat belts molded on. Parts count is quite large for this small scale, and most elements are delicate. Add to this the presence of tiny photo-etched parts, and we have enough arguments to say that this kit is not suitable for those with little experience.
On the other hand, detail is generally very good considering the size, and gives a clear idea of the great advances in this scale during the past years. With kits like this, small-scale modellers now have almost nothing to envy their counterparts in larger scales.
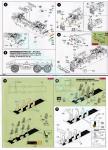
Transmission and suspension
Assembly begins with the placement of the rear axle tie rods and some small parts on the lower hull sides. The rear axle is then built separately. This consists of two axles attached to the differentials and glued to the rear half of the driveshaft. The suspension for these two axles, consisting of two pieces with leaf springs and brackets plus a connecting rod, is added on top of the two axles. Finally, the assembly is attached to the lower hull with four tiny photo-etched parts added later, these representing elements of the rear axle’s suspension. A small plan view of the rear axles in the instructions helps to position them slightly offset from the driveshaft.
The front axle has a separate differential section. In this case, the front half of the driveshaft is glued behind the differential. The axle is placed on the suspension, which also includes two leaf springs with their brackets and two parallel tie rods. The thin steering rod is then attached. During assembly, it is advisable to check on a flat surface that the suspension is correctly leveled.
The driveshaft has no auxiliary gearbox and instead we find the armored cover that has two options. American vehicles have two bolted side panels, while French vehicles have the same panels plus a device on each side consisting of arms supporting horizontal ladder-shaped frames. I couldn’t find out what this device can be, maybe some kind of deflector.
Wheels
The brake drums come separately. A bearing is inserted inside without gluing it, along with an external disc on which the rim drum and tire is added for the rear wheels. The rims external detail, which are different on the front and rear axles, is excellent, with the hubcaps and lug nuts clearly visible.
The front axle is assembled similarly, except for the lack of the external disc in the brake drum and the different rim. The spare wheel rims are different on their rear sides, as they are glued straight onto brackets on the vehicle sides.
The tires are 3D-printed pieces comprising six weighted items and two unweighted spares. The tread detail is very good. You can even read the manufacturer (Michelin) embossed on the sidewalls using a magnifying glass.
Cab and interior
The interior floor is a single piece with a panel at the front and the driver’s pedals molded on. The cab contains parts for the front console, the dashboard with decal instruments, the steering wheel, and the gear lever. The instructions provide full-scale views of both the dashboard and steering wheel for correct assembly.
The seats are molded on the floor, but detailed bases and backrests are provided in the upgrade frame for modification by cutting and replacing the backrests. Each backrest includes the headrest and seatbelts, but also has a couple of negative marks that need to be filled. Luckily, they do not affect detail. The seat behind the driver has the CROWS II operator’s display behind the backrest. The interior includes what appear to be two small fire extinguishers and a panel with the communications equipment.
The rear door is separate and detail includes tiny hinges and the lock, plus a separate external panel. The windshield, molded with thin wipers, and the side windows are attached from outside the cab. Pieces are thin and look appropriate for this scale.
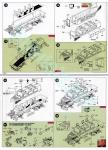
Lower hull
The front hull shows the armored radiator panel with sharp front grilles, plus some small parts for hooks and photo-etched plates. The bumper is separated in two pieces with the front one made of clear plastic and the headlight lenses included. The piece could have had the lenses separated to avoid masking them for painting. The bumper is detailed with a pintle hook, a foothold, a base for the robotic arm, and photo-etched headlight covers. Optionally, the Rhino infrared system for detonating IEDs can also be attached. The system has a peculiar flag shape seen in photos of modern military vehicles.
The rear hull features a pintle hook, the taillights molded inside clear pieces, and two small photo-etched plates. One of these is the license plate, which has two options with different numbers stamped on the piece, an unusual and surprising detail that can also be seen with a magnifying glass. The fenders are thin and have shallow marks on the undersides. They are all attached to the body with pins and have separate rear mudflaps. The rear pieces are detailed with baskets for stowing equipment and two antennas with the choice for a base with or without the whip.
Upper hull
The hood is detailed with a well-defined engine grille and a separate engine air cleaner intake. However, the side grilles are incorrect, as they are recessed rather than protruding, a detail easily visible to the naked eye. Several handles and other tiny photo-etched items enhance the hood side plates.
In addition to the rearview mirrors, the cab sides also feature one of the DUKE system antennas for jamming radio-controlled improvised explosives and another flattened antenna above the driver’s window. The spare wheels have brackets on the hull sides. Both have small photo-etched pulleys to raise or lower the wheels. The cable must be provided by the modeller. The instructions only indicate the installation of the right-side pulley, but in fact there is another one on the opposite side. On the right side, we find the one-piece exhaust pipe molded with the muffler and detailed with a photo-etched guard. The roof has six separate hatches with locks molded on. One of these can be replaced with the CROWS II system, which is also shown in the instructions but not included in the kit. Detail includes two clear beacons with lights provided in the bases. These seem to be GPS or SATCOM antennas.
Behind the crew compartment there is a pair of stowage boxes, the rear ladder with handrails located on a separate piece, and the option to attach either two antennas for DUKE system or two photo-etched whip antennas with separate bases.
The robotic arm consists of a boom and the arm itself with the claw. The boom and arm are provided with separate hydraulic cylinders. The claw has tiny photo-etched parts for the teeth and can be posed folded or not. Although the instructions do not show it, the arm can be attached extended or stowed on the side support. All the detail is fine and sharp.
Figures
On a small sprue we find nine parts for assembling two seated figures, corresponding to the driver and the CROWS II system operator. I deduce that the latter must be the one with only one separate arm, since the remote system can be controlled with just a joystick.
The driver’s arms are separated so they can be placed on the steering wheel. The figure is very well molded and shows remarkable definition in the uniform and equipment. Thus, the helmet, boots, uniform knee pads, vest, and cartridge belts can all be seen.
The remote system operator’s head is separated, which seems a bit overkill, as it does not improve detail at all and makes assembly difficult. As said, the figure only has one arm separated and his feet are in a very natural and relaxed position, resting one on top of the other. Detail in his equipment and uniform is identical and even better than that of his partner, as it shows a water bottle. Both figures also have separate backpacks with excellent definition in the pockets and straps, although I doubt they could be used with the figures seated as they are bulky.
Decals
The small decal sheet contains license plates, unit badges, a map, dashboard instruments, and communication displays which have a very fine, glossy appearance, good registration, and lack of excess support. Sharpness is superb; if a magnifying glass is used, you can even read the smallest numbers and the nickname Bonecrusher of the USMC vehicle.
Instructions
They are included in a 16-page landscape booklet printed in color containing a numbered parts diagram, 34 assembly sequences, four pages of profiles, and a color chart with paint matches from VIC Hobby, Vallejo, AMMO MIG, Tamiya, Mr. Hobby, and the RAL and Federal Standard codes.
Assembly steps clearly distinguish the parts from the upgrade plastic frame and PE fret in color. Assembly needs in-depth prior study due to the number and size of the parts.
The profile pages show four vehicles, but there are actually only two paint options, as the American vehicles are painted overall tan, and the French ones look the same, but with dark reddish patches.
Conclusion
It’s clear that AFV kits, including the smaller scales, are going through a golden age. T-Model has done an excellent job on this Buffalo MPCV, even more so considering its size. Detail is superb, even surprising in the case of the stamped license plates, for example. Thanks to the extra pieces provided in this release, the modeller has everything he needs to build a highly realistic rendition of the vehicle, except for the CROWS II system, but this isn’t installed as standard in real Buffalos.
Building this kit isn’t easy due to the number, size and brittleness of parts. It clearly needs the skills that come with practice, so I think it cannot be recommended to beginners.
In my opinion, there’s nothing really important to criticize in this kit. Maybe the mistake on the hood side grilles could be the only one. Otherwise, the breakup of one of the figures with the tiny head apart, as well as the lenses included in clear parts instead of being separate pieces only indicate that the kit’s designers went a bit too far with parts breakup. Perhaps they didn’t know where they should stop.◊
Publicado – Published: 6 / 2025
©www.jmodels.net

Debe estar conectado para enviar un comentario.