

De un vistazo – Quick look
MATERIAL Y PIEZAS
MEDIA & PARTS:
- Plástico inyectado (138 piezas), fotograbado (9 piezas), resina (13 piezas), varilla metálica (4 piezas), cadena metálica (1 tramo), cadenas de plástico (2 tramos).
- Injected plastic (138 parts), photo-etched (9 parts), resin (13 parts), metal rod (4 lengths), metal chain (1 length), plastic tracks (2 lengths).
CALCAS – DECALS:
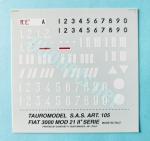
- Impresas por Zanchetti. Matrícula, numerales en blanco y negro, marcas de unidad. Brillantes y finas, con buen registro y saturadas. Sin exceso de soporte.
- Printed by Zanchetti. Tank number plate, white and black numbers, unit markings. Thin and glossy finish, with good register and saturation. No surplus carrier.
OPCIONES – OPTIONS:
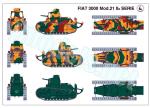
- FIAT 3000 mod. 21 IIª serie. Carro pintado de verde oscuro.
- FIAT 3000 mod. 21 IIª serie. Carro camuflado con manchas de amarillo ocre, gris medio y marrón oscuro.
- FIAT 3000 mod. 21 IIª serie. Tank painted overall dark green.
- FIAT 3000 mod. 21 IIª serie. Tank painted with big patches of ochre yellow, medium grey and dark brown.
INSTRUCCIONES – INSTRUCTIONS:
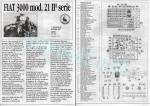
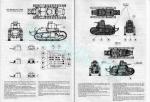
- Folleto doblado de 6 páginas impreso en blanco y negro. Contiene un sumario histórico sobre el carro, una lista numerada de piezas, un diagrama numerado de piezas, 7 secuencias de montaje y perfiles con referencias de color genéricas. Una hoja separada de formato A3 impresa en color muestra perfiles para pintar la maqueta.
- 6-page folded brochure printed in black and white. It contains a historical summary abut the tank, a numbered parts list, a numbered parts diagram, 7 construction steps and profiles with generic paint references. A separate A3 sheet shows profiles in color to paint the model.
LO MEJOR – THE BEST:
- Tema inusual. Buen detalle general.
- Unusual topic. Overall nicely detailed.
LO PEOR – THE WORST:
- El montaje requiere destreza. Cadenas de plástico. Vaguedad en las instrucciones.
- Assembly needs some skill. plastic tracks. Vague parts placement in the instructions.
VALORACIÓN – CONCLUSION:
- Junto con el carro de la primera serie es la única maqueta 1/35 del FIAT 3000 en plástico. No es para novatos, pero es ideal para los seguidores de los carros de entreguerras poco vistos, y además se puede ambientar en la Segunda Guerra Mundial.
- Together with the first series release, it is the only 1/35 kit in plastic of this tank. It is not for the newbie, but is especially suitable for those with an interest for interwar unusual, and even can be placed in a WWII setting.

La maqueta
Esta es la segunda maqueta que la italiana Tauro Model lanzó del carro FIAT 300. De la primera edición, FIAT 3000 mod. 21 – Iª serie (referencia 104), he publicado antes una revisión completa. En ella me basaré para esta nueva entrega.
El molde no es original de Tauro Model, sino que procede de una serie coleccionable publicada por los editores Fratelli Fabbri allá por mediados de los 70. Tauro Model la puso a la venta con su sello en los años 80. La caja retrata un carro de la segunda serie producida por FIAT en la cual se reforzó el sistema de suspensión original y las cadenas para mejorar la adaptación al terreno. También se renovó la transmisión, las ruedas tractoras, y las ametralladoras S.I.A. que iban situadas en la parte inferior del frontal de la torreta en la Iª Serie, se reemplazaron por otras del mismo calibre y de diseño más moderno FIAT Modelo 29 colocadas en la parte superior.
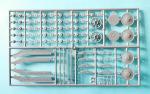
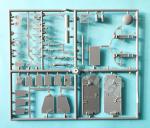
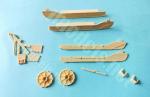
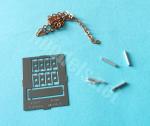
La caja contiene tres bastidores de piezas, un bastidor con las cadenas de plástico, la hoja de calcas y las instrucciones. En esta edición Tauro Model añadió una caja de cartón alargada para proteger las piezas de resina, una plancha de fotograbados, cuatro pequeños cilindros metálicos y un tramo de cadena metálica, que son los elementos nuevos en esta edición. Los bastidores de plástico y las cadenas son los mismos de la primera caja, las calcas son diferentes y las instrucciones sólo parcialmente distintas. Al contener las mismas piezas de la primera caja, el modelista también puede armar un carro de la primera serie con esta maqueta.
El moldeado de las piezas, propio de una edición multimedia, es bueno en general, con detalles limpios en el grabado de las planchas y remaches nítidos en su gran mayoría. Hay rebabas muy evidentes en algunas piezas y marcas de eyector profusas, pero casi todas en lugares no visibles tras el montaje. La plancha del dispositivo para salvar trincheras y sus soportes laterales tienen marcas que habrá que eliminar necesariamente.
Dejando a un lado el ajuste de las piezas, que no he comprobado, el montaje es más dificultoso de lo imprescindible debido a la poca claridad en algunas secuencias de las instrucciones. Su estudio y contraste con las referencias visuales que el modelista pueda conseguir me parece más importante que de costumbre.
Como en mi artículo anterior, también he consultado aquí las fotos y planos de la viejísima pero relevante publicación de B. Benvenuti y U. F. Colonna Carri Armati in Servizio fra le Due Guerre 1, de la serie Fronte Terra. L’Armamento Italiano nella 2ª Guerra Mondiale, Edizioni Bizzarri, 1972.
Revisión
El casco consta de siete planchas en total. La base y el techo poseen líneas en relieve en los bordes para alinear las planchas verticales. Las piezas están remachadas con limpieza en su gran mayoría, aunque la excepción son las tres planchas situadas delante del puesto de conductor, con detalle borroso y remaches poco nítidos. Las mirillas están poco marcadas y moldeadas en ligero relieve. Sin embargo, la tapa de la escotilla frontal del conductor está muy bien reproducida e incluye las bisagras representadas con acierto.
La cubierta del motor muestra las tapas con bisagras bien reproducidas y lo que parece ser el tapón de llenado de combustible sin el pestillo de cierre. Detrás de las tapas está la rejilla de ventilación del motor, cuyo detalle es decente.
Los lados del casco llevan dos asas y los tubos de escape con el silenciador y el protector separado. El tubo de salida es recto en lugar de ligeramente torcido hacia abajo como el real. Para colocar el protector hay dos pequeños cilindros en el interior de la pieza que coinciden con los moldeados en el escape, así, el protector queda separado del escape. Las instrucciones sólo muestran el montaje del escape del lado izquierdo. Debe entenderse que el opuesto se construye de la misma forma.
La plancha delantera inferior lleva dos ganchos de remolque con pernos. En la parte posterior del casco hay que montar el dispositivo para salvar trincheras. Este comprende la plancha redondeada central con dos soportes laterales provistos de amortiguadores. También hay un soporte adicional en la parte superior con refuerzos en forma de aspa. El dispositivo posee algunos elementos adicionales pequeños que añadir, pero las instrucciones no ayudan a colocarlos con certeza. El casco lleva en su lado trasero un pico y una barra finos moldeados con sus soportes.
La torre tiene los lados separados y tanto el techo como la base llevan perfiles próximos a los bordes para alinearlos correctamente. Las piezas laterales están numeradas en la parte trasera para evitar errores en la colocación. La base incluye en su interior un cilindro para orientar adecuadamente el techo de la torre al pegarlo sobre él. Las planchas tienen un remachado bien definido y las escotillas de acceso de la parte posterior reproducen con acierto las bisagras, mirillas y asas, aunque estas últimas es mejor sustituirlas para darles más realismo.
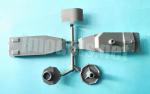
El mantelete y las dos planchas a sus lados son de resina, con las ametralladoras colocadas en la parte superior y la apertura de la mira abierta entre las dos armas. Las ametralladoras también son de resina y poseen el tubo bien definido y parcialmente horadado. Las piezas son mucho mejores que las de plástico grueso y casi deforme de la primera maqueta.
La cúpula de la torre viene moldeada en el techo sin horadar con su tapa separada. Las dimensiones pueden ser correctas, pero le faltan las mirillas orientadas a los cuatro lados del vehículo. Una vez completada la torre, se inserta en un vástago situado sobre el techo del casco. Para lograr que la torre se adapte y pueda rotar, es necesario limpiar algunas marcas de eyector de su base.
El tren de rodaje es claramente el punto de la maqueta al que más afecta la poca concreción de las instrucciones. Las ruedas tractoras son en este caso de resina, ambas bien moldeadas y con mínimas rebabas que limpiar. Los radios huecos del carro de la serie anterior se han sustituido con acierto por planchas. Los dientes no deben dar problemas para adaptar las cadenas, aunque el inconveniente es que son más frágiles que los de plástico.
Cada lado del carro dispone de dos carretones dobles con dos ruedas en cada uno. Estas van insertadas en medio de las dos mitades de cada carretón, que carecen de las ballestas o de cualquier otro detalle. Los cuatro carretones se insertan en ejes moldeados en las cubiertas de protección junto con la rueda tensora. Las piezas externas de las cubiertas son de resina con la longitud conveniente para cubrir la rueda tractora, característica del carro de la segunda serie. El detalle exterior se complementa con varias piezas de fotograbado que simulan refuerzos en las planchas. Los soportes traseros en forma de U también son de resina.
Este conjunto va unido al casco por medio de cuatro soportes triangulares en cada lado. Los soportes parecen un tanto gruesos y tal vez necesiten ser refinados para ajustar entre las placas remachadas moldeadas en el casco. El lateral izquierdo del casco lleva también una pieza cónica para introducir la manivela de arranque del motor.
Los rodillos de retorno se componen de cinco ruedas por lado insertadas entre dos largueros. Estos van situados en el casco con un pivote en el extremo trasero y un soporte separado en el delantero. Este soporte debería tener en su interior un muelle helicoidal, pero en su lugar hay un horrendo cubo sólido para sostener la pieza con comodidad.
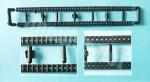
Las cadenas son dos tramos de plástico algo gruesos pero de cierta flexibilidad. Los eslabones están mucho mejor marcados y detallados por fuera que por dentro, donde el detalle es simplón. Los extremos se unen a presión con calor. Las instrucciones no muestran la orientación de los eslabones, pero es fácil comprobarla en cualquier foto del carro.
La hoja de calcas es de Zanchetti, impresor conocido por sus trabajos para Italeri. En ella vemos una matrícula, series de numerales en blanco y negro y marcas de unidad con acabado brillante y fino, buen registro y correctamente saturadas. No hay exceso de soporte.
Para seleccionar las calcas adecuadas conviene consultar fotos del carro, ya que las marcas, números y matrículas cambian en distintos periodos y hasta en vehículos concretos. Por ejemplo, las grandes marcas blancas de formas geométricas básicas (círculos, triángulos, barras) y los numerales en el frontal y lados del casco son más frecuentes antes de la Guerra Mundial y desaparecen a lo largo de los años 30.
Las instrucciones están impresas en blanco y negro en un folleto doblado de seis páginas. Contiene un sumario histórico sobre el carro, una lista numerada de piezas, un diagrama numerado de piezas, siete secuencias de montaje y perfiles con referencias de color genéricas. Una hoja separada de formato A3 impresa en color muestra perfiles para pintar la maqueta.
Además de los perfiles, las nuevas instrucciones siguen en general el mismo montaje de las anteriores, por ello la posición de ciertas piezas no es muy clara y el modelista necesitará consultar referencias. La secuencia D es propia de esta edición y nos muestra el montaje de la torreta con nuevas piezas en el mantelete, las dos planchas contiguas a ambos lados y las ametralladoras. Las piezas de resina tienen distinta numeración que las de plástico y los pasos de montaje reflejan correctamente cada cambio concreto sin alteraciones en las vistas explosionadas de la edición precedente.
Valoración
Las maquetas de Tauro Model son las únicas de plástico en esta escala del FIAT 3000 en sus diferentes modelos y, dada su singularidad y escasa relevancia fuera de su país, no parece que las marcas lo vayan a dejar de obviar en un futuro al menos cercano.
Esta nueva edición muestra cambios y ciertas mejoras respecto a la primera que la convierten aún más en una maqueta multimedia destinada a modelistas de nivel medio y avanzado, con interés particular por este tipo de carros de entreguerras muy poco comunes.
Para mejorar o complementar esta maqueta hay algunas mejoras aún no muy antiguas en el mercado, como cadenas impresas en 3D y hasta el carro de transporte remolcado por un camión que se empleaba para mover estos vehículos.◊


The kit
This is the second kit the Italian company Tauro Model released of the FIAT 300 tank. I have previously published a complete review of the first boxing, FIAT 3000 mod. 21 – 1st series (reference 104). I will base this new review on that one.
The tool is not original from Tauro Model, but comes from a collectible series published by Fratelli Fabbri in the mid-1970s. Tauro Model released it under their own label in the 1980s. The box depicts a tank from the second series produced by FIAT, in which the original suspension system and tracks were reinforced to improve terrain adaptation. The transmission, drive wheels, and S.I.A. machine guns, which were located on the lower part of the turret front in the 1st Series, were also updated and replaced with newer, more modern FIAT Model 29 machine guns of the same caliber mounted higher on the mantlet.
The box contains three sprues of parts, a sprue with the plastic tracks, a decal sheet, and the instructions. In this release, Tauro Model added a long cardboard box to protect the resin parts, a photo-etched sheet, four small metal cylinders, and a section of metal chain, which are the new elements in this edition. The plastic sprues and tracks are the same as in the first boxing, the decals are new, and the instructions are only partially different. Since it contains the same parts as the first box, the modeler can also build a tank from the first series with this kit.
The molding of parts, typical of a multimedia edition, is generally good, with clean engraved plates and crisp rivets for the most part. There is very noticeable flash on some parts and numerous ejector pin marks, but almost all of them are in places not visible after assembly. The plate for the trench-crossing device and its side supports have marks that will necessarily need to be removed.
Leaving aside the fitting of parts, which I haven’t checked, assembly is more difficult than necessary due to the lack of clarity in some construction steps. Studying and comparing them with any visual references the modeler can find seems more important than usual.
As in my previous article, I also made use of the photos and plans from the very old but relevant publication by B. Benvenuti and U. F. Colonna, Carri Armati in Servizio fra le Due Guerre 1, from the series Fronte Terra. L’Armamento Italiano nella 2ª Guerra Mondiale, Edizioni Bizzarri, 1972.
Review
The hull consists of seven plates. The base and roof have raised lines along the edges to align the vertical plates. The pieces are mostly cleanly riveted, with the exception of the three plates in front of the driver’s seat, which have blurry detail and indistinct rivets. The portholes are barely defined and molded slightly raised. However, the driver’s front hatch cover is very well reproduced and includes accurately represented hinges.
The engine deck shows well-reproduced hinged covers and what seems to be the fuel filler cap without the locking latch. Behind the covers is the engine ventilation grille, which is decently detailed.
The hull sides are detailed with two handles and the exhausts molded in one piece with the muffler and covers separated. The outlet pipe is straight instead of slightly bent downwards like the real one. To fit the cover, there are two small pins inside the piece that match those molded on the exhaust, aligning the cover and spacing it from the exhaust. The instructions only show the left-side exhaust assembly, but we can assume that the opposite is built in the same way.
The lower front plate has two tow hooks with bolts. The trench-crossing device comprises the central rounded plate with two side supports fitted with shock absorbers. There is also an additional support at the top with cross-shaped reinforcements. The device has some additional small components that can be attached, but the instructions don’t provide clear guidance on their placement. The hull has a finely molded peak and bar molded with clamps in the rear side.
The turret has separate sides, and both the roof and base have raised lines near the edges for proper alignment. The side pieces are numbered on the back to prevent mistakes during assembly. The base includes a cylinder inside to correctly attach the turret roof. The plates have well-defined rivets, and the access hatches at the rear accurately reproduce the hinges, vision ports, and handles, although the latter are best replaced for greater realism.
The gun mantlet and the two plates on either side are made of resin, with the machine guns mounted on top and the sight opening between the two weapons. The machine guns are also made of resin and have a well-defined, partially hollowed barrel. These machine guns are much better than the thick, almost deformed plastic pieces of the first kit.
The turret cupola is molded on the roof and has a separate cover. The dimensions may be correct, but it lacks the vision ports facing the four sides of the vehicle. Once the turret is assembled, it is inserted into a shaft located on the hull roof. To ensure the turret fits and can rotate, some ejector marks on its base need to be cleaned up.
The running gear is clearly the part of the kit most affected by the lack of clarity in the instructions. The drive wheels are made of resin, both well-molded and with minimal flash to clean up. The hollow spokes of the first seriesare correctly replaced with flat plates. The teeth shouldn’t pose any problems for fitting the tracks, although the drawback is that they are more fragile than plastic ones.
Each side of the hull has two double wheel bogies, with two wheels each. These are inserted between the two halves of the bogies, which lack leaf springs or any other detail. All four wheel bogies are built on axles molded on the sponsons, along with the idler wheel. The outer sponson pieces are made of resin and show of the appropriate length to cover the drive wheel, a characteristic of the second series tank. The external detail is complemented by several photo-etched parts that simulate reinforcements on the plates. The U-shaped rear supports are also resin pieces.
This assembly is attached to the hull by means of four triangular supports on each side. The supports look a bit thick and may need to be thinned to fit between the riveted plates molded on the hull. The left side of the hull also has a conical piece for inserting the engine’s starting crank.
The return rollers consist of five wheels per side, inserted between two spars. These are attached to the hull with a pin at the rear and a separate bracket at the front. This bracket should have a coil spring, but instead, there’s an awful solid cube to hold the rollers.
The tracks are two thick but flexible lengths of plastic. The links are much better molded and detailed on the outside than on the inside, where detail is rather simplistic. The ends are joined with a heated tool as in old kits. The instructions don’t show the correct link position, but this is easy to check in any picture of the tank.
The decal sheet is made by Zanchetti, a usual printer of sheets for Italeri. It features a license plate, black and white numbering, and unit markings with a glossy, fine finish, good registration, and correct saturation. There is no excess support material.
To select the appropriate decals, it is advisable to check pictures of the tank, as markings, numbers, and license plates change in different periods and even on specific vehicles. For example, large white markings in basic geometric shapes (circles, triangles, bars) and numbers on the front and sides of the hull were more common before World War II and disappeared throughout the 1930s.
The instructions are printed in black and white in a six-page folded leaflet. It contains a historical summary of the tank, a numbered parts list, a numbered parts diagram, seven assembly sequences, and profiles with generic color references. A separate A3 sheet printed in color shows profiles for painting the model.
Besides the profiles, the new instructions generally follow the same assembly as the previous ones; therefore, the position of some parts is not very clear, and the modeler will need to check references. Sequence D is specific to this release and shows the turret assembly with new parts on the mantlet, the two plates on either side, and the machine guns. Resin parts have different numbers than the plastic ones, and the assembly steps accurately reflect each specific change without altering the exploded views from the previous kit.
Conclusion
Tauro Model’s kits are the only FIAT 3000s in plastic in this scale. Since they are quite rare and little known outside Italy, it seems unlikely that manufacturers will stop ignoring them anytime soon.
This second box features changes and improvements over the first, making it an even more comprehensive kit for intermediate and advanced modelers with a particular interest in these rare interwar tanks.
To enhance or complement this kit, there are some relatively new upgrades on the market, such as 3D-printed tracks and even the truck-towed transport trailer that was used to carry these tanks.◊
Publicado – Published: 12 / 2025
©www.jmodels.net

Debe estar conectado para enviar un comentario.