
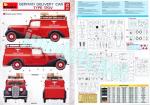
De un vistazo – Quick look
MATERIAL Y PIEZAS
MEDIA & PARTS:
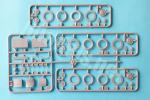
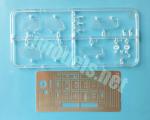
- Plástico inyectado (223 piezas), plástico transparente (14 piezas), fotograbado (33 piezas).
- Injected plastic (223 parts), clear plastic (14 parts), photo-etched (33 parts).
CALCAS – DECALS:
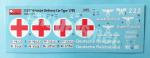
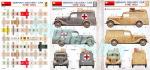
- Impresas por Decograph. Marcas de la Cruz Roja, rótulos, 4 juegos de matrículas, números y marcas tácticas. Apariencia brillante y fina. Buen registro y saturación de color. Bien impresas.
- Printed by Decograph. Red Cross markings, 4 sets of plates, numbers and tactical markings. Shiny and thin appearance. Good register and color saturation. Well printed.
OPCIONES – OPTIONS:
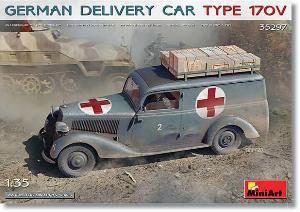
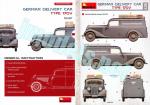
- Mercedes-Benz Tipo 170V. Ferrocarriles Alemanes (Deutsche Reichsbahn), 1940-1943.
- Mercedes-Benz Tipo 170V. Correo Alemán (Reichspost), 1940-1945.
- Mercedes-Benz Tipo 170V. Pelotón desconocido de vehículos sanitarios. Wehrmacht, 1941-1943.
- Mercedes-Benz Tipo 170V. Unidad desconocida. Wehrmacht, 1943-1945.
- Mercedes-Benz Type 170V. German Railways (Deutsche Reichsbahn), 1940-1943.
- Mercedes-Benz Type 170V. German Mail (Reichspost), 1940-1945.
- Mercedes-Benz Type 170V. Unknown platoon of sanitary vehicles. Wehrmacht, 1941-1943.
- Mercedes-Benz Type 170V. Unknown unit. Wehrmacht, 1943-1945.
INSTRUCCIONES – INSTRUCTIONS:
- Folleto de tamaño A4 de 16 páginas impresas a color en papel satinado. Contiene plano de piezas numerado, lista de colores con equivalencias en diferentes pinturas, 47 etapas de montaje y 4 páginas de perfiles. Incluye una hoja con cajas recortables como carga del vehículo. Muy claras y bien impresas.
- A4 16-page booklet printed in color on satin paper. Contains a numbered parts plan, a list of colors with matches in modelling paints, 47 construction stages and 4 pages of profiles. A page printed in color shows cutout paper boxes as a load for the vehicle. Clear and well printed.
LO MEJOR – THE BEST:
- Muy buen detalle general. Opciones de montaje. Incluye versiones civiles y militares.
- Nicely detailed overall. Construction options. Civil and military finishes included.
LO PEOR – THE WORST:
- Fotograbados muy pequeños. Algunas piezas quebradizas.
- Tiny PE parts. Some fiddly pieces.
VALORACIÓN – CONCLUSION:
- Excelente maqueta de un pequeño vehículo que lleva siendo producido por MiniArt en múltiples modelos y versiones civiles y militares. Tiene algunas zonas más delicadas debido a las piezas, pero es apto para modelistas de nivel medio a avanzado.
- Excellent kit of a vehicle MiniArt have been releasing in many models with both military and civil finishes. It has some delicate pieces due to the size, but it is more than suitable for medium to advanced-level modellers.

La maqueta
A lo largo del tiempo parece que Masterbox y MiniArt se han complementado para lanzar este Mercedes-Benz Tipo 170V en diferentes modelos y versiones. Masterbox, que fue la primera en traer a la palestra este automóvil en la escala, ha llegado a producir hasta ocho maquetas, con y sin figuras, y todas ellas en versiones militares o de la policía alemana. MiniArt lleva la friolera de 16 ediciones diferentes por ahora, igualmente con y sin figuras, y parece empeñada en sacarle partido sobre todo a las versiones civiles, algunas de ellas con caja cerrada y otras con la caja abierta con toldo y sin él, donde encontramos vehículos comerciales de reparto, agrícolas, de mudanzas y un etcétera que supongo se alargará todavía más.
La maqueta de Masterbox no contiene fotograbados y las ruedas son de vinilo. Fue bien recibida en su momento y, por lo que he podido ver, incluso los novicios pueden sacarle partido. La de MiniArt me parece mejor detallada, el montaje es más delicado y también posee mayor número de versiones. El nivel de experiencia necesario puede variar de medio a avanzado.
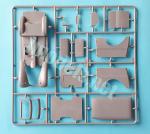
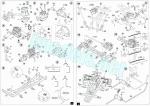
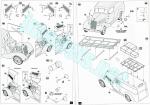
La caja contiene seis bastidores de piezas de plástico gris, con un total de 223 piezas, un bastidor transparente, una plancha de fotograbados, la hoja de calcas y las instrucciones. Las piezas están embaladas con limpieza y los fotograbados protegidos con plástico adherente sobre la plancha y metidos en un sobre de cartón con solapa.
Las piezas están bien moldeadas y no presentan deformaciones ni rebabas. Muy pocas de ellas muestran cilindros de salida del eyector, pero hay algunas marcas que tapar en el interior del techo y los lados de la caja, así como detrás del panel trasero de la carlinga. Al estar todas en el interior de la caja, ninguna será visible a menos que queramos dejar la puerta trasera abierta.
La maqueta incluye piezas sobrantes destinadas a la versión turismo con cuatro asientos y cuatro puertas con sus cristales respectivos, así como la parte inferior de la carrocería provista de maletero en la parte trasera.
Este Mercedes Tipo 170V (Vorn, “delante”, por la posición del motor) fue el automóvil más popular de la marca desde su introducción en 1936 y hasta 1953. Su motor de gasolina de 1,7 litros y cuatro cilindros tenía caja de cuatro velocidades. Se fabricó con diferentes carrocerías estándar, como el modelo Salón/Sedán de dos y cuatro puertas con techo duro, el denominado Cabriolet A de cuatro puertas, el Cabriolet B de dos puertas con techo de lona enrollable y el turismo sin techo. Se fabricaron también modelos especiales con caja cerrada y con caja plana abierta para fines comerciales y el Ejército alemán adoptó para emplearlos como ambulancias, coches de policía, de personal o de oficiales.
Motor y transmisión
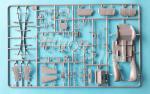
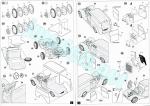
El motor consta de más de 20 piezas y muestra gran nivel de detalle. El bloque, el cárter, la tapa de balancines y la caja de cambios están separados en diferentes piezas. Lo mismo ocurre con otros elementos menores como el compresor de aire, las poleas, los colectores, los filtros de aire y aceite, etc. El ventilador es fino y sus palas están estampadas con molduras. La caja de cambios viene aparte y está detallada con seis piezas, entre ellas el pequeño motor de arranque.
La transmisión consta de un diferencial situado en medio del eje trasero y el eje de transmisión. El diferencial está dividido en mitades y detallado con algunas piezas pequeñas. El eje de la transmisión carece de las juntas cardan y debe pegarse cuando ya está instalada el diferencial con el eje delantero.
Bastidor y suspensión
El bastidor está fabricado de una pieza con el paragolpes y la placa de matrícula separados para unirlos en una etapa posterior. Está detallado con pequeños fotograbados en los extremos de algunos travesaños que posteriormente servirán para pegar los estribos. Según las instrucciones, primero hay que instalar la suspensión trasera, que se centra en dos palieres unidos a cada lado del diferencial. Un vástago en cada palier permite introducir el muelle amortiguador de cada lado. El muelle está muy bien hecho y resulta delicado tanto de cortar del bastidor como de limpiar. Por debajo de los muelles hay que añadir un par de bielas unidas por un lado al eje y por el otro a una cincha de fotograbado. Este momento del montaje debe ser cuidadoso para que todo quede en su lugar y no partir nada. Los extremos del eje van unidos a los tambores de freno.
En la parte delantera, el motor debe estar ya pegado antes de añadir las ballestas, muy bien detalladas, por encima y debajo del mismo así como la delicada barra estabilizadora que está provista de un vástago para introducir los tambores de freno. Las instrucciones no indican que las ruedas se puedan girar, pero con sólo cortar y reposicionar este vástago podríamos simular el giro de las ruedas si lo deseamos, aunque, obviamente, la barra estabilizadora no tendría la posición correcta por mucho que no se vea.
Los conductos del líquido de frenos de las ruedas traseras debe fabricarlos el modelista con cable y doblarlos de acuerdo a la plantilla que ofrecen las instrucciones.
En este punto, del chasis sólo resta pegar el tubos de escape. El extremo del tubo, que no está horadado, está unido al silenciador cilíndrico con dos tapas en los extremos. Sobre una de ellas hay que añadir el tramo inicial del escape que va pegado al motor.
Ruedas
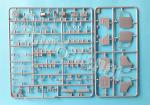
Típico de MiniArt, vienen despiezadas en finos anillos, cuatro por rueda unidos mediante vástagos situados por dentro de una de las caras externas, de este modo el dibujo de la banda de rodadura queda perfectamente alineado y realista. El detalle en la banda muestra buena definición, lo mismo que las llantas, detalladas con el buje separado y diferentes según el eje. La rueda de repuesto viene en un bastidor separado para no mezclarla con las demás.
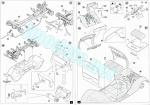
Interior
Como he dicho, en los bastidores encontramos dos bases de la carrocería, una de ellas con cuatro asientos y maletero. Lo distinguiremos fácilmente del aplicable a esta maqueta, que cuenta con dos asientos y la parte trasera más plana y escalonada. La pieza incluye los guardabarros, moldeados con finura, un hueco para alojar el motor delante, las bases de los asientos en la parte central y una zona trasera moldeada para pegar un suelo suplementario a media altura y el compartimento de la rueda de repuesto.
El mamparo del motor es una pieza detallada por fuera con diversas herramientas moldeadas con sus soportes y el depósito de combustible. El depósito cilíndrico consta de cuatro partes y tiene el tapón de llenado aparte. El lado interno de la pieza contiene los pedales separados. Instalado este panel, podemos añadir la columna de la dirección y las palancas. El volante es fino y está reforzado por una pieza de fotograbado en su centro.
El marco del parabrisas está unido a los secciones de la carrocería situadas entre la cabina y los lados del morro. Lleva los motores de los limpiaparabrisas moldeados en la pieza. El cristal del parabrisas es fino y transparente y se inserta fácilmente en el marco gracias a finos rebajes. En un paso posterior, lo detallaremos con los limpiaparabrisas. El lado interno del marco tiene el espacio necesario para instalar el salpicadero, magníficamente reproducido con guanteras a los lados y la consola de indicadores en el centro.
Una vez pegado el marco del parabrisas al chasis, se procede a terminar los asientos con facilidad, ya que sólo hay que pegar el asiento a la base del chasis y el respaldo al panel trasero de la cabina. El tejido de los asientos está bien reproducido aunque no viene texturizado. El panel trasero viene en una pieza que incluye un hueco rebajado para insertar la ventanilla trasera transparente.
La parte trasera tiene un suelo sobreelevado de una pieza sin detalle con un hueco debajo para colocar la rueda de repuesto.
Carrocería
En la parte delantera del morro aparece el radiador con la parte superior separada y detallada con el tapón. La moldura del morro permite instalarlo dentro de un rebaje y colocar la parrilla de fotograbado por la parte externa. El radiador viene suavemente texturizado por ambas caras y la parrilla debe doblarse ligeramente para adaptarla a su marco. Este marco está detallado con la famosa estrella de la marca.
Los lados del morro están detallados con las ranuras de ventilación del motor. Vienen limpias y abiertas, aunque con un poco de cuidado al usarlo, se pueden mejorar con pegamento líquido extrafino. Dependiendo de si dejamos el capó abierto o cerrado, los lados llevan pestillos de fotograbado colocados en dos posiciones diferentes. Los pestillos son muy pequeños y no sencillos de manipular. El capó viene en dos piezas separadas para poder mostrarlo parcial o totalmente abierto. Las piezas poseen marcas de eyector en las caras internas, pero incluso si las ponemos en posición abierta no se verán, quedando cubiertas por las piezas laterales. Sobre el motor hay que colocar varillas finas para sostener el capó abierto.
Para instalar los faros sobre los guardabarros hay dos pequeñas bases sobre la superficie. El derecho es el de serie en el vehículo y tiene la lámpara en una pieza y la lente estriada en pieza transparente por otra. El izquierdo es opcional, y se puede elegir el estándar o bien un faro Notek en las versiones militares. Este último está detallado con una base de fotograbado muy pequeña.
Las puertas de la cabina se pueden poner abiertas al estar separadas. Las piezas están bien moldeadas y muestran las molduras y bisagras nítidamente. Están detalladas con las manijas, el panel interior con la manivela del cristal y detalle texturizado en las bolsas portaobjetos. El cristal casi no hace falta pegarlo, ya que queda encajado entre el marco y el panel trasero.
Los lados de las puertas llevan dos indicadores de giro y dos retrovisores. Los soportes de los retrovisores son opcionales, con forma recta o en ángulo, pero los perfiles de las instrucciones sólo llevan el primero.
Los lados de la caja de transporte vienen de una pieza moldeados en el perfil delantero con parte de las bisagras de las puertas. La puerta trasera es de una sola hoja con la manija exterior separada. Según las instrucciones debe pegarse tras unir el techo al vehículo. El techo es de una pieza y posee leves resaltes en las esquinas y lados para unirlo.
La maqueta ofrece la posibilidad de añadir la baca representada por una pieza de fotograbado para formar el bastidor. Los soportes son también del mismo material y están separados. Para rellenar la baca MiniArt ha incluido en las instrucciones una página con cajas recortables de distintos productos. Las cajas están impresas sobre papel satinado con pestañas para un rápido pliegue y montaje. El detalle añadido nunca viene mal, pero la única desventaja que veo es que son todas del mismo tamaño y la única forma de darles alguna diferencia visual es colocarlas horizontal o verticalmente.
Calcas
La hoja está impresa por Decograph y contiene marcas de la Cruz Roja, rótulos de los ferrocarriles y correos alemanes, cuatro juegos de matrículas, números y marcas tácticas. Los motivos poseen apariencia brillante y fina, con buen registro y saturación de color.
Instrucciones
El folleto de tamaño A4 tiene 16 páginas impresas a color en papel satinado. Contiene un plano de piezas numerado, una lista de colores con equivalencias en diferentes pinturas (Vallejo, AK RC, Mission Models, AMMO MIG y Tamiya), 47 etapas de montaje y cuatro páginas de perfiles. Como he señalado, también incluye una hoja con cajas recortables como carga del vehículo. El folleto es claro, no tiene errores y está bien impreso.
Los acabados de pintura son bastante variados ya que esta edición incluye tanto versiones civiles como militares. Es interesante que los fabricantes de esta escala recojan cada vez más versiones civiles porque abren nuevas posibilidades al ya sobresaturado mundo de los vehículos militares.
Valoración
A estas alturas no deben de quedar muchos vehículos militares alemanes que no hayan pasado al plástico y concretamente también a esta escala. Este Tipo 170V es otro más que añadir a la lista.
La maqueta me parece excelente, muy bien detallada en todas las zonas y el montaje resulta sólo un poco más entretenido en ciertos pasos donde las piezas son pequeñas, muy finas o de fotograbado. Una vez terminada, debe ser una muy buena representación de este automóvil que en cualquier versión, y hay cajas de MiniArt donde elegir, no debería dejar indiferente a ningún aficionado. Además, este pequeño vehículo también es susceptible de ser empleado en múltiples escenas o dioramas situadas en diferentes lugares de Europa.
Por el nivel de dificultad esta maqueta parece más apropiada para modelistas de nivel intermedio en adelante.◊

The kit
Over time it seems Masterbox and MiniArt have complemented each other to launch this Mercedes-Benz Type 170V in different models and finishes. Masterbox, which was the first to have a 1/35 kit of this car, have produced up to eight boxes, with and without figures, and all of them in military or German police versions. MiniArt have released no less than 16 different boxes so far, both with and without figures, and seem determined to take advantage of civilian versions with varied cargo beds. The boxes depict almost all sorts of commercial vehicles (delivery vans, agricultural vehicles and so on). I suppose the unending list will continue to grow in the coming dates.
Masterbox kit does not contain photo-etched parts and the wheels are vinyl. It was well received at the time and, from what I have seen, even novices can take advantage of it. MiniArt offer seems better detailed, assembly is more delicate and it also has a greater number of versions. This kit seems to need a more experienced modeller.
The box contains six frames of gray plastic parts, with a total of 223 pieces, a clear frame, a photo-etched fret, the decal sheet and the instructions. Pieces are packed cleanly and the photo-etched parts protected with adhesive plastic on the fret and inside a cardboard envelope with a flap.
Pieces are well molded and do not have blemishes or flash. Very few of them show plastic pips, but there are some marks to fill on the inside of the roof and the sides of the box as well as behind the rear cab bulkhead. Since they are all inside the cargo box, none of them will be visible unless we wish to leave the back door open.
The kit includes parts belonging to the touring version with four seats and doors with their windows we are not going to use, as well as the lower body with a trunk in the rear.
This Mercedes Type 170V (Vorn, “front”, due to the engine position) was the brand’s most popular car from its introduction in 1936 until 1953. Its 1.7-liter four-cylinder gasoline engine had a gearbox with 4 speeds. It was manufactured with different standard bodies, such as two- and four-door Saloon/Sedan model with a hardtop, the so-called four-door Cabriolet A, the two-door Cabriolet B with a roll-up canvas roof, and the touring car without a roof. Special variants with a cargo box and an open flat bed were also manufactured for commercial purposes and the German Army also adopted them for use as ambulances, police cars, staff or personnel cars.
Engine and transmission
The engine consists of more than 20 parts and shows a great level of detail. The block, crankcase, rocker cover and gearbox are separated into different pieces. The same goes for other minor pieces such as the air compressor, pulleys, collectors, air and oil filters, etc. The fan is thin and the blades are stamped with moldings. The gearbox comes separately and is detailed with six pieces, including the small starter motor.
The transmission consists of a differential located between the rear axle and the drive shaft. The differential is divided in halves and detailed with some small parts. The transmission shaft lacks the cardan joints and is attached once the differential is already installed.
Frame and suspension
The frame is made in one piece with the bumper and number plate separated to be glued at a later stage. It is detailed with small photo-etched parts at the ends of some crossbars that will later be used to attach the running boards. According to the instructions, you must first install the rear suspension, which is centered on two driveshafts attached to each side of the differential. A pin on each drive shaft allows the shock absorber springs to be inserted on each side. The springs are very well rendered and is quite fiddly so care is needed to cut and clean up the parts. Below the springs there is a pair of connecting rods attached on one side to the axle and on the other to a photo-etched strap. This stage of assembly needs attention to align pieces correctly without breaking them. The ends of the axle are attached to the brake drums.
At the front, the engine is already attached before adding the very well detailed leaf springs above and below it as well as the delicate stabilizer bar that is provided with a pin to insert the brake drums. Instructions do not mention the wheels are steerable, but by simply cutting and repositioning this pin we can simulate the wheels turning if we wish. Obviously, the stabilizer bar would not be in the correct position though it is not visible.
The brake fluid ducts for the rear wheels are provided by the modeller using wire and bent according to the templates shown in the instructions.
At this point of construction, the only thing left to be attached to the frame is the exhaust. The tail pipe is molded with the cylindrical muffler comprising four parts. The separate front length of the exhaust is joined to the engine and the muffler.
Wheels
Typical of MiniArt, they come molded in thin four plastic rings per wheel joined by means of pins located inside one of the external sides, this way the tread pattern is perfectly aligned and looks realistic. Detail on the tread shows good definition, as do the rims, detailed with different separate hubs in each axle. The spare wheel comes in a separate frame so as not to mix it up with the rest.
Interior
As said before, we can find two lower bodies on the frames, one of them with four seats and trunk. We will easily distinguish it from the one applicable to this kit, which has two seats and a flatter and more stepped rear. The piece includes finely molded fenders, a gap to house the engine in front, the seat bases in the middle and a rear space to attach an additional floor and the spare wheel compartment.
The engine firewall is detailed with several tools molded with its brackets and the fuel tank at the front. The cylindrical tank consists of four parts and has a separate filler cap. The inner firewall contains separate pedals. Once this bulkhead is installed, we can add the steering column and the levers. The steering wheel is thin and detailed with a photo-etched piece in the center for a more defined appearance.
The windshield frame is attached to the body sections between the cockpit and the nose sides. It has the windshield wiper motors molded on the piece. The windshield glass is thin and transparent and easily inserted into the frame thanks to fine recesses. In a later step we will detail it with the windshield wipers, rendered in tiny PE parts. The inner side of the frame has the space to install the dashboard, nicely engraved with the glove compartments on the sides and the gauge console in the middle.
Once the windshield frame is glued to the chassis, the seats can be finished easily, as you only have to glue the seat to the body floor and the backrest to the rear cab bulkhead. The fabric of the seats is well reproduced although it is not textured. The bulkhead is one piece including a recessed gap to insert the clear rear window.
The rear lower body has a flat raised floor with a compartment underneath to store the spare wheel.
Body
At the front is the radiator with the upper section separated and detailed with the cap. The nose molding allows it to be installed inside a recess and the photo-etched grill to be placed on the outside. The radiator comes softly textured on both sides and the grille needs to be bent slightly to fit the frame. This frame is detailed with the brand’s famous star.
The sides of the nose are detailed with engine louvers. The slots come clean and open, although with some care, they can be improved with extra-thin liquid glue. Depending on whether we wish to leave the hood open or closed, the sides have photo-etched clips placed in two different positions. The clips are very small and not easy to handle. The hood comes in two separate pieces so it can be displayed partially or fully open. The hood pieces have ejector marks on the internal faces, but even if we place them open, they will not be seen, being covered by the side pieces. The X braces and the hood hinge support are thin rods that are only necessary if you are leaving the hood open.
To install the headlights on the fenders there are two small bases on them. The right headlight is the standard type and has a lamp with a separated grooved lens. The left headlight is optional, and you can choose the standard one or a Notek headlight for the military versions. The latter is detailed with a very small photo-etched bracket.
The cab doors can be posed opened. The pieces are well molded and show the moldings and hinges clearly. They are detailed with the handles, the interior panel with the window winder handle and textured detail on the storage bags. The glass almost does not need to be glued, since it is placed between the frame and the rear panel.
The sides of the doors have two turn indicators and two mirrors. The mirror arms are optional, with a straight or angled shape, but the profiles in the instructions only include the first one.
The sides of the cargo box come in one piece molded with a part of the door hinges on the front edges. The rear door is one piece with a separate outer handle. According to the instructions, it should be glued after attaching the roof to the vehicle. The roof is in one piece and has raised lines on the corners and sides to join it.
The kit offers the possibility of adding the roof rack in a photo-etched piece to form the frame. The base comprises separate pieces of the same material. To fill the roof rack, MiniArt have included a pege in the instructions with cut-out boxes of different products. Boxes are printed on glossy paper with tabs for quick folding and assembly. Bonus detail never hurts, but the only disadvantage I see is that they are all the same size and the only way to give them any visual difference is to place them horizontally or vertically.
Decals
The sheet is printed by Decograph and contains Red Cross markings, German railway and post signs, four sets of license plates, numbers and tactical markings. Decals have a shiny and fine appearance, with good registration and color saturation.
Instructions
The A4 size booklet has 16 pages printed in color on glossy paper. It contains a numbered parts plan, a list of colors with equivalences in different paints (Vallejo, AK RC, Mission Models, AMMO MIG and Tamiya), 47 assembly stages and four pages of profiles. As pointed out, it also includes a sheet with cut-out boxes as a load. The brochure is clear, error-free, and well printed.
Paint finishes are quite varied as this release includes both civil and military versions. It’s interesting that manufacturers choose civilian versions because these open up new possibilities to the oversaturated world of military vehicles.
Conclusion
At this point there must not be many German military vehicles left that have not been kitted in plastic, especially at this scale. This Type 170V is another one to add to the list.
The kit seems excellent, very well detailed in all areas and construction is only a little slower in some steps where pieces are small, very thin or photo-etched. When finished, it should build into a very good rendition of this car. Any model or finish, and there is a whole lot to choose from, should not leave any fan indifferent. In addition, this small vehicle can also be used in multiple scenes or dioramas located in different places in Europe.
Considering the skills needed in this kit, it seems more suitable for intermediate level modellers and above.◊
Publicado – Published: 10 / 2023
©www.jmodels.net

Debe estar conectado para enviar un comentario.