
De un vistazo – Quick look
MATERIAL Y PIEZAS
MEDIA & PARTS:
- Plástico inyectado (176 piezas), plástico transparente (6 piezas), fotograbado (23 piezas).
- Injected plastic (176 parts), clear plastic (6 parts), photo-etched (23 parts).
CALCAS – DECALS:
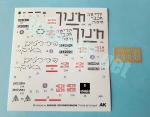
- Impresas por Cartograf. Varios juegos de matrículas, marcas tácticas, rótulos para el toldo e instrumentos del salpicadero. Apariencia muy fina y brillante. Buen registro y nítidas. Sin exceso de soporte.
- Printed by Cartograf. Seval sets of number plates, tactical markings, grafittis for the canvas and dashboard instrument. Vey thin and glossy appearance. Sharp and in register. No excess of carrier.
OPCIONES – OPTIONS:
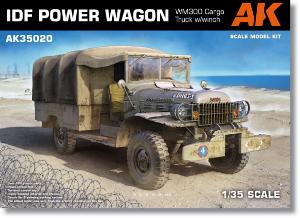
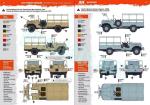
- Power Dragon WM300. Fuerzas de Defensa de Israel. Guerra del Yom Kipur. Suez. Octubre de 1973.
- Power Dragon WM300. Fuerzas de Defensa de Israel. Guerra del Yom Kipur. Octubre de 1973.
- Power Dragon WM300. Fuerzas de Defensa de Israel. Guerra del Yom Kipur. Octubre de 1973.
- Power Dragon WM300. Fuerzas de Defensa de Israel. Guerra del Yom Kipur. Octubre de 1973.
- Power Dragon WM300. Ejército del Sur del Líbano. Líbano, años 80.
- Power Dragon WM300. Israeli Defence Forces. Yom Kippur War. Suez area. October 1973.
- Power Dragon WM300. Israeli Defence Forces. Yom Kippur War. October 1973.
- Power Dragon WM300. Israeli Defence Forces. Yom Kippur War. October 1973.
- Power Dragon WM300. Israeli Defence Forces. Yom Kippur War. October 1973.
- Power Dragon WM300. South Lebanon Army. Lebanon, 1980s.
INSTRUCCIONES – INSTRUCTIONS:
- Folleto de tamaño A4 de 28 páginas impreso a color en papel satinado. Contiene un plano numerado de piezas, una tabla de colores con equivalencias de pinturas de AK Interactive, 43 secuencias de montaje y una guía de pintura de 5 páginas con perfiles.
- 28-page A4 booklet printed in color on satin paper. It shows a numbered parts plan, a color chart with AK Interactive paint matches, 43 assembly steps and 5 pages of profiles as a painting guide.
LO MEJOR – THE BEST:
- Tema novedoso. Buen detalle en general. Relativa sencillez de montaje. Instrucciones.
- New topic. Nicely detailed overall. Relative ease of assembly. Instructions.
LO PEOR – THE WORST:
- Marcas en el bastidor del chasis. Motor. Capó de una pieza. Bastidor del toldo muy frágil.
- Small sinks on the chassis frame. Engine. One-piece hood. Brittle canvas frame.
VALORACIÓN – CONCLUSION:
- Estreno de un Power Wagon en plástico con un detalle bastante notable, aunque un tanto lastrado por la ausencia de motor y la imposibilidad de mostrarlo. Recomendable a los aficionados a los vehículos militares ligeros y seguidores de la serie Dodge WC.
- First kit of a Power Dragon in plastic. It has an outstanding detail a bit downgraded by the lack of an engine and the one-piece hood. Recommendable to both softskins fans and followers of the Dodge WC series.

La maqueta
Esta es una maqueta rara en su clase porque se trata de la única que hay de plástico en cualquier escala por ahora. Lo cierto es que AK ha visto muy bien el hueco y posible mercado de este vehículo, que en su versión militar es más conocida por haberla empleado las Fuerzas de Defensa de Israel, tanto en la Guerra de los Seis Días (1967) como en la del Yom Kipur (1973).
El WM300 es la designación de uno de los modelos de la tercera serie del Power Wagon que la empresa norteamericana Dodge fabricó entre 1960 y 1971. A partir de 1966, Israel adquirió cierto número de vehículos muy usados o en mal estado para hacerles cambios importantes en el diseño, que originalmente era parecido a la serie Dodge WC de la Segunda Guerra Mundial, y adaptarlos a sus necesidades.
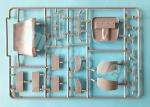
La maqueta trae siete bastidores, incluidos dos de ellos repetidos y el de piezas transparentes, la caja de carga, el capó y el toldo sueltos, una pequeña lámina de fotograbados, las calcas y las instrucciones.
El plástico está bien moldeado y limpio de rebabas. A algunas piezas hay que quitarles los cilindros de salida de eyector y también hay marcas visibles en la cara interior del toldo, especialmente en el de la caja de carga, el lado inferior de los guardabarros y en el marco del parabrisas. Todas ellas son leves y no deben plantear problemas para eliminarlas. El chasis tiene unos rechupes poco profundos sobre las dos caras de los largueros. Nada grave, pero conviene taparlos, al menos por fuera, antes de empezar el montaje.
La secuencia de construcción de la maqueta es la habitual: en una primera fase se monta el chasis, la suspensión, la transmisión y las ruedas; en la siguiente el morro y la cabina; y termina con la caja de carga y toldos, si se añaden. El montaje no debe resultar difícil a quienes ya tienen alguna experiencia, aunque no me parece una maqueta muy apta para principiantes.
Para pintar el modelo no hay prácticamente elección, ya que casi todas las opciones son del Ejército israelí durante la Guerra del Yom Kipur, con la única diferencia del vehículo libanés, pintado de azul claro.
Revisión
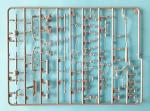
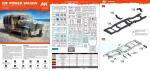
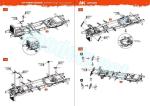
El bastidor del chasis está moldeado de una pieza, salvo un par de travesaños separados. Varias piezas van añadidas al mismo, como los soportes de los estribos laterales y el de la rueda de repuesto, los ganchos delanteros, los paragolpes traseros detallados con luces transparentes, y el enganche trasero. Las ballestas vienen separadas y muestran buena definición en las láminas.
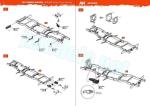
El radiador está bien detallado por delante, pero la parte trasera carece del ventilador porque no hay motor digno de tal nombre. AK proporciona solamente la parte inferior del motor como medio de pegar la caja de cambios y la transmisión. La pieza sólo tiene el cárter definido y carece de toda la parte superior. Uno se pregunta si, por el mismo esfuerzo, no hubiese resultado más rentable proporcionar el motor completo, siquiera fuese a grandes rasgos. En cualquier caso, como el capó no viene separado, tampoco es posible mostrarlo abierto.
Antes de montar los ejes y la transmisión, se añaden el engranaje de la columna de dirección, el tubo de escape, que tiene medio silenciador aparte, y el depósito de combustible, también separado en dos piezas.
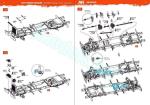
Los ejes están unidos a una parte de los diferenciales, que se completan con otras dos piezas suplementarias para formar el engranaje entero. Los extremos del eje delantero están detallados con dos pequeños aros que soportan la barra estabilizadora y en la parte izquierda tenemos el brazo de dirección. Los ejes van sujetos por encima de los amortiguadores con cinchas. Los amortiguadores son idénticos y van instalados por fuera del chasis en el caso de los delanteros, mientras que los traseros van pegados por dentro.
La transmisión necesita un montaje cuidadoso, no tanto por su dificultad, sino por los cuatro ejes de transmisión que la componen. La caja de cambios y la caja transfer están separadas en varias piezas con un eje entre ellas. Otros dos ejes conectan las cajas con los diferenciales delantero y trasero. Un cuarto eje une la caja de cambios con el motor del cabrestante delantero. Los árboles tienen las juntas cardan reproducidas con nitidez. El ensamblaje de la transmisión está bien representado en las instrucciones, que incluyen vistas en detalle de las uniones que pueden resultar problemáticas por ser menos visibles.
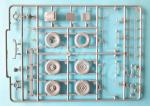
Las ruedas están separadas por la mitad. El detalle en las llantas es correcto y muestra gran nitidez y lo mismo se puede decir del detalle del fabricante de los neumáticos (Goodyear) reproducido en los flancos tanto externos como internos. También destaca la reproducción de la banda de rodadura.
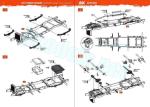
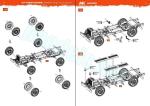
El paragolpes delantero está formado por dos planchas con otra pieza entre ellas que las une y sirve de apoyo al cabrestante y a la bobina del cable. La bobina está separada en mitades y el cable grabado en ambas, mientras que el motor va unido a esta por uno de sus lados. El chasis se termina con el añadido de los estribos laterales, separados en cuatro piezas que muestran un detalle excelente en el patrón antideslizante.
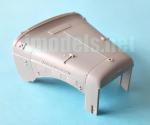
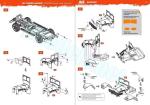
El morro viene en una pieza cortado por las tapas del capó que muestran los pestillos definidos. Los lados con la rejilla de ventilación definida vienen aparte. La pieza muestra el logotipo del fabricante con nitidez e incluye el salpicadero en la parte posterior, sobre el que se aprecian varios indicadores y la guantera finamente grabados.
La parte frontal contiene varias piezas, como la parrilla frontal con los indicadores transparentes y los soportes de los guardabarros. El capó está detallado con el tapón del radiador, dos enganches para sujetar el parabrisas en posición abatida, los retrovisores, así como las bisagras del parabrisas. Los guardabarros son finos y están provistos de faros con la lente transparente.
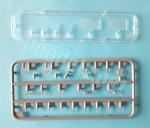
Desgraciadamente, el parabrisas no está diseñado para colocarlo plegado, aunque no coloquemos el toldo de la cabina. El marco es de una pieza y posee los cristales en piezas finas. La cara exterior lleva dos limpiaparabrisas aparte y la interior los pequeños motores y dos pestillos para asegurar el parabrisas. Las instrucciones proporcionan plantillas de tamaño real para cortar las máscaras de los cristales y de las marcas de los limpiaparabrisas, lo que ahorra trabajo al pintar.
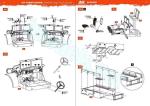
Siguiendo las instrucciones, una vez terminado el morro, la pieza va pegada sobre la parte anterior del suelo de la carlinga, que se proporciona de una pieza. La parte delantera de la cabina cuenta con los pedales y varias palancas separados, el volante y la columna de dirección. Los instrumentos del salpicadero están representados mediante calcas. Los asientos tienen la base y la mitad trasera del respaldo aparte. El moldeado de estas piezas es bastante realista. El toldo de la cabina es de una pieza y está bien texturizado en la parte externa.
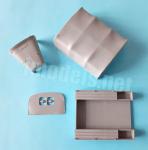
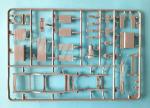
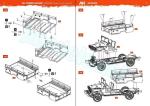
La caja de carga también es de una sola pieza salvo la puerta trasera que, en principio, no está diseñada para mostrarla abierta. Sin embargo, las dos cajas de respeto de la parte trasera sí pueden colocarse abiertas al tener las tapas exentas. La caja muestra los listones de madera de los asientos muy bien texturizados, dos cajas de respeto laterales grabadas con nitidez, el tapón del depósito, al que se le añade el tubo de llenado tras pagar la caja al chasis, y los catadióptricos muy bien reproducidos. Los asientos tienen los respaldos, también texturizados, y los soportes curvados de los extremos. Los lados externos de la caja están detallados con diversos enganches para el toldo en piezas de fotograbado muy pequeñas.
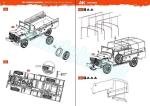
Para cubrir la parte trasera tenemos la opción de instalar el bastidor del toldo, formado por cuatro travesaños más tres largueros. Esos elementos son muy finos y tan delicados que el modelista experto no dudará en sustituirlos por hilo de cobre. También podemos cubrir la caja con un toldo que posee el lado delantero separado. Según se indica en las instrucciones, esta pieza delantera con ventanas plastificadas no siempre se instalaba. El lado trasero aparece recogido y deja ver el interior.
La hoja de calcas está impresa por Cartograf, que ha dejado buena muestra de su trabajo en una hoja con varios juegos de matrículas, marcas tácticas, rótulos para el toldo e instrumentos del salpicadero. Los motivos tienen una apariencia muy fina y brillante, poseen buen registro y son nítidos. No tienen exceso de soporte.
El folleto de instrucciones tiene un tamaño A4 y consta de 28 páginas impresas a color en papel satinado. Contiene un plano numerado de piezas, una tabla de colores con equivalencias de pinturas de AK Interactive, 43 secuencias de montaje y una guía de pintura de cinco páginas con perfiles. Los pasos de montaje se complementan con vistas en detalle que aclaran la posición correcta de determinadas piezas.
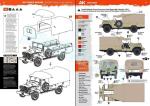
Salvo la versión libanesa, todos las terminaciones de pintura son idénticas, aunque dos de ellas llevan marcas de reconocimiento aéreo sobre el capó y los guardabarros. Para añadir variedad, los perfiles de las instrucciones muestran vehículos provistos de toldo, con y sin grafitos en hebreo, o sólo con el bastidor.
Valoración
Es extraño que a estas alturas no hubiera una maqueta de plástico del Dodge Power Dragon, pero ciertamente AK Interactive le ha dado un estreno bastante bueno. La maqueta captura con gran corrección las características del vehículo con un montaje asequible para la gran mayoría de modelistas.
Lástima que la ausencia de gran parte del motor y el morro de una pieza imposibiliten mostrar el capó abierto. Aunque no de tanta relevancia y por leves que sean, también hay que reseñar las marcas del bastidor del chasis, que no están a la altura de la calidad general del producto.
Como en otras maquetas, AK sigue ofreciendo una instrucciones bien presentadas, sin escatimar en el tamaño y especialmente útiles a la hora de añadir ciertos detalles difíciles de localizar o colocar certeramente.
Los seguidores de estos vehículos ligeros, y en especial los aficionados a la saga del Dodge WC, ya tienen otra maqueta más que llevar a la vitrina, pero en este caso muy singular por ser la primera.◊


The kit
Incredible though it seems, this is the first and only kit in plastic we have of the Power Wagon in any scale at the moment. The truth is that AK have clearly identified the potential market for this vehicle, which in its military version is best known for its use by the Israel Defense Forces in both the Six-Day War (1967) and the Yom Kippur War (1973).
The WM300 is the designation of one of the models in the third series of the Power Wagon, manufactured by the American company Dodge between 1960 and 1971. Beginning in 1966, Israel acquired a number of heavily used or poorly maintained vehicles to make significant changes to the design, which was originally similar to the World War II Dodge WC series, and adapt them to its needs.
The kit comprises seven sprues, including two double runners and one with clear parts, the tray, the hood, and the separate cab, a small sheet of photo-etched parts, the decals, and the instructions.
Parts are well molded and free from flash. Some ejector pips need to be removed from a few pieces and there are also visible pin marks on the inside of the cab and tray tarps, the underside of the fenders and the windshield frame. All of these are shallow and should not pose any problems to clean up. The chassis frame has some shallow sinks on both sides of the side members. Nothing serious, but it’s a good idea to fill them, at least on the outside, before beginning assembly.
The construction sequence is the usual one: the first phase involves assembling the chassis, suspension, transmission, and wheels; the next stage involves assembling the nose and cab; and finishing with the tray and tarps, if these are used. Assembly shouldn’t be difficult for modelers with some experience, so I don’t think this is a suitable kit for beginners.
There’s virtually no choice when it comes to painting the kit, as almost all the options are from the Israeli Army during the Yom Kippur War, with the only difference being the Lebanese vehicle, which is painted light blue.
Review
The chassis frame is molded in one piece, except for a couple of separate cross members. Several parts are attached to these, such as the running boards brackets and spare tire mount, the front tow hooks, the rear bumpers provided with clear taillights, and the rear tow hitch. The leaf springs show good definition in the blades.
The radiator is well detailed on the front, but the rear lacks a fan because there is no engine worthy of the name. AK provides only the lower part of the engine as a means of attaching the gearbox and transmission. The part only has a defined crankcase and lacks the entire upper part. One wonders if, for the same effort, it might not have been more cost-effective to provide the complete engine, even in rough outline. In any case, since the hood is not molded separately, it is impossible to show it open.
Before assembling the axles and transmission, you need to add the steering column gear, the exhaust pipe, which has a separate half-muffler, and the fuel tank, also separated in two pieces.
The axles are molded with half of the differentials, which are completed with two additional pieces. The ends of the front axle are detailed with two small rings to hold the stabilizer bar, and has the steering arm on the left side. The axles are secured above the shock absorbers with shackles. The shock absorbers are all the same with the front ones installed on the frame side members, while the rear ones are glued inside the frame.
The transmission needs careful assembly to install the four driveshafts. The gearbox and transfer case are separated into several pieces with a shaft between them. Two other shafts connect the gearboxes to the front and rear differentials. A fourth shaft joins the gearbox to the front winch motor. The shafts have clearly reproduced universal joints. The transmission assembly is well represented in the instructions, which include detailed views of some parts assemblies that can be problematic because they are less visible.
The wheels are separated in half. Detail on the rims is correct and very sharp, as is the detail of the tire manufacturer (Goodyear) reproduced on both the outer and inner sidewalls. The reproduction of the tread pattern is also quite nice.
The front bumper is made up of two plates with a piece between them holding the winch and the cable reel. The reel is separated in halves, with the cable engraved on both, while the motor is attached to it on one side. The chassis is completed with the addition of the running boards. These are provided in four pieces with excellent detail in the anti-slip pattern.
The front body is one piece with the hood molded closed and showing defined latches. The hood side panels have sharp vents and come separately. The piece clearly displays the manufacturer’s logo and includes the dashboard at the rear. This is engraved with the gauges and glove compartment.
The nose front contains several parts, such as the front grille with clear indicators and the fender brackets. The hood is detailed with the radiator cap, two latches to hold the windshield in the folded position, the rearview mirrors, and the windshield hinges. The fenders are thin and feature headlights with clear lenses.
Unfortunately, the windshield is not designed to be attached folded down, even if we do not install the tarp. The frame is a single piece and has thin glass panes. The outer side has two separate wiper blades, and the inner side is provided with the small motors and two latches to secure the windshield. The instructions provide full-size templates for the masks of both the glass and wiper blade markings, which makes them easier to paint.
Following the instructions and once finished, the nose is glued onto the front of the cab floor, which is supplied in one piece. The cab front features separate pedals and levers, the steering wheel, and the column. The dashboard gauges are represented with decals. The seats have separate bases and the rear half of the backrest. These pieces have a realistic appearance. The cab tarp is one-piece and shows a nice texture on the outside.
The tray is also one-piece except for the tail gate, which is not intended to be displayed open. However, the two rear storage boxes can be posed open as they have separate lids. The tray features nicely textured wooden seat slats, two clearly engraved side storage boxes, the fuel filler cap, with the filler tube attached after the tray is glued to the chassis, and sharp reflectors. The seats have textured backrests. The sides of the tray are detailed with several small PE tie downs.
We have the option of installing just the tarp frame, consisting of four crossbars and three spars. These elements are very thin and so delicate that the experienced modeler will probably replace them with copper wire. We can also hide the cargo bed with a one-piece tarp with a separate front side. As indicated in the instructions, this front piece provided with windows was not always installed. The rear side is rolled up showing the interior.
The decal sheet is printed by Cartograf, which has provided a good example of their work in a sheet with several sets of license plates, tactical markings, graffitis for the canvas and dashboard instruments. They all have a very thin and glossy appearance, are sharp and in register with no excess carrier.
The A4 instruction booklet consists of 28 pages printed in color on glossy paper. It contains a numbered parts plan, a color chart with AK Interactive paint matches, 43 assembly chapters, and a 5-page painting guide with profiles. Assembly steps are complemented by helpful detailed views that clarify the correct positioning of some parts.
Except for the Lebanese version, all paint finishes are identical, although two of them have air reconnaissance markings on the hood and fenders. For added variety, the profiles in the instructions show vehicles fitted with a tarp, painted or not with Hebrew graffiti, or with only the canvas frame.
Conclusion
It’s strange that there wasn’t a plastic kit of the Dodge Power Dragon by now, but AK Interactive have certainly given it a pretty good debut. The release accurately portrays the vehicle’s characteristics and assembly is suitable for most modelers.
It’s a shame that the absence of most of the engine and the one-piece nose makes it impossible to show the hood open. Although not as significant and however slight, the sinks on the chassis frame are also worth noting, as they don’t match the overall quality of the product.
As with other kits, AK continue to offer well-presented instructions without skimping on size. Steps are quite clear and the detailed views are useful for attaching parts during assembly.
Fans of these lightweight vehicles, and especially followers of the Dodge WC saga, now have another kit for the shelf, but this is a very unique one for being the first.◊
Publicado – Published: 8 / 2025
©www.jmodels.net

Debe estar conectado para enviar un comentario.