
De un vistazo – Quick look
MATERIAL Y PIEZAS
MEDIA & PARTS:
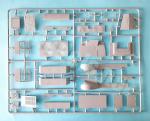
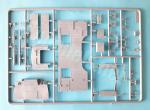
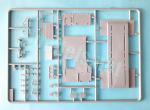
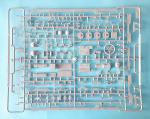
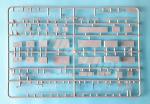
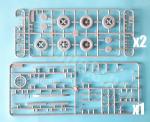
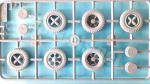
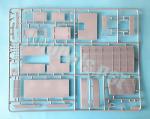
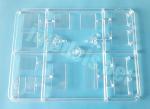
- Plástico inyectado (398 piezas), plástico transparente (16 piezas).
- Injected plastic (398 parts), clear plastic (16 parts).
CALCAS – DECALS:
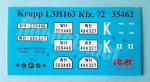
- Diales del salpicadero, dos juegos de matrículas y marcas tácticas. Apariencia fina y brillante. Saturación y registro correctos. Escaso sobrante de soporte.
- Dashboard dials, two set of number plates and tactical markings. Thin and glossy finish. Correct saturation and register. No excess of carrier film.
OPCIONES – OPTIONS:
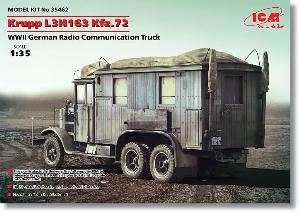
- Krupp L3H163 Kfz. 72. Francia, mayo de 1940.
- Krupp L3H163 Kfz. 72. Ucrania, septiembre de 1941.
INSTRUCCIONES – INSTRUCTIONS:
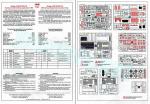
- Folleto A4 de 12 páginas impreso en blanco y negro. Contiene una breve reseña histórica y datos sobre el camión, un plano numerado de piezas, una tabla de colores con equivalencias de Model Master, 37 secuencias de montaje y una página de perfiles.
- 12-page A4 brochure printed in black and white. It shows a short historical summary and tachnical data about the vehicle, a numbered parts plan, a color chart with matches in Model Master paints, 37 construction steps and a page of profiles.
LO MEJOR – THE BEST:
- Motor. Transmisión y suspensión detalladas.
- Engine. Transmission and suspension detail.
LO PEOR – THE WORST:
- Amplio despiece. No se puede mostrar el motor. Compartimento de radio vacío.
- High parts count. Engine cannot be shown. Empty radio compartment.
VALORACIÓN – CONCLUSION:
- Es una buena representación de este camión, pero tiene un despiece excesivo y está mermada porque ICM no la ha explotado al máximo de sus posibilidades. Para modelistas con nivel medio o avanzado.
- It is a nice rendition of this German truck, but it has an excessive parts count and ICM has not developed all the potential the kit can give. For average and advanced modellers.

La maqueta
ICM ha reeditado esta maqueta de hace una década y la ha revitalizado en tiempos más recientes con otra caja denominada Wehrmacht Radio Trucks (DS3509), donde nuestro protagonista de hoy (el modelo denominado Funkbetriebskraftwagen Kfz. 72, con dos ventanas a los lados del compartimento de radio y dos mástiles de radio en la parte trasera) aparece acompañado del Henschel 33D1 de la propia casa ucraniana.
El único cambio de esta reedición es el color del plástico, que ha pasado del color arena original al gris, mucho más adecuado como base para pintar la maqueta. La recia caja con sobrecubierta trae diez bastidores de piezas, uno de ellos contiene las piezas transparentes, la hoja de calcas y las instrucciones. Todos los bastidores están metidos en una única bolsa de cierre sellado con el espacio bastante justo dentro de la caja, por eso no será raro si encontramos algún bastidor con un ligero doblez que normalmente no suele afectar a las piezas más grandes, por fortuna. Las piezas transparentes están protegidas en una bolsa adicional, pero las calcas las encontramos entre las páginas de las instrucciones, como de costumbre.
Las piezas muestran una dureza media tirando un poco a blanda y están limpias de rebabas, con escasos cilindros de eyector para el abultado número de piezas. Hay leves marcas de eyector negativas en el interior de la carlinga y bajo los guardabarros, sin embargo las más grandes y positivas, están situadas justo debajo de los guardabarros delanteros y no serán evidentes, menos aún con las ruedas en su lugar.
En los bastidores encontramos piezas para la versión de carga de este camión, como el toldo de la cabina, aunque la caja de carga ha sido reemplazada por dos bastidores conteniendo el compartimento de las radios. Supongo que para no elevar aún más el número de piezas, ICM no ha proporcionado el interior del compartimento, de modo que la maqueta, hecha de caja, únicamente se puede mostrar en el modo de desplazamiento, por así decirlo.
Actualmente hay varias mejoras para esta maqueta y su versión de carga en forma de ruedas, fotograbados, máscaras, cadenas para el barro o nieve e incluso de resina para simular carga estibada sobre el techo de esta versión de radio.
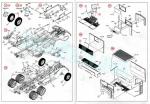
Motor, chasis y transmisión
El motor está bastante bien detallado. Lo componen el bloque separado en mitades más el cárter, y diversas piezas que representan la caja de cambios, las bombas de agua y aceite, el motor de arranque y los colectores de escape entre otras. También separado está el ventilador y las poleas, aunque la correa no está completa por carecer de la polea inferior, que debería ser casi toda ella visible y estar parcialmente tapada por una cubierta unida al bloque motor, con un pequeño eje por delante que debe simular el cigüeñal de arranque. Aunque no habrá forma de apreciarlo una vez montada la maqueta, esta pieza es un tanto decepcionante lo mismo que la falta del radiador, que ICM se ha saltado. El tubo de escape es todo de una sola pieza con el silenciador incluido. La pieza es bastante fina y está moldeada con los soportes. Al ser tan larga, hay que cuidar la alineación sobre el bastidor del chasis con la ayuda de los pasos de construcción 14 y 15 donde se ve instalado.
El bastidor está formado por dos largueros más cinco travesaños, sin contar el trasero, que contiene el montaje del gancho de remolque, ni el primero, que va pegado con la suspensión del eje delantero. El paragolpes es del tipo estandarizado en el modelo H163 y viene separado, la pieza está bien de finura y muestra el hueco central para insertar la manivela de arranque. Las instrucciones indican que antes de formar el bastidor, hay que añadir diferentes elementos colocados sobre los travesaños, como los guardabarros delanteros, para después formar el chasis. Sin embargo, parece más sencillo hacerlo justamente al contrario.
Los largueros incluyen los ganchos frontales de remolque y llevan en sus lados externos distintas abrazaderas, el depósito de combustible con sus cinchas, lo que parece un cabrestante formado por seis piezas así como los guardabarros, moldeados con los estribos y los soportes separados. La tablazón de madera está limpiamente grabada y sobre ellos van colocadas dos cajas de respeto y un depósito de forma triangular.
El hueco interno del bastidor contiene un soporte para la caja de transferencia más una pieza formada por dos rodillos que la unen a la caja de cambios. Una vez instalado el motor en el bastidor, dos ejes de transferencia unen la caja de transferencia con los ejes traseros y el motor auxiliar de la caja de cambios con el cabrestante. Los ejes traseros no son fáciles de montar por el número de piezas en cuestión. Los diferenciales, moldeados con los ejes, constan de cinco piezas cada uno, un eje entre ellos y seis piezas más que representan el mecanismo para desconectar las ruedas traseras de la transmisión. Las piezas van pegadas a los diferenciales y son fáciles de romper por su extrema finura.
Al montar el bastidor, las instrucciones especifican el añadido de la columna de dirección junto con el brazo de mando separado pegados ambos sobre una pestaña del guardabarros izquierdo, pero me parece mejor dejarlo sin pegar para que no estorbe la terminación del chasis hasta el momento de pegar la cabina sobre este.
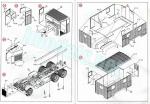
Suspensión y ruedas
El eje delantero está detallado con los brazos de la suspensión en los extremos, dos ballestas y la barra estabilizadora. El montaje requiera cierto punto de finura y tiento al pegar las piezas por ser pequeñas o muy finas.
La suspensión trasera consta de un soporte doble con el muelle amortiguador separado y dos abrazaderas alargadas como topes. Los muelles tienen una buena definición, pero en uno de sus lados hay que limpiar un par de cilindros que afectan parcialmente al detalle.
Las ruedas son del tipo Trilex del modelo H163, también conocidas como ruedas de araña o ruedas de artillería con la parte exterior de la llanta, invisible en la maqueta, separada en tres piezas. Los característicos seis radios de la llanta parecen bien reproducidos, junto con sus tuercas y el detalle central del buje. Los neumáticos son bastante decentes y tienen un detalle aceptable en la banda de rodadura, aunque hay que limpiar las finas líneas de molde.
Las ruedas delanteras van unidas directamente a los brazos de la suspensión del eje, mientras que las traseras son dobles. Las internas carecen de radios y van pegadas a las exteriores por medio de los tambores de freno separados. El vástago de unión con la suspensión es bastante corto, pero podría reemplazarse por una varilla algo más larga.
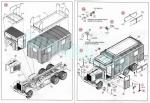
Cabina y carrocería delantera
Ya que el molde es compartido con la versión de carga, encontramos dos suelos de la cabina idénticos en los bastidores. El detalle de las zonas con paneles antideslizantes es demasiado tenue. El interior de la cabina incluye las palancas, pedales y el volante, los soportes de los fusiles más un asiento liso con el respaldo pegado sobre el panel trasero. Este panel lleva una ventanilla transparente fina.
Los laterales de la cabina contienen los marcos de las puertas unidos a un panel que muestra la estructura de madera exterior bien representada y una ventanilla estrecha sólo en el lado izquierdo. De acuerdo con las fotos de este vehículo, la pala situada en el lado derecho junto a la puerta de la versión de carga estaba sustituida por los estribos plegables de acceso al techo. Las instrucciones señalan la colocación de la pala y su soporte (piezas E14 y E7) en el paso de montaje 33, pero en el paso 37 se aprecian los estribos correctos y la ausencia de la pala.
Las puertas son piezas separadas con un detalle similar al de los marcos por fuera, aunque en las caras internas hay algunas tenues marcas. Los tiradores y la manivela de los elevalunas vienen separados y los cristales se pegan sobre rebajes en los marcos. Las piezas transparentes son finas y no se pueden mostrar más que totalmente bajadas o subidas.
El panel delantero comprende dos piezas superpuestas. La delantera muestra cierto detalle en el cableado del motor, el depósito de los limpiaparabrisas y la bocina, mientras que la trasera incluye el marco del parabrisas y dos soportes para el salpicadero, cuyos instrumentos en relieve se mejoran con calcas. El marco del parabrisas del conductor es algo más ancho y viene separado, lo que da la posibilidad de mostrarlo abierto. El marco incluye los limpiaparabrisas, pero los motores internos son piezas aparte al igual que los retrovisores y las luces auxiliares, provistas de lentes transparentes.
El techo metálico de esta versión es de una pieza y está bien detallado en su superficie. La pieza cuenta con el triángulo de aviso de remolque y una bandeja de estiba con finos soportes.
El morro lo forman la parrilla frontal y tres piezas que impiden mostrar el capó abierto. La parte superior contiene las bisagras de apertura, las dos solapas de ventilación cerradas y los pestillos de estas. Los lados contienen rejillas de ventilación, bien perfiladas pero tampoco extraordinarias con los cierres separados. La parrilla frontal está bien representada y muestra las características tuercas con buena definición y el nombre del fabricante nítido. En la parte posterior hay que añadir lo que parece en depósito de agua del radiador. El tapón de llenado viene unido a la parrilla, pero la pequeña insignia del fabricante está separada.
Los faros tienen la lente transparente y el soporte separado. El soporte del banderín es un poco grueso y quedaría mejor de fotograbado. Hay también un retrovisor adicional sobre el guardabarros izquierdo y los tradicionales indicadores de anchura.
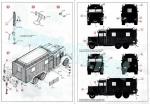
Caja de carga
El compartimento de las radios lo componen el suelo, el techo y cuatro lados, con dos puertas separadas y seis ventanillas en piezas transparentes. Las superficies exteriores, excepto el techo, poseen el recubrimiento de madera bien reproducido, aunque sin textura. Sobre él pueden verse algunos compartimentos laterales con bisagras. El suelo tiene dos rebajes laterales para colocar los guardabarros traseros. Estos vienen en una pieza cada uno, son finos y llevan un perfil interno que cubre parcialmente el hueco. El compartimento está soportado por dos largueros situados sobre el bastidor ceñidos por cuatro cinchas cerradas (G26) situadas por delante y detrás de las ruedas traseras. Extrañamente estas aparecen al final del montaje (paso 25), cuando es totalmente imposible colocarlas. Los largueros de soporte y las cinchas deben pegarse antes de formar el bastidor del chasis o bien ser reemplazadas con ventaja por finas tiras de plástico.
El techo tiene el recubrimiento metálico correctamente representado. Sobre él hay que colocar una amplia bandeja de estiba con finos soportes en las esquinas.
El lado derecho lleva una placa de matrícula, un soporte para los tubos del mástil de la radio de 10 m (Steckmast), el tirador y un asa para la puerta, que no tiene detalle interno, y los peldaños plegables de acceso al techo en la parte trasera de la cabina. Los peldaños pueden pegarse abiertos o cerrados al estar separados en dos piezas. El lateral opuesto está detallado con una matrícula y dos rampas de acceso con los soportes y cinchas moldeados en las piezas. Estas rampas permitirían hacer subir o bajar al vehículo en lugares desnivelados o salvar lugares arenosos o embarrados.
La parte trasera posee una puerta separada con asa y manija como la lateral e igualmente sin detalle interno, las luces y el faro, la placa de matrícula y el peldaño de acceso. Los mástiles de las antenas van colocados en los extremos detallados con abrazaderas, manivelas y fundas de protección en el extremo superior.
Calcas
La hoja lleva impresos los diales del salpicadero, dos juegos de matrículas y marcas tácticas. Las calcas muestran un aspecto fino y brillante, con aparente buena saturación, registro correcto y escasa película sobrante.
Instrucciones
Vienen en un folleto de tamaño A4 con 12 páginas impresas en blanco y negro. Contiene una breve reseña histórica y datos sobre el camión, un plano numerado de piezas, una tabla de colores con equivalencias de Model Master, 37 secuencias de montaje y una página de perfiles.
Las vistas del montaje son claras y sencillas de seguir en general, aunque el montaje del chasis, la transmisión y la suspensión, donde se concentra el mayor número de piezas de la maqueta, requiere mayor atención para evitar desajustes. He encontrado un par de errores en el folleto que he mencionado en su lugar en el texto. Afortunadamente se pueden evitar con facilidad.
Las alternativas de pintura son inexistentes puesto que ICM sólo ofrece dos camiones con distintas matrículas y marcas pintados en Schawarzgrau (RAL 7021), vulgarmente conocido como gris Panzer.
Valoración
La maqueta peca de un excesivo despiece en la construcción del chasis, pero el detalle en general es bueno y representa bastante correctamente esta versión de radio. Considerando el trabajo que se ha tomado ICM, especialmente en el motor, es lástima que el camión únicamente se pueda mostrar “en ruta” y que no ofrezca la alternativa de mostrar el motor o algo del interior. Si además permitiese desplegar las antenas, ya sería algo realmente fastuoso.
Algunas piezas exteriores se pueden afinar con fotograbados, aunque salvo en contados casos no me parecen imprescindibles, y naturalmente el techo pide a gritos una carga que le dé algo más de vida.
Sin ser un gran reto, esta edición está destinada al modelista de nivel medio o avanzado dotado con la gran virtud de la paciencia porque ciertamente no se terminará en dos ratos.◊


The kit
ICM has reissued this kit from a decade ago but in fact it was last released inside a box called Wehrmacht Radio Trucks (DS3509), where our protagonist today (L3H163 variant called Funkbetriebskraftwagen Kfz. 72, with two windows on each side of the radio compartment and two radio masts at the rear) appeared accompanied by a Henschel 33D1.
The only change in this rebox is the color of the plastic, which has been changed from the original sand color to gray, much more suitable as a base for painting the model. The sturdy box with jacket contains ten sprues of parts, one of them containing the clear parts, the decal sheet and the instructions. All the sprues are packed in a single self-sealing bag with the content tightly kept inside the box, so it will not be surprising if we find some sprues with a slight bend that usually does not affect the parts, fortunately. The clear parts are protected in an extra bag, but the decals are found between the pages of the instructions, as usual.
The parts are medium hard, slightly soft, and free from flash, with few ejector pips for the large number of parts. There are very shallow negative marks on the cab inside and under the fenders, however the largest and positive marks are located just under the front fenders and will not be evident, even less so with the wheels installed.
On the sprues we find parts for the cargo version, such as the cab canvas, although the cargo bed has been replaced by two sprues containing the radio compartment. I suppose ICM did not provide the interior of the compartment to avoid extra parts in a kit already cram-full. For this reason, the kit can only be shown in the travelling mode, so to speak.
There are currently several aftermarkets for this release and the cargo version in the form of wheels, etched parts, masks, tracks for mud or snow and even a resin load to detail the roof of this specific radio version.
Engine, chassis and transmission
The engine is quite well detailed. It consists of the block separated in halves plus the oil sump and several parts for the gearbox, the water and oil pumps, the starter motor and the exhaust manifolds among others. Also separated are the fan and the pulleys, although the belt lacks the lower pulley, which should be almost entirely visible and partially hidden by a cover attached to the engine block, with a small shaft in front that should simulate the starter crankshaft. Although it will not be visible once the kit is finished, this piece is somewhat disappointing, as is the lack of the radiator, which ICM has skipped. The exhaust pipe is all in one piece with the muffler included. The piece is quite thin and molded with the supports. Being so long, care is needed to attach the piece on the chassis frame. Building steps 14 and 15 are helpful for this as you can see the exhaust installed.
The chassis frame is made up of two side members plus five cross members, not counting the rear one, which contains the pintle hook assembly, or the first one, which is glued to the front axle suspension. The bumper is of the standardised type on the H163 model and comes separate, the piece being thin and showing the central hole to insert the starter handle. Following the instructions, you add several elements on the cross members, such as the front mudguards, and then build the chassis. However, it seems much easier to do it exactly the other way around.
The side members include the front tow hooks and have several mountings on their external sides, the fuel tank moulded with the straps, what looks like a winch made of six pieces as well as the mudguards, moulded with the running boards and separate supports. The wooden planking is cleanly engraved and two spare boxes plus a triangular tank are placed on them. The frame contains a support for the transfer case plus two narrow cylinders that join this to the gearbox. Once the engine is installed, you can add two axles joining the transfer case to the first rear differential and an auxiliary motor moulded with the gearbox to the winch. The rear axles are not easy to build due to the number of parts involved. The differentials, moulded with the axles, consist of five pieces each, a shaft between them and six more pieces that represent the mechanism to disconnect the rear wheels from the transmission. These pieces are extremely thin and can be easily broken.
Once the frame and transmission are finished, the instructions suggest the addition of the steering column and a separate control arm, both glued on a tab in the left fender, but it seems much more reasonable to leave the parts aside until the moment you need to attach the cab on the chassis.
Suspension and wheels
The front axle is detailed with the suspension arms at both ends, two leaf springs and the stabiliser bar. Assembly needs a pinch of finesse and caution when gluing the pieces together because they are small and very thin.
The rear suspension consists of a double support with a separate coil spring and two long brackets for the bumper stops. The springs have a good definition, but a pair of ejector pips partially affect detail.
The wheels are of the Trilex type of the H163 model, also known as spider wheels or artillery wheels with the outer part of the rim, invisible in the kit, separated into three pieces. The characteristic six spokes of the rim seem well reproduced and the same goes for the nuts and the hub detail. The tires are quite decent and have acceptable detail on the tread and a thin seam line to clean up.
The front wheels are attached directly to the suspension arms, while the rear ones are double. The inner wheels have no hubs and are attached to the outer ones by means of the separate brake drums. The rod connecting to the suspension is rather short, but could be replaced by a slightly longer plastic piece.
Cab and hood
Since the tool is shared with the cargo version, we find two identical cab floor pieces on the sprues. The detail on the anti-skid panels is too faint. The cab interior includes the levers, pedals and steering wheel, the gun butt holders plus a flat seat with the backrest glued onto the rear panel. This panel has a thin transparent window.
The cab sides contain the door frames attached to a panel showing the exterior wooden planking and a narrow window only on the left side. According to photos of this vehicle, the shovel on the right side next to the door of the cargo version seems to have been replaced by footholds to allow access to the roof. The instructions indicate the placement of the shovel and its clamp (parts E14 and E7) in assembly step 33, but step 37 shows the correct steps and the absence of the shovel.
The doors are separate pieces with similar detail on the outside, although there are some shallow marks on the inside surfaces. The handles and window crank are separate and the glass is glued into recesses around the frames. The clear pieces are thin and can only be shown fully down or up.
The front panel comprises two overlapping pieces. The front shows some raised wiring moulded on, the windscreen washer reservoir and the horn, while the rear piece includes the windscreen frame and two supports for the dashboard, which has raised gauges enhanced with decals. The driver’s windscreen frame is somewhat wider and comes separate, giving the possibility of showing it open. The frame includes the windscreen wipers with the internal motors in separate pieces as are the mirrors and auxiliary lights, detailed with clear lenses.
The metal roof of this version is in one piece with nice surface detail. The piece features the warning triangle and a stowage tray with thin supports.
The hood is made up of the front grille and three parts moulded in such a way that the engine cannot be shown. The top piece contains the opening hinges, two closed vent flaps with latches. The sides are moulded with the air vents, which are defined but not extraordinary, and the latches. The front grille is well represented and shows the characteristic nuts with good definition and a sharply rendered manufacturer’s logo. The rear side has a piece that seems the radiator water tank. The filler cap is attached to the grille, but the small manufacturer’s emblem is separate.
The headlights are provided with clear lenses and a separate bracket. The pennant is a bit thick and would look better in an etched piece. There is also an additional rearview mirror on the left fender and the usual width indicators in large German trucks.
Cargo bed
The radio compartment comprises the floor, the roof and four side panels with two separate doors and six windows in clear pieces. The outer surfaces, except for the roof, have a nicely rendered wood panels but moulded with no texture. There are a few compartments moulded closed on the sides. The floor has two side recesses to attach the rear mudguards. These come in one piece each, are thin and have an internal panel that partially covers the gap. The compartment is held by two side members attached on the frame with four brackets (G26) placed in front of and behind the rear wheels. Strangely, these appear at the end of assembly (step 25), when they are completely impossible to fit. The side members and brackets should be glued before building the chassis frame or else replaced with thin plastic strips.
The roof has the surface detail correctly represented. As on the cab roof, there is a large stowage tray with thin supports at the corners.
The right side is detailed with a license plate, a support for the 10m radio mast tubes (Steckmast), a handgrip and a door handle, a door showing no internal detail, and the folding footholds for access to the roof on the cab rear. The steps can be glued open or closed as they come in two pieces. The opposite side is detailed with a license plate and two supporting planks with the straps moulded on. I suppose these planks would allow the vehicle to negotiate uneven, sandy or muddy roads.
The rear has another door with identical detail, the lights and headlight, a license plate and the access step. The antenna masts come serate and detailed with clamps, cranks and protective covers.
Decals
The sheet offers the dashboard gauges, two sets of plates and tactical markings. The decals have a thin and glossy appearance, with apparent good saturation, correct registration and no excess of carrier film.
Instructions
They come in an A4 12-page booklet printed in black and white. It contains a short historical summary and technical data about the truck, a numbered parts diagram, a colour chart with Model Master paint matches, 37 assembly sequences and a page of profiles.
Exploded views are clear and easy to follow in general, although the assembly of the chassis, transmission and suspension, which have the largest number of parts, needs extra attention to avoid misalignments or mistakes. I have mentioned a couple of mistakes in the booklet, but fortunately they can be easily avoided.
Paint alternatives are non-existent since ICM only offers two trucks with different number plates and markings painted in Schawarzgrau (RAL 7021), commonly known as Panzer grey.
Conclusion
Though the kit has a high number of parts, overall detail is good and it can be built into a nice rendition of this radio version. Considering the work that ICM has put into it, especially on the engine, it is a shame that the truck can only be shown “on the road” and does not offer the choice of showing the engine or the interior. If it also included an option to show the antennas raised, it would be something truly gorgeous.
Some exterior detail can be refined with etched parts, although they do not seem essential except for a few exceptions, and naturally the roof badly needs a load to spice up the finished model.
Without being a great challenge, this kit is aimed at the intermediate or advanced level modeler blessed with the great virtue of patience because it certainly will not be finished in the blink of an eye.◊
Publicado – Published: 10 / 2024
©www.jmodels.net

Debe estar conectado para enviar un comentario.