
De un vistazo – Quick look
MATERIAL Y PIEZAS
MEDIA & PARTS:
- Plástico inyectado (170 piezas). Incluye una figura (3 piezas).
- Injected plastic (170 parts). One figure included (3 parts).
CALCAS – DECALS:
- Matrículas, marcas de unidad y numerales. Aspecto fino y mate sin exceso de soporte. Bien impresas.
- Number plates, unit markings and numbers. Thin and matt look without too much carrier. Well printed.
OPCIONES – OPTIONS:
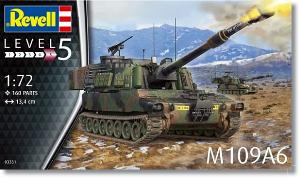
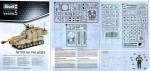
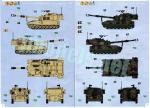
- M109 A6 Paladin. US Army. 1st Armoured Divison. Texas (USA), 2018.
- M109 A6 Paladin. US Army. 2nd Infantry Divison. South Korea.
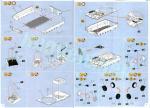
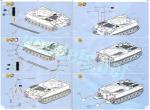
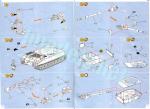
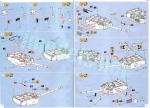
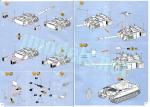
INSTRUCCIONES – INSTRUCTIONS:
- Folleto de tamaño A4 de 24 paginas en color. Contiene 2 páginas de colores numerados en códigos de pinturas de Revell, un plano numerado de piezas, 54 secuencias de armado y dos páginas de perfiles. Bien impresas y sencillas de seguir.
- 16-page A4 brochure printed in color. It shows 2 pages of colors with paint matches in Revell enamels, a numbered parts plan, 54 assembly sequences and 2 pages of profiles. Well printed and easy to follow.
LO MEJOR – THE BEST:
- Montaje sencillo. Buen detalle general. Variedad en las opciones de pintura.
- Easy assemble. Overall nicely detailed. Variety in paint choices.
LO PEOR – THE WORST:
- Boca del cañón. Cestas de estiba.
- Gun muzzle. Stowage baskets.
VALORACIÓN – CONCLUSION:
- Revell ha hecho una maqueta del M109 mejor que la anterior y con la que contar para hacer este conocido vehículo. Apta para cualquier modelista.
- Revell have released an even better M109 compared to the former offer. This is a kit to be considered to build this popular vehicle in the small scale. Suitable for any modeller.

La maqueta
No ha tardado mucho tiempo Revell en hacer un M109 actualizado. Aún no hace demasiados años que lanzó un M109G alemán y una secuela, denominada genéricamente M109, posteriormente. El problema de la primera maqueta es que el cañón queda en posición fija al montarlo y no puede elevarse, al menos si se monta de caja sin rectificaciones. Esto ha quedado mejor solventado en esta nueva edición, que no tiene el mismo molde que la primera, aunque parece que la casa alemana habrá aprovechado para copiar ciertos elementos de la maqueta anterior.
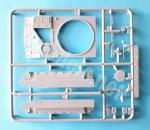
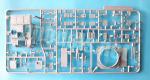
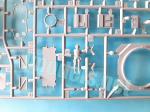
La caja trae cuatro bastidores de piezas, una pequeña hoja de calcas y el folleto de instrucciones. No hay defectos en este nuevo molde ni tampoco rebabas en las piezas, que aparecen bien moldeadas. Las marcas de eyector no son visibles al terminar el modelo salvo en el interior de las cestas de estiba en la parte posterior de la torre, pero no son difíciles de eliminar por su tenuidad.
La maqueta tiene varias opciones de montaje, tales como la posibilidad de dejar abierta la escotilla trasera, la del motor para mostrarlo, las escotillas de la torre, incluida la del comandante, e incluir algunos contenedores de gasolina como estiba.
La maqueta representa el penúltimo modelo de esta pieza de artillería móvil que ha sido y es empleada por muchos países en diferentes modelos y desarrollos propios. Actualmente el Ejército norteamericano opera tanto el modelo A6 como el más moderno A7. El vehículo ha sido empleado en multitud de conflictos, singularmente en la Guerra del Golfo y Afganistán.
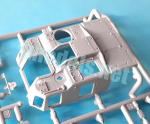
Casco
Está formado por cuatro lados y un suelo texturizado con relieve de diamante claramente sobredimensionado. La cara inferior del suelo lleva las cubiertas triangulares de los accesos moldeadas en la parte delantera. La cubierta del casco está detallada por debajo con el compartimento del motor, que viene separado y muestra el motor más bien sugerido e incompleto ya que solo tenemos la parte superior, si bien contamos con varios conductos separados y uno de los lados del habitáculo muestra dos ventiladores de refrigeración.
La cara delantera del casco lleva dos ojales de izado y los faros con sus respectivas cubiertas. Las piezas muestran pequeñas incorrecciones. Los ojales de izado son los del modelo alemán, ya que el norteamericano lleva dos ojales de remolque más pequeños situados debajo. También está mal situada la pestaña del faro de conducción nocturna y la cubierta de los faros parece un poco más gruesa de lo debido.
La plancha posterior del casco está mejor definida. Contiene la escotilla de acceso de los artilleros aparte y los faros moldeados en la pieza, aunque demasiado salientes. El detalle incluye los guardabarros, el gancho de remolque, otros dos ojales de izado, una caja de respeto sobre la escotilla y las palas estabilizadoras, compuestas de varias piezas y que pueden ponerse bajadas, aunque las instrucciones no lo indiquen. La escotilla es la correcta para este modelo, de una sola hoja, pero es dudoso que el modelista desee dejarla abierta, ya que el interior está vacío.
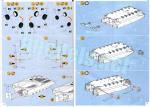
Tren de rodaje y cadenas
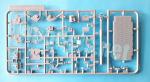
Las ruedas tractoras vienen en dos piezas y los dientes están bien perfilados. El diferencial de cada rueda está separado. Las tensoras llevan el eje aparte, pero antes de pegarlas al casco hay que montar la primera y última rueda del tren de rodaje, que tienen el amortiguador exento. Las demás ruedas son dobles y las interiores poseen el brazo unido a la pieza interior. Las ruedas están correctamente detalladas en los bujes, donde se puede apreciar las pequeñas tuercas, y las bandas de caucho están bien marcadas.
Las cadenas están moldeadas en tramos y eslabones separados para contornear las ruedas. Los eslabones son nítidos y no poseen marcas ni rebabas. Las zapatas de goma están adecuadamente definidas en la cara exterior, así como los dientes en la parte interna.
Superestructura
La cubierta del casco es de una pieza con huecos para insertar la torre y cubrir el compartimento del motor con una rejilla de ventilación bien detallada por ambas caras. El detalle moldeado en la pieza aparece bien definido. Tenemos las rejillas del escape y la tapa del depósito de carburante en un lado, los accesos a la transmisión delante y los de la batería a un lado. Sobre ellos aparece la escotilla del conductor, con los visores bien definidos, pero la tapa viene cerrada.
Las piezas separadas incluyen la salida del tubo de escape, la bomba de achique y lo que parece una salida de ventilación del sistema de calefacción de la tripulación. Sobre las cubiertas de acceso a la batería podemos añadir unos eslabones de repuesto.
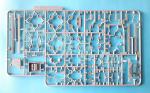
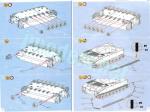
Torre
El despiece básico lo forman cinco piezas. Además de la base y el techo moldeado parcialmente con las superficies delanteras, hay otras tres planchas verticales separadas en la parte trasera, dos de ellas moldeadas con dos antenas de diferente longitud y forma. La más larga corresponde a la de navegación por satélite. La pieza superior tiene abiertas los accesos del techo y los tres del lado izquierdo, aunque las instrucciones los colocan todos cerrados excepto la cúpula del comandante, el acceso del artillero y una abertura de ventilación, todas ellas situadas sobre el techo.
El lado derecho de la torre lleva estibadas algunas herramientas, lo que parecen los utensilios de limpieza del cañón, más algunos contenedores de combustible. En el izquierdo hay una antena separada y más contenedores de combustible, además de las mencionadas escotillas detalladas con minúsculas bisagras.
Las escotillas de acceso al almacén de municiones de la torre están texturizadas de manera diferente al resto de las superficies del techo. Alrededor de ellos hay un conducto con pequeños apliques. Otras piezas moldeadas aparte son el periscopio panorámico, algunos ganchos de izado, una pala y varias cajas de munición para la ametralladora. El anillo separado de la cúpula del comandante está detallado con otro anillo superpuesto que contiene el soporte de la ametralladora. El arma no está del todo mal para la escala y me parece usable en la maqueta. El afuste y la caja de munición vienen en piezas exentas. La tapa de la escotilla puede mostrarse abierta para poner la figura.
Las cestas de estiba de la parte posterior de la torre se componen de varias piezas y pueden colocarse por detrás de la torre o a los lados de la parte trasera, ya que oscilan mediante bisagras. La maqueta tiene estas bisagras al menos perfiladas. La malla metálica que aparece sobre algunos paneles de las cestas no está mal representada, pero no es realista al no estar hueca y necesita una mejora.
El obús tiene la base casi completamente detallada. Además del tubo separado en una sola pieza, lo que nos evita líneas de unión que tapar, el arma cuenta con los cilindros de retroceso con su cubierta, el arco de rotación con el hueco de la mira abierto. Una vez montada la base, hay que añadir dos piezas laterales provistas de muñones para elevar o bajar el tubo. El tubo tiene el evacuador de humos y la abertura exterior del freno de boca bien perfilados, en cambio el refuerzo del freno y el tubo no están horadados, lo que rebaja significativamente el detalle de esta pieza.
El retén de transporte del cañón se compone de cuatro piezas bien detalladas. Las instrucciones lo muestran en posición elevada sosteniendo el tubo del obús, pero se puede montar también plegado sobre la cubierta delantera.
Figura
La figura del comandante tiene los brazos separados y, al menos en mi caso no tiene rebabas ni líneas de molde muy evidentes. Los detalles del uniforme están bien conseguidos para el tamaño, con buena definición en las botas, bolsillos, el chaleco ondulado sobre el tronco y el casco. Desgraciadamente, lo peor son las facciones, muy mal moldeadas y que le dan aspecto de orco. Desde luego en este caso no se cumple el dicho que reza que cuando eres feo, nunca eres demasiado feo.
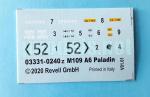
Calcas
Están impresas en una hoja pequeña que contiene matrículas, marcas de unidad y numerales. Los motivos muestran aspecto fino y mate sin exceso de soporte. Como de costumbre en esta escala al menos, Revell no identifica del fabricante sino su origen italiano.
Instrucciones
Se adjuntan en un folleto de tamaño A4 de 24 paginas en color que muestra dos páginas de colores numerados en códigos de pinturas esmaltes de Revell, un plano numerado de piezas, 54 secuencias de armado y dos páginas de perfiles. El folleto está bien impreso y el montaje es sencillo de seguir, con algunas vistas detalladas donde son necesarias.
Afortunadamente, las opciones de pintura son claramente distintas. La primera es un vehículo pintado en tono arena basado en EE. UU., mientras el segundo lleva camuflaje de tres colores, similar al de la OTAN, situado en Corea del Sur.
Valoración
Revell ha hecho una buena actualización de su maqueta y nos ofrece este M109 renovado sin los problemas del molde anterior. La maqueta me parece sencilla de montar para modelistas de cualquier nivel y los acabados ofrecen diferencias donde elegir.
Desde luego hay detalles mejorables y que no parecen especialmente difíciles de solucionar, como el detalle del cañón y las cestas de estiba.
Creo que esta maqueta no tiene mucho que envidiar a la de Riich Models en esta escala, que es también un A6. Tal vez lo único pueden ser los dos problemas mencionados antes. El detalle sobre la torre que Revell presenta separado, por ejemplo, la maqueta de Riich Models lo lleva moldeado sobre ella. En fechas recientes la marca china FOREART ha sacado un modelo A7 de gran calidad, pero hasta cierto punto el A6 no es tan comparable porque aquella es una variante más moderna con ciertos elementos distintos.◊

The kit
Revell hasn’t taken long to release an updated M109. It was not too many years ago that they launched a German M109G and a sequel, generically called M109, later. The problem with the first kit is that the barrel remains in a fixed position when assembled and cannot be raised, at least if it is built from the box. This has been improved in this new release, which does not have the same tooling as the first, although it seems the German brand has taken the opportunity to copy certain parts from the previous model.
The box arrives with four sprues of parts, a small sheet of decals, and the instruction booklet. There are no blemishes or any flash on the pieces, which look well molded. Ejector pin marks are not visible when the model is finished except on the inside of the rear stowage baskets, but being small and shallow, they are not difficult to address.
The kit has several assembly options, such as the possibility of leaving several hatches open, for example on the rear hull, the engine deck and the turret, including the commander’s hatch, or using some jerrycans as stowage.
The kit represents the penultimate variant of this self-propelled gun that has been, and still is, operated by many countries. Currently, the US Army operates both the A6 and the more modern A7. The vehicle has been used in many conflicts, particularly in the Gulf War and Afghanistan.
Hull
It is made up of four sides and a clearly oversized textured floor showing a diamond pattern. The underside of the floor has triangular cover plates molded on the front. The hull deck is detailed with the engine compartment, which is separate and shows the upper engine part only, although we have several separate ducts and one of the compartment sides shows two cooling fans.
The front face of the hull has two lifting eyes and the headlights. The pieces show minor inaccuracies. The lifting eyes in fact belong to the German M109, as the North American variant has two smaller towing eyes located under them. The night driving headlight tab is also wrongly positioned and the headlight covers seem a little thicker than they should.
The rear hull plate is better defined. It contains a separate door and the headlights molded on the piece, although they look too small and protruding. Detail includes the separate fenders, the tow pintle, two lifting eyes, a spare box on the door and the stabilizing spades, made up of several pieces. The spades can be set lowered though the instructions do not show it. The rear single door is correct for this A6 model but it is doubtful the modeller would want to leave it open, since the interior is empty.
Running gear and tracks
The sprockets come in two pieces and the teeth are well profiled. The differential for each wheel is separate. The idlers have a separate axle, but before gluing them to the hull, the first and last wheels of the running gear are attached. These have the shock absorber apart. The other wheels are double and the inner ones have the suspension arm attached to the inner piece. The wheels are correctly detailed on the hubs, where you can see the small nuts, and the rubber bands are well marked.
The tracks are molded in separate lengths and links to contour the wheels. The links are sharp and have no marks or flash on either side. The rubber pads are correctly defined on the outside, as well as the teeth on the inside.
Superstructure
The hull roof and engine deck is in one piece with gaps to insert the turret and the engine compartment hatch, which shows a well-detailed ventilation grille on both sides. Detail molded on the roof looks well defined. We have the exhaust grilles and the fuel tank cover on one side, the transmission access doors at the front and the battery accesses on one side. Above them is the driver’s hatch, provided with cleanly molded visors, but the cover comes closed.
Separate parts include the exhaust outlet, the bilge pump, and what looks like a vent for the crew heating system. We can also add some loose spare links on the battery access covers.
Turret
The basic breakdown is made up of five pieces. In addition to the base and the roof molded with most of the front sides, there are three other separate vertical plates at the rear, two of them include two antennas of different lengths and shapes. The longest seems to be the satellite navigation device. The upper piece has gaps for all the roof and left turret side hatches. Instructions show them all closed except for the commander’s cupola, the gunner’s hatch and the cab weather cover, all of which are on the roof.
The right side of the turret has some tools stowed, what seems to be the gun cleaning kit, plus some jerrycans. On the left there is a separate antenna and more fuel cans in addition to the doors provided with tiny hinges.
The access hatches on the turret ammo stowage are textured differently than the rest of the roof surfaces. Around them there is a duct with small brackets. Other separate parts include the panoramic periscope, some lifting hooks, a shovel and several ammo boxes for the machine gun. The commander’s cupola includes two rings, one of them containing the machine gun mount. The weapon is not bad at all for the scale and seems usable in the model. The mount and ammo box come separate. The hatch cover can be displayed open to pose the figure.
The stowage baskets at the turret rear are made up of several pieces and can be attached in the open (behind the turret) or folded position (attached to the turret sides), as they swing on hinges. The kit has these hinges outlined. The mesh present on some basket panels is not bad either but it is not realistic due to the limitations of plastic and should be replaced by photo-etchd mesh for improvement.
The howitzer has an almost completely detailed base. In addition to the separate barrel in a single piece, which avoids filling lines, the weapon has the recoil cylinders with their cover and the rotation arc with the open sight hole. Once the base is assembled, two side pieces provided with trunnions are added to raise or lower the barrel. The barrel shows the smoke evacuator and the external opening of the muzzle brake well outlined, however the brake interior and the barrel itself are not drilled, which is a bit disappointing.
The travel lock is made up of four well-detailed pieces. Instructions show it in a raised position holding the howitzer barrel, but it can also be assembled folded on the front hull.
Figure
The commander figure has the arms separated and, at least in my kit, does not have very obvious flash or seam lines. The details are nicely rendered for the size, with good definition in the boots, pockets, uniform and helmet. Unfortunately, the worst thing is the face, which is very poorly molded and make it look like an orc. When you are ugly, you are never too ugly, the saying goes, but this is not really the case.
Decals
They are printed on a small sheet containing plates, unit marks and numerals. Decals show a thin and matte appearance without excess support. As usual on this scale at least, Revell does not identify the manufacturer but only its Italian origin.
Instructions
They are provided in a 24-page A4 brochure printed in color containing two pages of paints in Revell enamel range, a numbered parts plan, 54 assembly sequences and two pages of profiles. The brochure is well printed and assembly is easy to follow, with some detailed views where necessary.
Fortunately, paint choices are clearly different. The first is an overall sand vehicle based in the US, while the second wears three-color camouflage, similar to that of NATO, located in South Korea.
Conclusion
Revell have done a good job with this update of their previous M109 and solved the issues that release has. The kit seems easy to assemble and paint finishes offer differences to choose from, so I think it can be turned into a nice replica of the SPH gun in the small scale.
Of course there are details that could be improved but do not seem particularly difficult to fix, such as the muzzle brake and the stowage baskets.
I think this model doesn’t have much to envy in the Riich Models offer, which is also an A6. Perhaps the only thing may be the two problems mentioned above. The detail on the turret that Revell molded separately, for example, the Riich Models kit has it molded on it. Recently, the Chinese brand FOREART has launched a high-quality A7 kit, but to some extent the A6 is not so comparable because FOREART’s is a more modern variant with certain differential elements.◊
Publicado – Published: 6 / 2024
©www.jmodels.net

Debe estar conectado para enviar un comentario.