
De un vistazo – Quick look
MATERIAL Y PIEZAS
MEDIA & PARTS:
- Plástico inyectado (226 piezas), plástico transparente (10 piezas), vinilo (5 piezas), hilo de nailon (1 tramo).
- Injected plastic (226 parts), clear plastic (10 parts), vinyl (5 parts), nylon string (1 length).
CALCAS – DECALS:
- Estrellas norteamericanas, insignias canadienses, matrículas, indicadores del salpicadero, marcas de formación y unidad. Finas, de aspecto brillante. Registro correcto. Soporte excesivo en algún caso.
- US stars, Canadian markings and bridge plates, registers, dashboard gauges, formation and unit markings. Thin, glossy finish and in register. Surplus carrier film in some items.
OPCIONES – OPTIONS:
- M37. US Army. Vietnam, late 1960s.
- M37. RCAF. Korea, 1953.
INSTRUCCIONES – INSTRUCTIONS:
- Folleto A4 de 12 páginas impreso en blanco y negro. Contiene un sumario histórico sobre el vehículo con especificaciones técnicas, una lista de colores con referencias de pintura de Vallejo, un plano numerado de piezas, 31 capítulos de montaje y una página de perfiles. Un lado de la caja muestra perfiles en color de las alternativas de pintura.
- 12-page A4 booklet printed in black and white. Contains a historical summary about the vehicle with technical specifications, a list of colors with Vallejo paint matches, 31 construction steps and a page of profiles. One side of the box shows profiles of both paint choices in color.
LO MEJOR – THE BEST:
- Buen detalle general. Motor. Neumáticos de vinilo. Opciones de montaje, algunas no plasmadas en las instrucciones.
- Nicely detailed overall. Engine. Vinyl tires. Assembly choices, some of them not showed in the instructions.
LO PEOR – THE WORST:
- Algunas marcas internas. Ausencia de techo rígido alternativo en la cabina y enganches traseros.
- Some marks inside the cab. Lack of alternative hardtop roof and rear towing clevises.
VALORACIÓN – CONCLUSION:
- Primer M37 en plástico. Acertado detalle en casi todo, salvo la omisión de un par de elementos que no deslucen al resto. Múltiples posibilidades de montaje no explícitas en las instrucciones.
- First kit of an M37 in plastic. Overall accurately reproduced, except for a couple of omissions that don’t detract from the rest. Multiple assembly choices not explicitly shown on the instructions.

La maqueta
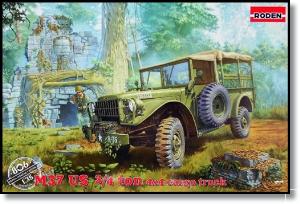
Roden produjo este primer Dodge M37 en plástico hace una década. Posteriormente, también lanzó los modelos M42 y M43, versiones de mando y ambulancia respectivamente (referencia 809 y 811). En realidad, la maqueta reproduce un M37B1, variante que llevaba la rueda de repuesto en un soporte externo sobre la puerta del conductor, y no un M37 inicial, que la portaba dentro de la caja de carga. Respecto al vehículo de la RCAF que Roden ofrece como alternativa al norteamericano hay que señalar que todos los M37 y derivados canadienses tenían el techo rígido en lugar de la pieza simulando lona de esta edición.
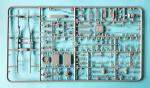
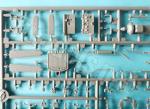
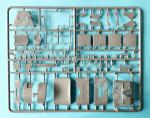
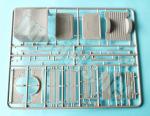
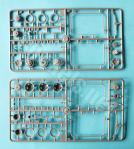
La caja contiene cinco bastidores de piezas grises, un bastidor transparente, cinco neumáticos de vinilo, una hoja de calcas y el folleto de instrucciones. El moldeado de las piezas es bueno y característico de las maquetas de Roden, donde el plástico no suele presentar el refinamiento de otras marcas actuales. El fabricante parece emplear una tecnología algo desfasada que sigue pareciéndose más a la de ediciones limitadas. Las piezas carecen de rebabas y hay finas líneas de molde en algunas. La mayoría de marcas de eyector no son evidentes en el modelo terminado, pero hay algunas localizadas en el interior de la cabina y en la cara interna del capó, que son relevantes si se desea mostrar el vehículo abierto.
La maqueta parece combinar bien el detalle con cierta facilidad de montaje y creo que Roden acertó al elegir el motor como un elemento clave, ya que su detalle permite mostrarlo. Esta opción no se contempla en las instrucciones, como tampoco aparecen como alternativas la no colocación del toldo, la apertura del lado trasero de la caja o las puertas.
Las opciones de montaje indicadas en las instrucciones proponen la adición de un cabrestante en el M37B1 norteamericano con su correspondiente paragolpes separado, más la inclusión de un pequeño motor con su eje a un lado del motor y el empleo de la parrilla delantera sin la sección central inferior, separada para recibir el cabrestante o añadirle esa pieza central si no lo usamos. Las imágenes del M37 evidencian que algunos vehículos canadienses también llevaban el cabrestante.
La pintura del modelo no ofrece sorpresas, pero al menos tiene grandes diferencias de color. El vehículo norteamericano está pintado en Olive Drab y el de la Fuerza Aérea canadiense en gris azulado. Un lado de la caja muestra dos perfiles que ayudan a tener una idea aproximada del color de cada uno, ya que las instrucciones están impresas en blanco y negro.
Revisión
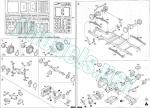
El montaje comienza por la construcción de los ejes y las ruedas. Los ejes poseen los diferenciales separados en dos piezas, los tambores de freno y sus cubiertas así como los cubos de la dirección. Aunque las ruedas no tienen en principio posibilidad de giro, podría ser factible colocarlas de esa manera. Completados los ejes, se pueden añadir al bastidor del chasis, reproducido en una pieza, junto con los amortiguadores, las ballestas y la barra estabilizadora en el eje delantero. Las ballestas poseen los ojales, abrazaderas y bridas bien definidas y las láminas grabadas. La pieza del chasis incluye los soportes de los estribos y tiene líneas de molde en los largueros, aunque no en toda su longitud.
La siguiente etapa de la construcción es el motor, compuesto de 25 piezas entre las que se aprecian el cárter, el filtro de aceite, el delco, el ventilador y sus correas. Como opción tenemos un pequeño motor y su eje, ambos necesarios cuando se instala el cabrestante. El motor está lo bastante completo y detallado para poder mostrarlo si parece conveniente. Colocado el motor sobre el chasis, se le añade el tubo de escape separado en dos tramos. La pieza más larga está limpia e incluye el silenciador y los soportes, aunque el extremo no está horadado. El radiador viene separado en dos mitades. La pieza delantera presenta buen detalle en la malla metálica y la trasera contiene un hueco para el ventilador. En esta última hay un par de rechupes ligeros que se pueden rellenar con sencillez.
La transmisión consta de tres ejes de diversa longitud cuyos puntos de unión están bien plasmados en las instrucciones mediante vistas de detalle. Para instalarlos, previamente habremos colocado la caja de transferencia, que consta de cinco piezas.
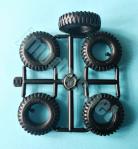
Las ruedas tienen las llantas de plástico separadas en dos anillos de anchura desigual y los neumáticos de vinilo. Las llantas tienen un detalle muy bueno en su centro y las aberturas entre los radios. Los neumáticos de vinilo son sencillamente excelentes, por mucho que este material no tiene buena fama entre muchos modelistas. En este caso, no es esencial buscarles reemplazo. La llanta viene completamente limpia y posee un dibujo nítido y realista. Los flancos, además, muestran letras y numeración en diminuto relieve.
Otros elementos del chasis son los estribos separados, el depósito de combustible moldeado con sus cinchas y el tapón, así como el cabrestante. Los estribos muestran el patrón antideslizante, pero el detalle está ligeramente por encima de escala. El cabrestante opcional tiene el cable simulado con hilo de nailon y el gancho de plástico, pero le falta la cadena que suele verse en fotos de época. Como he mencionado, los paragolpes y la parrilla delantera tienen alternativas dependiendo de si instalamos el cabrestante. Los paragolpes se instalan en el chasis mediante soportes separados y llevan las argollas de remolque aparte. La parrilla es bastante fina y no requiere sustituto obligatorio, en mi opinión.
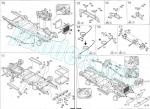
La parte trasera del chasis tiene el último travesaño aparte. La pieza está detallada con los dos paragolpes y las luces por separado. Sin embargo, Roden olvidó incluir los dos ojales de remolque situados por debajo de los paragolpes.
La construcción de la cabina está diseñada a partir del suelo moldeado con el panel delantero. Las superficies no están texturizadas y aquí sería de gran ayuda un fotograbado de suelo antideslizante, sobre todo si se van a poner las puertas abiertas. Los pedales y diversas palancas están bien reproducidos, aunque algunas de las piezas tienen mínimas líneas de molde y necesitan limpieza. Los asientos están bien representados, pero las superficies son demasiado lisas. El salpicadero, cuyos instrumentos hay que pintar, tiene un relieve muy nítido y limpio. La cubierta superior, que forma parte de la carrocería, va apoyada en dos paneles situados por delante de las puertas. La pieza lleva la toma de ventilación aparte y por tanto se puede colocar abierta.
El lado trasero está exento y presenta las dos molduras centrales muy claras, así como diversos ganchos para el lado posterior del toldo de la cabina. Sobre esta pieza se colocan dos soportes que sostienen el bastidor del toldo del techo, para el que Roden sólo proporciona una pieza que simula lona y no el techo duro del M37 canadiense, como he dicho antes. Sobre los soportes verticales se añade luego el lado trasero del toldo, provisto de una fina ventanilla.
Las puertas llevan el lado interno aparte detallado con bolsillos. Las manetas y manivelas elevalunas vienen como piezas exentas en ambos lados. Los cristales son de una pieza, con finura más que aceptable y gran transparencia. Para simularlos bajados parcialmente habría que cortarlos. La puerta derecha lleva un contenedor de gasolina sobre el panel situado por delante, mientras que la del conductor tiene en ese panel la rueda de repuesto y su soporte muy bien reproducido.
Tras pegar la cabina al chasis, el modelista entra en una etapa delicada del montaje para instalar la columna de la dirección sobre una muesca del guardabarros izquierdo y pegar a su vez este sobre el chasis. Posteriormente se completa el interior añadiendo el fino volante a la columna, una vez pasada esta a través del salpicadero. La finura de los guardabarros me parece adecuada. Las marcas del lado interno son poco apreciables, menos aún más con las ruedas en su lugar. Sobre esta piezas tenemos las luces de posición y los faros con las lentes transparentes.
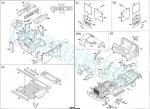
Los lados del morro muestran los pestillos de cierre del capó y la luz de conducción nocturna por separado. El capó puede colocarse abierto tras limpiar varias marcas de eyector del lado interno. La pieza muestra definición en las bisagras y los enganches para fijar el parabrisas plegado.
El marco del parabrisas incluye los pequeños motores de los limpiaparabrisas. Las escobillas vienen reproducidas aparte, lo mismo que los soportes del parabrisas, junto a los cuales se pegan los retrovisores. Los cristales son finos y se insertan en rebajes situados en el lado interno de la pieza. El parabrisas podría situarse bajado de no emplear el toldo de la cabina, pero no se contempla en las instrucciones.
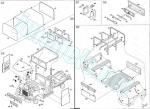
La caja trasera tiene algunas marcas en las caras internas de los lados, menos en el suelo, pero no se aprecian si se coloca el toldo porque está cerrado en la parte trasera. Las molduras externas y del suelo están bien reproducidas y sobre los lados se aprecian los catadióptricos y el conducto de llenado de combustible con su tapón. El lado trasero muestra también los reflectantes y el panel central con varias herramientas por separado.
Los listones de los bancos están bien moldeados en piezas sin marcas. Los asientos van unidos a dos soportes en cada lado, mientras que los respaldos se pegan sobre los bastidores del toldo. El toldo es una pieza de finura aceptable y presenta un texturizado en la lona más realista que el de los lados. No hay piezas para simular el toldo enrollado.
La hoja de calcas muestra estrellas norteamericanas, insignias canadienses, matrículas, indicadores del salpicadero, marcas de formación y de unidad. Todas ellas tienen un acabado fino y brillante, aparentan buen registro. El soporte sobresale ligeramente de los motivos en la mayoría, y en varias es excesivo. Las calcas del fabricante tienen mala fama. Ignoro lo que estas pueden dar de sí y sólo juzgo por su aspecto.
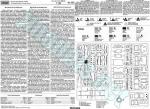
El folleto de instrucciones tiene un formato A4 y consta de doce páginas en blanco y negro. Contiene un sumario histórico sobre el vehículo con especificaciones técnicas, una lista de colores con equivalencias de pintura de Vallejo, un plano numerado de piezas, 31 capítulos de montaje y una página de perfiles. Un lado de la caja muestra perfiles en color de las versiones de pintura. Corresponden a un vehículo norteamericano pintado en Olive Drab y otro de la RCAF de color gris azulado como contraste con el anterior.
Valoración
Las maquetas de vehículos militares de Roden no suelen tener gran predicamento entre muchos modelistas, pero esta es una clara excepción y realmente merece mayor aprecio. Ciertamente, si este mismo M37 lo hubiese producido cualquier fabricante asiático con una tecnología de hoy en lugar de Roden hace una década, muchos echarían las campanas al vuelo. Así corre el mundo.
El fabricante le puso ganas y bastante acierto a este molde y se nota en múltiples detalles que otras marcas suelen pasar por alto, como el hecho de no dejar al albur las piezas del bastidor del toldo, los elementos internos de las puertas o la excelente reproducción de los neumáticos de vinilo, por poner pocos ejemplos. La omisión de los enganches traseros o la falta de una pieza alternativa para el techo rígido de la carlinga, que impide plasmar un auténtico vehículo canadiense, son desventajas claras, pero no tan cruciales que desluzcan las virtudes de la maqueta.
Además, la maqueta cuenta con más posibilidades de montaje reales de las que nos indican las instrucciones. El modelista de cierta pericia puede intentar explorarlas por su cuenta. Entre otras, la maqueta permite, sin realizar modificaciones muy importantes, colocar las ruedas con giro, mostrar las puertas y el capó abiertos, retirar el toldo en la cabina y caja trasera, dejando o no los bastidores solamente, o bien ir más allá y rehacer el toldo para enseñarlo abierto a los lados o en la parte trasera.
A primera vista este M37 no debe ser difícil de construir, aunque seguramente necesitará un poco de habilidad en ciertos pasos, como sucede en cualquier maqueta.◊


The kit
Roden released this first plastic Dodge M37 a decade ago. Later, they also released the M42 and M43 kits, command and ambulance versions respectively (references 809 and 811). Actually, this is an M37B1, a variant that had the spare tire on a side external mount, and not an early M37, which carried it inside the cargo tray. Regarding the RCAF vehicle that Roden offers as an alternative, it should be noted that all Canadian M37s and derivatives had a hardtop instead of the canvas roof of this edition.
The box contains five sprues of gray parts, one clear sprue, five vinyl tires, a decal sheet, and the instruction booklet. The molding of parts is good and characteristic of Roden kits, where plastic doesn’t usually show the refinement of other current brands. The manufacturer seems to be using somewhat outdated technology that still resembles that of short runs. Parts are free from flash, and some have fine seam lines. Most ejector pin marks are not visible on the finished model, but there are a few located inside the cab and on the inner side of the hood, which are relevant if you want to display the vehicle open.
The kit seems to combine detail with relative ease of assembly, and I think Roden made the right choice in selecting the engine as a key element, as its detail allows it to be displayed. This option is not included in the instructions, nor are the alternatives shown for not using the canvas, opening the rear cargo tray or the doors.
Assembly options present in the instructions suggest adding a winch to the US M37B1 with its corresponding separate bumper, including a small engine with a shaft to one side of the engine, and using the front grille without the lower central section, which can be removed to accommodate the winch or have that central piece added if not used. Pictures show that some Canadian vehicles also carried a winch.
The kit’s paint job offers no surprises, but at least it features some striking color differences. The US vehicle is painted Olive Drab, and the Canadian Air Force vehicle bluish-gray. One side of the box shows two profiles to help give a rough idea of colors, as the instructions are printed in black and white.
Review
Assembly begins with the construction of the axles and wheels. The axles have separate two-piece differentials, brake drums and ball joints. Although the wheels are not designed to turn, it could be possible to position them that way. Once the axles are finished, they can be added to the chassis frame, which is a single piece, along with the shock absorbers, leaf springs, and stabilizer bar on the front axle. The leaf springs have clearly defined eyelets, clamps, and shackles, and the leafs are engraved. The frame piece includes the running board brackets and has seam lines on the side members, but not all along the piece.
The next stage of construction is the engine, a subassembly comprising 25 parts, including the crankcase, oil filter, distributor, fan, and the belts. A small engine and its shaft are available as an option, both necessary when installing the winch. The engine is quite complete and detailed enough to be displayed if desired. With the engine mounted on the chassis, the exhaust pipe, which comes in two lengths, is added. The longer piece is clean and includes the muffler and brackets, although the tailpipe is not hollowed. The radiator comes in two halves. The front section has good detail in the mesh, and the rear section contains a recess for the fan. There are a couple of shallow sinks on the rear side that can be easily filled.
The transmission consists of three shafts of different lengths, with connection points clearly shown in the instructions with detailed views. To install them, the transfer case, which consists of five parts, must first be installed.
The wheels have plastic rims separated into two rings of different width and vinyl tires. The rims have excellent detail in their center caps and the openings between the spokes. The vinyl tires are simply excellent, despite this material not having a good reputation among many modelers. In this case, finding resin replacements isn’t essential. The tires come completely clean and has a crisp, realistic tread pattern. The sidewalls also display tiny raised letters and numbers.
Other chassis elements include separate running boards, a fuel tank molded with the straps and cap, and a winch. The running boards show the anti-slip pattern, but detail is slightly over-scale. The optional winch has a nylon string as a cable and a plastic hook, but it lacks the chain that is often seen in period photographs. As mentioned, the bumpers and front grille have alternative pieces depending on whether the winch is installed. The bumpers are attached to the chassis using brackets and have separate towing clevises. The grille is quite thin and doesn’t need replacement, in my opinion.
The last crossmember of the chassis is separate. The part is detailed with two bumpers and the lights as separate components. However, Roden forgot to include the two towing clevises below the bumpers.
The cab is built from the floor piece, which is molded with the front panel. The floor is not textured, and a photo-etched non-slip floor would be very helpful, especially if the doors are to be posed open. The pedals and levers are well rendered. Some parts have very slight seam lines and need cleaning. The seats are well represented, but the surfaces are too smooth. The dashboard has nice raised gauges that need to be painted. The upper cowl is attached on two side panels glued in front of the doors. The part has a separate air vent air and this can be shown open.
The rear cab side is separate and features two very clear central moldings, as well as several hooks for the canvas. Two pieces are mounted on this panel to hold the roof canvas frame. Roden only provides a piece simulating the canvas and not the hardtop of the Canadian M37, as I mentioned above. The rear canvas side includes a thin clear window and is attached to the rear pillars.
The doors have separate, detailed inner panels with pockets. The handles and window cranks are separate pieces on both sides. The windows are one-piece, with more than acceptable fineness and transparency. To simulate them partially lowered, they would need to be cut. The right door has a jerrycan on the panel in front of it, while the driver’s door has the spare tire with a nice holder.
Once the cab is attached onto the chassis, assembly enters a delicate stage with the installation of the steering column onto a notch in the left fender and then gluing the fender to the chassis. The interior is then completed by adding the thin steering wheel to the column, once it has been passed through the dashboard opening. The fenders look thin enough for the scale and have barely noticeable marks on the inner side, still less with the wheels in place. The fenders are provided with the indicators and headlights with clear lenses.
The cowl sidewalls show the hood latches and a separate night driving light. The hood can be positioned open after cleaning off several ejector marks on the inner side. The part shows definition in the hinges and the hooks for securing the folded windshield.
The windshield frame includes the small wiper motors. The wipers are provided separately, as are the windshield hinges, next to which the rearview mirrors are glued. The thin glass panes are inserted into recesses on the inside of the frame. The windshield could be lowered if the cab canvas is not used, but this is not mentioned in the instructions.
The rear tray has some marks on the inner sides, but none on the floor piece. These won’t be visible with the canvas in place because this is closed at the rear. The external and floor moldings are quite nice, and the reflectors and fuel filler neck with its cap are defined on the sides. The tailgate also shows the reflectors and the center panel with the tools in separate pieces.
The bench slats are well molded and show no marks. The seats are attached to two brackets on each side, while the backrests are glued onto the canvas frames. The canvas is rather thin and shows a more realistic texture than the front and rear sides. There are no parts for a rolled-up canvas.
The decal sheet shows American stars, Canadian badges, license plates, dashboard gauges, and formation and unit markings. All have a fine, glossy finish and seems to be in register. There is a bit of excess carrier. The manufacturer’s decals have a bad reputation. I don’t know whether these will have a good result as I am judging only by their appearance.
The instruction booklet is A4 format and has twelve black and white pages. It contains a historical summary with technical specifications, a color list with Vallejo paint equivalents, a numbered parts diagram, 31 assembly chapters, and a page of profiles. One side of the box shows color profiles of the paint versions. These correspond to an US M37 painted in Olive Drab and an RCAF vehicle in a bluish-gray color as a contrast to the former.
Conclusion
Roden’s AFV kits don’t usually arouse much attention among modelers, but this one truly deserves greater appreciation. Certainly, if this same M37 had been produced by any Asian manufacturer with today’s technology instead of by Roden a decade ago, many would be celebrating. That’s the way the cookie crumbles.
The manufacturer put a lot of effort and skill into this kit, and this is clear in several details that other brands often overlook, such as the provision of both the canvas and the frames, the internal elements of the doors, and the excellent rendition of the vinyl tires, to name just a few examples. The omission of the rear clevises or the lack of an alternative part for the Canadian hardtop vehicle are clear disadvantages, but not so crucial as to detract from the model’s virtues.
The kit offers more realistic assembly possibilities than the instructions show. Modelers with some experience can try to explore them on their own. Just without major modifications, the kit lets you show the wheels turned, pose the doors and hood open, use or not the canvas over the cab and rear tray (with or without the frame), or going further to scratchbuild a new rolled-up canvas for the sides or rear.
At first glance, this M37 shouldn’t be difficult to build, although it will certainly need some skill in a few steps, as is the case with any kit.◊
Publicado – Published: 3 / 2026
©www.jmodels.net

Debe estar conectado para enviar un comentario.