
De un vistazo – Quick look
MATERIAL Y PIEZAS
MEDIA & PARTS:
- Plástico inyectado (98 piezas), fotograbado (10 piezas), acetato (5 piezas).
- Injected plastic (98 parts), photo-etched (10 parts), acetate (5 parts).
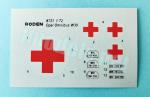
CALCAS – DECALS:
- Tres juegos de matrículas y marcas sanitarias. Apariencia brillante no demasiado fina. Colores saturados. Nitidez en los motivos. Sin demasiado soporte.
- Three sets of plates and medical markings. Glossy finish, not too thin. Saturated colors. Sharply printed. Not too much carrier.
OPCIONES – OPTIONS:
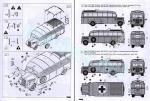
- Opel Omnibus WH-341709. Unidad desconocida. Francia, 1941.
- Opel Omnibus WH-265451. Frente Oriental. Unidad médica desconocida. Inicios de 1942.
- Opel Omnibus WH-751731. Afrika Korps. Túnez, inicios de 1943.
- Opel Omnibus WH-341709. Unknown unit. France, 1941.
- Opel Omnibus WH-265451. Eastern Front. Unknown medical unit. Early 1942.
- Opel Omnibus WH-751731. Afrika Korps. Tunisia, early 1943.
INSTRUCCIONES – INSTRUCTIONS:
- Folleto de 8 páginas impreso en blanco y negro. Contiene una introducción con datos técnicos sobre el vehículo, un plano numerado de piezas, 21 fases de montaje y 2 páginas de perfiles. El lado trasero de la caja muestra perfiles de una tercera versión de pintura con una relación de colores de Vallejo. Imprecisas en la colocación de algunas piezas (ver texto).
- 8-page brochure printed in black and white. It contains a historical introduction with technical data, a numbered parts plan, 21 assembly chapters and 2 pages of profiles. The back side of the box shows a third paint finish with a list of Vallejo paint colors. They are not very clear in some assemblies (see taxt).
LO MEJOR – THE BEST:
- Tema. Motor. Buen detalle externo y en la cabina.
- Topic. Engine. Nice external and cab detail.
LO PEOR – THE WORST:
- Marcas de eyector internas. Tubo de escape. Montaje delicado al pegar el suelo y la carrocería.
- Interior pin marks. Exhaust pipe. Delicate assembly of the interior floor and body.
VALORACIÓN – CONCLUSION:
- Tema muy original en esta escala que ofrece posibilidades en múltiples escenarios. El montaje necesita cierta experiencia y por ello la maqueta no es recomendable a quienes no tengan mucha experiencia.
- Quite an original topic on this scale that offers varied possibilities in different settings. Assembly needs experience, so it is not recommendable to the newbie.

La maqueta
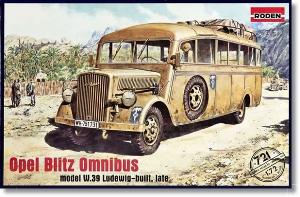
Roden fue la primera marca que hizo una maqueta de este autobús alemán basado parcialmente en el famoso y ubicuo camión Opel Blitz. La primera maqueta era un Opel Ómnibus del modelo 1939 en su primera versión. Posteriormente la firma lanzó otros modelos civiles y militares, ente los que se encuentra esta versión tardía, reconocible por los perfiles más angulados de la carrocería y la rueda de repuesto integrada en la carrocería. En años posteriores a su lanzamiento, Roden sacó otras maquetas de este autobús en la escala 1/35.
La maqueta representa el modelo Opel 3,6-47 W.39 fabricado justo al inicio de la Segunda Guerra Mundial. La denominación oficial de los autobuses civiles adoptados por el Ejército alemán era mittlerer Kraftomnibus (o), o autobús medio comercial. Esta clasificación integraba vehículos con un peso de hasta 7.300 kg. de entre 15 y 30 asientos. Naturalmente los autobuses no se emplearon sólo para el transporte de personal, sino también como vehículos sanitarios, de mando (Befehlskraftwagen), de radio (Funkauswertekraftwagen) o laboratorios móviles (Laboratoriumskraftwagen).
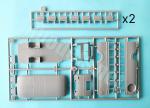
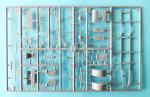
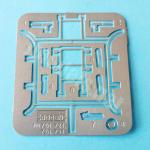
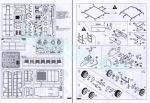
La maqueta comprende seis bastidores, una lámina de acetato, una plancha de fotograbados, la hoja de calcas y las instrucciones. Las piezas están moldeadas con el habitual plástico rígido y más bien duro que emplea Roden, que también le permite lograr finura en determinados elementos, en ocasiones bastante frágiles. Los bastidores apenas muestran rebabas residuales y ligeras líneas de molde. Sin embargo el interior del vehículo tiene múltiples marcas de eyector desde el techo al suelo y desde la parte delantera a la trasera. En su mayoría son fáciles de limpiar o no serán muy perceptibles, ya que el interior no puede mostrarse abierto. Las peores marcas son las de la cara trasera de los asientos de los pasajeros, que muestran grandes marcas positivas y además tienen un ligero rechupe en la parte delantera que estropea el detalle. Aparte de esto, el detalle general no está por debajo de otras maquetas de esta escala.
La construcción no aparenta ser fácil y las instrucciones no son muy claras respecto a la posición de algunas piezas. Por este motivo el proceso necesita detenimiento y precisión al pegar ciertas piezas, especialmente de la carrocería, los cristales y los fotograbados. Las instrucciones sólo indican la presencia de un ventilador sobre el techo como única alternativa de montaje, por tanto las tres versiones de esta caja son prácticamente iguales.
Chasis, motor y transmisión
El chasis está completo en una pieza sin marcas. La parte delantera está detallada con el paragolpes más los ganchos de remolque y la matrícula. El último travesaño lleva el enganche posterior aparte. Además de esto hay que añadir el depósito de combustible, formado por dos mitades con grandes marcas en los lados de unión y un rechupe en la parte superior.
Como es habitual en Roden, el motor es de lo mejor de la maqueta. Lo forman doce piezas, entre las que se aprecian el ventilador, la bomba de aceite y de gasolina, los colectores, el distribuidor, etc. El bloque tiene un detalle con buena definición y está moldeado con la caja de cambios. El radiador, muy bien detallado con la rejilla trasera, y su manguito vienen separados. El tubo de escape está separado en dos tramos e incluye el silenciador. Esta disposición nos obliga a unir dos piezas muy finas cuya posición exacta en el bastidor no se aprecia con mucha claridad.
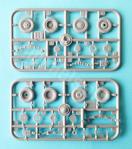
El eje de transmisión es de una pieza con las juntas marcadas sin demasiada nitidez. El eje delantero tiene los brazos de la suspensión separados y permite poner las ruedas giradas, aunque este detalle no lo señalen las instrucciones. Los tambores de freno también vienen aparte. El eje trasero con el diferencial están divididos en mitades con los tambores de freno idénticos a los anteriores.
Suspensión y ruedas
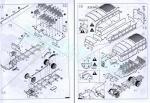
Las ballestas son diferentes en los dos ejes y muestran buen detalle en las láminas y abrazaderas. Para pegarlas hay que limpiar antes las marcas positivas de sus lados traseros.
Los neumáticos poseen buen aspecto. Tienen las llantas detalladas y los bordes finamente marcados. Los neumáticos tienen la banda de rodadura bien marcada, aunque presentan finas líneas de molde.
Interior
La zona delantera de la cabina del conductor consta de un suelo y el mamparo delantero. Este último lleva los pedales representados con nitidez, las palancas separadas y el salpicadero, que muestra algunos indicadores y la guantera. La maqueta carece de calcas para los indicadores. El volante y la columna también son piezas aparte, ambas finas.
Desde el asiento del conductor hasta la zona trasera el suelo es de una pieza con los pasos de rueda unidos en la parte posterior. Los estribos de acceso al interior están separados en piezas algo gruesas con marcas internas. Acaso merezca la pena reemplazarlos.
Además del asiento del conductor, hay catorce asientos para el pasaje. Las piezas muestran la tablazón de madera con cierta nitidez, pero el detalle está afectado por un leve rechupe del plástico en la parte central y en la cara trasera de los respaldos hay que limpiar necesariamente las marcas positivas que mencionaba antes.
Las ventanillas y el parabrisas son piezas de acetato fino que se se recortan de la lámina. Salvo en el caso de la ventanilla trasera, no hay rebajes en los marcos para pegarlas. Las instrucciones son imprecisas en la colocación del suelo sobre el bastidor.
Carrocería
Está formada por cuatro lados más el techo. Todos ellos tienen marcas en los lados internos y ningún detalle grabado, ni siquiera las puertas. El detalle exterior no está nada mal. Los lados y la parte trasera muestran perfiles en relieve, las puertas grabadas y las bisagras marcadas, así como las cerraduras definidas, al menos hasta donde da el material y el tamaño. La cara delantera incluye el techo de la cabina. Parece más conveniente iniciar el montaje por la parte posterior, cuyo lado trasero tiene un par de vástagos para alinearlo.
La parte trasera lleva la placa de matrícula separada y la escalerilla de acceso al techo de fotograbado; uno de los lados tiene el hueco de la rueda de repuesto que va pegada dentro sin más, y el techo tiene moldeado el estampado antideslizante del portaequipajes detallado con la barandilla de fotograbado en una pieza. Hay también un ventilador opcional, según he mencionado arriba.
De acuerdo con las instrucciones, el suelo debería tener dos lengüetas en el lado trasero para introducirlas en las muescas del lado posterior de la carrocería, pero las piezas no los traen. Esto provoca que la carrocería y el suelo haya que alinearlas y pegarlas “a ojímetro”, por decirlo vulgarmente.
El morro está formado por dos lados, un perfil superior entre ellos, la parrilla frontal y los guardabarros. Los lados muestran las salidas de ventilación del motor en relieve y la pieza frontal también está bien detallada en la rejilla, que tiene incluso el logotipo del fabricante. Los guardabarros no son muy finos pero su perfil parece correcto. De nuevo, las instrucciones no son de gran ayuda para colocarlos.
El detallado del morro lo componen varias piezas separadas como los faros, el faro Notek, las herramientas, una lata de combustible y los indicadores de giro. El espejo del retrovisor, al igual que los gálibos y los limpiaparabrisas son fotograbados. La posición de estos últimos está bien aclarada en las instrucciones.
Calcas
La hoja contiene tres juegos de matrículas y marcas sanitarias con apariencia brillante y no demasiado fina. Los colores poseen una saturación aparentemente correcta y las matrículas son nidas. No hay demasiado soporte.
Instrucciones
Se presentan en un folleto de ocho páginas impresas en blanco y negro con una introducción y datos técnicos sobre el vehículo, un plano numerado de piezas, 21 capítulos de montaje y dos páginas de perfiles. El lado trasero de la caja muestra perfiles de una tercera versión de pintura más una relación de colores de Vallejo. Desgraciadamente, Roden no se esmera lo bastante en sus instrucciones y algunas secuencias de armado son imprecisas en la situación de determinadas piezas o ensamblajes.
Los acabados de pintura presentan vehículos pintados de gris o arena sin camuflaje en dos versiones estándar y otra sanitaria.
Valoración
La maqueta aparenta no ser tan sencilla de armar como otras de esta escala y es más apropiada para modelistas con experiencia. Lástima que las instrucciones no sean más claras en los puntos críticos del montaje, por ejemplo en la unión del suelo con el chasis y la carrocería.
Un autobús es siempre raro de ver en cualquier escala y más aún en esta, por eso hay que felicitar a Roden al haberse atrevido con un vehículo que ofrece variadas posibilidades para integrarlo en escenas y dioramas.◊

The kit
Roden was the first manufacturer to release a kit of this German bus, which was partially based on the famous and ubiquitous Opel Blitz truck. The first kit was an Opel Omnibus model 1939 in its first version. The company later launched other boxings with civilian and military variants, including this late version, recognizable by the more angled profiles and the spare wheel integrated in the body. Several years after the 1/72 kits, Roden also offered this vehicle in the 1/35 scale.
The kit represents the Opel 3.6-47 W.39 model manufactured just at the beginning of the Second World War. The official name of the civilian buses adopted by the German Army was mittlerer Kraftomnibus (o), or medium commercial bus. This classification included vehicles with a weight of up to 7,300 kg and between 15 and 30 seats. Naturally, the buses were not only used for personnel transport, but also as medical vehicles, command vehicles (Befehlskraftwagen), radio vehicles (Funkauswertekraftwagen) or mobile laboratories (Laboratoriumskraftwagen).
The kit comprises six sprues, an acetate sheet, a photo-etched fret, the decals and the instructions. Parts are molded in the usual stiff and rather hard plastic that Roden uses, which also allows it to produce very brittle pieces. The sprues hardly show minimal flash and thin seam lines. However, the interior of the vehicle has lots of pin marks on the floor and sides. Most of them are easy to clean up or will not be very noticeable, as the interior cannot be shown open. The most evident marks are on the rear sides of the passenger seats. The seats also have small sink marks on the backrests that ruin the pieces a bit. Apart from this, overall detail is not below other kits in this scale.
Construction does not look that easy and the instructions are not very clear about the location of some pieces. For this reason, assembly needs care and precision when gluing the major subassemblies as well as the windows and photo-etched parts. The instructions only show a fan on the roof as the only assembly choice, so the three versions in this box are almost identical.
Chassis, engine and transmission
The chassis is complete in one piece without any pin marks. The front part is detailed with the bumper plus the tow hooks and the plate. The last cross member has a separate hitch. In addition to this, we must add the fuel tank, made up of two halves with large raised marks on the interior sides and a sink mark on the top.
As usual with Roden, the engine is nice and one of the best elements in the kit. It is made up of twelve pieces and, among others, we have the fan, the oil and fuel pump, manifolds, the distributor, etc.. The block includes the gearbox and is molded in halves. The radiator is detailed with the rear grille and a separate hose. The exhaust pipe is not so good. It comes in two lengths and includes the silencer. It will not very easy to attach both pieces and the position of the pieces in the frame is not very clear in the instructions.
The transmission shaft is one piece with the joints, which look a bit faint. The front axle has separate suspension arms and this in fact allows the wheels to be turned, although this possibility is not indicated on the instructions. The brake drums are also separate. The rear axle with the differential is divided in halves with the brake drums identical to those in the front axle.
Suspension and wheels
The leaf springs are different on the two axles and show good detail on the blades and clips. Prior to attachment, you need to clean up the positive marks on the rear sides.
The wheels look fine. They have detailed hubs and very thin rims. The tires have a nice tread pattern although they also show small seam lines.
Interior
The driver’s cab front consists of a floor and a bulkhead. This has defined pedals, separate levers and the dashboard, which shows some gauges and the glove compartment. The kit does not include decals for the gauges. The steering wheel and column are also separate thin pieces.
The rest of the floor from the driver’s seat comes in one piece with the rear wheel arches molded on. The door steps are separated in bit thick boxy pieces that also have marks difficult to clean up inside. It may be worth replacing them.
In addition to the driver’s seat, there are fourteen passenger seats. The pieces show the wooden planking with some definition. As said, detail is affected by small sink marks in the middle. The pieces also have positive marks on the rear sides that will be quite evident.
The windows and windscreen are thin acetate pieces that are cut out from the sheet. Except for the rear window, there are no recesses in the frames for attaching the pieces. The instructions are not clear in the attachment of the floor on the frame.
Body
It consists of four sides plus the roof. All of them have marks on the inner sides and no engraved detail, not even the doors. Exterior detail is not bad at all. The sides and rear have raised mouldings, engraved doors and marked hinges, as well as defined handles considering the media and size. The front side includes the cab roof. It seems more convenient to start assembly attaching the rear piece to the sides as this has pins for alignment.
The rear side is detailed with a separate license plate and a photo-etched ladder. One side is molded with the spare wheel well to attach the wheel inside and the roof shows a non-slip stamped surface for the luggage rack with a photo-etched railing in one piece. There is also an optional fan, as mentioned above.
According to the instructions, the floor should have two tabs on the rear edge to insert them into slots molded on the rear body side but all of them are missing. This means that the body and floor have to be aligned and glued by eye.
The nose is made up of two sides, a profile between them, the front grille and the mudguards. The sides show raised engine louvers and the front piece has a nice grille with the manufacturer’s logo. The mudguards are not very thin but their profile seems correct. Again, the instructions are not very helpful in attaching them.
Separate pieces to enhance the vehicle nose include the headlights, the Notek light, tools, a jerrycan and the turn indicators. The rearview mirror, as well as the clearance gauges and the windshield wipers are photo-etched. For once the position of wipers is clearly shown in the instructions.
Decals
The sheet contains three sets of plates and Red Cross markings with a glossy appearance and not too thin. The colors have apparently correct saturation and the numbers on the license plates are sharp. Decals do not have too much carrier.
Instructions
They come in an 8-page brochure printed in black and white with an introduction and technical data about the vehicle, a numbered parts plan, 21 assembly chapters and two pages of profiles. The back of the box shows profiles of a third finish plus a colour chart with Vallejo paints. As mentioned, attachment of some parts and subassembies is not very clear sometimes.
Paint finishes show vehicles painted in grey or sand without camouflage in two standard versions and one ambulance.
Conclusion
The kit does not look as easy to build as others in this scale and is more appropriate for experienced modellers. It is a pity that the instructions are not clearer at critical points of assembly, for example in the attachment of the floor with the chassis and body.
A bus is always rare to see in any scale and even more so in this small one, so Roden should be congratulated for having released a vehicle that offers varied possibilities for integrating it into scenes and dioramas.◊
Publicado – Published: 11 / 2024
©www.jmodels.net

Debe estar conectado para enviar un comentario.