
De un vistazo – Quick look
MATERIAL Y PIEZAS
MEDIA & PARTS:
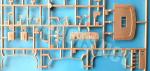
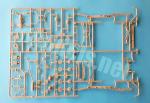
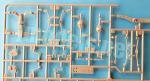
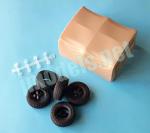
- Plástico inyectado (142 piezas), plástico transparente (15 piezas), fotograbado (8 piezas), máscara adhesiva (17 piezas), vinilo (5 piezas), rodamientos de plástico (8 piezas). Incluye una figura (8 piezas).
- Injected plastic (142 parts), clear plastic (15 parts), photo-etched (8 parts), adhesive mask (17 parts) vinyl (5 parts), polycaps (8 parts). One figure included (8 parts).
CALCAS – DECALS:
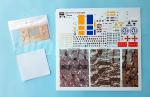
- Instrumentos del salpicadero, numerales amarillos y blancos, matrículas, numerosas insignias de unidad, marcas de identificación y tres tipos de tejidos con patrones de camuflaje distintos para la figura. Aspecto brillante y fino. Buen registro y saturación de color. Sin exceso de soporte.
- Dashboard instruments, plenty of unit badges, white and yellow numbers, plates, blue and yellow stripes and three types of camo fabric for the figure uniform. Glossy and thin appearance. Good register and color saturation. No excess of carrier film.
OPCIONES – OPTIONS:
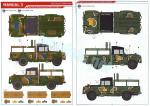
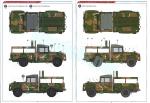
- K311A1. Ejército de Corea del Sur, 2020. Camuflaje marrón, verde, blanco.
- K311A1. Cuerpo de Marines de Corea del Sur.
- K311A1. Fuerza Aérea de Corea del Sur, 2020.
- K311A1. Ejército de Corea del Sur, 2020. Camuflaje verde, negro, marrón.
- K311A1. Fuerzas Armadas Filipinas, 2014.
- K311A1. Infantería de Marina de Chile. Camuflaje marrón, verde, blanco.
- K311A1. Infantería de Marina de Chile, 2008. Camuflaje arena completo.
- K311A1. R.O.K. Army, 2020. Brown, green, white camouflage.
- K311A1. R.O.K. Marine Corps.
- K311A1. R.O.K. Air Force, 2020.
- K311A1. R.O.K. Army, 2020. Green, black, brown camouflage.
- K311A1. Armed Forces of the Philippines, 2014.
- K311A1. Chilean Navy Marine Corps. Brown, green, white camouflage.
- K311A1. Chilean Navy Marine Corps, 2008. Overall sand camouflage.
INSTRUCCIONES – INSTRUCTIONS:
Tres manuales.
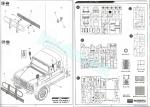
- Manual 1: folleto doblado de 8 páginas impresas en blanco y negro. Contiene una tabla de colores con equivalencias en varias marcas de pintura, pasos de montaje 1-14, pintura y calcas de la figura.
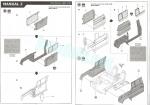
- Manual 2: folleto doblado de 8 páginas impresas en blanco y negro. Contiene pasos de montaje 15-27 y un plano numerado de piezas.
- Manual 3: folleto doblado de 8 páginas impresas a color. Contiene perfiles para pintar y colocar calcas más varias cajas y brazaletes recortables.
Three manuals.
- Manual 1: 8-page folded brochure printed in black and white. It contains a color chart with paint matches in several brands, assembly steps 1-14 and a view of the figure for painting and decalling.
- Manual 2: 8-page folded brochure printed in black and white. It shows assembly steps 15-27 and a numbered parts plan.
- Manual 3: 8-page folded brochure printed in color. It includes profiles to paint and decal the vehicle plus a few cutouts of boxes and armlets.
LO MEJOR – THE BEST:
- Buen detalle general. Montaje bien diseñado. Incluye mascarillas.
- Nicely detail overall. Well thought-out assembly. Paint masks included.
LO PEOR – THE WORST:
- Carece de motor. Pequeñas marcas de eyector en la cabina y caja de transporte.
- Lack of engine. Small pin marks inside the cab and cargo tray.
VALORACIÓN – CONCLUSION:
- Primera maqueta de este vehículo en plástico. Tiene un montaje bien diseñado, apto para casi cualquier modelista, y opciones de pintura variadas. Las marcas y la ausencia de motor no la hacen más destacable aún.
- First kit of this vehicle in plastic. It has a well thought-out assembly suitable for almost any modeller. Paint choices are varied enough. Pin marks and the lack of an engine do not make it still more outstanding.

La maqueta
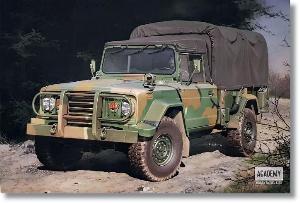
Academy continúa trayéndonos vehículos militares empleados por las fuerzas armadas surcoreanas. En esta ocasión le ha tocado el turno a este K311A1, una variante modernizada del modelo K311, fabricada por la marca automovilística Kia, puesta en servicio desde 2003 y exportada con la denominación de KM450. El vehículo está operativo actualmente en ejércitos de varios países de África, Oriente Medio y América del Sur. Este pequeño camión multipropósito se fabrica en múltiples versiones de ambulancia, vehículo taller, reconocimiento NBQ, comunicaciones, etc. También ha sido dotado de diferente armamento como lanzacohetes, ametralladoras pesadas y armas antiaéreas por sus operadores.
En cierta manera, esta edición complementa a los camiones K511 y K511A1 (KM250) también fabricados por Kia y que Academy puso a la venta hace años.
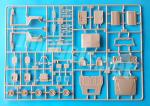
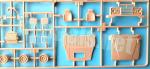
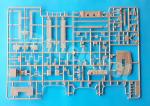
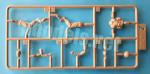
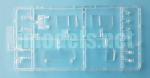
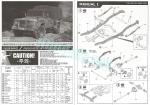
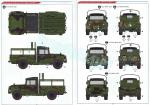
La maqueta comprende cuatro bastidores de piezas, el suelo de la cabina, el toldo y la caja trasera moldeados por separado, un bastidor transparente, una hoja de máscaras adhesivas, una plancha de fotograbados, cinco neumáticos de vinilo más ocho rodamientos de plástico, la hoja de calcas y tres manuales de instrucciones. El total de piezas de plástico de esta maqueta, descontando la figura, no llega a 150, lo que parece bastante ajustado a la escasa complejidad de un vehículo ligero como este.
Las piezas carecen de deformaciones y rebabas ni tampoco encuentro líneas de molde dignas de reseñar. En general no hay muchas marcas de eyector visibles y estas son en su gran mayoría pequeñas y limitadas a los bancos de la zona de carga y el panel delantero del toldo. El suelo, por ejemplo, y la caja de carga están libres de ellas.
Siguiendo las instrucciones, el montaje comienza por el chasis y la suspensión, prosigue con el montaje de la zona trasera de carga, luego la cabina y finalmente el detallado de la parte frontal del vehículo.
Las opciones de montaje no son muchas: podemos representar el vehículo con toldo o sin él, simular la ventanilla del conductor subida o bajada, o bien emplear piezas de plástico o fotograbado en los protectores de los faros delanteros. Aunque las instrucciones no lo señalen, también podemos colocar abiertos tanto el portón trasero como las puertas. En cambio, las opciones de pintura tienen cierta variedad en los patrones de camuflaje y también hay una versión monocolor para los menos diestros.
Chasis y suspensión
El bastidor del chasis está casi completamente despiezado y hay que unir los largueros con los diferentes travesaños. En esta etapa inicial del montaje hay que pegar el motor, del que solo tenemos la mitad inferior, la caja transfer, separada en mitades y pegada sobre uno de los travesaños y la suspensión trasera, compuesta de ballestas con detalle nítido en ambos lados y moldeadas con las bridas, y los amortiguadores.
El eje trasero está unido al diferencial, que tiene una mitad separada. El delantero está hecho de la misma forma y cuenta con los brazos de control en una pieza cada uno, la barra estabilizadora, las ballestas y los tambores de freno. Estos vienen separados en dos piezas con un rodamiento de plástico traslúcido entre ellas que permite el giro de las ruedas mediante un eje moldeado en la cara interior de las llantas. Los ejes de la trasmisión van unidos a la caja transfer a diferente altura. Un tercer eje, más corto une el motor y la caja. Los ejes están bien detallados con las juntas cardan.
El chasis queda terminado con la adición del tubo de escape, moldeado con el silenciador y separado en dos tramos, dos contenedores más bien pequeños que, por su posición, supongo cajas de respeto, y el último travesaño al que hay que pegar los paragolpes traseros y dos paneles que contienen las luces. Los faros traseros vienen separados de sus paneles con piezas transparentes para las lentes y mascarillas para ayudarnos a pintarlos.
Las llantas delanteras y traseras muestran un detalle correcto y diferente según el eje. Los neumáticos son de vinilo y van unidos a presión en las llantas. El detalle de los lados y la banda de rodadura es limpio y nítido, sin líneas de moldeado. A no ser que se tenga aversión a este material, no me parece imprescindible sustituir los neumáticos por otros de resina.
En general, el chasis de la maqueta está bastante bien representado y no parece ofrecer dificultad en el montaje. Sólo se echa en falta el motor, del que únicamente tenemos la parte inferior.
Cabina
El suelo, el panel delantero y los guardabarros están moldeados en una sola pieza sin marcas de eyector y unida al bastidor mediante cuatro pivotes.
Los asientos están divididos en cuatro piezas e incluyen los reposacabezas. Entre ellos están situadas las palancas, el freno de mano y un contenedor portaobjetos. El salpicadero es de una pieza y muestra los indicadores y diversos instrumentos en excelente relieve. Algunos de ellos están detallados con calcas. Los pedales están unidos en una pieza y pegados por detrás del salpicadero. El volante y la base están separados. Esta última contiene también las palancas de los indicadores de giro y limpiaparabrisas, pero está extrañamente abierta por su cara inferior. Antes de pegar el volante, parece aconsejable añadir la figura si vamos a emplearla.
El panel trasero está bien reproducido con molduras en la parte inferior y una lona texturizada en la mitad superior provista de una ventanilla con pieza transparente, también con textura, encajada en su marco. La pieza está complementada por un extintor y muestra algunas pequeñas marcas de eyector.
Academy ha moldeado correctamente el parabrisas con las diferencias del modelo K311A1 respecto al anterior K311. El parabrisas viene de una pieza (en lugar de dos en el K311) con una única luna transparente separada y tres limpiaparabrisas (dos en el K311). Los limpiaparabrisas están bien definidos y la cara interna de la pieza también tiene algunas pequeñas marcas por cubrir.
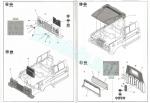
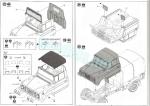
El techo de la cabina es de lona y está representado en una pieza con textura realista. En su interior hay algunas marcas, pero no serán visibles.
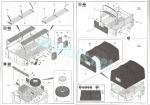
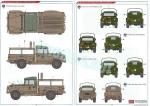
Carrocería delantera
Los lados de la carrocería delantera son de una pieza cada uno e incluyen las superficies superiores de los guardabarros. Las piezas muestran pequeños rebajes para introducir los indicadores de giro transparentes, que son las únicos elementos que no disponen de mascarillas. Además de los retrovisores a cada lado, el lado izquierdo tiene un faro de conducción nocturna con el protector. El lado interno por delante de las puertas tiene una pieza para pegar las bisagras de las puertas, pero deberemos decidir antes si las vamos a poner abiertas o cerradas.
Las puertas poseen el panel interno separado y detallado con los elevalunas y los cierres. Los cristales están moldeados con lengüetas en la parte inferior para introducirlos en la ranura situada entre la cara exterior de cada puerta y el panel interno. La ventanilla del lado izquierdo (del conductor) tiene doble opción para mostrarla subida o bajada.
Una vez unidos los lados de la carrocería al suelo, queda por colocar la parrilla delantera y el capó. La pieza frontal de la carrocería tiene los faros bien moldeados e incluyen una pequeña lámpara en el caso de los faros principales y piezas transparentes para las lentes. Los protectores vienen separados, con doble opción (plástico o fotograbado) para estas piezas. La calandra lleva en su cara interna una rejilla de fotograbado y tras ella hay que situar el radiador, que sólo está detallado en su lado frontal mientras que el trasero está hueco, una licencia que se ha permitido Academy porque no se va a ver. El capó es de una pieza con buena definición en la rejilla de desagüe del parabrisas y las bisagras. Al no haber motor, la pieza sólo puede ponerse cerrada.
Los últimos pasos de montaje comprenden la adición de las aletas de los guardabarros y del paragolpes delantero. Este tiene dos eslabones de remolque y una barra parachoques en una pieza aparte.
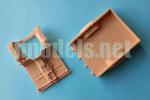
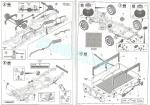
Caja de carga
Está moldeada en una pieza con muy buena definición en el estampado del suelo y las caras externas, que muestran catadióptricos (reflectantes) circulares, dos estribos en posición plegada con sus pestillos de cierre y las bisagras del portón trasero separado. Este lado trasero puede colocarse abierto, aunque las instrucciones no lo indican. Los guardabarros traseros están unidos en la pieza y son finos. Cada uno de ellos tiene un par de marcas positivas de eyector en la cara inferior, pero no merece la pena eliminarlas porque las ruedas las taparán. La caja va insertada en el chasis mediante cuatro pivotes de plástico al igual que el suelo.
Los lados de la caja están detallados con un hacha y una pala a un lado, y una lata de combustible y el tubo de llenado de combustible al otro. Las herramientas están bien moldeadas, si bien parecen ligeramente grandes. El contenedor de combustible está separado en mitades con el tapón y las asas separadas. Muestra buen detalle en las correas y la base de sujeción a la carrocería.
El lado inferior de la caja tiene algunas piezas más, entre ellas un perfil en L en la zona trasera, la rueda de repuesto, el depósito de combustible y las aletas traseras, representadas en piezas finas, con bordes biselados y limpias de marcas.
La parte superior de la caja contiene dos bancos de listones con soportes separados. Las caras inferiores de los bancos tienen algunas pequeñas marcas, pero no es imprescindible rellenarlas porque no serán visibles. Dos piezas a los lados de la caja, que simulan también listones, sirven de respaldos a los asientos. Las piezas tienen pequeñas marcas en el lado interno que deben eliminarse, especialmente si no vamos a emplear el toldo.
La parte posterior de la caja lleva una cincha de seguridad y la parte anterior lleva una pieza (B5) sobrepuesta que muestra una estructura de listones limpia de marcas y herrajes bien definidos. Si no usamos el toldo, hay que colocar tres finos soportes en forma de arco estibados en la parte delantera de la caja.
El toldo del vehículo tiene la cara anterior separada donde muestra una ventana sin pieza transparente. La textura de la lona está muy bien representada. La cara interna contiene una réplica de la pieza B5 mencionada antes con algunas marcas de eyector. El resto del toldo está muy bien moldeado en una pieza delgada con excelente representación de la tensión y arrugas de la lona.
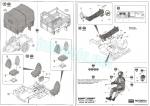
Figura
La figura del conductor está despiezada en ocho partes que representan la cabeza, los brazos, el tronco, y las piernas unidas a la cadera. La cabeza tiene dos opciones, tocada con boina o con casco separado. La cara muestra rasgos bien definidos excepto en la boca, mientras que el uniforme parece mejor detallado en los brazos y piernas que en el tronco, donde los detalles de los correajes, bolsillos y equipo no son tan nítidos.
Calcas
La hoja incluye los instrumentos del salpicadero, insignias de unidad, numerales amarillos y blancos, matrículas, numerosas insignias de unidad, marcas de identificación y tres tipos de tejidos con patrones de camuflaje distintos para la figura. Las calcas poseen aspecto brillante y fino. Están impresas con buen registro y saturación de color, y no muestran exceso de soporte.
Entre las insignias nacionales aparecen dos ucranianas que parecen indicar que Academy podría también sacar la versión Bars-6 fabricada por Bogdan y basada en el chasis del KM450.
Instrucciones
En lugar de imprimir las instrucciones en un libreto grapado, Academy las ha separado en tres manuales de 8 páginas plegadas cada uno. Los dos primeros están impresos en blanco y negro y el tercero en color.
El primer manual contiene una tabla de colores con equivalencias de pintura (Humbrol, Gunze Sangyo, Testor/Model Master, Revell, Vallejo y AK Interactive), las secuencias de montaje 1 a 14 y una vista de la figura con indicaciones para pintarla y ponerle calcas. El segundo muestra los pasos de montaje 15 a 27 y un plano numerado de piezas. El tercero tiene perfiles para pintar y colocar calcas, más varias cajas y brazaletes para la figura, todos ellos recortables.
Los pasos de montaje son bastante claros y están complementados con vistas de detalle de la colocación de piezas donde es necesario.
Valoración
Este es un muy buen estreno para este vehículo en plástico y probablemente Academy sacará otras versiones si hacemos caso a lo que ha impreso en las calcas. Sin dificultad le daría todavía mejor consideración a esta notable maqueta si no le faltase el motor, una pieza que nos daría una opción más de montaje al poderlo enseñar y la presencia de algunas marcas de eyector, especialmente visibles en la parte trasera si no empleamos el toldo.
El montaje no parece difícil, dado el equilibrio entre el número de piezas y el nivel de detalle de la maqueta. El despiece está bien pensado y permite montar y pintar alternativamente, si así lo deseamos, la parte delantera y la caja de carga una vez terminado el chasis.
Por otra parte, las versiones de pintura plasman cierta variedad en los patrones de camuflaje y también hay una versión monocolor de los Marines chilenos para los menos diestros. La inclusión de mascarillas para casi todas las piezas transparentes son un acierto y serán de gran ayuda con la pintura del modelo.◊

The kit
Academy continue to bring us military vehicles used by the South Korean armed forces. This time it was the turn of the K311A1, a modernized variant of the K311 light truck manufactured by the Kia automobile company which entered service in 2003 and has been exported under the name KM450. The vehicle is currently in the inventory of several countries in Africa, the Middle East and South America. It is manufactured in multiple versions as ambulance, workshop vehicle, NBC reconnaissance, communications, etc. It has also been equipped with different weapons such as rocket launchers, heavy machine guns and anti-aircraft weapons by its operators.
In a way, this kit complements the K511 and K511A1 (KM250) trucks also manufactured by Kia that Academy released years ago.
The kit includes four sprues of parts, the cab floor, tarp and rear box molded separately, a clear sprue, a sheet of adhesive masks, a photo-etched fret, five vinyl tires plus eight plastic polycaps, the decal sheet and three instruction manuals. The total number of plastic parts in this kit, excluding the figure, is below 150, which seems quite adequate for the low complexity of a light vehicle like this.
The standard of moulding is quite good and pieces do not have blemishes or flash, nor do I find any seam lines to note. In general there are not many visible ejector marks and these are mostly small and limited to the tray benches and the front roof panel. The floor, for example, and the cargo tray are free from them.
Following the instructions, construction begins with the chassis and suspension, continues with the rear tray assembly, then the cabin and finally the detailing of the front bodywork.
There are not many assembly options: we can represent the vehicle with or without a tarp, simulate the driver’s window raised or lowered, or use plastic or photo-etched parts in the headlight brush guards. Although the instructions do not indicate it, we can also place the tailgate and the doors open. Paint choices have some variety in camouflage patterns and there is also an overall sand finish for the less experienced.
Chassis and suspension
The first step is to build the chassis frame, which has all the cross members apart. In this initial stage of assembly, we must glue the engine, of which we only have the lower half, the transfer case, separated into halves and glued onto one of the crossmembers, and the rear suspension, comprising leaf springs with sharp detail on both sides and molded with the shackles, and shock absorbers.
The rear axle is attached to the differential, which has a separate half. The front is made in the same way and has the control arms in one piece on each side, the sway bar, the leaf springs and the brake drums. These come in two pieces with a translucent plastic polycap between them that allows wheel turning as there is an axle molded on the inside of the rims. The transmission shafts are attached to the transfer case at different heights. A third, shorter axle joins the engine and the case. The axles are well detailed with the cardan joints.
The chassis is finished with the addition of the exhaust pipe, molded with the silencer and separated into two lengths, two small containers that look like tool boxes, and the last crossmember to attach the rear bumpers and two panels containing the taillights. These come separated with clear pieces for the lenses and masks to help us paint them.
The front and rear rims show correct and different detail depending on the axle. The tires are vinyl and are press-fitted to the rims. Detail on the sides and tread is clean and crisp with no seam lines. Unless the media is not your cup of tea, I don’t think it is essential to replace the tires with resin counterparts.
In general, the kit chassis is quite well rendered and does not seem to have special difficulties during assembly. The only thing missing is the engine, of which we only have the lower part.
Cab
The floor, front panel and fenders are molded in one piece clean from ejector marks and attached to the frame by means of four pins.
The seats are divided into four pieces and include the headrests. Between them are the levers, the handbrake and a storage container. The dashboard is in one piece and shows the dials and several excellent raised instruments. Some of them are detailed with decals. The pedals are joined in one piece and glued behind the dashboard. The steering wheel and the base are separate. This piece is molded with the turn indicator and the wiper switch. Before gluing the steering wheel, it seems advisable to add the driver figure if we are going to use it.
The rear panel is well reproduced with stamped moldings at the bottom and a textured canvas in the upper half provided with a clear textured window. The piece is detailed with a fire extinguisher and shows some small pin marks.
Academy have correctly molded the windshield with the differences of the K311A1 model compared to the previous K311. The windshield comes in one clear piece (instead of two in the K311) and three wipers (two in the K311). The wipers are well defined and the inside of the piece also has some small marks to fill up.
The cab roof is made in one piece with realistic canvas texture. There are some marks inside, but they will not be visible.
Front bodywork
The front body sides are one piece each and include the upper sides of the fenders. The pieces show small recesses to fit the turn indicators, which are the only clear parts that do not have masks. In addition to the mirrors on each side, the left side has a night driving headlight with bracket. The internal side in front of the doors has a piece to attach the door hinges, but we must first decide if we are going to put the doors open or closed.
The doors have a separate internal panel provided with the handles and window regulators. The clear glass panes are molded with tabs on the bottom to fit them into the slot between the door and the inside panel. The left side window (the driver’s) has a double option to show it raised or lowered.
Once the sides of the body are attached to the cab floor, the next step is to add the front grille and the hood. The front grille piece is sharply moulded with small bulbs and clear pieces for the headlight lenses. The brush guards come separately, with a double option (plastic or photo-etched) for these pieces. The grille has a photo-etched mesh and the radiator behind it. This is only detailed on the front side while the rear side is hollow. Academy have made it this way probably because it will not be seen. The hood is one piece with good definition on the windshield drain and hood hinges. Since there is no engine, the piece can only be shown closed.
The final assembly steps are adding the mud flaps and the front bumper. This one has two tow shackles and a grille guard in a separate piece.
Cargo tray
It is molded in one piece with very good definition in the stamped floor and the external sides, which show sharp red reflectors, two steps in the folded position with defined latches and the hinges of the separate tailgate. This rear side can be placed open, although the instructions do not point it out. The rear fenders are joined in the piece and are thin. Each of them has a couple of positive pin marks on the underside, but they are not worth cleaning as the wheels will hide them. The box is attached to the chassis by means of four plastic pins, just like the floor.
The sides of the cargo tray are detailed with an ax and shovel on one side, and a jerrycan and the fuel filler on the other. The tools are well molded, although they look a bit large. The jerrycan is broken down in halves with separate cap and handles and nice detail on the straps.
The lower side of the tray has a few more parts, including an L-shaped piece in the rear side, the spare wheel, the fuel tank and the mud flaps, molded in thin pieces, with beveled edges and clean from marks.
The top of the box contains two benches with separate supports. The undersides of the benches have some small marks, but it is not essential to fill them because they will not be visible. Two pieces on the sides of the box are used as backrests for the seats. The pieces have small marks on the inner side that must be removed, especially if we are not going to use the tarp.
The back of the box has a safety strap and the front side has an overlapping piece (B5) that shows a slat structure free from marks. If we do not use the tarp, we have the choice to use the canvas frame stowed in the front part of the box.
The vehicle’s canvas tarp cover has a separate front side molded with a window without a clear part. The canvas texture is nicely rendered. The inner side has a reproduction of piece B5 mentioned before, so if the tarp is used, this piece is not necessary. The tarp is well molded in a thin piece with excellent rendition of the canvas wrinkles.
Figure
The driver figure is divided into eight parts that represent the head, arms, trunk, and legs joined at the hip. The head has two options, molded with a beret or with a separate helmet. The face shows well-defined features except for the mouth, while the uniform is better detailed on the arms and legs than on the trunk, where the details of the straps, pockets and equipment are not as sharp.
Decals
The sheet includes the dashboard instruments, yellow and white numbers, license plates, plenty of unit badges, identification marks and three types of fabrics with different camouflage patterns for the figure. The decals have a glossy and fine appearance. They are printed with good registration and color saturation, and do not show too much carrier film.
Among the national markings there are two Ukrainian crosses that seem to indicate that Academy could also release the Bars-6 version manufactured by Bogdan and based on the KM450 chassis.
Instructions
Instead of printing the instructions in a stapled booklet, Academy have separated them into three manuals of 8 folded pages each. The first two are printed in black and white and the third in color.
The first manual contains a color chart with paint equivalencies (Humbrol, Gunze Sangyo, Testor/Model Master, Revell, Vallejo and AK Interactive), assembly sequences 1 to 14 and a view of the figure with instructions for painting and setting the decals. The second manual shows assembly steps 15 to 27 and a numbered parts plan. The third one has profiles for painting and setting the decals, plus several cutout boxes and armlets for the figure.
The assembly steps are quite clear and complemented by detailed views of the parts placement where necessary.
Conclusion
This is a very good debut in plastic for this vehicle and Academy will probably release other versions if we consider the Ukranian markings printed on the decals. With no difficulty I would give this remarkable kit even better consideration if it had a complete engine, a part that would give us one more assembly option to show it open, and the presence of some ejector marks, especially visible in the tray if we do not use the tarp.
Assembly does not seem difficult, given the balance between the number of parts and the level of detail. Parts breakup is sensible and well thought-out and allows the front part and the cargo box to be built and painted alternatively if desired once the chassis is finished.
On the other hand, paint versions show a certain variety in the camouflage patterns and there is also a single-color version of the Chilean Marines for the less skilled. The inclusion of masks for almost all the clear pieces is an asset and will be of great help when painting the kit.◊
Publicado – Published: 3 / 2024
©www.jmodels.net

Debe estar conectado para enviar un comentario.