
De un vistazo – Quick look
MATERIAL Y PIEZAS
MEDIA & PARTS:
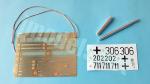
- Plástico inyectado (487 piezas), fotograbados (38 piezas), aluminio torneado (2 piezas), hilo de cobre trenzado (1 tramo).
- Injected plastic (487 parts), photo-etched (38 parts), turned aluminium (2 parts), braided copper wire (1 length).
CALCAS – DECALS:
- Cruces balcánicas y numerales negros. Apariencia fina. Bien impresas.
- Balkan crosses and numbers. Apparently thin and well printed.
OPCIONES – OPTIONS:
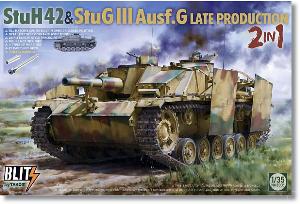
- StuG. III Ausf. G (final). 202 negro. 9ª División Panzer SS Hohenstaufen. Berhida (Hungría).
- StuG. III Ausf. G (final). 711 negro. 3ª División de Granaderos Panzer Totenkopf. Mödrath (Germany).
- StuH42 (final). 306 negro. Sin datos.
- StuH42 (final). Sin numeración. Brigada Sturmgeschütz 907.
- StuG. III Ausf. G (late). Black 202. 9 SS-Panzer Division Hohenstaufen. Berhida (Hungary).
- StuG. III Ausf. G (late). Black 711. 3 Panzer Grenadier Division Totenkopf. Mödrath (Germany).
- StuH 42 (late). Black 306. No data.
- StuH 42 (late). No number. Sturmgeschütz Brigade 907.
INSTRUCCIONES – INSTRUCTIONS:
- Folleto apaisado de 22 páginas impreso en color. Contiene una breve referencia histórica sobre el vehículo, una lista de pinturas de Ammo MiG, un plano de piezas numerado, 29 secuencias de construcción y cuatro páginas de perfiles en color. Son claras excepto el plano de piezas que apenas es útil debido a su tamaño. Bien impresas.
- 22-page landscape brochure printed in color. It contains a short historical reference about the vehicle, a list of Ammo MiG paints, a numbered parts plan, 29 assembly stages and four pages of color profiles. Assembly is clear but the parts plan is almost useless due to the size. Well printed.
LO MEJOR – THE BEST:
- Detalle muy destacable. Opciones de montaje.
- Outstanding detail. Assembly choices.
LO PEOR – THE WORST:
- Algunas piezas delicadas, especialmente de fotograbado.
- Some delicate parts, especially photo-etched ones.
VALORACIÓN – CONCLUSION:
- Muy buena maqueta con acertado detalle para el vehículo que dice representar. Aparente sencillez de montaje, adecuada para modelistas de nivel intermedio en adelante.
- Very nice kit with correct detail for the vehicle it depicts. Apparently not a difficult build, it is suitable for modellers with intermediate skills onwards.

Introducción (acaso necesaria)
Como “Panzer” o “Sherman”, la palabra “StuG” tiene un magnetismo indiscutible para los modelistas de vehículos militares de cualquier escala. Me ha dado por echar un ojo en Scalemates a las maquetas de este vehículo que llevamos hasta el momento en la escala 1/35, reediciones incluidas. Por citar sólo algunas más actuales, Takom lleva nueve nada menos, pero aún queda muy lejos de las 47 de Dragón/DML, sin meter en la cuenta las de Cyber-Hobby (otras 8). MiniArt, que lo mismo que Takom ha entrado en la brega por un lugar en el mercado mucho más tarde, tiene el contador en diez por ahora. Muy atrás quedan otras marcas con molde propio como Tamiya (nueve, contando viejo y nuevo molde) o Rye Field Model, que estrena su cuenta con cuatro hasta hoy, todas del modelo Ausf. G. Las mejoras ni las cuento porque sería la historia de nunca acabar.
Como vemos, la competencia es dura y amplia. Con tantos Ausf. nosecuántos donde elegir, más los apelativos de “early” o late” para complicarlo todo, el modelista del común debe tentarse la ropa antes de comprarse un StuG con el precio que tienen las cosas del plástico actualmente.
En esta revisión, como en todas, intentaré centrarme en lo que tiene la caja y dar mi opinión sobre lo que veo en ella. No cabe esperar de mí, simple aficionado y experto en nada, un veredicto sobre si esta edición es mejor o peor que las de las otras marcas, o si tal o cual detalle tiene una tuerca de más o un muelle de menos. Si a alguien le sirve al menos para conocer esta maqueta, aunque sea para luego desecharla, bienvenido sea. Alguna utilidad habrá tenido y además es gratis, no se olvide.
La maqueta
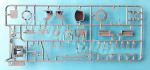
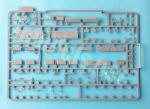
La caja de esta edición trae diez bastidores de piezas, dos planchas de fotograbados, dos cañones de aluminio, un tramo de hilo de cobre trenzado, las calcas y las instrucciones. El casco, la cubierta y la superestructura vienen separadas. Los bastidores están bien embalados en bolsas con banda sellante. La maqueta comparte el molde con otras maquetas de este vehículo que Takom ha ido editando con el tiempo, por ello encontraremos piezas sobrantes que no están señaladas en el plano de las instrucciones.
El aspecto general de las piezas es excelente y no presentan rebabas ni deformaciones. Sólo encuentro marcas de eyector en el lado interno de los tramos de las cadenas, pero los eslabones sueltos carecen de ellas. Las marcas están espaciadas y desaparecerán fácilmente al ser pequeñas y muy tenues. Aparte de esto, sólo hay algunos cilindros de eyector en muy pocas piezas que también son sencillos de eliminar.
La maqueta puede montarse como un StuG III G de producción final o bien un Sturmhaubitze 42 (StuH 42) que estaba armado con un obús de 105 mm. en lugar del cañón estándar de 75 mm. Hay alternativas también para el mantelete del StuG III G con y sin tronera para la ametralladora coaxial.
Aunque las instrucciones no proporcionan datos sobre los vehículos representados en ellas, hay algunas pistas para aventurar al menos en qué periodo de la guerra mundial pudieron intervenir. Así, la ausencia de recubrimiento de Zimmerit nos lleva a fechas posteriores a septiembre de 1944. Por las mismas fechas se añadió la ametralladora coaxial al mantelete de fundición alargado del cañón y desde el verano anterior, los StuG ya empleaban la ametralladora giratoria que era operada por el cargador desde el interior del vehículo. Hay más características que podrían mencionarse, pero no haré la lista larga. Por tanto, estamos ante cuatro opciones cronológicamente encuadradas entre los últimos meses de 1944 y el final de la guerra.
Casco, suspensión y tren de rodaje
El casco viene completo salvo la plancha trasera separada. La cara inferior no se ha dejado sin detallar y cuenta con distintos desagües (aceite, agua y combustible), así como un acceso inferior atornillado. Los lados están muy bien reproducidos con los topes de la amortiguación y los ejes de los rodillos de retorno. El interior lleva una pieza, fabricada a conveniencia, sobre la que posteriormente asentaremos la parte no visible del cañón.
La plancha frontal es lisa y carece del blindaje añadido de los StuG III G iniciales. Los agujeros de remolque de la parte anterior vienen en dos planchas y hay piezas separadas para reproducir los amortiguadores, el sistema tensor de las cadenas, las cubiertas de los diferenciales, así como los brazos de la suspensión. La definición de los dientes y las llantas en las ruedas tensoras y tractoras es muy bueno.
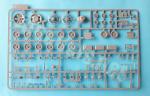
El tren de rodaje se compone de las habituales seis ruedas pareadas con adecuada nitidez en el detalle de las llantas y también en la banda de rodadura, donde puede leerse con claridad el nombre del fabricante (Continental). Lo mismo ocurre con los rodillos de retorno. El montaje del tren de rodaje no parece nada complicado y es el usual en este tipo de maquetas.
La plancha trasera del casco es doble y en medio lleva reproducidos los escapes, con la salidas abiertas y moldeados con los silenciadores y otros detalles añadidos, como los enganches de remolque y sus pasadores separados, sin embargo el enganche central carece del suyo. La plancha externa muestra el protector blindado del sistema de arranque, aunque falta la manivela, y va pegada sobre cuatro soportes transversales a la pieza. Una vez pegada, la parte inferior del hueco entre las planchas va cubierta por una rejilla de fotograbado y la superior por la parte superior del casco que añadiremos en una fase posterior del montaje.
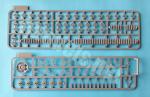
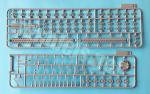
Cadenas
Las cadenas están despiezadas en tramos y eslabones. Cada lado tiene tres tramos para cubrir la parte inferior y uno para la superior, que se ha moldeado con una sutil caída entre los rodillos que le da mucho realismo. Hay además 20 eslabones sueltos a cada lado para cubrir la parte delantera de las tractoras y tensoras.
El detalle de los eslabones está muy bien conseguido, especialmente en los dientes huecos internos. Los eslabones sueltos no requieren limpieza y los tramos muestran ligeras marcas de eyector muy pequeñas que será fáciles de eliminar. Los puristas deben saber que los eslabones no son del tipo final, puesto que carecen de los pequeños listones en diagonal que mejoraban la tracción en el hielo. Al resto de los mortales supongo que este detalle les importará bien poco.
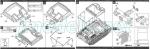
Parte superior del casco
Takom ha simplificado mucho el montaje al incluir en una sola pieza la parte superior del casco. La pieza comprende los guardabarros, el glacis y la plancha frontal y la cubierta del motor. El detalle es fino y muy bueno en toda la pieza, destacando la finura de los guardabarros y sus superficies antideslizantes, así como de las bisagras de los distintos accesos del motor y caja de cambios. Antes de ponerle detalles a esta pieza, hay que abrir varios agujeros para instalar algunas piezas sobre los guardabarros.
La plancha del glacis contiene un buen faro Notek en tres piezas y el soporte del cañón detallado con el muelle y la cadena para retraer el soporte en piezas de fotograbado. Sobre los guardabarros y zonas adyacentes del casco hay numerosas piezas, como por ejemplo las herramientas (pala, palanca, cizalla, maza), los ganchos de remolque del tipo denominado G, los cables de arrastre, compuestos de presillas de plástico e hilo de cobre trenzado, el extintor, el gato, que se compone de siete piezas, y el taco de madera en una pieza bien texturizada. Sobre los filos laterales de los guardabarros hay también algunas piezas pequeñas que no sé identificar.
En la cubierta del motor, las salidas de ventilación tienen las tapas separadas. Por delante de ellas están también el juego de baquetas del cañón y a los lados las salidas de ventilación, detalladas con rejillas de fotograbado y cableado externo separado.
Las ruedas de repuesto están situadas sobre pequeños soportes y sujetadas mediante seis finos pernos situadas sobre los accesos a la parte posterior del motor. Los pernos son finas varillas que hay que manipular con cuidado.
La barandilla de soporte del equipo estibado en la parte posterior es de fotograbado. Está formada por tres lados más siete soportes, tres de ellos en la parte posterior. Esta pieza, una vez formada, también es delicada de manipular.
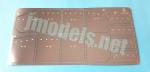
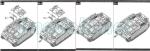
Las planchas de blindaje adicional (Schürzen) son de fotograbado y vienen en piezas separadas. Las placas centrales tienen una plancha más pequeña superpuesta por el lado interno y detallada con remaches de plástico que están moldeados en el propio bastidor (E) que también contiene las asas de soporte. Las asas me parecen más realistas y más fáciles de pegar que si fuesen de fotograbado. Tanto los soportes dentados del blindaje como los que están unidos a la superestructura y casco son finos y están bien moldeados.
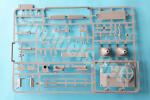
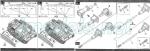
Superestructura
Una vez unida la parte superior del casco al resto, el montaje se centra en la superestructura y posteriormente en el cañón.
La casamata es de una pieza sin el techo, ni las dos planchas frontales. La plancha frontal del conductor está moldeada con la parte interna del visor, a la que va superpuesta la externa correctamente biselada. El panel remachado que rodea el visor muestra muy buena definición y también está exento. Estas dos planchas son características también del Ausf. G final. La cara trasera contiene el filtro de aire, las bases de las antenas y el soporte de las cadenas de repuesto. El filtro está horadado en la plancha trasera, lo que le da más realismo.
El techo viene de una pieza aparte, ya que la maqueta comparte molde con otros modelos del StuG del fabricante y en esta zona la diferencia esencial es el deflector de la cúpula del comandante. La pieza cuenta con las soldaduras entre planchas reproducidas con mucha finura y en las esquinas y centro de la plancha muestra los anclajes denominados Pilzen para fijar los soportes de la grúa auxiliar.
Las escotilla del cargador tiene las compuertas separadas, buen detalle en las bisagras y el cierre reproducido por dentro. También tenemos la tapa para instalar la defensa de punto, el periscopio del artillero, que no está reproducido completo, sino pegado a dos corchetes internos sobre la cara interna del techo y el afuste de la ametralladora. El montaje de la ametralladora comprende la cuna, dos lados donde ajustar el escudo, que está separado en mitades, y una abrazadera. Al hueco del afuste le falta el periscopio. La MG34 es de una pieza, está reproducida con gran nitidez e incluso posee las miras, aunque le falta la munición. La pieza me parece un poco grande para la escala.
La cúpula del comandante consiste en dos anillos superpuestos. En el inferior los emplazamientos de los periscopios están abiertos para poder introducirlos desde el interior. Las piezas son de plástico no transparente y me parecen algo grandes. La tapa de la escotilla está detallada con cierres separados en el interior y la pequeña tapa para el periscopio doble también aparte con las bisagras nítidas. Entre las opciones no incluidas en esta maqueta están los lanzadores de granadas fumígeras.
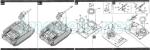
Aunque he descrito el techo de la superestructura en primer lugar, el montaje del cañón es lógicamente un proceso previo. La parte interna del cañón comprende una culata dividida en mitades y provista de muñones que van encajados en dos piezas laterales provistas de agujeros donde alojarlos. Estas dos piezas horadadas llevan otra posterior de refuerzo. Hay tres tipos de manteletes. El del StuH 42 tiene el mantelete más antiguo de forma trapezoidal invertida, mientras que para el StuG G hay alternativas entre el mantelete de fundición (Saukopf) inicial o el modelo final con tronera para la ametralladora coaxial.
Los tubos de los cañones tienen opciones de plástico o aluminio, aunque los primeros tienen muy buena factura y están moldeados de una pieza. Los frenos de boca también son alternativos para el StuG G. Los frenos no están fabricados del modo tradicional en mitades, sino que están moldeados de una pieza y tiene los dos anillos de su extremo, interno y externo, por separado. Esto simplifica el montaje y le da gran realismo al cañón.
El cañón va pegado a la base del interior del casco. Una vez unido, se añade el deflector superior de la plancha trasera del mantelete, que además se puede detallar opcionalmente con una cubierta de lona texturizada.
Calcas
La hoja sólo contiene cruces balcánicas y numerales negros. Nada raro, ya que las marcas externas de identificación, aparte de los numerales, no se prodigaban en exceso en los blindados alemanes del final de la guerra. Las calcas poseen apariencia fina y están bien impresas.
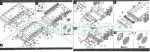
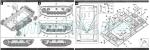
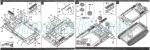
Instrucciones
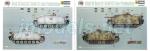
Vienen en un folleto apaisado de 22 páginas en color. Contiene una breve referencia histórica sobre el vehículo, una lista de pinturas de Ammo MiG, un plano de piezas numerado, 29 secuencias de construcción y cuatro páginas de perfiles en color que muestran dos StuG Ausf. G sin blindaje lateral y en camuflaje tricolor, mientras que los StuH 42 aparecen en camuflaje blanco invernal y tricolor con el blindaje añadido.
Las vistas explosionadas del montaje son mínimamente claras, pero lo serían más si Takom les hubiese dado mayor tamaño. Por este motivo el plano de piezas apenas es útil, ya que la numeración no llega a apreciarse.
Valoración
Como cualquier maqueta, esta seguramente también tendrá sus detractores de la pataleta, entre los que suelen encontrarse los supuestos expertos de turno y su correspondiente cohorte de turiferarios. Dejando a los aguafiestas a un lado, me parece que el detalle de este StuG es muy notable y consistente con el aspecto externo del vehículo en el periodo final de la guerra.
El montaje parece más sencillo que de costumbre gracias a que Takom ha sabido simplificar algunas piezas, por ejemplo uniendo en una pieza los guardabarros y la parte superior del casco, sin perder detalle, lo que nos indica que el proceso de construcción ha sido bien planeado. Además, las alternativas de montaje y las mejoras de aluminio y fotograbado incluidas en esta edición son otro punto fuerte de la maqueta.
En el escaso lado negativo hay que dejar apuntadas la ausencia de las pocas piezas que he señalado en los apartados correspondientes y las instrucciones, que son bastante mejorables de tamaño.
Esta edición me parece especialmente adecuada en su nivel de dificultad para modelistas de nivel medio en adelante.◊


Introduction (maybe necessary)
Like “Panzer” or “Sherman”, the word “StuG” has an indisputable magnetism for AFV modellers in any scale. I decided to surf the Scalemates site checking the 1/35 kits we have so far including reissues. To name just a few of the latest and most popular ones, Takom has nine releases no less, but it is still a long way from the 47 of Dragon/DML, not counting those of Cyber-Hobby (another 8). MiniArt, which, like Takom, entered the struggle for a place in the market much later, has the counter at ten by now. Far behind are other brands with their own tooling, such as Tamiya (nine, counting old and new tool kits) or Rye Field Model, which open their count with four to date, all of the Ausf. G. I don’t even count aftermarkets because it would be a never-ending story.
As we see, competition is tough and broad. With so many Ausf. whatever to choose from, plus the labels «early» or «late» to complicate everything, it is logical that the average modeller does not want to back the wrong horse when buying a StuG, especially with the price plastic kits currently have.
In this review, as in all of them, I will try to focus on what is in the box and give my opinion on what I see inside. You cannot expect from me, a simple amateur and expert in anything, a verdict on whether this release is better or worse than others offered by different brands, or if this or that detail has one nut more or one spring less. If it helps someone to get to know this kit, even if it’s only to discard it, this review will have been quite worth writing.
The kit
The box arrives with ten frames of pieces, two photo-etched frets, two aluminum barrels, a length of braided copper wire, the decals and the instructions booklet. The hull, deck and superstructure come separately. The sprues are neatly packed in self-sealing bags. This edition shares the tool with other kits Takom have been releasing over time, which is the reason why we find unused parts that are not indicated on the instructions.
Overall appearance of the sprues is excellent and there are no flash or sinks on parts. There are only ejector pin marks on the inner side of the tracks lengths, but the loose links are quite clean. The marks are sparse and will be easily cleaned up as they are small and shallow. Apart from this, there are only a few ejector pips in very few pieces that are also easy to remove.
The kit can be assembled as a late production StuG III G or as a Sturmhaubitze 42 (StuH 42) which was armed with a 105mm howitzer instead of the standard 75mm. cannon. There are also alternatives for the StuG III G mantlet with and without a coaxial machine gun opening.
Although the instructions do not provide data on the vehicles depicted in them, there are some clues to at least guess in which period of the world war they might have taken part. Thus, the absence of Zimmerit coating takes us to dates after September 1944. Around the same time, the coaxial machine gun was added to the gun cast mantlet and since the previous summer, StuGs were already using the remote control machine gun that was operated by the loader from inside the vehicle. There are more features that could be mentioned, but I won’t make the list long. Therefore, we are faced with four options chronologically framed between the last months of 1944 and the end of the war.
Lower hull, suspension and running gear
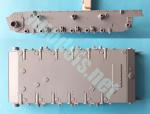
The hull tub comes in one piece except for the separate rear plate. The underside has not been overlooked and shows different drains (oil, water and fuel), as well as a riveted lower plate. The sides are very well reproduced with the bumper stops and the return roller shafts. Takom have included a square raised part inside the hull tub to set the gun.
The front plate is smooth and lacks the added armor of the early StuG III G. The tow holes on the front part come in two separate plates and there are pieces to reproduce the shock absorbers, track tensioning system, final drive covers, as well as the suspension arms. Definition in the teeth and rims on the idler and sprocket wheels is quite good.
The running gear is made up of the usual six paired wheels with correct detail on the tires and rubber treads, where the name of the manufacturer (Continental) can be clearly read. The same goes for the return rollers. Assembly of the running gear does not seem complicated and is the usual we can find in any kit.
The rear hull plate is double and the exhausts are placed in between them. The exhausts are molded with the mufflers and provided with open tail pipes. Other details include the tow hitches and the separate pins, however the central hitch lacks one. The external plate shows the engine crank armored cover although the crank piece is also missing and is attached to four supports transverse to the piece. Once glued, the lower gap between the plates is covered by a photo-etched grille and the upper side by the upper hull piece that we will add in a later construction stage.
Tracks
The tracks are broken up in lengths and links. Each side has three lengths to cover the lower run and one for the upper one, which has been molded with a subtle and realistic sag between the rollers. There are also 20 loose links on each side to contour the front of the sprocket and idler wheels.
Detail on the links is very well done, especially on the internal hollow teeth. As said, the loose links do not need cleanup and the lengths show small pin marks that will be easy to remove. Nitpickers should note that the links are not the final type, as they lack the small diagonal ice cleats that improved traction. I suppose that the rest of us mortals will care very little about this detail.
Upper hull
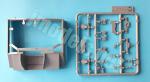
Takom have greatly simplified assembly by including the upper hull in one piece. The part includes the fenders, the front plate and the engine cover. Detail is crisp on the piece, especially the finesse on the fenders non-slip surfaces, as well as the hinges present on the engine deck and the gearbox covers. The piece needs some holes to be drilled on the fenders undersides to attach some fittings.
The glacis plate contains a good Notek headlight in three pieces and the barrel travel lock detailed with the spring and chain to fold the lock in photo-etched parts. The fenders are provided with stowed fittings such as tools (shovel, lever, shears, sledgehammer), towing hooks of the so-called G type, towing cables, these comprising plastic eyelets and lengths of copper wire, the fire extinguisher, the jack, which is made up of seven pieces, and the wooden block in a well textured piece. There are also some small pieces that I can’t identify on the fenders edges.
The engine covers are separate pieces with the set of barrel ramrods placed behind the superstructure and the engine outlets detailed with photo-etched grilles and separate external tubing.
The spare wheel racks are placed on the rear engine deck, which is correct for this production variant, and attached with six pins. Pins are very thin that must be handled with care.
The rear railings for equipment stowage are photo-etched parts. They comprise three sides plus seven brackets, three of them at the back. This piece is also delicate to handle.
The additional armor plates (Schürzen) are photo-etched and come in separate pieces. The center plates have a smaller overlapped plate on the inner side detailed with plastic rivets that are molded on frame E, which also contains the Schürzen brackets. The brackets look much more realistic in plastic and they are easier to glue than if they were photo-etched pieces. The side skirt hull brackets as well as the frames with triangular brackets are made of plastic too.
Superstructure
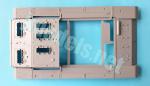
Once the upper hull is attached and detailed, assembly moves on to the superstructure and the gun. The superstructure is in one piece without the roof and the two front armored plates. The driver’s front plate is molded with the internal part of the visor that has a separate beveled cover. The riveted panel surrounding the visor shows very good definition and is also separate. These two plates are also characteristics of the late Ausf. G. The rear superstructure side contains the ventilator fan, the antenna bases and the rack for the spare tracks. The plate under the fan is drilled, which gives it a more realistic look.
The roof comes separate since the kit shares the tool with other Takom’s StuGs and one essential difference is in the deflector of the commander’s cupola. The piece has the welds between plates finely rendered and the roof corners and center include the so-called Pilzen mountings to fix the auxiliary crane.
The loader access have separate hatches, good detail on the hinges and the lock lever molded on the underside. We also have the cover to install the point defense, the gunner’s periscope, which is glued to two internal brackets on the roof inside and the machine gun mount. Assembly of the weapon comprises the cradle, two sides to attach the shield, which comes in halves, and a clamp. The periscope is missing in the mount gap. The MG34 is in one piece, nicely rendered including the sights, although there is no ammo belt. The piece looks a little big for the scale.
The commander’s cupola consists of two overlapping rings. The lower ring has gaps to insert the plastic periscopes from the inside. The pieces are made of opaque plastic and look a bit overscaled. The hatch cover is detailed with separate latches on the inside and the small hatch for the scissors periscope is also separate and provided with neat hinges. Among the options not included in the kit are the 90mm. smoke candles.
Although I have described the superstructure roof first, the gun assembly is logically a previous stage. The rear gun comprises a breech molded in halves and provided with trunnions fitted into two side pieces. There are three types of mantlets. The StuH 42 has the older mantlet with an inverted trapezoidal shape, while the StuG Ausf. G has a choice for an early cast (Saukopf) mantlet or the late model provided with the coaxial machine gun opening.
The barrels have plastic or aluminum alternatives, with the former also in one piece. The StuG Ausf. G also has options for the muzzle brakes. These are not the usual two-piece stuff, but are molded in one piece and include two separate rings. This simplifies assembly and gives a realistic touch to the brake.
The barrel is attached to the base inside the hull tub. Once the gun is in place, you can add the upper hull plate and an optional canvas cover to fill the gap between the mantlet and the hull top.
Decals
The sheet only shows Balkan crosses and numbers. This is nothing to write home about, as markings other than numbers were rare on late war German tanks. Decals are apparently thin and well printed.
Instructions
They come in a 22-page landscape booklet printed in color. It contains a short historical reference about the vehicle, a list of Ammo MiG paints, a numbered parts plan, 29 assembly stages and four pages of color profiles showing two StuG Ausf. Gs without Schürzen and painted in similar three-tone camouflages while the StuH 42s are painted in winter camo and a three-tone scheme with Schürzen.
Exploded views are clear, but would be more so if Takom had printed them in a bigger size. For this reason the parts plan is almost useless because part numbers are hardly seen.
Conclusion
Like any kit, this one will surely have critics, usually the presumed experts on duty and their mob of brown-nosers. Killjoys aside, I think this kit is really outstanding and consistent with the external appearance of the vehicle in the final period of the war.
Assembly looks simpler than usual due to the fact that Takom have been able to simplify some parts without losing detail, for example by molding the fenders and the upper hull in one piece. This indicates that assembly has been well thought out. In addition, construction alternatives and the inclusion of aluminum and photo-etched details that really improve the kit are other assets.
On the small negative side, we must note the lack of the few pieces that I have pointed out above and the instructions, which could have been greatly improved in size.
The kit seems especially suitable for intermediate and experienced modellers.◊
Publicado – Published: 11 / 2023
©www.jmodels.net

Debe estar conectado para enviar un comentario.