
De un vistazo – Quick look
MATERIAL Y PIEZAS
MEDIA & PARTS:
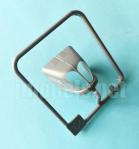
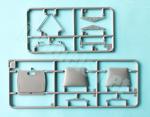
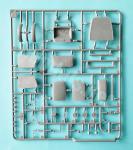
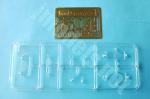
- Plástico inyectado (119 piezas), plástico transparente (8 piezas), fotograbado (44 piezas).
- Injected plastic (119 parts), clear plastic (8 parts), photo-etched (44 parts).
CALCAS – DECALS:
- Cuatro juegos de matrículas, logotipos comerciales y del Reichsarbeitdienst, logotipos del fabricante y el velocímetro. Hoja de aspecto brillante con calcas mate y de fina apariencia. Bien impresas.
- Four sets of number plates, trade and Reichsarbeitdienst logos, manufacturer logos and speedometer. Glossy sheet with matt, fine-looking decals. Well printed.
OPCIONES – OPTIONS:
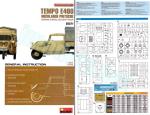
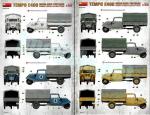
- Tempo E400 Hochlader Pritsche. Servicio técnico de Junkers. Alemania, finales de los años 30.
- Tempo E400 Hochlader Pritsche. Servicio de Trabajo del Reich (Reichsarbeitdienst, RAD). Alemania, inicios de los años 40.
- Tempo E400 Hochlader Pritsche. Unidad antiaérea sin identificar. Alemania, verano de 1942.
- Tempo E400 Hochlader Pritsche. Unidad antiaérea sin identificar. Alemania, 1944.
- Tempo E400 Hochlader Pritsche. Junkers Technical service. Germany, late 1930s.
- Tempo E400 Hochlader Pritsche. Reich Labour Service (Reichsarbeitdienst , RAD). Germany, early 1940s.
- Tempo E400 Hochlader Pritsche. Unidentified Flak unit. Germany, summer 1942.
- Tempo E400 Hochlader Pritsche. Unidentified Flak unit. Germany, 1944.
INSTRUCCIONES – INSTRUCTIONS:
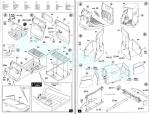
- Folleto de 12 páginas impreso en color sobre papel satinado. Contiene un plano numerado de piezas y del contenido de la caja, una tabla de colores con equivalencias en varias marcas de pintura, 30 capítulos de montaje y dos páginas de perfiles.
- 12-page booklet printed in color on satin paper. It contains a numbered parts plan and the box content, a colour chart with matches in several paint ranges, 30 assembly chapters and two pages of profiles.
LO MEJOR – THE BEST:
- Molde limpio y con detalle notable. Opciones de montaje y variedad en los acabados. Instrucciones claras de gran ayuda.
- Clean nicely detailed tooling. Assembly choices. Varied finishing choices. Clear and helpful instructions.
LO PEOR – THE WORST:
- Fotograbados diminutos que necesitan cierta experiencia.
- Tiny PE parts that need some experience.
VALORACIÓN – CONCLUSION:
- Vehículo olvidado que MiniArt ha tenido el acierto de traer a la palestra a una escala popular en multitud de versiones. El montaje no debe resultar complicado salvo por algunos fotograbados que requieren un poco de pericia.
- Overlooked vehicle that MiniArt has kitted in a very popular scale and in multiple versions. Assembly does not seem difficult for the average modeller who has some experience with PE parts.

La maqueta
Hace unos años MiniArt descubrió el potencial de este triciclo alemán y realmente le está sacando partido. Y es que esta especie de “motoreta” despareja lleva hasta ahora nada menos que doce ediciones en los modelos E400 y A400 en versiones civiles y miltares, entre las que hay configuraciones con furgón trasero, caja trasera de madera alta o baja y de metal. En este caso se trata de una versión con caja de madera de lados altos (Hochlader Pritsche).
La maqueta comprende siete bastidores, un bastidor de piezas transparentes, una plancha de fotograbados, las calcas y las instrucciones. El moldeo de las piezas es notable, destacando su limpieza y finura en su práctica totalidad. Carecen de rebabas y marcas de eyector difícilmente visibles en la cara interna del techo de la cabina y en la cubierta interna del toldo, aunque están disimuladas en sus esquinas. Pocas piezas muestran cilindros de salida del expulsor, normalmente en lugares fáciles de limpiar, pero en otras ocasiones en lugares insólitos como el interior del marco de parabrisas.
Contrariamente a otras maquetas de vehículos, el montaje comienza por la cabina, quedando el motor para una fase bastante posterior. Las alternativas de construcción permiten colocar las puertas abiertas o cerradas y ofrecen dos tipos de bujes en las ruedas. La adición del toldo no aparece como opción en las instrucciones, pero de hecho puede no usarse. Las versiones militares de esta caja cuentan, además, con un faro Notek por delante de la parrilla del motor. De acuerdo con las instrucciones, el añadido del cableado del motor y de los frenos, cuya longitud y grosor se señala en cada caso, está indicado para modelistas con experiencia. Sin duda MiniArt debe tener su concepto de experiencia en un nivel demasiado bajo.
El Tempo E400 se fabricó entre 1936 y 1937 y la Wehrmacht tan sólo llegó a emplear algo más de 3.000 unidades, mientras que el modelo A400, producido entre 1938 y 1943, alcanzó más de 24.000 vehículos operativos. Ambos modelos no llegaban a los 800 kg. de peso y empleaban un motor de dos cilindros refrigerado con agua. Su transmisión era de cadena y alcanzaban los 50 km/h a plena carga. El A400 se siguió produciendo tras la guerra con la denominación de Hanseat desde 1949 hasta mitad de los años 50.
Motor, transmisión y cubierta
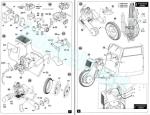
Pese al tamaño de este vehículo, MiniArt no ha dejado de incluir un motor bastante bien detallado, compuesto por alrededor de una veintena de piezas, la mayoría de plástico complementadas por algún fotograbado, entre las que se distinguen el bloque, el radiador, la bomba de agua y el tubo de escape. El montaje completo comprende cinco profusos capítulos de las instrucciones con la construcción de la transmisión de cadena, protegida por una cubierta compuesta de dos piezas más el tambor de freno delantero.
Como he dicho, el cableado eléctrico del propio motor y del que une este con el freno y la batería, situada dentro de la cabina, debe aportarlo el modelista siguiendo el grosor y longitud que proporcionan las instrucciones.
La amortiguación delantera se compone de un amortiguador y dos brazos laterales pegados sobre una sección de guardabarros añadida por debajo del motor.
La cubierta del motor está moldeada en su propio bastidor. La pieza es relativamente fina y sus formas están bien plasmadas. Los lados y la parte superior muestran las pestañas de ventilación sin aberturas y el detalle separado comprende las dos parrillas delanteras, la placa de matrícula, pestillos laterales y el gancho de sujeción para sostener la cubierta complementado por un asa situada en el marco del parabrisas, todas ellas piezas de fotograbado. Las versiones militares llevan un faro Notek de dos piezas y un soporte de fotograbado en la parte frontal.
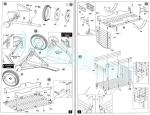
Chasis y ruedas
El vehículo carece de transmisión a las ruedas traseras por lo que no vamos a encontrar un diferencial ni un eje de transmisión. El bastidor del chasis está formado por un eje central unido en su extremo posterior al eje de las ruedas. El eje trasero es un canal de tres piezas cuyo interior contiene una barra amortiguadora y dos muelles en los extremos, a los que se añaden los dos tambores de freno de las ruedas. Dos barras laterales en forma de V unidas por un lado al eje central y por el otro a los extremos del eje trasero dan consistencia al conjunto.
Los cables de freno, si queremos añadirlos, están provistos de dos pequeñas cinchas de fotograbado para sujetarlos unidas a las dos barras en V laterales.
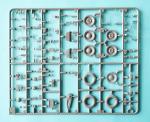
Las ruedas están divididas en dos piezas. El neumático viene separado de la llanta, pero esta incluye el flanco del neumático en su cara externa con el logotipo del fabricante (Continental) perfectamente legible. La banda de rodadura están finamente grabada sin apenas restos de líneas de molde. MiniArt proporciona dos tipos de llantas, unas con tapabujes con el logotipo del fabricante (Tempo) y otras sin ellos. Las tres ruedas poseen pequeños vástagos en la llanta interior para pegarlos directamente a los tambores de freno.
El chasis va unido a la cabina insertándolo en el lado trasero de esta. En esta contingencia parece necesario tener las ruedas montadas para equilibrar la maqueta adecuadamente.
Cabina
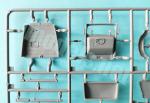
La cabina está formada por un suelo, los paneles delantero y trasero y un techo metálico, quedando los lados descubiertos para colocar las puertas. El suelo está texturizado con relieve de bandas estampadas en el metal y muestra tres marcas de eyector, todas invisibles al quedar tapadas por el asiento. La pieza está detallada con una barra longitudinal, la batería, situada bajo el asiento, los pedales y la palanca de freno con su cable correspondiente si queremos añadirlo. El asiento está finamente texturizado con el tejido acolchado.
El panel trasero dispone de una ventanilla transparente encajada por dentro en su hueco, el respaldo del asiento y dos refuerzos laterales. El panel delantero incluye el marco del parabrisas, que es también una pieza transparente añadida desde el interior, los indicadores de giro y los soportes de los faros. La cara anterior lleva un depósito en el lado derecho y un dispositivo cuya función ignoro en el lado opuesto, además de una pequeña placa de fotograbado en la parte inferior para introducir los cables de freno y de la batería. Los limpiaparabrisas son de fotograbado, los faros llevan lentes transparentes y los retrovisores están separados de sus soportes e incluyen pequeñas abrazaderas de fotograbado. El lado interno muestra el reducido salpicadero bien definido con el velocímetro de calca. La corta columna de la dirección, el volante, la palanca de marchas y el diminuto motor de los limpiaparabrisas son piezas separadas.
Las puertas disponen de dobles paneles (internos y externos) más una ventanilla transparente que no puede colocarse bajada a menos que se corte. El detalle separado incluye los picaportes exteriores y las manivelas elevalunas interiores, sin embargo los pestillos de apertura están moldeados in situ por dentro. Las bisagras, que baten hacia atrás, están moldeadas en los perfiles laterales del panel trasero de la cabina y permiten colocar las puertas abiertas.
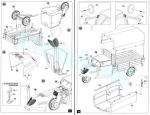
Caja de carga
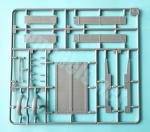
Está formada por una estructura de láminas de madera unidas por nítidos herrajes metálicos remachados en los cuatro lados y el suelo. El suelo está apoyado en dos soportes longitudinales y detallado con ocho piezas de fotograbado simulando los goznes de las bisagras de las puertas laterales y trasera. El extremo trasero también lleva las luces así como la placa de matrícula. Los guardabarros traseros son finos y carecen de las usuales marcas de eyector internas. Van unidos con finas lengüetas a los soportes de la caja.
El lado delantero tiene idéntica altura y forma en su filo superior que el toldo. Las esquinas superiores del portón trasero y los lados tienen cierres separados de plástico que permiten mostrarlos abiertos.
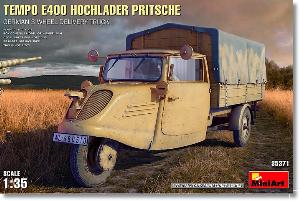
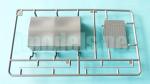
El toldo es una pieza realmente singular por su finura y la reproducción del tejido. La parte interna lleva la estructura de soporte en relieve fino más dos barras laterales aparte apoyadas en los lados de la caja. La filos de la pieza están detallados por fuera con pequeñas hebillas y correas de fotograbado.
Calcas
La hoja de calcas contiene cuatro juegos de matrículas, logotipos comerciales y del Reichsarbeitdienst, logotipos del fabricante y el velocímetro. El soporte posee un aspecto brillante mientras que las calcas, impresas con nitidez y finura, son mates.
Instrucciones
El folleto tiene doce páginas impresas en color sobre papel satinado. Contiene un plano numerado de piezas, una tabla de colores con equivalencias de Vallejo, Mr Color, AK, Mission Models, Ammo MiG y Tamiya, 30 capítulos de montaje y dos páginas de perfiles. La construcción del modelo está muy facilitada por las numerosas vistas detalladas añadidas en varias secuencias.
Los acabados muestran dos vehículos civiles y otros dos militares pintados en los ya clásicos gris y amarillo, este último con líneas cruzadas en X del mismo color sobre los lados del toldo grisáceo a modo de camuflaje básico.
Valoración
Con la saturación que hay de vehículos alemanes de la Segunda Guerra Mundial, MiniArt ha tenido el olfato comercial de encontrar uno olvidado hasta ahora y desde luego no ha desperdiciado la ocasión para lanzarlo en multitud de versiones militares y civiles, lo que también le ha dado pie para complementarlo con otra pléyade de cajas de figuras que amplían las posibilidades para el modelista.
La maqueta no parece difícil de ensamblar para un modelista de nivel medio en gran parte gracias a unas instrucciones claras y útiles, aunque requiere una cierta experiencia con las piezas de fotograbado, cuyo número no es abrumador.
Después de tanto tiempo sacando cajas del Tempo A400 y E400, parece haber una cierta expectación nada extraña por ver cuáles serán la siguientes versiones que MiniArt decidirá poner a la venta. Yo no apostaría porque vaya usted a saber por dónde podrá salir.◊

The kit
A few years ago MiniArt discovered the potential of this German tricycle and they have really taken advantage of it with no less than twelve boxings of the E400 and A400 models released so far. The kits cater for both civil and military vehicles in different configurations ranging from enclosed rear boxes, wooden and metal flatbeds. In this case, it is a version with a high-sided wooden bed (Hochlader Pritsche).
The kit comprises seven sprues, a clear parts sprue, a photo-etched fret inside a protective cardboard envelope and the instructions. The moulding of parts is remarkable for their finesse and they come free from flash or blemishes. Ejector marks are present on the cab roof and the rear tarp, but are not evident and those inside the tarp are hidden in the corners. A few parts show ejector pips easy to clean up but those inside the windscreen frame are really unusual.
Unlike similar kits, assembly begins with the cab, leaving the engine for a much later stage. Construction alternatives allow for doors to be placed open or closed and offer two types of wheel hubs. The addition of the tarp is not an option in the instructions, but in fact may not be used. The military versions of this kit also feature a Notek headlight in front of the engine grille. According to the instructions, the addition of the engine and brake wiring is intended for experienced modellers. MiniArt must certainly have their concept of experience set too low.
The Tempo E400 was produced between 1936 and 1937 and the Wehrmacht only used just over 3,000 units, while the A400 model, manufactured between 1938 and 1943, reached more than 24,000 vehicles. Both models weighed less than 1,760 lb and used a water-cooled two-cylinder engine. They had a chain drive and reached 31 mph at full load. The A400 continued to be produced after the war under the Hanseat designation from 1949 until the mid-1950s.
Engine, transmission and cowling
Despite the size of this vehicle, MiniArt has included a fairly well-detailed engine, made up of around twenty parts, most of them plastic, complemented by some photo-etched pieces, including the block, radiator, water pump and exhaust pipe, to list just a few. The complete assembly includes five extensive chapters in the instructions with the construction of the chain transmission, protected by a cover in two pieces plus the front brake drum.
As said, the engine electrical wiring and that connecting the brake and the battery, located inside the cab, is provided by the modeller. The length and thickness of the necessary wires in each case is shown in the instructions.
The front suspension consists of a shock absorber and two side arms glued onto a short fender attached below the engine.
The engine cowling is moulded separately. The piece is relatively thin and the shapes nicely rendered. The sides and top feature air vents and separate detail comprises the two front grilles, a number plate, side latches and the hook for holding the cowling open complemented by a handle on the windscreen frame, all of them photo-etched parts. The military versions feature a two-piece Notek headlamp glued onto a photo-etched bracket on the front.
Chassis and wheels
The vehicle lacks the transmission to the rear wheels, so we will not find a differential or a drive shaft. The chassis frame is made up of a centreline axle part joined to the rear axle. This is a three-piece channel with a shock absorber bar and two springs at the ends, which are detailed with two brake drums. Two V-shaped braces give stability to the structure by joining the centre axle to the ends of the rear axle.
The brake wires, if we want to add them, are provided with two small photo-etched brackets to hold them to the two side V braces.
The wheels are divided into two pieces. The tire comes separated from the rim, but this includes the outer tire sidewall with the raised manufacturer’s logo (Continental) perfectly legible. The tread is finely engraved with hardly any traces of seam lines. MiniArt provides two types of wheels, one with hubcaps bearing the manufacturer’s logo (Tempo) and one without it. All three wheels have small pegs on the inner rim to attach them directly to the brake drums.
The chassis is attached to the cab by inserting it into the rear cab side. It seems advisable to place the wheels in place prior to gluing both pieces to balance the model properly.
Cab
The cab is made up of a floor, front and rear bulkheads and a metal roof, with the sides left open for the doors. The floor is textured with engraved metal planks and shows three ejector marks, all invisible as they are covered by the seat. The piece is detailed with a longitudinal bar, the battery, located under the seat, the pedals and brake lever detailed with a wire if we want to add it. The seat is finely textured with the padded fabric.
The rear bulkhead has a clear window fitted from the inside into a recessed gap, the seat back and two side parts. The front bulkhead includes the windshield frame, with the clear windshield also fitted from the inside, the turn indicators and the headlight supports. The front face has a tank on the right side and a device I do not know what it is for on the opposite side, as well as a small PE plate on the bottom to insert the brake and battery cables. The windscreen wipers are photo-etched, the headlights have clear lenses and the mirrors have small PE brackets. The inner side shows a small but sharp dashboard provided with a decal speedometer. The short steering column, the steering wheel, the gear lever and a tiny wiper motor are separate parts.
The doors have double panels (inner and outer) plus a clear window which cannot be lowered unless cut out. Separate detail includes the outer door handles and winders, however the inner door handles are moulded in place. The hinges, which swing back, are moulded into the cab side pieces and allow the doors to be attached open.
Cargo bed
It consists of a wood planking structure joined by neat metal fittings riveted on all four sides and the floor. The floor rests on two support rails and is detailed with eight photo-etched pieces simulating the hinges for the side and rear doors. The rear end also has pieces for the lights as well as the license plate. The rear fenders are thin and lack the usual internal ejector marks present in most kits. They are attached with thin tabs to the bed rails.
The front end has the same height and top edge shape as the tarp. The top corners of the tailgate and sides have separate plastic latches that allow to pose them open.
The canopy is a truly unique piece for its finesse and the rendition of the fabric texture. The inner side shows the thin raised support structure plus two separate side bars attached to the bed sides. The edges of the piece are detailed on the outside with small photo-etched buckles and straps.
Decals
The decal sheet contains four sets of number plates, commercial and Reichsarbeitdienst logos, manufacturer logos and the speedometer. The sheet has a glossy appearance while the decals have a matt finish and look thin and sharp.
Instructions
The booklet has twelve pages printed in colour on glossy paper. It contains a numbered parts plan, a colour chart with Vallejo, Mr Color, AK, Mission Models, Ammo MiG and Tamiya paint matches, 30 assembly chapters and two pages of profiles. Construction looks much easier thanks to the numerous detailed views added in several steps.
Paint finishes show two civilian and two military vehicles, these being painted in the already classic grey and yellow, the latter with X-shaped lines of the same colour painted on the sides of the greyish tarp as a basic camouflage.
Conclusion
With the saturation of German vehicles from the Second World War, MiniArt has had the commercial sense to find one that had been overlooked so far and has certainly not wasted the opportunity to release it in a multitude of military and civilian versions. This has also given the company the chance to complement it with another pleiad of figures that expand the possibilities for the modeler.
The kit does not seem difficult to build for the average modeller, largely thanks to the clear and useful instructions but it needs some experience with photo-etched parts despite their number is not overwhelming.
After so much time releasing Tempo A400 and E400 kits, there seems to be a kind of expectation to see which will be the next liveries in the market. I wouldn’t bet because one never knows what MiniArt may have in mind.◊
Publicado – Published: 2 / 2025
©www.jmodels.net

Debe estar conectado para enviar un comentario.