
De un vistazo – Quick look
MATERIAL Y PIEZAS
MEDIA & PARTS:
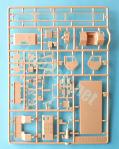
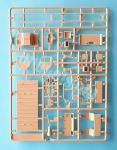
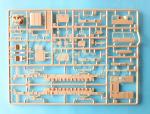
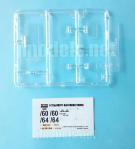
- Plástico inyectado (125 piezas), plástico transparente (7 piezas).
- Injected plastic (125 parts), clear plastic (7 parts).
CALCAS – DECALS:
- Matrículas, numerales y marcas de la SFOR. Aspecto muy brillante y fino. Sin exceso de soporte.
- Number plates, numbers and SFOR markings. Very glossy and thin appearance. No excess carrier.
OPCIONES – OPTIONS:
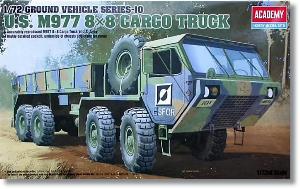
- M977. Ejército norteamericano. Stabilisation Force (SFOR). Bosnia y Herzegovina, 1996-2004.
- M977. Ejército norteamericano. Vehículo pintado en color arena.
- M977. U. S. Army. Stabilisation Force (SFOR). Bosnia and Herzegovina, 1996-2004.
- M977. U. S. Army. Vehicle painted in overall sand.
INSTRUCCIONES – INSTRUCTIONS:
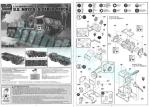
- Folleto de tamaño A5 doblado de 8 páginas impresas en blanco y negro. Contiene 10 secuencias de montaje, un plano de piezas y una tabla de colores con pinturas equivalentes de varios fabricantes. Claras.
- 8-page A5 folded leaflet printed in black and white. It contains 10 assembly steps, a parts diagram and a table of colors with matches in several paint ranges. Clear.
LO MEJOR – THE BEST:
- Bien detallada en general. Ruedas. Grúa.
- Nicely detailed overall. Wheels. Crane.
LO PEOR – THE WORST:
- Marcas de eyector. Puertas de la cabina cerradas. Pequeños detalles simplificados pero fácilmente mejorables.
- Pin marks. Cab doors molded closed. Simplified small details, but easily improvable.
VALORACIÓN – CONCLUSION:
- Es una alternativa muy válida y más sencilla a las maquetas más recientes de este vehículo de otras marcas. Con poco añadido más, se puede mejorar mucho su buen detalle.
- It is a valid and easier alternative to other 1/72 kits from other manufacturers. With some extra detail, it can be turned into an excellent model.

La maqueta
Academy fue la primera marca en poner en circulación el M977 en la escala 1/72. Después la han seguido otras como Trumpeter y Modelcollect, con distintas variantes de este conocido camión pesado norteamericano.
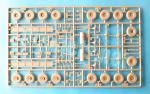
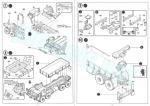
La caja trae tres bastidores de piezas, un bastidor transparente, una pequeña hoja de calcas y las instrucciones. Las piezas están bien moldeadas y carecen de imperfecciones, además no hay rebabas ni los habituales nódulos del eyector. Sin embargo, las piezas más grandes poseen múltiples marcas de eyector, pequeñas y leves, especialmente en las caras internas o inferiores. Muchas de ellas serán evidentes si no se cubren.
De acuerdo con las instrucciones, no hay alternativas de montaje. Hasta cierto punto es lógico considerando que la maqueta representa el modelo básico de este vehículo, pero se echa de menos que Academy nos hubiese dado al menos la opción de mostrar las puertas abiertas y la grúa desplegada.
Las posibilidades de pintura son variadas y cubren los dos camuflajes típicos que se pueden apreciar en fotos del M977.
Chasis, motor y transmisión
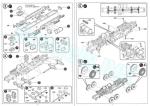
El montaje del bastidor, la suspensión y los detalles adicionales de aquel es bastante sencillo. El bastidor viene en una sola pieza con tres travesaños cuya parte superior está separada. También viene exenta la parte trasera, que incluye los faros y el gancho de remolque. Hay dos perfiles laterales que pegar a los lados del bastidor que incluyen las ballestas y los brazos de la suspensión. Sobre ellos van también colocados el depósito de combustible, una caja de respeto, y algunos depósitos que semejan bombonas de aire comprimido.
El motor del M977 está situado por detrás de la cabina en un compartimento elevado tras ella. Academy lo ha copiado decentemente, aunque no completo. El compartimento del motor está situado sobre una plataforma sobre la que pegar los lados, la rueda de repuesto y algunos elementos más. La cubierta también está separada y la cara trasera es en realidad la parte posterior del motor, donde vemos el motor de arranque unido al eje de la transmisión, algunos conductos y el tubo de escape, estos dos últimos separados. El tubo de escape lleva el protector detallado con orificios, pero no está horadado.
Los diferenciales vienen unidos a los ejes y tiene la mitad inferior aparte. Los árboles de la transmisión también están incluidos en estas piezas, lo que hace más sencillo el montaje si se alinean correctamente. Los diferenciales delanteros cuentan con tambores de freno por separado. La caja de transferencia es una pieza exenta situada en el centro del bastidor con aberturas para introducir los ejes. La disposición real de esta caja es inclinada con la parte superior ligeramente hacia detrás, pero la maqueta parece tenerla perpendicular al suelo. Las instrucciones no lo señalan, pero lo más sensato es pegar primero los ejes traseros, añadir la caja de transferencia y después los ejes delanteros para alinear bien toda la transmisión. Una vez pegada esta, se añaden ocho pequeños amortiguadores unidos por un lado al bastidor y por el otro a los ejes.
Antes de pegar la plataforma del motor al chasis, hay que montar un soporte situado tras la plataforma y el cabrestante para manipular la rueda de repuesto.
Ruedas
Son de plástico y están divididas en mitades. El detalle de la llanta y los lados de los neumáticos está representado con buena definición. También está detallada la banda de rodadura, que no tiene líneas de molde.
La rueda de repuesto es idéntica, aunque la llanta muestra el buje desacoplado sin tuercas y lleva un enganche separado.
Cabina
El suelo de la cabina es de una pieza. Los asientos vienen separados, pero no tienen textura y no se parecen mucho a los reales por ser demasiado anchos y bajos. Hay dos estribos a los lados del suelo, y el salpicadero también está exento, con algunos indicadores en relieve y un fino volante que añadirle. El panel acristalado situado sobre el suelo del conductor es una pieza transparente, pero no hay pedales ni palanca de marchas.
El panel trasero de la cabina también lleva dos ventanillas transparentes, lo mismo que los lados, cuyas puertas están moldeadas en posición cerrada y muestran un detalle muy fino por fuera, pero la cara interior está vacía. Fuera de la cabina hay un par de retrovisores montados en bastidores que parecen demasiado anchos y un poco sobredimensonados. El techo esta detallado con un acceso cerrado y la luz de advertencia transparente.
La parte frontal de la cabina está separada en dos planchas. La superior contiene el parabrisas con los marcos finamente moldeados que incluyen los limpiaparabrisas y los faros. La pieza transparente es única para ambos cristales. La zona inferior se añade posteriormente y contiene tanto los huecos de los faros como la rejilla delantera bien marcada. La pieza inferior va insertada en la parte delantera del bastidor. Los extremos están detallados con argollas de remolque.
Caja de carga y grúa trasera
La pieza del suelo de la caja está detallada con travesaños en la parte inferior y lo que parece una caja de herramientas en pieza aparte. Los lados muestran pequeños cierres y perfiles en relieve. El lado trasero incluye también los guardabarros unidos a los faldones. Siendo ambos elementos de distinto material y grosor, el resultado aquí no es muy realista, pero este detalle se puede arreglar para darle un aspecto más convincente. Hay otros dos guardabarros separados pegados sobre la cara inferior del suelo que carece de faldones en este caso.
El motor y la base de la grúa constan de cuatro piezas en total. Los cilindros aparecen separados y se montan en posición plegada, situados entre las mitades de la pluma. El cabrestante está detallado en el brazo, pero no hay gancho ni cable en el extremo. Añadirlos sería un detalle digno de estas piezas, que en general están muy bien representadas. Una vez montado, el conjunto va pegado sobre el extremo trasero del bastidor del chasis, reforzado por debajo con los dos cilindros hidráulicos laterales, que vienen en mitades. La pieza cuenta también con dos guardabarros separados.
Calcas
La pequeña hoja trae matrículas, numerales y marcas de la SFOR. Las calcas muestran aspecto muy brillante y fino sin exceso de soporte.
Instrucciones
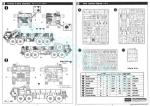
Están impresas en un folleto doblado de tamaño A5 de 8 páginas en blanco y negro. Contiene 10 secuencias de montaje, un plano de piezas y una tabla de colores con pinturas equivalentes de Gunze Sangyo (acrílicas y esmaltes), Life Color, Model Master y Humbrol. Los pasos de montaje son claros, aunque un poco pequeños, y algunos de ellos disponen de vistas de detalle que facilitan la colocación de piezas.
Las alternativas de pintura muestran un vehículo de la denominada Fuerza de Estabilización (SFOR) que operó en Bosnia y Herzegovina entre 1996 y 2004 pintado en camuflaje OTAN de tres colores. La segunda opción presenta un vehículo pintado de color arena sin datar ni localizar.
Valoración
Contemplando detenidamente esta maqueta, uno tiene la sensación de que se puede mejorar mucho con tan sólo añadir algunos elementos que Academy no ha terminado de redondear o que directamente ha omitido. Por ejemplo, se puede detallar un poco más el interior de la cabina, si bien parte de estos añadidos no llegarán a verse, así como mejorar los faldones de los guardabarros, los retrovisores y añadir un gancho a la grúa. Naturalmente, la caja también pide una carga adecuada al vehículo y su función.
Dicho esto, hay que señalar que la maqueta está bien detallada en general y que el montaje de caja no debe suponer grandes dificultades, dejando aparte la cantidad de pequeñas marcas que tapar en lugares visibles. La variedad de acabados es mínima, pero suficiente y muy distinta.
Aunque hay maquetas más modernas de este vehículo en esta escala, creo recordar que ninguna de ellas representa el modelo básico del M977 y la de Academy sigue siendo aún muy válida tanto para mostrarla sola como situada en una escena.◊

The kit
Academy was the first brand to release the M977 in the 1/72 scale. Later, other companies, such as Trumpeter and Modelcollect, have followed with different variants of this well-known US heavy truck.
The box comes with three sprues of parts, a clear sprue, a small decal sheet and the instructions. The pieces are well molded and free from blemishes. There is no flash or the usual ejector nodules to clean up. However, larger pieces show small pin marks, especially on the inner or lower faces. Many of them will be evident if they are not filled.
According to the instructions, there are no assembly alternatives. To a certain extent it is logical considering that the model represents the basic variant of this vehicle, but I think Academy could have given us the option of showing the cab doors open and the crane unfolded.
Paint choices are varied and include the two typical camouflage schemes that can be seen in photos of the M977.
Chassis, engine and transmission
Assembly of the frame, suspension and other additional pieces around them is quite easy. The frame comes in one piece with three cross members with separate tops. The rear cross member is enhanced with a separate piece including the headlights and the pintle hook. There are two side profiles to attach to the frame sides that are molded with the leaf springs and suspension arms. The fuel tank, a spare box, and some tanks that resemble air cylinders are also placed on them.
The M977’s engine is located behind the cockpit in a raised compartment. Academy have copied it decently, although not completely. The engine compartment has a base to attach the sides, the spare wheel and some other items. The compartment cover is also separated and the rear side is actually the back of the engine, where we see the starter engine attached to the transmission shaft, some ducts and the exhaust pipe, the last two in separate pieces. The exhaust pipe has the cover detailed with holes, but the tail pipe is not drilled.
The differentials are moulded in halves and joined to the axles. The drive shafts are also included in these parts, making assembly easier if they are aligned correctly. The front differentials have separate brake drums. The transfer case is separate and placed located in the center of the frame with holes to insert the axles. The actual layout of this box is tilted slightly backwards, but the kit seems to have it perpendicular to the ground. The instructions don’t mention it, but the most sensible thing to do is to glue the rear axles first, add the transfer case and then the front axles to properly align the entire transmission. Once this is glued, eight small shock absorbers are added, attached to the frame on one side and to the axles on the other.
Before gluing the engine platform to the chassis, a support must be mounted behind the platform and the winch I suppose is used to handle the spare wheel.
Wheels
They are made of plastic and are divided into halves. The detail on the rim and on the sides of the tires is rendered with good definition. The tread has a defined pattern and no seam lines.
The spare wheel is identical, although the rim shows the hub detached without nuts and has a separate bracket.
Cab
The cab floor is in one piece. The seats come separately, but they are not textured and don’t look much like the real thing, being too wide and low. There are two foot holds on the floor sides as well as a separate dashboard with some raised gauges and a thin steering wheel apart. The glass panel on the driver’s floor is a clear piece, but there are no pedals or gear lever.
The rear cab panel also has two clear windows, as do the sides, which have the doors molded closed and show very thin detail on the outside, but the inner side is empty. On the outside, the mirrors are molded on frames that seem too wide and a little oversized. The roof is detailed with a closed hatch and a clear warning light.
The cab front is separated into two plates. The upper one contains the windshield with finely molded frames that include the wipers as well as the headlights. The clear windshield is one piece for both windows. The lower plate is added later and contains both the headlight housings and a detailed front grille. This piece is inserted into the front long members, which are detailed with towing clevises.
Cargo tray and rear crane
The floor of the cargo tray is molded with crossbars on the lower side and what seems a separate tool box. The sides show small fittings and raised side detail. The rear side also includes the fenders attached to the mud flaps. They are not very realistic because they look much the same, but this detail can be fixed to give it a more convincing appearance. There are two other separate fenders attached under the floor, but they lack the flaps.
The engine and the base of the crane consist of four parts. The arm cylinders are assembled in the folded position and attached between the boom halves. The pulley on the arm is well defined, but there is no hook or cable. Scratchbuilding them would be a nice touch worthy of these pieces, which in general are very well represented. Once finished, the assembly is attached on the rear chassis frame. Below this there are a separate part for the two side boom cylinders, which come in halves. The piece also has two fenders molded separately.
Decals
The small sheet has license plates, numbers and SFOR markings. Decals show a very shiny and thin appearance without excess support.
Instructions
They come in a 8-page A5 size folded booklet printed in black and white. It contains ten assembly chapters, a parts plan and a chart of colors with equivalent paints from Gunze Sangyo (acrylics and enamels), Life Color, Model Master and Humbrol. The assembly steps are clear and some of them have detailed views that make parts location easier.
Paint alternatives show a vehicle of the so-called Stabilization Force (SFOR) that operated in Bosnia and Herzegovina between 1996 and 2004 painted in three-color NATO camouflage. The second option depicts a vehicle, without identifying place or time, painted overall sand.
Conclusion
Looking closely at this kit, one gets the feeling that it can be improved a lot by simply adding some items that Academy overlooked or did not round off. For example, the cab interior can be improved a little more, even though some of these details will not be seen. Also, a suitable improvement will benefit the mud flaps, the mirrors and the crane hook. Of course, the cargo tray also needs a load worthy of the vehicle and its role.
That said, I think the kit is overall nicely detailed and looks an easy build even for those with basic modelling skills, leaving aside the pin marks in visible spots. Paint finishes have a minimal variety, but it is enough for the schemes the M977 usually sports.
Although there are more modern 1/72 offers of this vehicle, none of them represent the basic variant as far as I can remember, and the Academy kit is still very valid to build it alone or placed in a scene.◊
Publicado – Published: 6 / 2024
©www.jmodels.net

Debe estar conectado para enviar un comentario.