

De un vistazo – Quick look
MATERIAL Y PIEZAS
MEDIA & PARTS:
- Plástico inyectado (38 piezas), plástico transparente (4 piezas), fotograbado (17 piezas), acetato (3 piezas), resina (20 piezas).
- Injected plastic (38 parts), clear plastic (4 parts), photoetched (17 parts), acetate (3 parts), resin (20 parts).
CALCAS – DECALS:
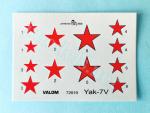
- Estrellas soviéticas con borde blanco y negro de varios tamaños. Aspecto brillante y fino. Buena densidad de color y registro. Sin exceso de soporte.
- Soviet stars of different sizes outlined in black and white. Thin and glossy finish. Good color density and in register. No excess of carrier film.
OPCIONES – OPTIONS:
- Yakovlev Yak-7V. Escuadrón Normandie-Niemen. Tula (Rusia). Diciembre de 1943.
- Yakovlev Yak-7V. Escuela de Entrenamiento de la Fuerza Aérea. URSS. Invierno de 1942-43.
- Yakovlev Yak-7V. Normandie-Niemen Squadron. Tula (Russia). December 1943.
- Yakovlev Yak-7V. Trainer school Air Force. USSR. Winter 1942-43.
INSTRUCCIONES – INSTRUCTIONS:
- Folleto A5 de 12 páginas impreso en color sobre papel satinado. Contiene una introducción histórica sobre el avión, un plano numerado de piezas, 8 secciones de montaje, 5 páginas de perfiles y una lista de colores con pinturas coincidentes de varias marcas.
- 12-page A5 booklet printed in color on satin paper. It shows a historical introduction about the aircraft, a numbered parts plan, 8 assembly chapters, 5 pages of profiles and a list of colors with paint matches in several brands.
LO MEJOR – THE BEST:
- Opciones de construcción. Buen detalle interior.
- Assembly choices. Nice cockpit detail.
LO PEOR – THE WORST:
- Escasa nitidez en accesos y remaches en las alas y cola. Algunas piezas delicadas y frágiles. Ciertas indicaciones de las instrucciones un tanto indefinidas.
- Faint engraving of accesses and rivets on wings and tail. Some delicate and brittle parts. Certain vague assembly directions on the instructions.
VALORACIÓN – CONCLUSION:
- Es una buena reproducción del avión, con un interior de extenso detalle para la escala. Necesita tiento en el manejo de ciertas piezas de resina delicadas. Para modelistas expertos.
- It is a good rendition of this aircraft with a extensive cockpit detail for the 1/72 scale. It needs more than average modeling skills to handle resin brittle parts. For expert modelers.

La maqueta
La maqueta pertenece a un molde que Valom lanzó en 2007 y que comparten varias versions del Yak-7, como el Yak-7A, -7B, -7V, -7UTI y el interesante y raro Yak-7PVRD, una versión experimental con estatorrectores bajo las alas.
El contenido de la caja comprende un bastidor de piezas de plástico, que contiene también piezas alternativas para el caza Yak-7B, un bastidor de piezas transparentes, una plancha de fotograbados, una cubierta de la carlinga de acetato, varios pequeños bebederos con piezas de resina, la hoja de calcas y las instrucciones. Las piezas y las calcas están bien protegidas en bolsas de plástico separadas, la mayoría con cierre sellado.
Las piezas de plástico tienen un moldeado limpio con un detalle general bastante nítido. No hay rebabas ni marcas que mencionar. Las líneas de panel y las superficies de control están bien grabadas, aunque el detalle remachado bajo las alas y sobre la cola es demasiado pequeño y tenue, por eso es muy probable que desaparezca bajo la pintura.
Las alternativas de montaje permiten cambiar el tren de aterrizaje de ruedas por esquíes y la cubierta de acetato por otra de plástico. Las opciones de pintura difieren en el camuflaje bicolor de las superficies superiores y el borde de las estrellas, blanco en el de la Escuadrón Normandía-Niemen y negro en el de la Escuela de Entrenamiento.
Es sencillo confundir el Yak-7V con su antecesor Yak-7UTI por ser ambos aviones biplazas. El UTI estaba pensado inicialmente para servir no sólo como entrenador, sino también como aparato de enlace o correo en el frente, mientras que el -7V se diseñó como entrenador desde el inicio. La diferencias fundamentales, y visibles por fuera, eran la supresión de la única ametralladora en el capó que llevaba el UTI y el tren de aterrizaje fijo en el -7V, que simplificaba la producción y no suponía mucha pérdida de rendimiento dadas sus funciones. Consecuentemente, los pozos del modelo -7V se carenaban.
Revisión
Los lados internos de las carlingas están detallados con sendas piezas de resina que contienen el detalle estructural y algunos instrumentos de vuelo. Las dos tienen algunas rebabas muy delgadas y fáciles de limpiar. Entre ellas hay un suelo para los dos puestos detallado con piezas de fotograbado y resina entre las que se encuentran las palancas, los arneses además del panel de instrumentos y el asiento posterior. El panel anterior es un fotograbado pegado sobre una lámina de acetato con los diales y una pieza de plástico de respaldo. El asiento delantero es de plástico con el reposacabezas separado y hechuras diferentes al trasero.
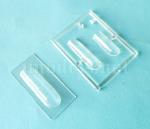
Para la cubierta tenemos la opción de emplear una cubierta de plástico en una pieza no muy gruesa y con el bastidor bien definido, o bien otra similar de acetato de similares características, pero más fina. Esta última es la más adecuada para cortarla y dejar uno o los dos puestos abiertos. Sobre la cubierta hay un mástil de antena que solamente aparece en uno de los perfiles de las instrucciones, pero no en los dedicados a la pintura. Para instalar cualquiera de estas piezas es necesario recortar los lados del fuselaje que están moldeados con la forma de la versión del caza Yak-7B. Las instrucciones no lo indican, pero las mitades del fuselaje muestran paneles grabados que sirven de guía en el corte.
Los lados del fuselaje están bien reproducidos por fuera, destacando el moldeado realista de las superficies de cola de estructura de tubos entelada. Las piezas incluyen las raíces alares, las de los estabilizadores y la deriva. El timón vertical y la cubierta del motor vienen separados, esta última sin troneras por el armamento suprimido. Las escasas líneas de panel están bien grabadas. Antes de pegar las mitades hay que introducir los escapes en las salidas del fuselaje. Las piezas están moldeadas con buena definición en dos hileras. El lado izquierdo dispone de un pequeño estribo de fotograbado. La toma de refrigeración de aceite bajo el morro consta de una cubierta y la rejilla interna de fotograbado.
La hélice tiene buena factura y el cono separado con el trinquete de arranque muy bien definido. Las palas están moldeadas con finura y carecen de rebabas. Van pegadas sobre una placa trasera de resina con el eje y hay además un anillo de plástico dentro del fuselaje. Al estar la placa separada, se puede posponer el montaje de la hélice hasta después de pintar el avión.
Las alas constan de tres piezas. Las superficies muestran escasos paneles al tener recubrimiento de madera. Las líneas grabadas más nítidas son las de las superficies de control, pero los pocos accesos y las superficies remachadas en la parte inferior son demasiado tenues. El tubo pitot y el faro de aterrizaje vienen separados, este último reproducido con una pieza transparente. Las luces de las puntas también están marcadas levemente. Los pozos están moldeados con cierta profundidad, pero en este caso son irrelevantes porque las tapas van cerradas, como he mencionado. Cada una de ellas está separada en dos piezas. El extremo superior ha de taladrase para colocar las patas del tren de aterrizaje. La toma de aire del radiador cuenta con una carena separada y dos filtros en los extremos, el delantero está detallado además con una rejilla de fotograbado.
El empenaje tiene el timón vertical y los estabilizadores aparte. El primero tiene el relieve estructural bien ejecutado y una pieza de fotograbado que simula la aleta. Los estabilizadores van pegados a tope en la cola. Las superficies muestran un grabado nítido en los timones y aletas, más un tenue remachado de tamaño diminuto.
El tren de aterrizaje con ruedas comprende las patas, dos soporte que debe aportar el modelista del grosor y longitud que se especifica en las instrucciones y dos amortiguadores de torsión de fotograbado. Las ruedas son de resina con un detalle bastante bueno en las llantas y menos apreciable en la banda de rodadura. El tren posterior consiste en una rueda moldeada con la pata.
La maqueta incluye un tren alternativo con esquíes un tanto profuso, compuesto de piezas de plástico y resina. Parte de ellas son idénticas a las del tren de ruedas y el brazo auxiliar también debe fabricarlo el modelista. El conjunto consta de siete piezas en cada esquí y es bastante delicado por la finura de los soportes articulados. El patín y la horquilla de cola son de resina.
La hoja de calcas tiene impresas únicamente estrellas soviéticas con borde blanco y negro de varios tamaños. Tienen un aspecto brillante y fino así como buena densidad de color y registro. No hay exceso de soporte.
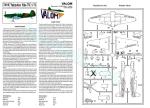
El folleto de instrucciones de formato A5 tiene doce páginas impresas en color sobre buen papel satinado. Contiene una introducción histórica sobre el avión, un plano numerado de piezas, ocho capítulos de montaje, cinco páginas de perfiles y una lista de colores con pinturas coincidentes de Humbrol, Agama, Model Master, Gunze Sangyo y el código F.S.595a. En ocasiones las instrucciones del montaje son un tanto vagas en el posicionamiento de algunas piezas. El folleto parece el mismo para las diferentes maquetas de Valom. Esto parece haber causado el olvido de advertir el corte de la parte trasera del fuselaje en el Yak-7V.
Los perfiles para pintar el modelo aparecen por las dos caras de una hoja doblada insertada en medio de las instrucciones que al desplegarse tiene un tamaño de A4.
Valoración
Esta es una maqueta multimedia claramente destinada al modelista con experiencia. En general, el detalle interno y externo está bien representado y me parece bastante mejor que el de otras maquetas de este fabricante.
El montaje necesita cierto tiento al tener algunas piezas de resina muy delicadas, especialmente si se desea emplear los esquíes en el modelo. Las opciones de pintura muestran dos camuflajes nada complicados de hacer, aunque en las calcas se echa de menos la inclusión de algún numeral para darle aliciente a las simples estrellas rusas que lucen los dos aparatos.◊


The kit
This kit was released in 2007 and shares the tooling with other boxings of Valom Yak-7, such as the Yak-7A, -7B, -7UTI, and the interesting and rare Yak-7PVRD, an experimental version with ramjets under the wings.
The box contains a sprue of plastic parts, which also includes alternative pieces for the Yak-7B fighter, a sprue of clear parts, a photo-etched sheet, an acetate canopy, several small gates with resin parts, the decal sheet, and the instructions. The parts and decals are well protected in separate ziplock bags.
Plastic parts are well molded with generally sharp detail. There is no flash or marks to mention. Panel lines and control surfaces are well engraved, although the riveted detail under the wings and on the tail is too small and faint, and will probably disappear under the paint.
Assembly options allow for choosing between a wheeled landing gear or skis and an acetate or plastic canopy. Paint choices differ in the two-color camouflage of the upper surfaces and the red stars: outlined in white for the Normandy-Niemen Squadron and in black for the Training School.
It is easy to confuse the Yak-7V with its predecessor, the Yak-7UTI, as both are two-seater aircraft. The UTI was initially intended to serve not only as a trainer but also as a liaison or mail aircraft at the front, while the -7V was designed as a trainer from the outset. The fundamental differences, visible externally, were the removal of the UTI single cowling machine gun and the fixed landing gear of the -7V, which simplified production and did not significantly compromise performance given its role. Consequently, the wheel wells of the -7V were enclosed.
Review
The cockpit sides are provided with two resin pieces containing the structural detail and some flight instruments. Both have some very thin flash easy to remove. Between them is a floor for the two cockpits, detailed with photo-etched parts and resin, including the columns, harnesses, rear instrument panel, and rear seat. The front panel is a photo-etched part glued onto an acetate sheet with the dials and a plastic rear piece. The front seat is plastic with a separate headrest and a different shape from that on the aft cockpit.
You have the option for a one-piece plastic canopy, which is thin and has a well-defined frame, or an acetate counterpart but still thinner. The latter is more suitable if you wish to cut it to pose one or both cockpits open. An antenna mast is added on the canopy. This only appears in one of the instruction profiles, but not in the painting guide. To install the canopy, it is necessary to trim the fuselage sides, which are molded to the shape of the Yak-7B fighter. The instructions don’t mention this point, but fortunately the fuselage halves have engraved panels that can be used as a guide.
The fuselage sides re cleanly molded with the realistic reproduction of the fabric-covered tail surfaces being particularly nice. The sides include the wing and stabilizer roots, and the tail fin. The vertical stabilizer and engine cowling are separate, the latter lacking the gun troughs of the UTI and fighter versions. The few panel lines are well engraved. Before gluing the halves together, the exhaust pipes are inserted into the fuselage gaps. The pieces are molded in two rows and are sharp. The left side has a small photo-etched foothold. The oil cooler intake under the nose consists of a cover and a photo-etched internal grille.
The propeller is nicely molded, with a separate spinner and a clearly defined starter dog. The blades are finely molded and free from flash. They are glued onto a resin backplate with the shaft, and there is also a plastic ring inside the fuselage for the axle. Because the backplate is separate, propeller assembly can be postponed until the kit has been painted.
The wings consist of three pieces. The surfaces show few panel lines due to their wood covering. The sharpest engraved lines are those of the control surfaces, but the few access points and riveted surfaces on the underside are too faint. The pitot tube and landing light are separate, the latter reproduced with a clear part. The wingtip lights are also faintly marked. The wheel wells are molded to a certain depth, but in this case, they are irrelevant because the covers are closed, as mentioned. Each cover is separated into two pieces. The upper end is drilled to attach the landing gear legs. The radiator air intake has a separate fairing and two filters at both ends; the front one is further detailed with a photo-etched grille.
The empennage has a separate vertical rudder and stabilizers. The rudder has a good raised structural detail and a photo-etched part simulating the trim tab. The stabilizers have a butt joint attachment to the tail. The surfaces show crisp engraving on the rudders and fins, plus subtle, tiny rivets.
The wheeled landing gear comprises the legs, two struts provided by the modeler with the thickness and length specified in the instructions, and two photo-etched torsion links. The wheels are resin with fairly good detail on the rims but less evident on the treads. The tail gear consists of a wheel molded with the leg.
The kit includes a bit complex alternative landing gear with skis made up of plastic and resin parts. Some of these parts are identical to those of the wheeled gear, and the side arm is also built by the modeler. Assembly consists of seven brittle pieces on each ski, some of them delicate to handle. The skid and tail fork are made of resin.
The decal sheet is only printed with Soviet stars in different sizes and outlined in black and white. They have a glossy, fine appearance, good color density and registration. There is no excess carrier film.
The A5 instruction booklet has twelve pages printed in color on good quality glossy paper. It contains a historical introduction to the aircraft, a numbered parts diagram, eight assembly chapters, five pages of profiles, and a color list with paint matches from Humbrol, Agama, Model Master, Gunze Sangyo, and the F.S.595a code. Occasionally, assembly is somewhat vague in the positioning of some parts. The booklet seems to be the same for the different boxings of this kit. This could explain the omission of the rear fuselage trimming on the Yak-7V.
The profiles for painting the kit are printed on both sides of a folded sheet inserted in the middle of the instructions, which unfolds to an A4 size.
Conclusion
This is a multimedia kit clearly aimed at the experienced modeler. Overall, internal and external detail is well represented and I find it better than in other previous kits from this brand.
Assembly needs some care due to the very delicate resin parts, especially if you intend to use the skis. Paint options include two apparently straightforward camouflage schemes, although the decals lack any numbers to add visual interest to the simple Russian stars on both paint alternatives.◊
Publicado – Published: 10 / 2025
©www.jmodels.net

Debe estar conectado para enviar un comentario.