
De un vistazo – Quick look
MATERIAL Y PIEZAS
MEDIA & PARTS:
- Plástico inyectado (83 piezas), plástico transparente (8 piezas).
- Injected plastic (83 parts), clear plastic (8 parts).
CALCAS – DECALS:
- Insignias británicas y norteamericanas, matrículas y algunos estarcidos. Bien impresas, de apariencia fina y aspecto mate.
- British and US markings, registrations and some stencils. Well printed, apparently thin with a matt finish.
OPCIONES – OPTIONS:
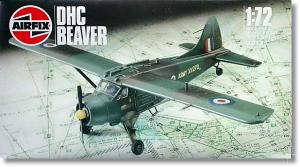
- DHC-2 Beaver. Ejército británico. XV270 blanco. Aparato con ruedas o esquíes.
- DHC-2 Beaver. Ejército norteamericano. 33727 amarillo. Aparato con flotadores.
- DHC-2 Beaver. British Army. White XV270. Aircraft with wheels or skis.
- DHC-2 Beaver. US Army. Yellow 33727. Aircraft with floats.
INSTRUCCIONES – INSTRUCTIONS:
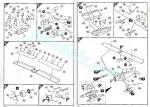
- Folleto tamaño A4 de 8 páginas impresas en blanco y negro. Contienen referencia histórica sobre el avión en varios idiomas, 8 capítulos de montaje y perfiles con referencias de pintura de esmaltes de Humbrol. Muy claras.
- 8-page A4 brochure printed in black and white. It shows a historical summary about the aircraft in several languages, 8 main assembly steps and profiles with paint references from Humbrol enamels. Very clear.
LO MEJOR – THE BEST:
- Detalle interior. Motor. Opciones de montaje.
- Interior detail. Engine. Assembly choices.
LO PEOR – THE WORST:
- Grosor de algunas piezas. Paneles y remaches al viejo estilo.
- Some parts are too thick. Old style panel lines and rivets.
VALORACIÓN – CONCLUSION:
- Parcialmente aún se mantiene en forma y no es complicada de montaje en apariencia. Ofrece diferentes configuraciones en una sola caja. Sabiendo lo que uno espera encontrar, merece la pena.
- Still partly in good shape and apparently not difficult to build. It includes different configurations in the same box. Knowing what you have in your hands, it is worth trying.

La maqueta
Hoy me he traído este viejo Beaver de Airfix para darle un vistazo. No soy de los nostálgicos del plástico precisamente. Como no pienso que el pasado fue mejor, tampoco me parece que las maquetas de antes fuesen gran cosa comparadas con la mayoría que hoy se hacen, ni las reverencio simplemente por antiguas o por haberlas conocido yo mismo en otro tiempo y lugar. A cada tiempo, sus hombres. Y sus maquetas también.
El Beaver de Airfix lleva unas cuantas reediciones desde 1971. La fecha se ve en una de las mitades del fuselaje. Curiosamente, la maqueta está de nuevo en el candelero porque el fabricante acaba de volverla a lanzar en su colección Vintage Classics, que no es sino una forma de sacarle partido a chustas de otra época a cuenta de la sensiblería del personal. Esto lo hacen otras marcas también, así no se les quedan los moldes muertos de risa en los almacenes. Otro molde alternativo a este Beaver, y conocido por la afición, es el de Hobbycraft, que también fabrica este avión a escala 1/48.
La caja trae cuatro bastidores de piezas grises, un bastidor transparente, las calcas y las instrucciones. La maqueta es fiel representante de lo que podríamos llamar, incluso sin ironía, la “tecnología punta” de la época. El plástico está bien moldeado en general, con excepciones que señalaré en su lugar, y las piezas no son todas gruesas. El fuselaje y las puertas lo son un poco, pero las alas y estabilizadores, por ejemplo, no tienen nada que envidiar a una maqueta actual. Hay rebabas en algunas piezas, singularmente en los soportes de los flotadores o las ruedas, y líneas de molde muy leves en algunas piezas más. Las marcas de eyector son escasas y se concentran en el mamparo trasero de la zona de carga y la carlinga, pero en este lugar son muy pocas y la zona viene bastante limpia. También existen rechupes del plástico en las caras inferiores de las puntas alares y en la cara inferior de los esquíes. Estas últimas las menciono porque están, pero ni se ven. Por último, hay puntos de salida del eyector en las carenas del tren de aterrizaje y los soportes de los flotadores. Resumiendo, se puede decir que hay todo tipo de marras, pero escasas, y el molde viene bastante limpio considerando sus años. Las piezas transparentes tampoco están nada mal de factura y nitidez, el problema es su grosor.
El detalle de las superficies del fuselaje, alas y empenaje es mixto, y consiste en líneas grabadas en las superficies móviles, líneas positivas muy finas en los paneles estructurales y un finísimo remachado positivo en todas ellas. Esta es, por tanto, una maqueta de “lo tomas o lo dejas”: o se quita todo esto y se vuelve a hacer como Dios manda, o se deja tal cual, y uno dice que la montó de niño y quería que fuese igual a aquella, intentando disimular su escaso amor al instructivo trabajo de remozar maquetas viejas.
Carlinga
La carlinga y la zona de carga tienen un suelo común sobre el que van colocados todos los elementos del interior. La carlinga dispone de un panel de instrumentos con los dispositivos en relieve bien definidos, los controles dobles y unidos en una pieza, dos asientos con formas más bien correctas y sus anclajes por separado.
La zona trasera contiene dos asientos separados y dos unidos en una pieza, ambos pares con formas diferentes, los soportes de los asientos, y un mamparo trasero que va insertado en el suelo. Las marcas del mamparo son tenues y sencillas de eliminar.
Los lados interiores no tienen detalle, pero sí algunas marcas negativas que rellenar. Las ventanillas deben colocarse antes de cerrar el fuselaje. Las de la carlinga son dobles y están moldeadas en la misma pieza. Las puertas de la zona de carga llevan sus ventanas y hay otras redondas y menores en el fuselaje. Todas las piezas son muy gruesas y encajan en su lugar con rebajes en los perfiles. El parabrisas viene unido a los cristales del techo, que ajustan a su vez en la parte central de las alas. Los marcos del parabrisas están muy bien definidos. Todas las piezas muestran buena transparencia, aunque mucha distorsión.
Como es habitual, Airfix incluyó la figura de un piloto que me parece algo mejor que algunas de las que hace hoy. Está representado con traje de vuelo, botas y casco. Los detalles no están muy bien definidos, en parte por el plástico y en parte porque tiene líneas de molde, pero el hombrecillo no es del todo malo y le doy una leve indulgencia.
Fuselaje y motor
El fuselaje está dividido en tres piezas. Además de las mitades de rigor, la maqueta tiene un techo que abarca desde detrás de las alas hasta la cola. El capó motor también está separado del resto.
Las puertas de la carlinga están cerradas, pero las de la bodega de carga vienen separadas y son muy gruesas. Bajo ellas hay dos estribos separados que parecen demasiado grandes. Sobre el techo hay que colocar algunas antenas de tipo diferente.
El capó del motor viene en una pieza, más gorda en la base que en la parte delantera. El motor me parece de lo mejor de esta maqueta. Muestra cilindros bien definidos y además la pieza está muy limpia de rebabas y líneas de molde. Sin embargo, la hélice debe ser repasada con lija porque presenta rugosidad en las palas, aunque estas son finas y están bien perfiladas. El buje viene separado. El capó cuenta con dos tomas independientes, una hueca y la otra no, y el escape, que tiene una forma un tanto rara en su tramo final.
Alas y cola
Las alas están fabricadas en tres piezas. La cara superior comprende toda la envergadura con los bordes de salida y las puntas, y está unida al techo de la carlinga, que muestra los huecos para insertar las ventanillas. Las dos caras inferiores son piezas separadas.
Los flaps están bien marcados en las superficies superiores, pero no en las inferiores. El lado superior muestra también el detalle de las luces de posición, la toma de aire de los depósitos auxiliares (alojados en las puntas) y la toma de combustible también aparece definida, aunque mal colocada en la parte delantera. El ala de babor tiene piezas aparte para el tubo Pitot y el faro de aterrizaje transparente. Sobre las alas aparecen dos soportes verticales o dispositivos cuya función ignoro.
Las caras inferiores cuentan con seis bisagras por ala para los flaps y alerones. Una de las bisagras se ha aprovechado para moldear los contrapesos de los alerones. Las piezas están bien moldeadas y son razonables en grosor para esta maqueta, pero podrían afinarse un poco. Los soportes de las alas tienen una anchura adecuada y están bien definidos.
El empenaje cuenta con estabilizadores en una pieza y las superficies verticales unidas a la aleta dorsal. Los estabilizadores son finos y los timones están bien grabados, incluso las aletas de trimado. El timón y la deriva van montados sobre una ranura del fuselaje. La pieza muestra también un prolongado tubo que semeja un Pitot. Las dimensiones de la pieza parecen algo grandes y el perfil superior no del todo correcto.
Tren de aterrizaje
La maqueta incluye dos configuraciones opcionales. Podemos hacerla con ruedas y esquíes, o bien con flotadores. Los carenados de las patas están bien perfilados y contienen los ejes de las ruedas y los esquíes en sus extremos. Están detallados con estribos separados. Las ruedas son de una pieza y llevan el buje detallado, pero parecen demasiado gruesas y grandes. La rueda de cola va unida a la pata y también parece demasiado grande. Hay un eje que la atraviesa para colocar el patín en la configuración con esquíes. Los esquíes son finos y están detallados en la cara superior. El mecanismo de unión con las patas viene aparte.
Para la configuración de hidroavión tenemos dos flotadores en mitades con timones separados. No están panelados, sólo muestran una especie de refuerzos en la parte delantera y los timones son finos y están bien perfilados. A cola, en lugar de rueda tenemos una aleta alternativa. Los soportes internos y externos son piezas independientes con ligeras líneas de molde y rebabas que limpiar.
Calcas
La hoja contiene insignias británicas y norteamericanas, así como matrículas más algunos estarcidos. Los motivos parecen bien impresos y finos con aspecto mate. El soporte no es excesivo.
Instrucciones
Están impresas en un folleto de tamaño A4 que tiene ocho páginas impresas en blanco y negro. Las páginas muestran una breve referencia histórica sobre el avión en varios idiomas, ocho capítulos de montaje con vistas explosionadas, y perfiles con referencias de pintura de esmaltes de Humbrol. Los pasos de montaje son muy claros.
Las opciones de acabado muestran un aparato británico camuflado configurado como avión terrestre con esquíes opcionales, y otro norteamericano en versión hidroavión sin camuflaje, que por cierto también propone la maqueta de Hobbycraft.
Valoración
Nostalgias aparte, creo que Airfix hizo un buen trabajo en esta maqueta con las posibilidades del momento, y está bien que la haya reeditado, pues en gran parte merece la pena. El montaje no se antoja muy complicado y el detalle puede mejorarse dentro de lo posible. Además las diferentes configuraciones en una sola caja le dan un cierto atractivo del que carecen muchas otras maquetas de aquel tiempo.◊


The kit
Today I have chosen this old Airfix Beaver to take a look at it. I am not exactly the nostalgic plastic type. As I don’t think anything in the past was better, I don’t believe old kits were much compared to those we enjoy today. I simply don’t revere them just because they are old or I have known them myself in another time and place. Times have their men, and their kits too.
The Airfix Beaver has had a few reissues since 1971. This date is visible on one of the fuselage halves. Curiously, the kit is trendy again these days because the manufacturer has just reboxed it in their Vintage Classics collection, which is nothing more than a way of taking advantage of modelling nostalgia. Other brands usually do the same, this way the old toolings stored for a long time can be reused. Another alternative to this Beaver, and well-known to 1/72 modellers, is the Hobbycraft offer. The company also released this aircraft in the 1/48 scale.
The box comes with four sprues of gray pieces, one clear sprue, the decals and the instructions. The kit is a true representative of what we could call, even without irony, the «high tech» of the time. Plastic is well molded overall, with exceptions that I will point out below, and the pieces aren’t all thick. The fuselage and the doors are a little, but the wings and stabilizers, for example, have nothing to envy to a current kit. There is some flash on a few parts, especially on the float struts and wheels, and very slight seam lines on some other pieces. Ejector marks are sparse and concentrated on the rear bulkhead and cockpit, but these are few and the spot comes pretty clean. There are also sink marks on the wingtip and skis undersides. The last mentioned can’t even be seen. Finally, there are ejector pips on the landing gear fairings and float supports. Summarizing, we can say there are all kinds of blemishes but few, and the truth is that the tool is quite clean considering its age. The clear pieces are not bad at all in transparency and sharpness, the problem is they are way too thick.
Detail on the fuselage, wings, and empennage is mixed, consisting of engraved lines on the moving surfaces, very thin positive lines on the structural panels, and very thin positive rivet lines on all of them. Clearly, this is a “take-it-or-leave-it” kit: you should either remove all this and do it again as traditional modelling rules demand, or leave it as is, and you can always say that you built this kit as a child and wanted to do it like that one once more, thus trying to hide your little love for the “rewarding” effort of improving old kits.
Cockpit
The cockpit and cargo bay have a common floor to attach all the interior pieces. The cockpit has an instrument panel with well-defined raised gadgets, double controls in one piece, two seats with rather correct shapes and separate bases.
The rear cargo bay contains two separate seats and another two molded in one piece, both pairs with different shapes, the seat bases, and a rear bulkhead that is inserted into the floor piece. The bulkhead pin marks are shallow and easy to remove.
The interior sides have no detail, but some negative marks to fill in. The windows are attached before closing the fuselage. The cockpit windows are double and come molded together. The doors of the cargo bay have windows and there are other round and smaller ones on the rear fuselage sides. All these clear parts are very thick and have a recessed profile to snap them in place. The windshield is molded with the roof windows, which fit in the wing center section. The windshield frames are very well defined. All the pieces show good transparency but also a lot of distortion.
As usual, Airfix included a pilot figure that looks a bit better than some they make today. The pilot is molded wearing a flight suit, boots, and helmet. Detail is not crispy, partly because of the plastic and partly because it has seam lines, but the little man isn’t all bad and I give him a little indulgence.
Fuselage and engine
The fuselage is divided into three pieces. In addition to the usual halves, the kit has a roof that spans from behind the wings to the tail. The engine cowling is also separated from the rest.
The cockpit doors are molded closed, but the cargo bay doors are separate and very thick. Below them are two separate footholds that look too big. On the roof you have to place some aerials of different type.
The engine cowling comes in one piece, thicker in the base than in the front. The engine seems the best of this kit. It shows well defined cylinders and the piece is very clean from flash and seam lines. However, the propeller should be sanded because it shows rough surfaces on the blades, even though they are thin and look nicely shaped. The hub is a separate piece. The cowling is detailed with two intakes, one of them hollowed, and the exhaust, which has a strange shape in the final section.
Wings and tail
Wings are molded in three pieces. The upper surface comprises the entire span including trailing edges and tips, and is attached to the cockpit roof, which shows the gaps to insert the windows. The two lower surfaces are separate pieces.
The flaps are well marked on the upper surfaces, but not on the lower ones. The upper side also shows the position lights, the air intake of the auxiliary tanks (housed in the tips) and the fuel intake, though wrongly placed at the front. The port wing has separate parts for the pitot tube and the clear landing light. On the wings there are two vertical struts or devices that I don know what they can be.
The undersides have six hinges per wing for the flaps and ailerons. One of the hinges is used to render the aileron counterweights. The parts are correctly molded and reasonable thin for this kit, but may be refined a little. The wing support struts are quite clean and well defined.
The tail comprises the stabilizers in one piece and the vertical surfaces attached to the dorsal fin. The stabilizers are thin and the rudders and trim tabs are engraved. The rudder and fin are glued on a slot on the fuselage. The piece also shows a long tube that resembles a pitot. Vertical surfaces seem a bit large and the upper profile not quite correct.
Undercarriage
The kit includes two optional configurations. We can build it with wheels and skis, or with floats. The leg fairings are well profiled and have the wheel and skis axles. They are detailed with separate footholds. The wheels are one piece and have detailed hubs, but they seem too thick and big. The tailwheel is molded with the leg and also looks too big. There is an axle through it to place the tail skid. The skis are thin and detailed on the upper face. The ski links come separately.
For the seaplane configuration we have two floats in halves with separate rudders. Floats have no panels, they only show raised lines at the front and the rudders are thin and correctly shaped. We also have an alternative fin instead of the taiwheel. The inner and outer support struts are separate parts with slight seam lines and some flash to clean up.
Decals
The sheet contains British and American markings, registrations and some stencils. Decals seem well printed and thin. They show a matt appearance without too much carrier film.
Instructions
They are printed in an A4 brochure comprising eight pages printed in black and white. It includes a short historical reference on the aircraft in several languages, eight assembly chapters with clear exploded views, and profiles with Humbrol paint references.
You have choices for a camouflaged British Beaver configured as a landplane with optional skis or an US seaplane version without camouflage, which is also included in the Hobbycraft kit, by the way.
Conclusion
Nostalgia aside, I think Airfix did a good job with the possibilities of the time, and it’s nice it has been reissued because it’s largely worth building. Assembly does not seem very complicated and detail can still be improved. In addition, the different configurations in a single box give it an appeal that other kits of that time lack.◊
Publicado – Published: 1 / 2023
©www.jmodels.net


Debe estar conectado para enviar un comentario.