
De un vistazo – Quick look
MATERIAL Y PIEZAS
MEDIA & PARTS:
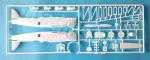
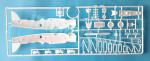
- Plástico inyectado (59 piezas), plástico transparente (3 piezas).
- Injected plastic (59 parts), clear plastic (3 parts).
CALCAS – DECALS:
- Escarapelas checoslovacas, matrículas, insignias de unidad y algunos estarcidos. Apariencia fina. Colores amarillentos.
- Czechoslovak roundels, registers, unit badges and some stencils. Apparently thin. Yellowish colors.
OPCIONES – OPTIONS:
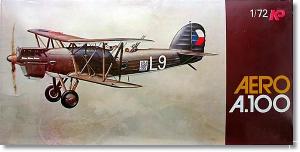
- Aero A.100. Fuerza Aérea Checoslovaca. 2º Escuadrón. L9 blanco. Olomouc (Checoslovaquia), finales de los años 30.
- Aero A.100.12. Fuerza Aérea Checoslovaca . 1er Escuadrón. Z10 blanco. Milovice (Checoslovaquia), finales de los años 30.
- Aero A.100. Fuerza Aérea Checoslovaca . Escuela Militar de Vuelo. c208 blanco. Prostějov (Checoslovaquia), finales de los años 30.
- Aero A.100. Czechoslovak Air Force. 2nd Air Regiment. White L9. Olomouc Czechoslovakia), late 1930s.
- Aero A.100.12. Czechoslovak Air Force. 1st Air Regiment. White Z10. Milovice (Czechoslovakia), late 1930s.
- Aero A.100. Czechoslovak Air Force. Military Flying School. White c208. Prostějov (Czechoslovakia), late 1930s.
INSTRUCCIONES – INSTRUCTIONS:
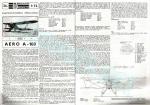
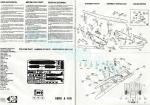
- Folleto de tamaño A4 formando 4 páginas impresas en blanco y negro. Contiene datos históricos y técnicos sobre el avión, un plano numerado de piezas y tres vistas del montaje sin secuenciar. La cara trasera de la caja muestra perfiles a color.
- 4-page A4 brochure printed in black and white. It shows a historical summary and technical data about the aircraft, a numbered parts plan and three views of the assembly wihout a sequence. The back side of the box shows profiles in color for one of the decal versions.
LO MEJOR – THE BEST:
- Tema inusual. Detalle general decente.
- Unusual topic. Overall decent detail.
LO PEOR – THE WORST:
- Panelado positivo (según gustos). Instrucciones.
- Raised panel lines (depending on taste). Instructions.
VALORACIÓN – CONCLUSION:
- Antigua pero aún en forma. Ideal para quien esté dispuesto a mejorarla un poco, seguramente será recompensado.
- Old kit but still in good shape. Ideal for those wishing to improve some details. They will surely be rewarded.

La maqueta
No es fácil encontrar maquetas del Aero A.100 a no ser en el mercado de segunda mano y, hasta fechas recientes, tampoco se libraba su secuela, el Aero A.101, pero ha sido más afortunado, ya que RS Models tiene a estas alturas un molde con varias ediciones en el mercado. Si al A.101 no lo ha librado del olvido el hecho de haber tomado parte en los dos bandos de la Guerra Civil Española, es fácil adivinar lo que ocurre con el A.100. Uno y otro sólo están presentes en la escala 1/72.
La maqueta de KP es del año 1987 y ha sido reeditada por otras marcas, o más bien con otras etiquetas, como Kopro o Kopro-Mastercraft. La única diferencia que he podido encontrar entre ellas, es que la ultima mencionada incluye alguna información sobre los tres aparatos representados por las calcas. En algunas ediciones cambia alguno de ellos, pero son básicamente lo mismo.
Dentro de la caja KP puso una hoja de calcas, las instrucciones, un bastidor de piezas transparentes y dos bastidores de piezas blancas. Las piezas están bien moldeadas, salvo el frontal del motor y una de las bombas, que muestran ligeros rechupes fáciles de rellenar, y limpias en general, con sólo ligeras rebabas en muy pocas de ellas y una marca positiva a cada lado del interior de la carlinga.
Carlinga
La carlinga es bastante parca y sólo contiene los elementos más imprescindibles, pero no me parece del todo mala. Los lados internos del fuselaje no muestran más detalle que una palanca apenas marcada en el lado izquierdo y que resulta difícil de notar, más dos huecos para instalar a ambos lados los paneles acristalados del observador, cuyas piezas son finas. El suelo es común para ambos puestos y está dividido por un panel intermedio que muestra algunos instrumentos en relieve en su cara trasera, y otro a cola, más grueso y detallado con el asiento del observador.
El puesto de pilotaje dispone de un parabrisas transparente fino, pedales, asiento, palanca de control y panel de instrumentos. El asiento es fino y está detallado con acolchado, mientras que los instrumentos del panel vienen representados en fino relieve.
Además del asiento y los instrumentos reproducidos en el panel delantero, el puesto de observador incluye el montaje de las ametralladoras con tambores de munición separados. Las armas no son muy buenas, pero al menos son finas y usables. A ambos lados de esta carlinga hay algunos tambores de munición adicionales en piezas separadas.
Fuselaje y motor
Las mitades del fuselaje están paneladas con líneas en relieve muy fino e incluyen la deriva, el patín de cola y el motor, salvo la parte superior del capó y el frontal, que están separados. El frontal tiene dos marcas de eyector positiva, pero no se notarán tras eliminarlas porque las tapa la hélice. El capó del motor muestra los pequeños escapes individuales así como las tomas del motor bien definidos, pero las troneras del armamento no me parecen tan limpias y conviene repasarlas. La parte inferior del capó muestra la salida del motor cegada por el plástico y la rejilla de la toma frontal moldeada con lineas finas en relieve que la hacen muy poco creíble. Hay otra pieza más por debajo de esta toma que debería contener una pequeña entrada de aire adicional, pero está mal definida. Aquí el modelista debería acudir a sus habilidades y mejorar estos detalles. Creo que la maqueta lo agradecería.
La hélice, aunque parece demasiado grande, está bien proporcionada y perfilada y sólo necesita afinarla un poco. El buje viene separado.
Alas y cola
Las alas se componen de una pieza para los planos superiores y dos para los inferiores. El panelado es igual que en el fuselaje, a base de líneas finas en relieve salvo en las superficies de control, donde aparece grabado. Las mitades inferiores van insertadas en el fuselaje con lengüetas. Ambos planos llevan bien grabados los puntos de unión de los soportes, pero los soportes centrales apenas cuentan con ligeras marcas de posición a los lados del fuselaje. Los flaps de los alerones están detallados con delgados compensadores separados. Todos los soportes de las alas son finos y parecen bastante bien perfilados.
Afortunadamente, KP le puso algo bajo las alas a su maqueta. Así, contamos con cuatro soportes, dos bombas de 100 kg. y otras dos de 200 kg. La posición de los soportes no están bien marcada y sólo para los externos encontramos una ligera muesca en la superficie del plástico.
El timón vertical es una pieza aparte detallada con lineas en relieve, lo mismo que los planos horizontales de cola, que consisten en una pieza insertada en la deriva y reforzados con dos soportes.
Tren de aterrizaje
Cada pata consta de tres soportes separados de apariencia fina, pero no tienen la amortiguación muy bien reproducida. Las ruedas vienen de una pieza y muestran los neumáticos bien marcados, aunque sin detalle. En la cara externa de los bujes puede notarse la marca del agujero de llenado de los neumáticos.
Calcas
Contiene escarapelas checoslovacas, matrículas, insignias de unidad y algunos estarcidos. Aparentemente los motivos son finos y deberían poderse usar, aunque los colores amarillentos inviten a buscarles reemplazo.
Instrucciones
Están impresas en un folleto de tamaño A4 formando 4 páginas en blanco y negro. Contiene datos históricos y técnicos sobre el avión, un plano numerado de piezas y tres vistas del montaje sin secuenciar. Esto último hace el montaje más lento y engorroso de lo que debiera al hacer más difícil identificar las piezas y colocarlas en su lugar correcto. En especial al montar los soportes de las alas y el tren de aterrizaje hay que tener cautela. Resulta obvio apuntar que el montaje necesita mayor estudio previo de lo habitual.
Aunque el folleto contiene un perfil frontal del avión como ayuda para arriostrarlo, la única guía para pintar la maqueta son los perfiles impresos en la cara trasera de la caja, pero no proporcionan información sobre los colores o pinturas que pueden usarse ni en el interior ni por fuera. Para colocar las calcas sólo podemos guiarnos por los dibujos de la propia caja en su cara anterior, posterior y en un lado de la misma.
Nada se dice tampoco sobre los tres aviones representados en esta edición. Afortunadamente, la reedición de Kopro-Mastercraft incluye unas instrucciones algo más completas, que he empleado para identificar cada uno de los aviones.
Valoración
Este A.100 está tan olvidado, que precisamente por eso no debería extrañarnos que algún día reaparezca con el marbete de la nueva Kovozávody Prostějov u otra marca parecida. Es una tendencia que viene ocurriendo muy a menudo en los últimos tiempos.
Es evidente que no se le debe pedir el nivel de hoy a una maqueta con casi 40 años. Y en esta me parecen muy necesarios unos planos del avión para complementar la escasa ayuda de las instrucciones y, como no, encontrar la información omitida sobre la pintura tanto del interior como del exterior.
Sin embargo, el molde no ha envejecido del todo mal y el modelo final puede ser muy gratificante si se le mejoran algunas zonas como el motor y la carlinga. Esto, naturalmente, si no consideramos el fino y coherente panelado positivo que tiene como una línea roja.◊


The kit
It is not easy to find kits of the Aero A.100 except in the second-hand market and, until recently, its development, the Aero A.101, was not available either. This has been luckier as RS Models released a new toll kit some time ago and has had several reissues so far. If the A.101 could not avoid being overlooked by the fact of having taken part in both sides of the Spanish Civil War, it is easy to guess what happens with the almost unknown A.100. Both are only present in the 1/72 scale.
The KP kit is from 1987 and has been reissued by other brands, or rather with other labels, such as Kopro or Kopro-Mastercraft. The only difference that I could find between them is that the last one mentioned includes some information about the three aircraft represented by the decals. In some boxes one of decal choice changes, but they are basically the same.
Inside the box KP included a decal sheet, the instructions, a clear sprue, and two sprues of white pieces. The parts are well moulded, except for the front of the engine and one of the bombs, which show slight sink holes that are easy to fill, and are generally clean, with only slight flash on a few of them and a positive pin mark on each side of cockpit walls.
Cockpit
The cockpit is quite sparse and contains only the most essential items, but it doesn’t seem all bad. The internal fuselage sides do not show more detail than a barely marked lever on the left side that is difficult to notice, plus two gaps to install the observer’s glazed panels on both sides. The panels are provided in clear thin pieces. The floor is common to both cockpits and is divided by a middle bulkhead that shows some raised instruments on the rear face, and another bulkhead at the tail, thicker and detailed with the observer’s seat.
The pilot’s cockpit is detailed with a thin clear windshield, the pedals, a seat, a control stick and the instrument panel. The seat is thin and includes the padding, while the instruments on the panel are moulded raised.
In addition to the seat and instruments rendered on the front panel, the observer’s station has a machine-gun mount with separate ammunition drums. The weapons are not very accurately rendered, but at least they are thin and usable. A couple of spare ammo drums are provided for one of the cockpit sides.
Fuselage and engine
The fuselage halves are detailed with finely raised lines and include the fin, the tailskid, and the engine, except for the top of the cowling and engine front, which are separate. The engine front has two positive ejector marks, but they won’t be noticeable after cleanup because they will be hidden by the propeller. The engine cowling shows the small exhausts as well as the well-defined engine intakes, but the weapons troughs do not seem so clean and should be improved a bit. The lower cowling shows the engine outlet closed by plastic and the front intake grille molded with thin raised lines that make it look unrealistic. There is another piece below this intake that should contain a small additional air intake, but it is poorly defined. Here the modeler should resort to his skills to improve these details. I think the kit would really look much better.
The propeller, although it looks oversized, is well proportioned and profiled and just needs some thinning. The spinner is a separate piece.
Wings and tail
There is one piece for the upper wings and two for the lower ones. Panels are rendered as on the fuselage except for the engraved control surfaces. The lower halves are attached to the fuselage with tabs. Both wings have the attachment points for the struts clearly open, but cabane struts are barely marked on the fuselage sides. Aileron are detailed with thin separate trim tabs. All wing struts are thin and profiled.
Fortunately, KP added something under the wings, and we have four racks, two 100kg and two 200kg bombs. The position of the racks are not clearly marked and we only find slight marks for the outboard ones.
The vertical rudder is a separate piece detailed with raised lines that look similar to those moulded on the horizontal tailplanes. These consist of a piece inserted into the fin and strengthened with two struts.
Undercarriage
Each leg consists of three separate thin struts and an axle beam, but shock absorbers are not correctly rendered. The wheels come in one piece with tires correctly moulded showing no detail on the tread. The external hub side is faintly marked with the tire inflation valve.
Decals
The sheet contains Czechoslovak cockades, registers, unit badges and some stencils. Decals are apparently thin and should be usable, although the yellowish colors invite you to look for a replacement.
Instructions
They consists of a 4-page A4 brochure printed in black and white. It shows a historical summary and technical data about the aircraft, a numbered parts map and three exploded views of the assembly wihout a sequence. The back side of the box shows profiles in color for one of the decal versions.
The exploded views are too busy and make assembly slower as you have to identify and double-check parts placement. Especial care is needed when assembling the wing supports and the landing gear. Obvious to say, assembly needs a more careful study than usual.
Although the brochure contains a front profile of the aircraft as an aid to rigging the wings, the only help for painting the model are the profiles printed on the back of the box. Unfortunately, they do not provide information about colors or paints that can be used either in the cockpit or outside. The only guide to set the decals are on the artbox, the back and side of the box.
Nothing is said about the three aircraft represented in this release either. Fortunately, the Kopro-Mastercraft kit instructions include this information, which I have used to identify each of them.
Conclusion
As it has been happening in recent times with unusual aircraft, we may see the forgotten A.100 in kit form with the label of the new Kovozávody Prostějov or another similar brand.
It is evident that a kit that is almost 40 years old cannot be asked for much more, and this one will also need some research to complement both the assembly instructions and the missing information about the painting.
However, the tool hasn’t aged too badly and the finished model can be very rewarding if some areas such as the engine and cockpit are improved. This, of course, if we do not consider the thin and coherent raised panel lines as a too serious issue.◊
Publicado – Published: 5 / 2023
©www.jmodels.net

Debe estar conectado para enviar un comentario.