
De un vistazo – Quick look
MATERIAL Y PIEZAS
MEDIA & PARTS:
- Plástico inyectado (55 piezas), plástico transparente (10 piezas), resina (19 piezas).
- Injected plastic (55 parts), clear plastic (10 parts), resin (19 parts).
CALCAS – DECALS:
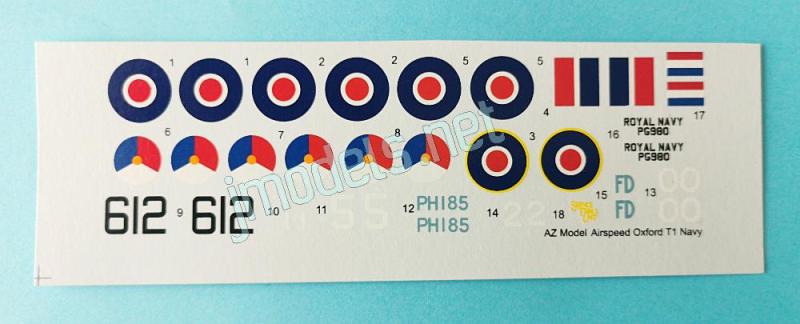
- Insignias nacionales, matrículas y registros. Acabado fino y muy brillante. Buena saturación de color y registro correcto. Sin exceso de soporte.
- National roundels and markings and registers. Thin and very glossy finish. Good color saturation and correct register. No excess carrier film.
OPCIONES – OPTIONS:
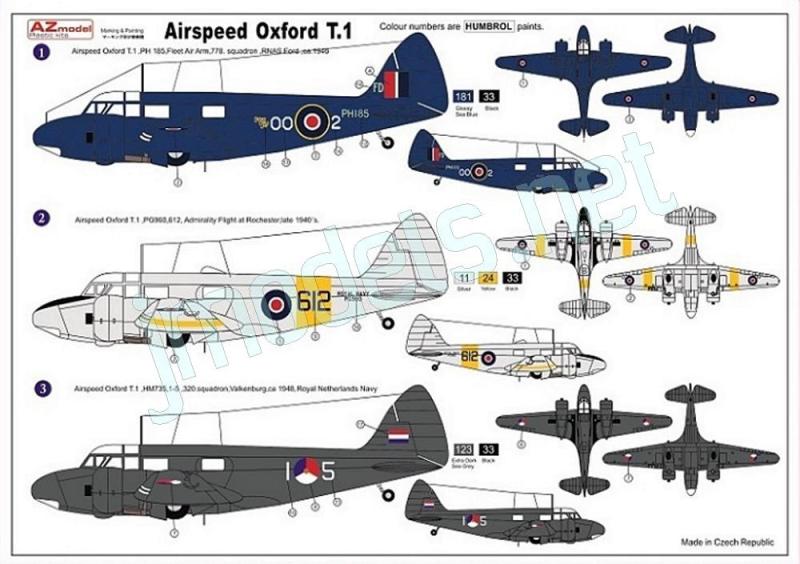
- Airspeed Oxfrod T.1. PH 185. 0002 blanco. Brazo Armado de la Flota. Escuadrilla N.º 778. Estación Aeronaval de la Armada. En torno a 1946.
- Airspeed Oxfrod T.1. PG960. 612 negro. Escuadrilla del Almirantazgo de Rochester. Finales de la década de 1940.
- Airspeed Oxfrod T.1. HM735. 1-5 blanco. Marina Real de los Países Bajos. Valkenburg. En torno a 1948.
- Airspeed Oxfrod T.1. PH 185. White 0002. Fleet Air Arm. No. 778 Squadron. RNAS Ford. Ca. 1946.
- Airspeed Oxfrod T.1. PG960. Black 612. Admiralty Flight at Rochester. Late 1940s.
- Airspeed Oxfrod T.1. HM735. White 1-5. Royal Netherlands Navy. Valkenburg. Ca. 1948.
INSTRUCCIONES – INSTRUCTIONS:
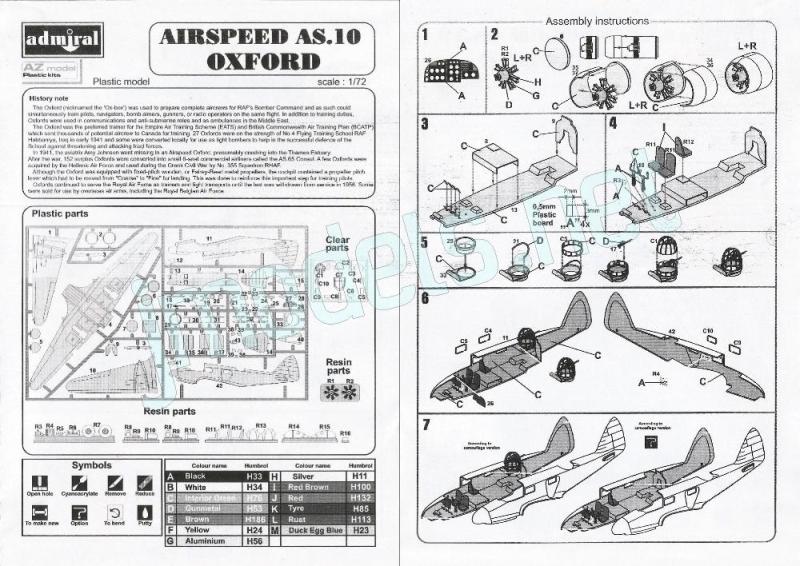
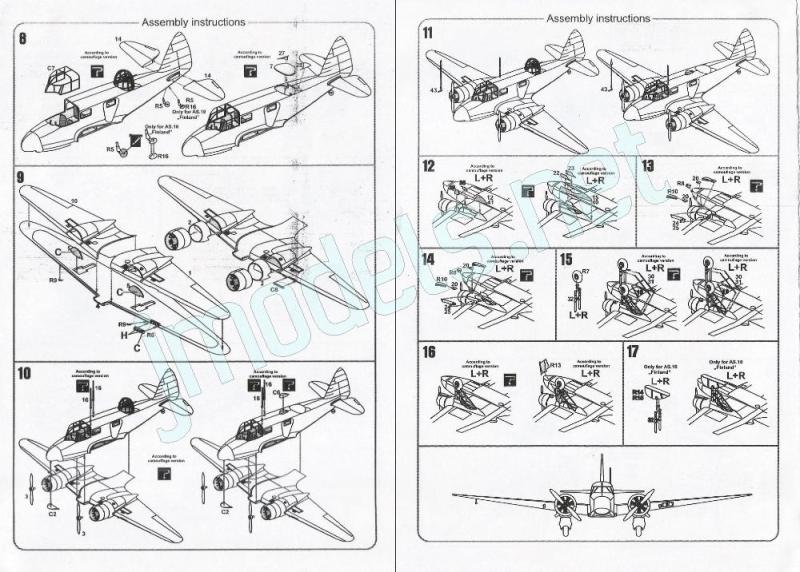
- Folleto A5 de 4 páginas impreso en blanco y negro que contiene un sumario histórico sobre el avión, un plano numerado de piezas, una tabla de colores con pinturas equivalentes de Humbrol y 17 secuencias de montaje. La parte trasera de la caja muestra perfiles en color con los códigos de las pinturas necesarias en cada terminación.
- 4-page A5 manual printed in black and white showing a historical summary about the aircraft, a numbered parts plan, a chart of colors with equivalents in Humbrol paints and 17 assembly chapters. The back side of the box shows profiles in color with paint codes to use with each of the finishing options.
LO MEJOR – THE BEST:
- Molde limpio. Motores. Ruedas.
- Clean tooling. Engines. Wheels.
LO PEOR – THE WORST:
- Instrucciones (ver texto). Algunos errores internos y ausencias externas.
- Instructions (see text). Some internal mistakes and external deficiencies.
VALORACIÓN – CONCLUSION:
- AZ Model no ha puesto todo de su parte para sacarle partido a la maqueta. Sólo recomendable a quienes deseen tener este avión concreto en la vitrina o retar sus propias habilidades de modelista experto.
- AZ Model hasn’t done their best to bring out the full potential of this beautiful aircraft. Only recommendable to those wishing to have this specific aircraft on their shelves or challenge their own skills as an expert modeler.

La maqueta
Las maquetas más antiguas del Airspeed Oxford en la escala 1/72 son las de Frog y Pavla. El molde más reciente que tenemos actualmente es de Admiral, del cual AZ Model ha sacado dos cajas adicionales. La otra caja (Airspeed Oxford Mk.I/II, referencia AZ7510) está dedicada a aviones de diferentes fuerzas aéreas ( RAF, SAAF y RCAF). Para complementar, esta caja lleva versiones empleadas por las armadas de Gran Bretaña y Holanda. AZ Models tuvo buen ojo para cubrir el hueco, porque ninguna de las maquetas de Admiral incluye aviones navales.
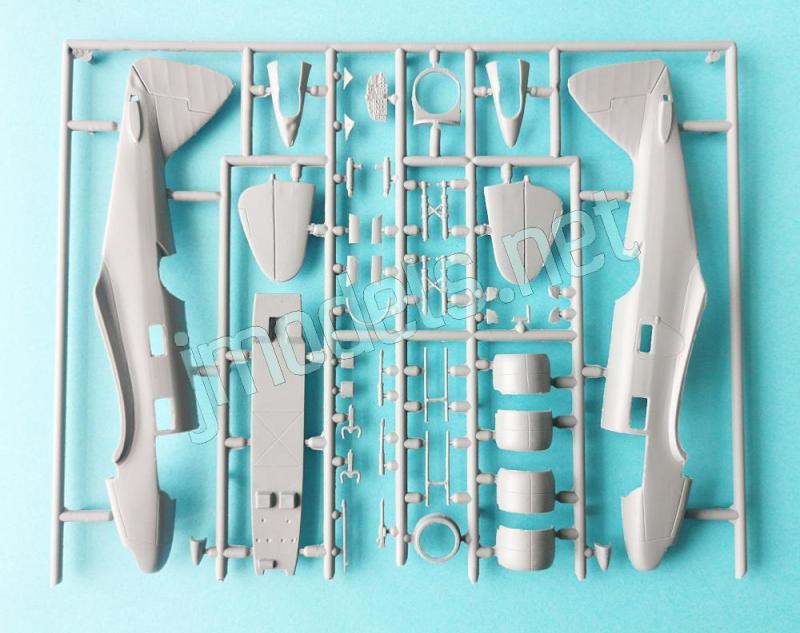
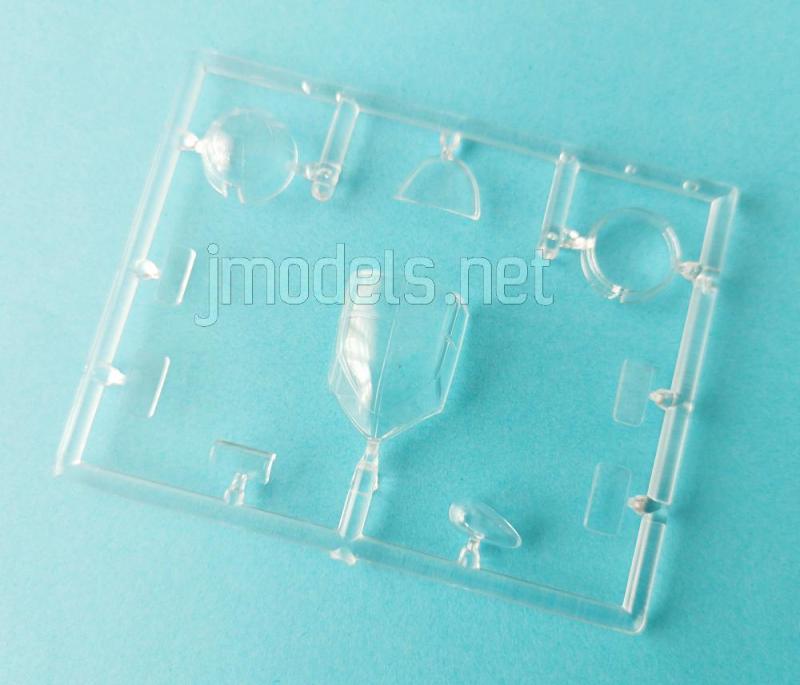
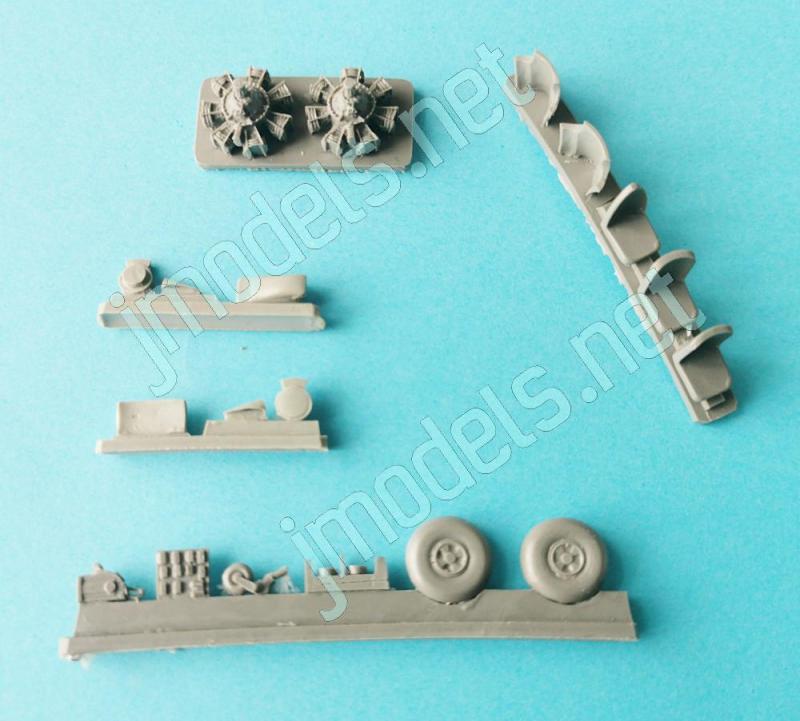
Como es hábito de AZ Model, el contenido de la caja está bien envuelto para evitar daños. La maqueta comprende dos bastidores con un total de 55 piezas, un bastidor transparente, varios bebederos de resina que básicamente incluyen las ruedas, tomas de aire, asientos y motores,, la hoja de calcas y las instrucciones.
Las piezas de plástico no muestran rebabas ni marcas de eyector y están bien moldeadas. Eso sí, hay que limpiar algunas líneas de molde que parecen inevitables en casi cualquier maqueta de serie limitada. Los elementos de resina están reproducidos con limpieza y nitidez. Los transparentes tienen un tanto de grosor, pero están dentro de los razonable para la escala.
En principio, el montaje de la maqueta no debe ofrecer sospresas al modelista experto. El inconveniente con las instrucciones es que AZ Model nunca se molesta en hacerlas específicas para cada versión, por ello las secuencias del montaje muestran todas las alternativas de las distintas versiones de Admiral, incluida la dotada con una torreta artillada que AZ no tiene. Excluir las opciones que no interesan no sería nada del otro jueves si no fuera por el tamaño de las ilustraciones, en especial las referentes al tren de aterrizaje, donde se ofrecen hasta cinco posibilidades distintas.
La selección de libreas para terminar el modelo me parece acertada por su distinción y son fáciles de pintar, sólo hay que añadir las bandas identificativas del aparato del Almirantazgo por toda dificultad.
Reseña
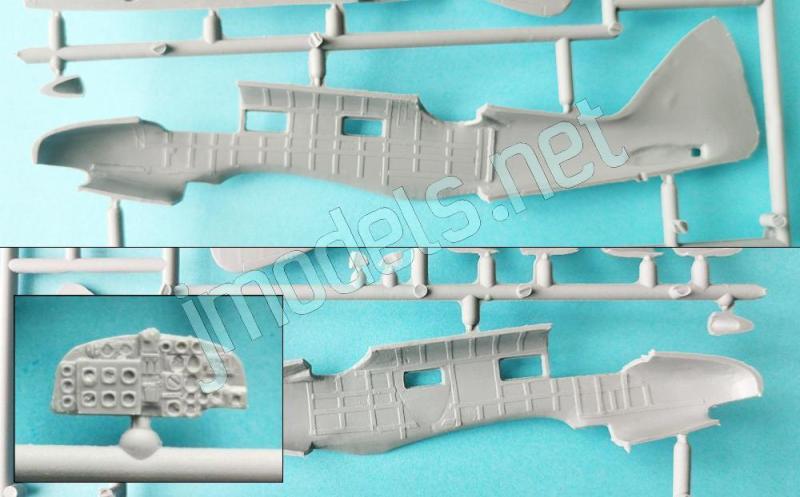
Los lados internos del fuselaje están moldeados con un relieve estructural idéntico en toda su longitud y de apariencia más bien blanda y poco nítida, pero visible. Las fotos del interior del avión real demuestran que Admiral se lo ha inventado. Sólo el lado izquierdo dispone de una pieza de resina con un panel de instrumentos situado entre las dos ventanillas.
La carlinga y el compartimiento trasero comparten el suelo, que en la parte anterior lleva el puesto de la posición del bombardero más las bases de los asientos de los pilotos y en la trasera es algo más alto con un mamparo trasero de formas correctas, cuya parte trasera soportaba los raíles de lanzamiento de bengalas en paracaídas. En la zona central hay que añadir una especie de tarima superpuesta sobre la que sólo está el asiento del operador de radio de formas correctas, pero sin los instrumentos. La carlinga lleva dos asientos de resina erróneos en los respaldos más los mandos y el panel de instrumentos, magnífico por cierto, de plástico. La consola central está incluida. Los pedales hay que hacerlos con lámina y varilla de plástico, que simulará los soportes de cada pedal. Las instrucciones muestran una plantilla de tamaño real con las medidas necesarias para construir uno mismo estos accesorios, que en definitiva tampoco son como los reales.
La cabina está cubierta por una sola pieza transparente que incluye el techo y el parabrisas. La pieza tiene un grosor razonable con los paneles y ventanillas bastante bien plasmados. Las ventanillas se añaden por fuera del fuselaje, aunque para pegar el panel acristalado del bombadero bajo el morro necesitaremos haber cerrado el fuselaje. La maqueta trae también la torreta y varios de sus elementos internos procedentes de una de las versiones de Admiral que en este caso no son necesarias.
El fuselaje está unido a las superficies verticales de la cola. Las piezas apenas muestran líneas grabadas en el morro además de la puerta del lado izquierdo, bien grabada pero cerrada, desgraciadamente. Sobre la zona dorsal tenemos una escotilla redonda y dos piezas triangulares más pequeñas para carenar el hueco de la torreta. La escotilla redonda llevaba dos pequeños acristalamientos alargados y paralelos, que están grabadas en la pieza, pero no abiertos. Estas aberturas se ven en las fotos a veces simplemente cegadas y en otras ni se notan por haber sido recubiertas completamente. También faltan dos paneles acristalados situados por detrás del techo de la carlinga. De estos no hay rastro.
También en esta zona hay un mástil de antena. Las instrucciones nos indican sin demasiada claridad su posición alternativa. En las fotos del avión real este mástil aparece en unos modelos justo por detrás de la carlinga, pero descentrado al lado izquierdo del fuselaje, que es donde lo llevaba el avión de la Escuadrilla Nº 778, junto con un pequeño mástil adicional sobre el lado derecho del morro que las instrucciones no mencionan, pero se aprecia en la carátula y los perfiles de la caja. Las otras dos versiones tenían sólo el mástil principal sobre el mismo lugar, ya que eran todos derivados del Mk. I. El avión del Admiralty Flight muestra también una pequeña cúpula en forma de lágrima cuya pieza está en el bastidor transparente, pero el hueco del fuselaje hay que abrirlo. De esto tampoco dicen nada las instrucciones.
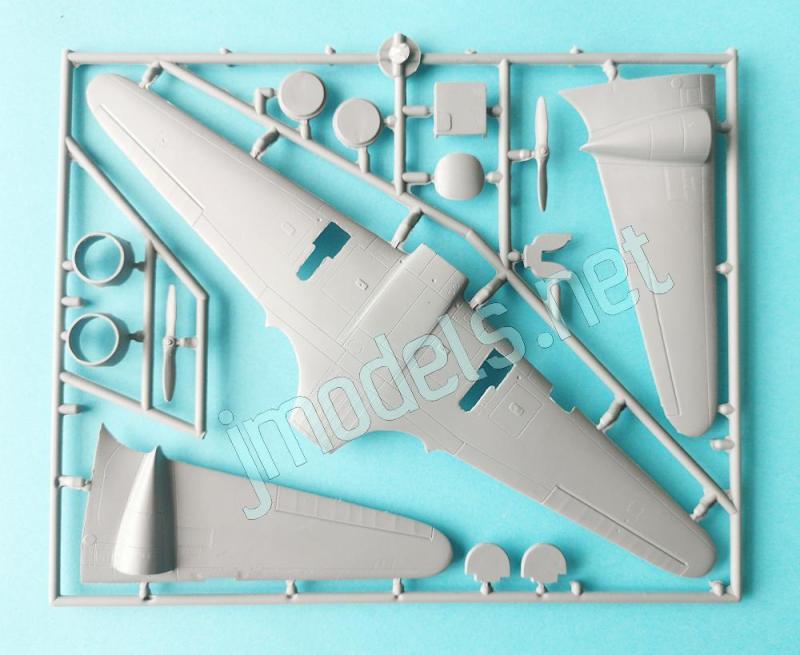
Las alas están distribuidas en tres piezas. Las mitades superiores muestran menos detalle grabado que las inferiores, donde es más profuso y ejecutado con precisión. Los alerones están muy bien grabados en los dos lados y presentan un suave relieve estructural. Las pequeñas luces de las puntas sólo están grabadas en la mitad inferior. Hay un pequeño tubo Pitot separado así como las luces de aterrizaje resueltas en piezas de resina de gran detalle, recubiertas por una lete transparente. Ambos bordes de ataque están provistos también de dos piezas de resina que simulan pequeñas tomas redondas.
La deriva y el timón vertical son parte de las piezas del fuselaje. Los estabilizadores vienen separados y provistos de un vástago en la parte trasera que ayuda a pegarlos. Los timones y aletas están muy bien grabados y el relieve estructural del empenaje es suave y bien consegudo.
Los motores son piezas de resina de factura excelente. Para colocarlos correctamente dentro de los capós hay que fijarse en el pequeño elemento cuadrado situado sobre la caja de engranajes. Los capós vienen en mitades con un panel trasero que tapa el hueco. Por debajo, la toma de aire está representada con una pieza de resina sin horadar y otra de plástico, más otras dos próximas a ellas cuya posición no se aprecia bien en las instrucciones. Las hélices están bien perfiladas pero son algo gruesas.
Los pozos no tienen detalle interior, ni siquiera marcas para posicionar las patas. Las tapas son algo gruesas, pero colocarlas con la ayuda de las instrucciones es casi inútil. Es mejor consultar fotos. El tren de aterrizaje secundario consta de una rueda de resina con su pata y para el principal temos las patas de una pieza con brazos de plegado separados. Las ruedas de resina, que se insertan a presión en las patas, son bastante buenas y tienen las llantas externas definidas.
Las calcas traen escarapelas y otras insignias nacionales, matrículas y registros. Tienen un acabado fino y muy brillante, buena saturación de color y registro correcto. No hay soporte excedente.
El folleto de instrucciones posee un formato A5 y consta de cuatro páginas impresas en blanco y negro. Contiene un sumario histórico sobre el avión, un plano numerado de piezas, una tabla de colores con pinturas equivalentes de Humbrol y 17 secuencias de montaje. La parte trasera de la caja muestra perfiles en color con los códigos de las pinturas necesarias en cada alternativa de acabado.
Como ya he dicho, AZ Model sigue fallando en las instrucciones, que suelen ser comunes para todas las cajas del mismo molde. En este caso, además, vienen todas las alternativas de las maquetas de Admiral, por ello hay que ir descartando las opciones no convenientes. Todo se torna más confuso debido al tamaño pequeño del montaje del tren de aterrizaje, del cual hay hasta cinco posibilidades distintas.
Las opciones para pintar el modelo incluyen tres aviones con libreas que los cubren en su totalidad y sólo a uno de ellos hay que pintarle bandas de otro color en el fuselaje y las alas.
Valoración
Aún considerando que se trata de una maqueta para manos expertas, podría ser más sencilla de armar de no ser por unas instrucciones descuidadas y confusas. El modelista necesitará mucha paciencia y tiempo para contrastar con imágenes lo que muestra este infortunado folleto, especialmente en las últimas secuencias del montaje.
El interior se queda corto en el detalle y es parcialmente erróneo. Puede que a algunos modelistas esto les pueda importar menos que terminar la maqueta de la mejor forma posible, que ya tiene su cierta miga si no se han citado con AZ Model antes. El detalle externo, salvando los paneles acristalados y huecos que faltan en el fuselaje, que no es poco, está bastante mejor y puede suponer un aliciente para los que prefieren los retos.
Sólo puedo recomendar este Oxford a modelistas con gusto por los aviones poco vistos o con ganas de torcerle el brazo a cualquier maqueta que se les ponga por delante.◊

The kit
The oldest 1/72 scale Airspeed Oxford kits are those from Frog and Pavla. The most recent kit we currently have is from Admiral, from which AZ Model has released two additional boxings. The other box (Airspeed Oxford Mk.I/II, reference AZ7510) includes aircraft aircraft from different air forces (RAF, SAAF, and RCAF). To complement this, this box includes versions used by the British and Dutch navies. AZ Model had a good eye for filling this gap, as none of the Admiral kits include naval aircraft.
As is customary with AZ Model, the contents of the box are well protected to prevent damage. The kit comprises two sprues with a total of 55 parts; a clear sprue; several resin gates that basically comprise the wheels, air intakes, seats, and engines; the decal sheet and the instructions.
Plastic parts show no flash or ejector marks and are well molded. That said, some seam lines need cleaning, which seem inevitable in almost any limited-run kit. Resin parts are cleanly and sharply cast. Clear parts are a tad thick, but within reasonable limits for the scale.
At first sight, assembling the model shouldn’t pose any surprises to the experienced modeler. The problem with the instructions is that AZ Model never bothers to make them specific to each release; so, the assembly sequences show all the alternatives for the different Admiral kits, including the one provided with a gun turret, which AZ doesn’t offer. Excluding the options that aren’t applicable wouldn’t be so difficult if it weren’t for the size of the illustrations, especially those relating to the landing gear, where up to five different possibilities are offered.
The selection of liveries to finish the model seems appropriate because of their difference, and they are easy to paint; the only difficulty being the Admiralty aircraft’s stripes.
Review
The fuselage sidewalls are molded with an identical structural raised detail along their length, appearing rather soft and indistinct, but visible nonetheless. Photos of the real aircraft’s interior demonstrate that this interior is completely unrealistic. Only the left side has a resin piece with an instrument panel located between the two windows.
The cockpit and rear compartment share the floor, which has the bombardier’s station and the bases for the pilots’ seats in the forward side, while in the rear it is somewhat higher with a correctly shaped rear bulkhead. Behind this were the parachute flare launching rails, but these are not represented. In the central area, there is a sort of platform with only the radio operator’s seat, correctly shaped but without the instruments. The cockpit contains two resin seats with incorrect backrests, as well as the controls and the instrument panel, which is superb, by the way, made of plastic. The center console is missing. The pedals are made from plastic sheet and rod, which will simulate the supports for each pedal. The instructions include a full-size template with the necessary measures to build these parts yourself, although they are quite different from the real pedals.
The cockpit is covered by a single transparent piece that includes the roof and windshield. The piece is reasonably thick, with the panels and windows quite well represented. The windows are added from the outside of the fuselage, although to attach the bomber’s glazed panel under the nose, the fuselage needs to be attached first. The kit also includes the turret and several of its internal components from one of the Admiral versions, which are not needed in this case.
The fuselage is molded with the vertical tail surfaces. Parts show only a few engraved lines on the nose, apart from the left-side door, which is well-engraved but unfortunately closed. On the dorsal fuselage, there is a round hatch and two smaller triangular pieces to cover the turret opening. The round hatch had two small, parallel glazed panels which are engraved on the part but not open. Two glazed panels behind the cockpit roof are also missing and these are not even engraved.
There is also an antenna mast on this fuselage surface. The instructions show its alternative position rather vaguely. In photos of the real aircraft, this mast appears on some models just behind the cockpit, but off-center to the left fuselage side, which is where it was located on the No. 778 Squadron aircraft, along with a small additional mast on the right side of the nose that the instructions don’t mention, but which is visible on the box cover and profiles. The other two versions only had the main mast in the same place, as they were all derived from the Mk. I. The Admiralty Flight aircraft also shows a small teardrop canopy. This is provided in the clear sprue, but the fuselage opening needs to be cut out. The instructions don’t show anything of this either.
The wings are divided into three pieces. The upper halves show less engraved detail than the lower surfaces, where it is more extensive. The ailerons are very well engraved on both sides and have a subtle structural detail. The small navigation lights are only engraved on the lower half. There is a small, separate Pitot tube and the nice landing lights come as resin pieces covered with a clear lense. Both leading edges also feature two resin pieces simulating small, round intakes.
As said, the fin and vertical rudder are molded with the fuselage halves. The stabilizers come separately and have a pin at the rear for easy attaching. The rudders and tabs are very well engraved, and the structure of the tail assembly looks smooth and realistic.
The engines are excellent resin parts. To place them correctly within the cowlings, pay attention to the small square item located on the gearbox. The cowlings come in halves with a rear panel covering the opening. The lower air intake is represented by a resin piece and a plastic one, plus two more pieces next to them. These are not clearly located in the instructions. The propellers are well-defined but need to be thinned.
The wheel wells lack interior detail, not even marks for attaching the landing gear. The covers are a bit thick and using the instructions to glue them is almost useless. It’s better and more straightforward to check pictures. The auxiliary landing gear consists of a resin wheel with its leg. The main gear consists of one-piece legs with separate retraction struts. The resin wheels, which are press-fit into the legs, are quite nice and have well-defined outer rims.
The decal sheet includes roundels and other national insignia and registration numbers. They have a fine, very glossy finish, good color saturation, and correct register. There is no excess carrier.
The A5 instruction booklet consists of four pages printed in black and white. It contains a historical summary about the aircraft, a numbered parts diagram, a color chart with equivalent Humbrol paints, and 17 assembly sequences. The back of the box shows color profiles with the paint codes needed in each finish.
As mentioned, AZ Model continues to fall short with the instructions, which are usually the same for all the kits from the same tool. In this case, they also include all the options for the Admiral kits, so you have to leave out the ones you don need. The size of the illustrations makes everything more confusing when you need to build the landing gear assembly, which has up to five different alternatives.
Paint finishes include three aircraft with overall liveries and only one of them needs the wing and fuselage stripes to be painted in a different color.
Conclusion
Even considering it’s a kit for expert hands, it could be easier to assemble were it not for the careless and confusing instructions. The modeler will need a lot of patience and time to compare what this inadequate booklet shows with pictures, especially in the final assembly steps.
The interior lacks detail and is partially incorrect. Some modelers might care less about this than finishing the model as well as possible, which is quite a challenge if they haven’t built an AZ Model kit before. External detail, apart from the missing glazed panels and fuselage openings (which are considerable), is much better and could be an incentive for those who prefer a challenge to test their skills.
I can only recommend this Oxford kit to modelers with a taste for uncommon aircraft or those eager to take on any kit they come across.◊
Publicado – Published: 6 / 2026
©www.jmodels.net


Debe estar conectado para enviar un comentario.