
De un vistazo – Quick look
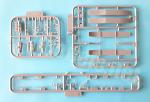
MATERIAL Y PIEZAS
MEDIA & PARTS:
- Plástico inyectado (57 piezas).
- Injected plastic (57 parts).
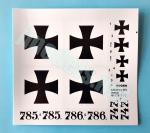
CALCAS – DECALS:
- Cruces alemanas, tres juegos de matrículas y algunos estarcidos. Apariencia fina, sin exceso de soporte.
- German crosses, three sets of registers and a few stencils. Apparently thin without too much carrier film.
OPCIONES – OPTIONS:
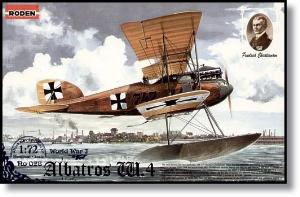
- Albatros W.4 inicial. N.º de serie 747. Centro Naval de Pruebas de Warnemünde (Alemania). Agosto de 1916. Aparato pilotado por el Oblt. R. Friedrich Christiansen.
- Albatros W.4 inicial. N.º de serie 785. Centro Naval de Pruebas de Windau (Alemania, hoy Letonia). Octubre de 1916.
- Albatros W.4 inicial. N.º de serie 786. Centro Naval de Pruebas de Warnemünde (Alemania). Noviembre de 1916.
- Albatros W.4 early. s/n 747. Naval Test Centre Warmemünde (Germany). August 1916. Aircraft flown by Obtl. R. Friedrich Christiansen.
- Albatros W.4 early. s/n 785. Naval Test Centre Windau (Germany, Latvia today). October 1916.
- Albatros W.4 early. s/n 786. Naval Test Centre Warmemünde (Germany). November 1916.
INSTRUCCIONES – INSTRUCTIONS:
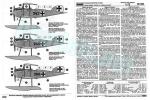
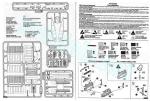
- Folleto de 8 páginas impresas en blanco y negro de tamaño A5. Contiene una introducción histórica al avión con datos técnicos, un plano numerado de piezas, una lista de colores con referencias de pinturas esmaltes de Humbrol, 12 capítulos de montaje y una página de perfiles. La cara trasera de la caja muestra una de las opciones a color con las pinturas aplicables. Claras e inteligibles.
- 8-page A5 booklet printed in black and white. It contains a history of the aircraft with technical data, a numbered parts plan, a list of colours with Humbrol enamel references, 12 assembly chapters and a page of profiles. The back side of the box shows one of the options in colour with a list of suitable paints. Clear and easy to follow.
LO MEJOR – THE BEST:
- Bien detallada en general. Motor. Armamento.
- Nicely detailed. Engine. Machine guns.
LO PEOR – THE WORST:
- Rebabas en alas y cola. Piezas frágiles y montaje delicado.
- Flash on wings and tail. Brittle parts and delicate assembly.
VALORACIÓN – CONCLUSION:
- Roden hizo un buen trabajo para reproducir este olvidado avión, aunque el moldeado blando y las piezas delicadas necesitan de una mano experta para sacarle partido.
- Roden did a good job to render this forgotten aircraft, though the soft moulding and brittle parts need an expert hand to take the best out of it.

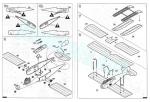
La maqueta
Nada de novedoso tienen esta maqueta, que lleva en el mercado dos décadas más o menos. Roden rescató este avión, bastante olvidado y poco conocido, aprovechando parcialmente el molde de su Albatros D.I. Fue una suerte que lo hiciera puesto que antes sólo hubo un par de maquetas más antiguas y prácticamente inencontrables.
La caja contiene cinco bastidores de piezas, las calcas y las instrucciones. El bastidor A, que contiene el fuselaje, así como el Z, que muestra el motor, armamento y el asiento, proceden de la mencionada maqueta del Albatros D.I. El molde es único para las dos versiones (inicial y final) que Roden sacó en su día, por ello encontramos algunas piezas para hacer la versión final, como las alas, el motor y parte del fuselaje, por ejemplo, pero sin las correspondientes calcas.
Las piezas se ven bien moldeadas y carecen de marcas, sin embargo es mucho el plástico sobrante en forma de rebabas que hay que limpiar en las alas. Hay también muchos elementos frágiles que deben manipularse y colocarse con cuidado. El montaje es delicado en algunas fases y, aunque no se trata de una edición limitada, bien podría serlo porque requiere un cierto nivel de habilidad impropio en principiantes.
El avión representado en esta caja es la variante inicial del W.4. De hecho, las tres opciones de acabado coinciden con los tres primeros aviones producidos, entre ellos el prototipo (número de serie y matrícula 747). Esta versión fue pronto modificada tras las primeras pruebas con nuevos flotadores y un cambio en la posición original de los radiadores y escapes, alteraciones que son las recogidas en la versión tardía de Roden.
Carlinga
Los lados del fuselaje no presentan marcas y muestran líneas en relieve fino que representan parte del costillaje interior. La carlinga carece de base y el asiento va simplemente unido a un mástil que a su vez va pegado sobre el interior del fuselaje. La palanca de mandos, unida a una barra transversal, tiene los asideros separados en una pieza muy pequeña. La barra también hay que ajustarla a uno de los lados del fuselaje antes de cerrarlo, operación que se antoja delicada cuando menos. No hay panel de instrumentos.
Además de cuidar la alineación de la palanca y el asiento, también hay que horadar los agujeros para situar los radiadores del motor a cada lado del fuselaje. Las instrucciones indican agujeros adicionales en el puro de cola para unir posteriormente el plano de cola horizontal.
Fuselaje y motor
Las mitades del fuselaje tienen el anillo del motor y la cubierta del armamento separados. Los lados están prácticamente lisos salvo algunos detalles mínimos próximos a los radiadores, que vienen aparte. La cubierta del motor no está muy limpia de rebabas y necesita un poco de lija para limpiar el hueco del motor y del armamento, compuesto por dos excelentes ametralladoras IMG 08, que eran idénticas también a las del Albatros D.I.
El motor Mercedes D.III está muy bien reproducido para la escala. El bloque incluye los cilindros y está separado en mitades. Hay piezas que muestran los balancines situados sobre los cilindros, el escape unido a su colector, los conductos de refrigeración y algunos dispositivos más que desconozco. El eje de la hélice va insertado entre las mitades del bloque, lo que permite el giro. Comparado con la imagen de un D.III auténtico, se comprueba que Roden lo estudió y reprodujo muy bien. Todo un mérito para esta escala donde se suelen obviar detalles mucho más relevantes con la excusa del tamaño.
Instalado el motor en el fuselaje y cerrado este, hay que colocar el delgado anillo externo, la hélice y el buje. La hélice, similar o idéntica a la del caza Albatros D.I, es fina y las palas poseen buena torsión.
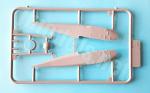
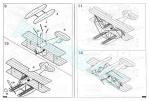
Alas y cola
Como he señalado, las alas y las piezas de cola tienen bastantes rebabas por limpiar. Otro inconveniente, más importante que el anterior, es que los planos inferiores no cuentan con vástagos firmes para unirlos al fuselaje. Lo mismo ocurre con el plano superior, que está dividido en tres piezas, ya que tiene una sección intermedia. Las superficies muestran contraste: por un lado el moldeado es bastante blando, pero por el otro las piezas son finas, con acertada curvatura, y tienen bien simulado el relieve de las costillas internas. Los flaps están bien marcados, aunque las bisagras no están muy definidas.
Los soportes, tanto los intermedios como los externos, están bien moldeados pero son extremadamente frágiles y el montaje debe ser muy cuidadoso para no partirlos.
Los planos de cola comprenden la aleta vertical moldeada en una pieza con el timón. La unión con el fuselaje es igualmente bastante endeble. Los estabilizadores y sus timones también son de una pieza que muestra un sutil relieve en la simulación de la estructura interna. Los timones de ambas piezas están bien marcados.
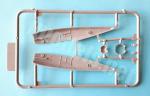
Tren de amerizaje
Los flotadores están separados en dos piezas, con las superficies superiores separadas. Estas muestran finas líneas y algunos accesos en relieve. Las piezas inferiores están unidas con vástagos delgados para mantenerlos alineados. La estructura de fijación cuenta con dos soportes finos a cada lado pegados bajo el fuselaje. Como en las alas, los soportes son frágiles y el modelista deberá considerar si los reemplaza por piezas más firmes.
Calcas
La hoja está impresa por el propio fabricante y contiene cruces alemanas, tres juegos de matrículas y algunos estarcidos. Las calcas muestran apariencia fina y no tienen excesiva película de soporte.
Instrucciones
Se presentan en un folleto con 8 páginas impresas en blanco y negro de tamaño A5. Contiene una introducción histórica al avión con datos técnicos, un plano numerado de piezas, una lista de colores con referencias de pinturas esmaltes de Humbrol, 12 capítulos de montaje y una página de perfiles. La cara trasera de la caja muestra una de las opciones a color con las pinturas aplicables. Las vistas explosionadas son claras e inteligibles. Las opciones de pintura no tienen variedad, al tratarse de prototipos idénticos salvo en la numeración.
Valoración
Si no fuese un símil exagerado, diría que esta maqueta es un pequeño diamante por pulir. Roden no solamente rescató este avión del olvido, sino que lo reprodujo bastante bien empleando el moldeado blando al que nos tiene acostumbrados, hecho que ya tiene su mérito. Hay piezas muy destacables en la factura, como el armamento o el motor, casi despiezado como uno a escala mayor.
El montaje requiere limpiar y refinar bien las piezas de las alas y la cola, así como una mano habilidosa y experta al ensamblar la carlinga, las alas y los flotadores, por ello no la recomendaría a modelistas de nivel inicial.◊


The kit
This kit is not going to raise anyone’s eyebrows as it has been on the market for quite a long time. Roden rescued this little-known aircraft using the tooling of their Albatros D.I kit. It was lucky that they did it, since there were only a couple of older and rare 1/72 kits before.
The box contains five sprues of parts, the decal sheet and the instructions. Frame A, which contains the fuselage, as well as frame Z, which includes the engine, armament and seat, come from the said Albatros D.I kit. The tooling is shared by the two versions (early and late) that Roden released many years ago, so we also find some parts to build the late version, such as the wings, the engine and part of the fuselage, for example, but without the suitable decals.
Pieces are well molded and have no marks, however there is a lot of flash to clean up on the wing and tail pieces. There are also many brittle parts that must be handled and attached with care. Assembly is delicate in the cockpit and wings. Though this is not a short run, it needs some modelling skills and this make the kit unsuitable for beginners.
The aircraft included in this boxing is the early variant of the W.4. In fact, the three finish options match the first three aircraft produced, including the prototype (serial number and registration 747). This version was soon modified after the first tests with new floats and a change in the original position of the radiators and exhausts. These changes are rpresented in Roden’s late version kit.
Cockpit
The fuselage sides have no pin marks and show a few thin raised lines reproducing part of the internal ribbing. The cockpit has no base and the seat is simply attached to a rod glued inside the fuselage. The control lever is molded with a crossbar and has the handgrips separated into a tiny piece. The crossbar is attached to one of the cockpit sides before closing the fuselage, which seems delicate to say the least. There is no instrument panel.
In addition to taking care of the alignment of the lever and the seat, you also have to drill holes to locate the engine radiators. The instructions indicate additional holes in the tail cone to glue the horizontal tailplane on a later building stage.
Fuselage and engine
The engine outer ring and armament deck are separated from the fuselage halves. External surfaces are smooth except for some minimal details near the radiators, which come separately. The engine deck is not very clean from flash and needs some sanding to clean up the gap. Armament consists of two excellent IMG 08 machine guns, which were also identical to those used in the Albatros D.I.
The Mercedes D.III engine is nicely reproduced for this scale. The block includes the cylinders and is separated in halves. There are pieces that show the rocker arms located on the cylinders, the exhaust attached to the manifold, the cooling ducts and some other pieces. The propeller shaft is inserted between the block halves and this allows the propeller to turn. Compared with a picture of a real D.III, it is clear that Roden studied and rendered it remarkably, quite a merit for this scale where more relevant details are sometimes left out with the excuse of size.
Once the engine is installed and the fuselage closed, the thin outer ring, the propeller and the hub are attached. The propeller, similar or identical to that in the Albatros D.I fighter, is thin and the blades are profiled.
Wings and tail
As noted, the wings and tail pieces have a lot of flash to clean up. Another drawback is that the lower planes do not have connecting pins for fuselage attachment. The same happens with the upper plane, which is divided into three pieces, with a centre wing section. Wing surfaces show contrast: on the one hand the molding is quite soft, but on the other pieces are thin, with a convincing rendition of the raised structural detail. The flaps are well engraved though the hinges are not crisply defined.
Both intermediate and cabane struts are correctly molded but look extremely fragile and assembly must be very careful not to break the parts.
The tailplanes comprise the vertical fin molded in one piece with the rudder. The connecting rods are way too short and impractical and should be repalced. The stabilizers and rudders are also molded in one piece showing a subtle raised internal structure. The rudders in both pieces are correctly engraved.
Floats
The floats come in two pieces, with the top surfaces separated. These show fine lines and some raised detail. The lower pieces are molded with thin struts to keep them aligned. The supporting structure has two thin struts on each side that are glued under the fuselage. As with the wings, the supports are fragile and the modeler should consider a replacement.
Decals
The sheet is printed by the manufacturer and contains German crosses, three sets of registers and some stencils. Decals look fine and do not have too much carrier film.
Instructions
They are provided in an A5 size booklet which has 8 pages printed in black and white. It contains a historical introduction to the aircraft with technical data, a numbered parts plan, a list of colors with Humbrol enamel paint references, 12 assembly chapters and a page of profiles. The back of the box shows one of the options in color with the applicable paints. Assembly steps are shown clearly and views of the finished model are also included as a guide for rigging the wings and floats. Paint schemes have no variety, as the three aircraft are identical except for their registers.
Conclusion
If it weren’t an exaggerated example, I would say this kit is a small diamond to be polished. Roden not only rescued this aircraft from oblivion, but they kitted it quite well regardless of the soft molding technology we are used to seeing in their releases. There is very nice detail on some parts, such as the machine guns or the engine, with this showing a parts breakup similar to one on a larger scale.
Assembly requires good cleaning and refining of the wing and tail parts, as well as a skilled and steady hand to build the cockpit, wings and floats, which is why I would not recommend the kit to beginners.◊
Publicado – Published: 4 / 2024
©www.jmodels.net

Debe estar conectado para enviar un comentario.