
De un vistazo – Quick look
MATERIAL Y PIEZAS
MEDIA & PARTS:
- Plástico inyectado (26 piezas), plástico transparente (1 pieza). Incluye una figura.
- Injected plastic (26 pieces), clear plastic (1 piece). One figure included.
CALCAS – DECALS:
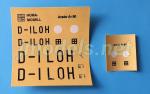
- Matrículas, panel de instrumentos y esvásticas recortables. Una pequeña hoja adicional contiene esvásticas recortables de menor tamaño. Aparentemente bien impresas.
- Codes, instrument panel and swastikas. An additional sheet shows smaller swastikas. Apparently correctly printed.
OPCIONES – OPTIONS:
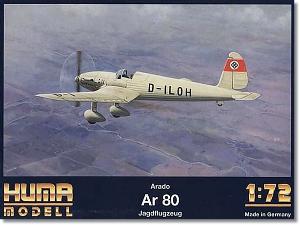
- Arado Ar 80V2. D-ILOH. Alemania, 1937. (Ver texto).
- Arado Ar 80V2. D-ILOH. Germany, 1937. (See text).
INSTRUCCIONES – INSTRUCTIONS:
- Hoja A4 impresa en color y blanco y negro. Contiene una breve historia y datos técnicos del avión, tres vistas explosionadas del montaje y perfiles a color. Bien impresas, claras, aunque con alguna omisión. Una hoja separada impresa en blanco y negro contiene un plano de piezas numerado.
- A4 sheet printed in color and black and white. Shows a brief history and technical data of the aircraft, three exploded views of the assembly and color profiles. Well printed, clear but with some omissions. A separate sheet printed in black and white shows a numbered parts plan.
LO MEJOR – THE BEST:
- Tema inusual. Buen detalle exterior. Montaje sencillo.
- One-off aircraft. Nice exterior detail. Easy assembly.
LO PEOR – THE WORST:
- Calcas. Poco detalle interior.
- Decals. Poor interior detail.
VALORACIÓN – CONCLUSION:
- Maqueta para buscadores de aviones infrecuentes. Fácil de montar y pocos detalles que mejorar.
- A kit for those looking for rare planes. Easy to build and not too many detail to improve.

La maqueta
Huma Modell nos trajo esta maqueta, como otras tantas de las que hizo en su momento, hace un par de décadas. El Ar 80 es un avión único y del que por el momento no hay maqueta en plástico a esta escala, pero sí una de resina de RS Model, que tiene ya su tiempo también. Huma se caracterizó por buscar los bichos raros de la aviación alemana a partir de los años 30 hasta el final de la Guerra Mundial.. Integraron casi todo su catálogo aviones singulares u otros que se quedaron en proyecto y que no llegaron ni a volar.
Para muestra vale este Arado, un avión cuya importancia aeronáutica está más en los desarrollos técnicos derivados de su diseño que en el propio avión. Sólo se llegaron a fabricar apenas unos prototipos. En el prototipo biplaza V3, por ejemplo, se probó por vez primera en Alemania el concepto de motor-cañón, que luego sería incorporado a aviones mucho más importantes, como el Me 109E. Para la firma Arado el Ar 80 también supuso enfrentarse por vez primera a un diseño monocasco y al desarrollo de la famosa cola Arado, luego empleada en otros aviones como el Ar 96, Ar 196, etc.
La maqueta comprende un bastidor de piezas, una pieza transparente, dos hojas de calcas y las instrucciones. El plástico tiene cierta dureza, pero las piezas están bien moldeadas y carecen de rebabas. Las pocas marcas de eyector ni se ven, ni plantean problemas de montaje. El detalle interno es escaso para lo que se estila hoy, si bien el externo me parece bastante bueno y aprovechable, como describiré luego.
Las instrucciones no identifican el avión que representa la maqueta, pero la matrícula impresa en las calcas, respaldada por fotografías del avión real, nos indica que se trata del prototipo Ar 80V2, probado en la competición que eligió al Me 109 como futuro caza de la Luftwaffe.
Carlinga
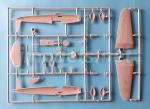
Como decía arriba, el detalle de la carlinga es bastante escaso y sencillo. Contiene un suelo con dos mínimos pedales moldeados encima, una palanca, el asiento, el panel de instrumentos y el mamparo trasero. Los lados del fuselaje no tienen detalle. Las instrucciones no señalan la presencia de una calca para simular los indicadores del panel.
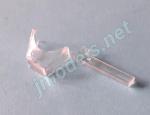
En la parte exterior, la carlinga está delimitada por dos piezas laterales separadas y el parabrisas transparente que, contra todo pronóstico, no es demasiado grueso y tiene la estructura correctamente marcada. Con todo, la forma del parabrisas original no parece bien conseguida.
Para rellenar la carlinga hay una figura de piloto patilargo de escaso detalle que no merece mayor comentario.
Fuselaje
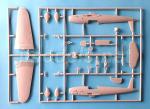
Las mitades incluyen la deriva, el motor y la toma de aire ventral. El detalle externo muestra una buena representación tanto de la estructura metálica delantera, con paneles bien grabados e incluso algunos pequeños remaches en relieve, como de la parte trasera, formada por una estructura tubular interna.
La toma ventral es fina y convincente, pero está mal detallada con una rejilla interna bastante pobre. En la parte delantera el detalle está bien conseguido tanto en las tomas y salidas del motor, como en los escapes, aunque están cerrados.
El morro abierto se tapa con una pieza redonda horadada para permitir insertar el eje de la hélice. Esta es fina y viene limpia de restos de plástico. Sin embargo, la pieza del buje es bastante gruesa en su parte interna. Por fuera parece bien conseguido.
Alas y empenaje
Las alas están fabricadas de una pieza con pestañas para insertarlas en el fuselaje. El diedro característico del V1 y V2 (el V3 no lo tenía) está bien simulado. El grosor no me parece excesivo para estar moldeadas de esta forma. El panelado es bueno, pero aún mejores son las superficies de los flaps, hechas con cierta textura que les da una apariencia mate diferente del resto del ala. El único detalle separado es el tubo Pitot.
El timón de dirección viene aparte y parece algo grueso. Tampoco el perfil parece el típico de Arado. El detalle del entelado es similar al de las alas. Los estabilizadores son de una pieza que va insertada en el puro de cola. El timón de profundidad está bien marcado con superficies enteladas texturizadas.
Tren de aterrizaje
El tren es sencillo. Contiene dos patas y dos ruedas carenadas. Las carenas de las ruedas están moldeadas en mitades unidas a las ruedas. La rueda de cola también tiene carena y es de una pieza. Las carenas no están abiertas por debajo y el detalle de las ruedas es un poco chusco. El inconformista acaso pueda usar unas ruedas de repuesto porque las carenas están huecas por dentro y parecen permitir su instalación.
Calcas
La maqueta tiene dos hojas. La primera incluye las matrículas del prototipo V2, los indicadores del panel, estarcidos del fuselaje, dos círculos blancos y dos esvásticas inscritas en cuadros recortables para la insignia de cola. La segunda hoja, más pequeña, parece una rectificación de la primera ya que incluye sólo círculos y esvásticas de menos tamaño.
Como suele suceder con Huma, las calcas parece gruesas y dudo de su adherencia, visto mi resultado con el Bücker Bü 180 de la marca, por eso quien sepa y pueda debería buscar alternativas mejores.
Instrucciones
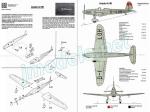
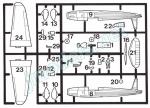
Están impresas en una hoja de tamaño A4. El anverso contiene una breve nota histórica sobre el avión y tres vistas explosionadas del montaje. En el reverso pueden verse perfiles a color y algunos datos técnicos del Ar 80. El avión está completamente pintado en color RLM 02. Como las piezas no están identificadas en el bastidor, Huma incluyó una hoja separada con un plano numerados de piezas de gran tamaño.
La hoja es clara y sólo cabe achacarle la omisión de la calca del panel de instrumentos y la no identificación del avión.
Valoración
Para los buscadores de piezas raras o de aviones singulares esta maqueta parece una opción ideal, si bien hoy día hay que buscarla de segunda mano. No tiene mucho detalle interior y las calcas no son de fiar, pero por fuera está bien detallada y el montaje no debe dar problemas por su sencillez.◊

The kit
Huma Modell brought us this kit, like so many others they made at the time, a couple of decades ago. The Ar 80 is a unique aircraft and for the moment being there is no plastic alternative at this scale, but there is a resin one from RS Model which is also an oldie. Huma was always looking for the oddballs of German aviation from the 1930s until the end of the World War. Almost all of their catalog included unique aircraft or others that remained in project stage and did not even fly.
This Arado can be an example, being an aircraft whose aeronautical importance lies more in the technical developments derived from its design than in the aircraft itself. Only a few prototypes were built. In the two-seater V3 prototype, for example, the engine-cannon concept was first tested in Germany. This would later be employed in much more important aircraft, such as the Me 109E. For the Arado company, the Ar 80 also meant facing a monocoque design for the first time and the development of the famous Arado tail, later used in other aircraft as well, such as the Ar 96, Ar 196, etc.
The kit includes a sprue of parts, a clear part, two decal sheets and the instructions. Plastic is on the hard side, but pieces are well molded and free of flash. The few ejector marks are neither visible nor pose assembly problems. The internal detail is scarce for today’s standards, although external detail seems quite good, as described below.
The instructions don’t identify the aircraft the kit renders, but the registration printed on the decals, supported by photographs of the real aircraft, indicates that it is the Ar 80V2 prototype, tested in the competition that chose the Me 109 as the future Luftwaffe fighter.
Cockpit
As I said above, cockpit detail is scarce and simple. It contains a floor with two minimal pedals molded on, a control stick, the seat, the instrument panel and the rear bulkhead. The fuselage sides have no detail. The instructions don’t show the decal to simulate the panel gauges.
On the outside, the cockpit is limited by two separate side pieces and the transparent windshield which, against all odds, is not too thick and has a properly engraved frame. However, the shape of the original windshield doesn’t seem well rendered.
To fill the cockpit there is a figure of a long-legged pilot with little detail that doesn’t deserve further comment.
Fuselage
The halves include the fin, engine cowling and belly air intake. External detail shows a good rendition of both the front metal structure, with engraved panels and even some small raised rivets, and the rear part showing the internal tubular structure.
The ventral intake is fine and convincing, but detailed with a rather poor internal grille. At the front, detail is much better both in the engine intakes and outlets, and in the exhausts, though they are closed.
The open nose is covered with a round piece drilled to insert the propeller shaft. This is thin and clean from flash. The hub is quite thick on the inside, but looks good from the outside.
Wings and empennage
The wings are made in one piece with tabs to insert them in the fuselage. The characteristic dihedral of V1 and V2 (the V3 didn’t have it) looks nice. Wings don’t seem too thick to be molded this way. Panels are well engraved, but the flaps are even better, molded with some texture that gives them a different matte appearance from the rest of the wing. The only separate piece is the Pitot tube.
The rudder comes apart and seems a bit thick. The profile doesn’t look correct on the sprue. Surface detail is similar to that of the wings. Stabilizers are one piece that is inserted into the tail cone. The elevator is engraved with textured tapered surfaces.
Undercarriage
The undercarriage is simple. It contains two legs and two faired wheels. The wheel fairings are molded in halves attached to the wheels. The tailwheel is also faired and is one piece. The fairings are not open next to the wheels and look unrealistic. The skillful modeller may well find a pair of real wheels to use because the fairings are hollow inside.
Decals
The kit has two sheets. The first includes the V2 prototype codes, panel gauges, fuselage stencils, two white circles, and two swastikas inscribed in cut-out squares for the tail marking. The second, smaller sheet seems to be a rectification of the first as it includes only smaller circles and swastikas.
As is often the case with Huma, decals look thick and I doubt their adherence, given my results with Huma’s Bücker Bü 180. Alternative decals are probably advisable.
Instructions
They are printed on an A4 size sheet. The obverse contains a brief historical note about the aircraft and three exploded views of the assembly. Color profiles and some technical data of the Ar 80 can be seen on the back. The aircraft is painted overall RLM 02. As the parts are not identified on the sprue, Huma included a separate sheet with a large numbered parts plan.
The sheet is clear, but directions for the decal on the instrument panel and the identification of the aircraft are missing.
Conclusion
For those looking for rare or unique aircraft, this kit seems most suitable, although today you only find it second-hand. It doesn’t have much interior detail and the decals are not to be trusted, but it is well detailed on the outside and assembly shouldn’t be troublesome due to its simplicity.◊
Publicado – Published: 9 / 2022
©www.jmodels.net


Debe estar conectado para enviar un comentario.