
De un vistazo – Quick look
MATERIAL Y PIEZAS
MEDIA & PARTS:
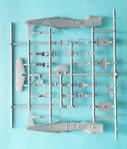
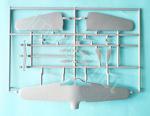
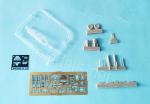
- Plástico inyectado (44 piezas), plástico transparente (3 piezas), resina (15 piezas), fotograbado (48 piezas), acetato (4 piezas).
- Injected plastic (44 parts), clear plastic (3 parts), resin (15 parts), photo-etched (48 parts), acetate (4 parts).
CALCAS – DECALS:
- Impresas por Aviprint. Cuatro tipos de cruces alemanas, matrículas, insignias de unidad, esvásticas y algunos estarcidos. Una pequeña hoja separada tiene dos esvásticas adicionales. Aspecto fino y brillante. Buen registro, saturación y nitidez. Sin exceso de soporte.
- Printed by Aviprint. Four types of German crosses, registrations, unit badges, swastikas and some stencils. A small separate sheet contains two additional swastikas. Thin and glossy finish. Good register, saturation and sharpness. No excess of carrier.
OPCIONES – OPTIONS:
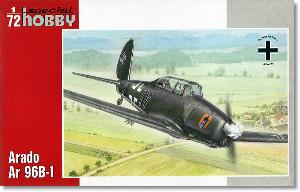
- Arado Ar96B-1. VI+IV. Flugzeugführerschule (Escuela de Aviación) FFS A/B 23. Base aérea de Kaufbeuren (Alemania), verano de 1943.
- Arado Ar96B-1. KE+MR. Wnr.1220. Flugzeugführerschule (Escuela de Aviación) FFS A/B 4. Base aérea de Neudorf-Oppeln (Silesia, Nowa Wieś en Polonia hoy), primavera de 1943.
- Arado Ar96B-1. RB+UF. Wnr.1220. Flugzeugführerschule (Escuela de Aviación) FFS A/B 52. Base aérea de Danzig-Langfuhr (Gdańsk Wrzeszcz, Polonia), abril de 1942.
- Arado Ar96B-1. VI+IV. Flugzeugführerschule (Aviation School) FFS A/B 23. Kaufbeuren airbase (Germany), summer 1943.
- Arado Ar96B-1. KE+MR. Wnr.1220. Flugzeugführerschule (Aviation School) FFS A/B 4. Neudorf-Oppeln airbase (Silesia, Nowa Wieś in Poland today), spring 1943.
- Arado Ar96B-1. RB+UF. Wnr.1220. Flugzeugführerschule (Aviation School) FFS A/B 52. Danzig-Langfuhr airbase (Gdańsk Wrzeszcz, Poland), April 1942.
INSTRUCCIONES – INSTRUCTIONS:
- Folleto de formato A5 de 12 páginas impreso en color sobre papel satinado. Contiene un sumario histórico sobre el avión, un diagrama de piezas numerado, una lista de colores con equivalencias de pinturas de Humbrol, 16 secuencias de montaje y tres páginas de perfiles.
- 12-page A5 booklet printed in color on satin paper. It shows a historical summary about the aircraft, a numbered parts plan, a list of colors with matches in Humbrol paints, 16 construction stages and 3 pages of profiles.
LO MEJOR – THE BEST:
- Carlinga bien detallada. Montaje general sencillo para expertos.
- Nicely detailed cockpit. Easy overall assembly for the experienced modeler.
LO PEOR – THE WORST:
- Fotograbados diminutos. Cubierta transparente de una pieza. Presunto encaje difícil de las alas con el fuselaje.
- Tiny PE pieces. One-piece canopy. Alleged difficult wings and fuselage fitting.
VALORACIÓN – CONCLUSION:
- Debe ser la mejor maqueta para hacer este avión en la escala 1/72 por el detalle y la variedad de modelos que el fabricante ha sacado en diferentes cajas, todas ellas recomendables.
- This must be the winner kit to build a 1/72 Ar 96 today due to its nice detail and the choice of variants the manufacturer has released in different boxings, any of them quite recommendable.

La maqueta
Durante muchos años las maquetas de Heller y KP (KP Models años después) fueron las más accesibles a los modelistas interesados en este avión en la escala 1/72. Ambas datan de los años 70 y 80 respectivamente y por ello están muy lejos de los estándares de hoy día. Ya en este siglo aparecieron los moldes de Special Hobby (SH) y de Kovozávody Prostějov. No conozco las ediciones de esta última marca, pero presumiblemente no son ideales para el modelista con poca experiencia.
Esta caja está dedicada a la versión B-1, la más numerosa de todas las fabricadas, y contiene dos bastidores de piezas de plástico, varios bebederos de resina, una plancha de fotograbados, una lámina de acetato, un bastidor de piezas transparentes, dos hojas de calcas y las instrucciones. Describir el contenido es suficiente para saber que la maqueta está destinada a modelistas con experiencia.
El plástico está bien moldeado, sin fallas ni marcas visibles y sólo algunas piezas tienen tímidos restos de rebabas en los filos que casi pasan inadvertidos. Sólo la cubierta de la carlinga y una pieza que emplearemos en los pozos tienen cilindros de salida del eyector que no ofrecen problemas para limpiarlos.
Salvo lo que dicte el ajuste de las alas con el fuselaje, la construcción del modelo solamente parece delicada en el interior de la carlinga y más en concreto en el panel de instrumentos debido a las piezas de fotograbado de diminuto tamaño que lo componen. Las alternativas de montaje comprenden dos tipos de pedales en ambos puestos y dos bombas con sus soportes bajo las alas, aunque ninguno de los aviones de entrenamiento de las instrucciones las llevan.
La posibilidades para pintar la maqueta se restringen a los dos patrones típicos de los Ar 96 de la Luftwaffe, a saber: el camuflaje compuesto de RLM 70 y 71 sobre RLM 65 o bien la librea completa en RLM 02.
Revisión
Los lados de la carlinga están provistos de una sección de la estructura interna reproducida en relieve con un par de palancas de gases en el lado izquierdo y algunos instrumentos en el opuesto. Curiosamente, cada puesto de pilotaje tiene su propio suelo y no es de una pieza, como suele suceder. Las piezas tienen distinto detalle en la superficie y están unidas por un mamparo ahuecado intermedio. La parte posterior dispone de otro mamparo algo más alto. La protección antivuelco situada en medio de los dos puestos se compone de una pieza de resina y otra de fotograbado añadidas tras cerrar el fuselaje.
Los asientos, palancas de control y arneses de fotograbado son idénticos en ambos habitáculos. Los primeros replican muy bien los de este avión. Los pedales tienen en realidad tres opciones, ya que además de los de fotograbado, diferentes para una y otra posición, los de plástico también son distintos y nada malos. El panel de instrumentos delantero consta de dos piezas de fotograbado complementadas con indicadores de acetato que van pegadas sobre una pieza de plástico con una mira de resina en la parte superior que no sé si es pertinente, ya que las instrucciones nos van a indicar posteriormente que tapemos la tronera de la cubierta del fuselaje. La parte inferior del panel tiene representadas las diversas palancas horizontales en fotograbados diminutos y delicados de pegar. El panel trasero, más pequeño, también está formado por dos piezas de fotograbado con indicadores de acetato. Mientras que el panel anterior va pegado al fuselaje, el trasero va unido al mamparo intermedio.
La cubierta de la carlinga es una pieza fina con la estructura muy bien reproducida. Aunque no se pueda colocar abierta, gran parte del detalle interno se podrá ver gracias sobre todo a la amplitud de los cristales. La pieza está detallada con dos asas internas tras el parabrisas.
Las mitades del fuselaje tiene los paneles grabados con finura y limpieza. Las piezas incluyen las raíces de las alas y la aleta vertical de cola. Antes de unirlas hay que añadir el motor y la toma de aire inferior. El motor está moldeado sobre una placa de plástico sobre la que se ha representado la caja de engranajes de la hélice y los dos primeros cilindros de cada lado. El detalle no es extraordinario porque la cubierta frontal lo tapa casi en su totalidad. Esta cubierta tiene la toma de refrigeración abierta. La toma del radiador cuenta con dos rejillas de fotograbado. A los lados de la pieza frontal hay que añadir un par de tomas pequeñas de resina y los escapes de plástico sin horadar, que se podrían haber fabricado de resina con el tubo ahuecado.
La hélice tiene el buje de resina para afinar el detalle y las palas separadas de plástico. La maqueta proporciona en realidad dos juegos de palas con mínimas diferencias en anchura y no opcionales. Las palas son sencillas de pegar en el buje, pero hay que darles la torsión adecuada que nos proporcionará la observación de imágenes del avión.
Las alas constan de tres piezas, dos de ellas para las superficies superiores. Los paneles y accesos grabados son finos y muy profusos, especialmente en la cara inferior. Las superficies de control muestran un detalle sutil y convincente para la escala y sus contornos son nítidos. En las alas y cola están detalladas con bisagras de fotograbado.
El timón vertical viene separado con la estructura finamente marcada y la aleta grabada. Los planos horizontales son de una pieza insertada tras la aleta vertical. Los paneles están correctamente grabados y los timones de profundidad muestran un detalle leve.
Los pozos disponen de un panel trasero detallado en su lado interno y otras dos piezas pegadas sobre la parte central, una de ellas debe ser el depósito de combustible o algo parecido, ya que se observa parte de un conducto. Estas dos piezas hacen dudar si el hueco de las alas será suficiente para cerrar sin problemas las mitades y añadir el fuselaje encima.
La parte inferior de las alas lleva una pieza simulando la salida de aire del motor, las luces de aterrizaje transparentes y el tubo pitot. También hay dos bombas de resina con soportes del mismo material y fotograbado. Las instrucciones no indican que sean opcionales, pero en realidad el Ar 96B-1 no llevaba armamento y las bombas se emplearon para entrenamiento a partir de los modelos Ar 96B-6 y B-7.
El tren de aterrizaje lo componen dos patas detalladas con las barras de torsión de fotograbado y dos tapas finas. Las ruedas son de resina, sin alternativa de plástico, y tienen las llantas bien definidas. La rueda de cola es una pieza aparte y está unida a su horquilla.
La hoja de calcas lleva la firma de Aviprint y contiene cuatro tipos de cruces alemanas, matrículas, insignias de unidad, esvásticas y algunos estarcidos. Una pequeña hoja separada tiene dos esvásticas adicionales de diferente tipo. Además de tener un aspecto fino y brillante, las calcas poseen un registro correcto, buena saturación y gran nitidez. Carecen de exceso de soporte.
El folleto de instrucciones es el habitual que SH proporciona en sus maquetas. Tiene formato A5 y consta de doce páginas impresas en color sobre papel satinado. Contiene un sumario histórico sobre el avión, un plano de piezas numerado, una lista de colores con equivalencias de pinturas de Humbrol, 16 secuencias de montaje y tres páginas de perfiles.
A las libreas descritas más arriba se unen las características individuales de cada aparato. Así, el primero de ellos (VI+IV) parece que tuvo un par de reparaciones y probablemente llevaba las nuevas piezas pintadas de RLM 02, aunque su camuflaje era de RLM 70 y 71. También tenía tapada la banda amarilla próxima a la cola, pero el color subyacente se transparentaba un tanto. El segundo (KE+MR) tenía una franja de RLM 02 sobre el capó motor y el último avión ( RB+UF) volaba sin las tapas de las ruedas y lucía un par de líneas rojas a cada lado del fuselaje por delante de la carlinga.
Valoración
La de SH debe ser la mejor oferta actualmente para hacer el Ar 96 en esta escala tanto en precio como en cajas distintas, que incluyen hasta aparatos civiles. Cualquiera de dichas alternativas es recomendable para el interesado.
La maqueta tiene un buen detalle dentro de la carlinga y fuera de ella, pero necesita cierta experiencia en el montaje y no es tan adecuada para modelistas bisoños. Para estos últimos, realmente no hay una maqueta más apropiada y que no requiera muchas mejoras, además de las antiguas de Heller, KP y otras marcas que las copian, como Encore, Směr o MisterCraft.◊


The kit
For many years, Heller and KP (later KP Models) kits were the most available to modelers interested in this aircraft in the 1/72 scale. Both kits date back from the 1970s and 1980s respectively, and are therefore far from today’s standards. New toolings from Special Hobby (SH) and Kovozávody Prostějov were launched in this century. I don’t know the latter brand’s boxings, but they are not presumably a cake for the inexperienced modeler.
This box is dedicated to the B-1 variant, the most numerous in the Ar 96’s production, and contains two sprues of plastic parts, several resin sprues, a photo-etched fret, an acetate sheet, a clear sprue, two decal sheets, and the instructions. A description of the contents is enough to indicate that the kit is intended for experienced modelers.
Plastic is well molded, with no blemishes or visible marks, and only a few pieces have slight traces of flash on the edges. Only the canopy and one piece we will use in the wells have ejector pips, but they are easy to clean up.
Except for the fitting of the wings and fuselage, construction only seems delicate inside the cockpit, and more specifically on the instrument panel due to the tiny photo-etched parts. Assembly options include two types of pedals in both seats and two bombs with their racks under the wings, although none of the training aircraft in the instructions include them.
Painting options are limited to the two typical patterns of the Luftwaffe Ar 96s: the camouflage consisting of RLM 70 and 71 over RLM 65, or the full RLM 02 livery.
Review
The cockpit sides feature a section of the internal structure reproduced with raised lines, with a pair of throttles on the left side and some instruments on the opposite side. Interestingly, each cockpit has its own floor and not a single piece as usual in most kits. The pieces have different surface details and are joined by a hollowed-out intermediate bulkhead. The rear floor has another, slightly higher bulkhead. The rollover protection located between the two cockpits comprise a resin and a photo-etched part and is added after closing the fuselage.
The seats, control columns, and photo-etched harnesses are identical in both cockpits. The seats are quite similar to those of the Ar 96. The pedals actually have three options. In addition to different photo-etched pedals for each seat, the sprue includes nice alternatives in plastic. The front instrument panel consists of two photo-etched parts with acetate gadgets glued onto a plastic piece with a resin sight on top, but I’m not sure if this is relevant, as the instructions tell us to fill the gun trough on the fuselage deck. The lower part of the panel features several horizontal levers in tiny, tricky-to-glue photo-etched parts. The smaller rear panel is also made up of two photo-etched parts with acetate gauges. While the front panel is glued to the fuselage, the rear panel is attached to the middle bulkhead.
The canopy is a thin piece with a very well-reproduced raised frame. Although it cannot be showed opened, much of the internal detail can be seen through the large windows. The piece is detailed with two internal handles behind the windshield.
The fuselage halves have finely and cleanly engraved panels. Parts include the wing roots and the vertical tail fin. Before joining them, the engine and lower air intake are added. The engine is molded on a plastic plate on which the propeller shaft gear and the first two cylinders on each side have been molded. Detail is not extraordinary because the front engine piece hides almost all of it. This piece has an open cooling intake. The radiator intake below the cowling has two photo-etched grilles. The nose sides are detailed with a pair of small resin intakes and two plastic exhausts that could have been made of resin with the outlet hollowed out.
The propeller has a nice resin hub for a better definition and separate plastic blades. The kit actually provides two sets of blades with minimal differences in width and are not optional parts. The blades are easy to glue onto the hub, but they need to be angled appropriately, but pictures of the aircraft can help in this. The wings consist of three pieces, two of them for the upper surfaces. The engraved panels and accesses are abundant, especially on the underside. The control surfaces show subtle, convincing detail for the scale, and their contours are well engraved. The wings and tail are provided with photo-etched hinges.
The vertical rudder comes separately with a finely raised structure and engraved fin. The stabilizers are a single piece inserted behind the vertical fin. The panels are correctly engraved, and the elevators show fine detail.
The wells have a detailed rear panel inside and two other pieces glued onto the center section. One of these must be the fuel tank or something similar, since part of a duct can be seen. These two pieces raise doubts about whether the gap between the wings will be enough to join the wing halves and add the fuselage on top.
The underside of the wings features an engine air outlet, clear landing lights, and the pitot tube. There are also two resin bombs with photo-etched racks. The instructions do not show that these are optional, but the Ar 96B-1 was not armed, and bombs were used for training from the Ar 96B-6 and B-7 models onward.
The landing gear consists of two struts detailed with photo-etched torque links and two thin covers. The wheels are resin, with no plastic alternative, and have well-defined rims. The tail wheel is a separate piece molded with the fork.
The decal sheet is printed by Aviprint and contains four types of German crosses, registrations, unit badges, swastikas, and some stencils. A separate, smaller sheet has two additional swastikas of different types. In addition to having a fine and glossy appearance, the decals have correct registration, good saturation, and great sharpness. They have no excess carrier film.
The A5 instruction booklet is the standard one SH provides with their kits. It consists of twelve pages printed in color on glossy paper containing a historical summary of the aircraft, a parts plan, a color list with Humbrol paint matches, 16 assembly sequences, and three pages of profiles.
In addition to the liveries described above, the individual characteristics of each aircraft are also present. The first Ar 96 (VI+IV) seems to have been repaired and probably wore RLM 02 on the new parts, although its camouflage was RLM 70 and 71. The yellow band near the tail was also painted in camouflage, but the underlying color showed through a bit. The second (KE+MR) had an RLM 02 stripe on the engine cowling, and the last aircraft (RB+UF) flew without wheel covers and featured a pair of red lines on each fuselage side ahead of the cockpit.
Conclusion
SH’s kit must be the best current offer for building the Ar 96 in this scale, both in terms of price and range of different boxings, which even include civilian aircraft. Any of these alternatives can be recommended to the interested modeler.
The kit has good detail inside and outside the cockpit, but needs some experience in assembly and is not suitable for novice modelers. For the latter, there is no appropriate kit that doesn’t require many improvements, apart from the old releases from Heller, KP, and other reboxes from Encore, Směr or MisterCraft.◊
Publicado – Published: 9 / 2025
©www.jmodels.net

Debe estar conectado para enviar un comentario.