
De un vistazo – Quick look
MATERIAL Y PIEZAS
MEDIA & PARTS:
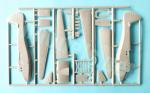
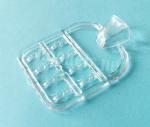
- Plástico inyectado (41 piezas), plástico transparente (10 piezas).
- Injected plastic (41 parts), clear plastic (10 parts).
CALCAS – DECALS:
- Estrellas rusas con y sin borde, numerales y algunos estarcidos. Aspecto fino y muy mate. Nítidas, con algún exceso de soporte.
- Russian stars with and without white outline, numbers and some stencils. Thin and very matte. Sharp with some excess of carrier.
OPCIONES – OPTIONS:
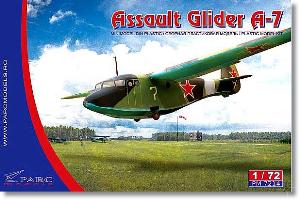
- Antonov A-7. 7 Amarillo. 1ª Escuela de Pilotos de Planeadores. Podmoskovie (Rusia), 1941.
- Antonov A-7. Aparato con camuflaje invernal.
- Antonov A-7. Yellow 7. 1st School of Glider Pilots. Podmoskovye (Russia), 1941.
- Antonov A-7. Aircraft in winter camouflage.
INSTRUCCIONES – INSTRUCTIONS:
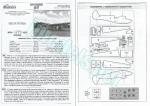
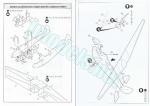
- Folleto de formato A5 de 4 páginas impreso en blanco y negro. Contiene una breve sinopsis histórica y técnica sobre el planeador, un plano numerado de piezas y 5 pasos de montaje. El folleto se complementa con una hoja separada del mismo tamaño impresa en color que muestra perfiles de dos opciones de acabado.
- 4-page A5 brochure printed in black and white. Contains a short historical and technical summary about the glider, a numbered parts plan and 5 assembly steps. A separate sheet of the same size and printed in color shows profiles for two finishing choices.
LO MEJOR – THE BEST:
- Sencillez (aparente) de montaje. Detalle decente en general. Terminaciones de pintura variadas.
- Apparent ease of assembly. Overall decent detail. Varied paint finishes.
LO PEOR – THE WORST:
- Grosor de algunas piezas. Algunas ausencias (ver texto).
- Some thickish parts. Some missing details (see text).
VALORACIÓN – CONCLUSION:
- Aunque se parece bastante a un A-7, la falta de algunos detalles y el molde de factura tan antigua no la hacen del todo sencilla de montar. Requiere algunas mejoras. Para modelistas desinteresados por las modas.
- Though the kit represents quite decently an A-7, some missing details and the old tooling make it not so easy to build for anyone. It needs some improvement. For modelers well away from modeling trending topics.

La maqueta
Esta es una de esas maquetas para muy cafeteros o, dicho de otro modo, para el modelista más interesado en el tema de la maqueta en cuestión que en su marca, molde o calidad. Por eso, este planeador A-7 no será un éxito de ventas ni tendrá predicamento alguno entre la grey del plástico jamás.
La maqueta de la rumana Parc Models es una copia actualizada con nuevas instrucciones de otra de AER Moldova de los años 90. Eastern Express también la reeditó por aquellos años. No hay más que abrir la caja para hacerse cargo de la catadura del molde, al tiempo que uno se dice que, efectivamente, los milagros no suceden y todo es como se esperaba. Dentro del envoltorio encontramos un simple bastidor de piezas, otro bastidor transparente, las calcas y las instrucciones. Qué menos.
Las piezas son en su mayoría gruesas, aunque generalmente moldeadas con cierta contundencia. Sin embargo, las rebabas son marginales y sólo hay un par marcas en el interior del fuselaje, nada importante porque, de entrada, el interior de la cabina no se puede mostrar. Las líneas de paneles y accesos son muy escasas, pero en cualquier caso demasiado gruesas, salvo en las superficies de control de las alas, donde la anchura da su juego a la verosimilitud. Algunas piezas, como las mitades inferiores de las alas, vienen con bebederos demasiado cortos, lo que dificulta sacarlas del bastidor sin dañarlas.
El montaje no tiene complicaciones aparentes a priori, otra cosa será lo que digan los ajustes del interior de la cabina y las alas con el fuselaje. En cambio, tenemos dos alternativas de pintura que, aunque no originales, sí le dan alguna variedad a esta edición.
Revisión
Los lados internos del fuselaje no tienen detalle y sólo un par de marcas negativas, como ya he mencionado. Hay tres ventanillas redondas que colocar desde el interior a cada lado, dos de ellas van situadas en las puertas de acceso, que están moldeadas cerradas. Las piezas transparentes no son muy gruesas, afortunadamente. La carlinga comprende un suelo detallado con lo que parece una cubierta enmaderada, los pedales, la palanca de mandos y el taburete, mejor que asiento porque carece de respaldo, del piloto. No hay panel de instrumentos. Tras el piloto hay tres bancos situados tras el piloto.
El fondo del pozo del tren de aterrizaje separa el suelo posterior de la cabina, también moldurado y con tres bancos. Sobre el fondo del pozo hay que colocar lo que parece otro asiento y una barra vertical que va unido un arco de la estructura interna de la bodega. Este soporte era en realidad el mecanismo para subir manualmente las ruedas del tren de aterrizaje, que corría a cargo de cualquiera de los pasajeros de la parte posterior. Otro arco similar aparece dispuesto sobre el suelo delantero.
La cubierta de la carlinga es de una pieza, con transparencia razonable y grosor acorde al del fuselaje. Las ventanillas de la parte anterior están decentemente grabadas.
Salvo por la ausencia del panel de instrumentos, el mal asiento del piloto y el excesivo promontorio que supone el hueco de los pozos, el interior coincide en líneas generales con el del planeador real. Sin embargo, la última ventanilla de cada lado no era completamente redonda sino recta en su parte inferior.
La mitades del fuselaje no tienen vástagos ni lengüetas para alinearlas, ni falta que les hace porque son bastante gruesas. Como corresponde a un avión de madera en su mayor parte, apenas encontramos líneas de panel en el fuselaje. Las puertas de ambos lados, bien situadas, tienen un grabado excesivo, lo mismo que el panel lateral situado bajo la carlinga. Faltan tanto el tubo Venturi en el lado derecho como el compartimento que protegía el gancho de remolque a proa. Sin embargo, el patín alargado situado bajo el fuselaje y el de cola no son del todo malos, aunque cabe refinarlos. Sobre el fuselaje hay un solitario mástil que contiene el tubo Pitot y que el modelista no debe confundir con otro de antena, ya que el planeador no la llevaba.
Las alas comprenden siete piezas. Las superficies superiores están separadas en tres secciones y las inferiores en cuatro. El hueco del fuselaje para insertar la sección intermedia de las alas tiene algunas rebabas tiesas y rebeldes que costará hacer desaparecer. Las alas propiamente dichas van insertadas con lengüetas en la sección central.
El relieve del costillaje me parece bien logrado, lo mismo que la simulación del entelado de los alerones, pero los accesos del lado inferior son exagerados y están mal situados. Al menos tenemos el hueco de la luz de aterrizaje y una pieza transparente para simular la lente que no viene mencionada en las instrucciones.
La deriva y el timón están moldeados en el fuselaje. Los estabilizadores se pegan con lengüetas y tienen los timones bien marcados y reproducidos, a mi entender. El timón vertical muestra un acertado relieve estructural parecido al de las alas, pero le falta el prominente contrapeso en el borde delantero.
El tren de aterrizaje no está mal representado en su sencillez. A cada lado, el eje de la rueda está moldeado con el amortiguador, un pequeño soporte externo en forma de clavija y un brazo de plegado en la parte interna. Este brazo debe unirse a la cara inferior de la pieza que tapa los pozos dentro de la cabina y que lleva la barra vertical del mecanismo de retracción de las ruedas. Las ruedas son simples, pero están bien moldeadas.
La hoja de calcas contiene estrellas rusas con y sin borde blanco, numerales y algunos estarcidos. Los motivos tienen un aspecto fino y muy mate, son nítidos con algún exceso de soporte.
Las instrucciones consisten en un folleto de formato A5 de cuatro páginas impreso en blanco y negro. Contiene una breve sinopsis histórica y técnica sobre el planeador, un plano numerado de piezas y cinco pasos de montaje. El folleto se complementa con una hoja separada del mismo tamaño impresa en color que muestra perfiles de dos opciones de acabado. Los colores para pintar el modelo se designan en su gran mayoría con la nomenclatura rusa (AMT) sin equivalencia en marcas de pintura.
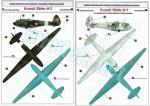
Las alternativas de pintura presentan un aparato con un camuflaje bicolor en las superficies superiores y otro con camuflaje invernal, susceptible de ser desgastado con capas subyacentes al blanco.
Valoración
Como suele ocurrir con estas maquetas antiguas del Este europeo, es siempre peor el cómo que el qué. Aunque el detalle en general se parece bastante al del planeador A-7 incluso por dentro, Parc Models hereda los defectos del molde original, de factura cuando menos pedestre en algunos aspectos como el grosor de ciertas piezas o los bebederos casi inexistentes en el bastidor principal.
En conjunto, la maqueta no me parece muy difícil de mejorar para quienes deseen meterse en tales dibujos, aunque el montaje puede no ser tan sencillo como aparenta. Las terminaciones de pintura permiten sacarle partido y compensar de alguna forma lo que no le viene de origen.◊


The kit
This is one of those model kits for enthusiasts, or in other words, for the modeler more interested in the subject matter of the kit itself than in the brand, tool, or quality. Therefore, this A-7 glider will never be a bestseller or gain any popularity among the plastic modeling community.
The kit from the Romanian company Parc Models is an updated copy, with new instructions, of an AER Moldova kit from the 1990s. Eastern Express also reissued it around that time. You only have to open the box to see the quality of the tool, while simultaneously telling yourself that, indeed, miracles don’t happen and everything is as expected. Inside the box, we find a lone sprue of parts, a clear sprue, the decals, and the instructions. What else would you expect?
Parts are mostly thick, although generally well molded. However, flash is minimal, and there are only a couple of marks on the inside of the fuselage, nothing significant because, to begin with, the cockpit interior can’t be displayed. Panel lines and accesses are very sparse, but in any case, they are too thick, except on the wing control surfaces, where the width contributes to realism. Some parts, as the lower wing halves, come with overly short gates, making it difficult to remove them from the sprue without damage. Assembly doesn’t look complicated at first glance; however, the fit of the cockpit interior and the wings to the fuselage will be a different matter. On the other hand, we have two paint options which, while not original, do add some variety to this release.
Review
The inner fuselage sides have no detail with only a couple of negative marks, as mentioned. There are three round windows to be placed from the inside on each side; two of them are located in the access doors, which are molded closed. The clear parts aren’t very thick, fortunately. The cockpit includes a floor detailed with what seems a wooden deck, the pedals, the control stick, and the pilot’s stool, rather than a seat because it lacks a backrest. There is no instrument panel. Behind the pilot are three benches.
The bottom of the landing gear bay separates the rear floor from the cockpit, which is also detailed with raised lines simulating the planking and has three benches. On the bottom of the bay, you have to place what looks like another seat and a vertical rod connected to an arch of the internal structure. This rod was actually the mechanism for manually raising the landing gear wheels, which was operated by any of the rear passengers. Another similar arch is positioned on the front floor.
The cockpit canopy is a single piece, with reasonable transparency and a thickness appropriate to that of the fuselage. The windshield and side windows are decently engraved.
Except for the absence of the instrument panel, the poor pilot’s seat, and the excessive wheel wells, the interior is generally the same as that of the real glider. However, the last window on each side was not completely round but rather straight at the bottom.
The fuselage halves have no pins or tabs for alignment, nor do they need them because they are quite thick. As is typical of a mostly wooden aircraft, panel lines are scarce on the fuselage. The doors on both sides, while well-placed, have a thick engraving, as does the side panel located under the cockpit. Both the Venturi tube on the right side and the compartment for the tow hook at the front are missing. However, the long skid under the fuselage and the tail skid are not too bad, although they could be refined. A single mast containing the Pitot tube is attached on the fuselage, which the modeler should not confuse with an antenna, as the glider did not have one.
The wings comprise seven pieces. The upper surfaces are divided into three sections and the lower ones into four. The fuselage recess for inserting the mid-wing section has some stiff, stubborn flash that won’t be easy to remove. The wings themselves are attached with tabs to the center wing section.
The raised structural detail seems well done, in my opinion, as does the simulation of the aileron tapered surfaces, but the access points on the underside are too big and badly placed. At least we have the landing light notch on the leading edge and a clear piece to simulate the lens, which isn’t shown in the instructions.
The fin and rudder are molded with the fuselage pieces. The stabilizers are attached with tabs and have well-defined rudders. The vertical stabilizer shows a nice structural ribbing similar to that on the wings, but it lacks the prominent mass balance on the leading edge.
The landing gear is well represented though simple. On each side, the wheel axle is molded with the shock absorber, a small external peg-shaped support, and a folding arm on the inside. This arm is attached to the underside of the piece that covers the wells inside the cockpit and carries the vertical rod of the wheel retraction mechanism. The wheels are simple, but well molded.
The decal sheet contains Russian stars with and without white outline, numbers and some stencils. The decals are thin, very matte and sharp with some surplus carrier.
The instructions come in a 4-page A5 brochure printed in black and white that contains a short historical and technical summary about the glider, a numbered parts plan and five assembly steps. A separate sheet of the same size and printed in color shows profiles for two finishing choices. The colors to paint the model are mostly given in the Russian AMT code, with no matches in the usual paint brands.
Paint alternatives feature one aircraft with a two-color camouflage on the upper surfaces and another in winter camouflage, which can be weathered with layers underneath the white surface.
Conclusion
As is often the case with these old Eastern European kits, the how is always worse than the what. Although overall detail roughly resembles that of the A-7 glider, even inside, Parc Models inherits the flaws of the original tool, which is, to say the least, poorly made in some aspects, such as the thickness of some parts or the almost nonexistent sprue gates.
Overall, the kit doesn’t seem too difficult to improve for those wishing to do so, but assembly may not be as simple as it may look. Paint finishes allow you to make the most of it and somehow compensate for its shortcomings.◊
Publicado – Published: 11 / 2025
©www.jmodels.net

Debe estar conectado para enviar un comentario.