
De un vistazo – Quick look
MATERIAL Y PIEZAS
MEDIA & PARTS:
- Plástico inyectado (57 piezas), plástico transparente (7 piezas).
- Injected plastic (57 parts), clear plastic (7 parts).
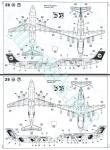
CALCAS – DECALS:
- Matrículas, marcas de compuertas, fuselaje y cola y estarcidos. Aspecto fino y brillante, buen registro y saturación de color. Sin exceso de soporte.
- Registers, fuselage, tail and hatches markings and stencils. Thin and glossy appearance, with good register and color saturation. No surplus carrier.
OPCIONES – OPTIONS:
- Avro RJ 85 Cityliner. D-AVRC. Lufthansa, 1997.
- Avro RJ 85 Jumbolino. HB-IXF. Crossair, 1997.
INSTRUCCIONES – INSTRUCTIONS:
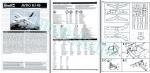
- Folleto de 12 páginas impreso en blanco y negro. Contiene una referencia histórica sobre el avión, una lista de colores con numeración de pinturas esmalte de Revell, un plano numerado de piezas, 27 pasos de construcción y dos páginas de perfiles.
- 12-page booklet printed in black and white. It contains a historical summary about the aircraft, a list of colors with Revell enamel paint codes, a numbered parts plan, 27 assembly steps and two pages of profiles.
LO MEJOR – THE BEST:
- Limpieza del molde. Construcción relativamente sencilla, salvo por lo indicado en el texto.
- Clean tooling. Relative ease of construction, except for the indications in the text.
LO PEOR – THE WORST:
- Ausencia de carlinga. Cabina de pasaje sin ventanillas. Tren de aterrizaje delicado de construir.
- Missing cockpit. No cabin windows provided. Delicate undercarriage assembly.
VALORACIÓN – CONCLUSION:
- No es tan fácil de montar como promete en apariencia porque Revell dejó ausencias innecesarias y un montaje delicado en el tren de aterrizaje. Recomendable con reservas a modelistas con destreza.
- It’s not as easy to assemble as it seems because Revell left out necessary details and reproduced a delicate landing gear assembly. Recommended with reservations to skilled modelers.

La maqueta
Hoy toca describir la única maqueta de plástico que tenemos de este avión por el momento. Revell la ha reeditado con cierta periodicidad desde finales de los años 90 con el marbete de Avro RJ 85 o BAe 146, ya que el modelo RJ 85 es equivalente al Bae 146-200. Actualmente, sólo hay maquetas de resina a cargo de Welsh Models en la escala 1/144, sin embargo hay una enorme cantidad de calcas alternativas con libreas de docenas de líneas aéreas, nada raro dada la popularidad de este avión en su momento.
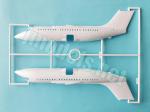
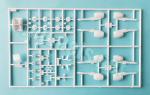
La caja contiene tres bastidores blancos, un bastidor transparente, las calcas y las instrucciones. Las piezas están bien moldeadas y limpias en general, sin rastro de rebabas, aunque hay marcas que eliminar en las tapas del tren principal y en el interior de los motores. Estas últimas son evidentes al estar situadas por delante de las turbinas y no será muy sencillo limpiarlas.
Por lo general, el panelado no parece grande para la escala, aunque en algunas zonas como los estabilizadores está claramente sobreescalado. Las líneas grabadas tienen buena nitidez y limpieza.
En principio la maqueta no aparenta tener problemas de montaje, sin embargo el tren principal tiene un despiece un tanto delicado debido al número y tamaño de sus elementos. Otro problema es la ausencia de piezas transparentes o calcas para las ventanillas. Simplemente Revell no se molestó en hacerlas y al modelista sólo le queda emplear potingues para modelismo o bien simularlas con piezas transparentes fabricadas ex profeso. La única opción de montaje es colocar los pozos cerrados para simular el modelo en vuelo.
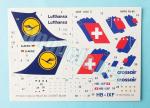
Las alternativas de pintura, distintas sólo en las calcas, nos ofrecen aviones empleados por las aerolineas Lufthansa y Crossair, dos de las mayores usuarias del RJ85. Las instrucciones los identifican por sus sobrenombres de Cityliner y Jumbolino, que no indican características específicas del modelo.
Revisión
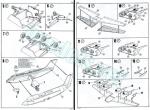
El interior del fuselaje no contiene nada, salvo los pozos de las ruedas. Además de añadir las ventanillas ausentes, probablemente el modelista se planteará el dilema de montar sólo los pozos y añadir el tren de aterrizaje tras pintar, o bien construir el tren dentro de los pozos y pegarlos al fuselaje antes de cerrar las mitades. Seguramente es mejor seguir las instrucciones y terminar la construcción del tren de aterrizaje, aunque sin ruedas, antes de pintar. La ausencia de una mínima carlinga obliga a simular el hueco interior con pintura oscura, ya que el espacio es evidente a través del parabrisas transparente. Antes de unir el fuselaje, hay que añadir los 10 gr de peso necesarios en el morro para equilibrar el modelo, de acuerdo con las instrucciones.
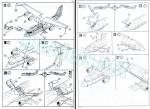
Las mitades del fuselaje muestran un panelado fino y nítido, con las puertas de acceso bien marcadas, las ventanillas sin rebabas y las salidas de la unidad de potencia auxiliar (APU) en el puro de cola. También están bien reproducidos los capotajes de las raíces alares y los de los pozos del tren principal.
El parabrisas de la carlinga tiene una finura muy razonable y las ventanas bien marcadas. También hay piezas transparentes para los faros de las raíces de las alas. Además, hay diversas antenas y aletas encima y debajo del fuselaje reproducidas en piezas muy pequeñas que deben manipularse con cuidado.
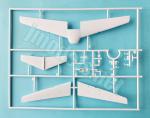
Las alas vienen separadas en tres piezas muy delgadas, lo que les permita coincidir en finas puntas. La mitad superior tiene en su centro la carena del fuselaje. Las aletas de los alerones están moldeadas en la mitad superior. Los paneles son finos y muestran los espóileres y alerones en la mitad superior y diversos accesos en las inferiores. Las luces de aterrizaje y las de navegación son piezas transparentes separadas.
Los motores están despiezados en mitades y unidos a los soportes. Los motores están representados por el ventilador de la turbina con las palas decentemente definidas y la tobera en una pieza en la parte trasera. La salida no es nada fina y conviene adelgazarla para darle más realismo. Bajo las alas hay también dos aletas próximas a las puntas formadas por dos mitades.
Las superficies verticales de cola están moldeadas con el fuselaje y tienen tanto los paneles como el timón bien grabados, aunque parecen algo grandes para la escala. Los estabilizadores están representados en una pieza pegada sobre la aleta vertical y también aquí los paneles y timones son un poco grandes. La pieza está detallada con una pequeña antena.
El pozo de la rueda delantera posee un detalle muy leve en su interior. Las tres compuertas hay que cortarlas de la pieza en la que vienen unidas para emplearla en simular el modelo en vuelo. La pata, el brazo de plegado y el de torsión son muy pequeños y delicados de manipular. Las ruedas son simplemente decentes y tienen las llantas definidas.
El pozo del tren principal está limitado por un mamparo central y dos en los extremos que cierran el hueco interno. El complejo sistema de extensión y retracción de las patas viene en cinco piezas bastante delicadas que necesitan mucho tiento para alinearlas correctamente con el suelo y también con las compuertas, ya que uno de los brazos es el de apertura. La pata muestra con nitidez el sistema de freno de las ruedas, que están bien moldeadas y tienen las llantas perfiladas sin detalle extraordinario. Las compuertas no son demasiado finas, aunque el grosor puede ser admisible y poseen cierto detalle interno que no llegan a estropear las leves marcas de eyector.
La hoja de calcas muestra dos juegos de matrículas, marcas de compuertas, fuselaje, cola y estarcidos con aspecto fino y brillante, registro correcto y adecuada saturación de color. No hay exceso de soporte.
Las instrucciones están impresas en blanco y negro en un folleto de doce páginas que contiene una referencia histórica sobre el avión, una lista de colores con numeración de pinturas esmalte de Revell, un plano numerado de piezas, 27 pasos de construcción y dos páginas de perfiles.
Las dos versiones de pintura ofrecen aviones de compañías que han usado ampliamente este modelo de avión de pasaje, como Lufthansa y la suiza Crossair. Las libreas sólo se diferencian en las calcas. Quienes no se conformen con lo que trae esta caja, tienen multitud de calcas diferentes aplicables a esta maqueta, como he mencionado arriba.
Valoración
En apariencia, la maqueta no es diferente a otras de aviones civiles en esta escala y representa con suficiencia el RJ85 en la escala 1/144, pero tiene dos inconvenientes que no la hacen ideal para el modelista demasiado verde, como son la extraña falta de ventanillas en el fuselaje y la delicada construcción del tren de aterrizaje debido al número y tamaño de las piezas. La ausencia de carlinga es también muy evidente, pero acaso importe menos a algunos modelistas que no dedicarán tiempo a remediarlo.
Estas deficiencias, subsanables para quienes tengan cierta destreza, hacen que la maqueta se pueda recomendar con ciertas reservas al modelista del común.◊


The kit
It is the only plastic kit we currently have of this aircraft. Revell have reissued it periodically since the late 1990s with the name Avro RJ 85 or BAe 146, as the RJ 85 airliner is equivalent to the BAe 146-200. There are also resin kits produced by Welsh Models in the 1/144 scale and a lot of alternative decals available with liveries of dozens of airlines, which is not surprising given the popularity of this aircraft in its time.
The box contains three white sprues, a clear sprue, the decals, and the instructions. Parts are well molded and clean, with no trace of flash, although there are pin marks on the main landing gear covers and inside the engines. The latter are evident as they are located forward of the turbines and will not be very easy to clean.
In general, paneling doesn’t seem large for the scale, although in some areas, such as the stabilizers, it’s clearly overscaled. The engraved lines are sharp and clean.
On a first inspection, the kit doesn’t seem to have any assembly issues; however, the main undercarriage has a delicate parts breakup due to the number and size of the pieces. Another issue is the lack of clear parts or decals for the windows. Revell simply didn’t bother to provide them, and the modeler has to resort to modeling “potions” of the Micro Krystal Klear type or simulate them with clear pieces of any sort. The only assembly option is to pose the wells closed to simulate the model in flight.
Painting choices, which differ only in the decals, offer aircraft flown by Lufthansa and Crossair, two of the largest users of the RJ85. The instructions identify them by their nicknames, Cityliner and Jumbolino, which don’t indicate specific model characteristics.
Review
The fuselage interior contains nothing except the wheel wells. Besides adding the missing windows, the modeler will likely face the dilemma of assembling only the wells and adding the landing gear after painting, or building the undercarriage inside the wells and gluing them to the fuselage before joining the halves. It is probably better to follow the instructions and build the landing gear in place without the wheels, before painting. The absence of a minimal cockpit requires simulating the interior gap with dark paint, as the space is evident through the clear windshield. Before joining the fuselage, a 10 g ballast is needed inside to balance the model, according to the instructions.
The fuselage halves show fine, crisp paneling, with well-defined access doors, flash-free windows, and auxiliary power unit (APU) exhausts in the tail cone. The wing root and main gear well fairings are also nicely reproduced.
The cockpit windscreen is reasonably fine, and the windows are neatly defined. There are also clear pieces for the wing root lights. In addition, various antennas and fins above and below the fuselage are provided in very small pieces that need to be handled with care.
The wings are separated into three very thin pieces, allowing them to match at the wing tips. The upper half is also molded with the center fuselage fairing. The aileron trims are molded on the upper half. The thin panels show the spoilers and ailerons on the upper half and accesses on the lower half. The landing and navigation lights are separate clear pieces.
The engines are provided in halves molded with the pylons. The engines are represented by the turbine fan, showing decently rendered blades, and the nozzle in a single piece at the rear. The exhaust is a bit thick and should be thinned for more realism. Under the wings, there are also two fins molded in halves near the tips.
The vertical tail surfaces are molded with the fuselage and have both the panels and the rudder well engraved, although they seem a bit large for the scale. The stabilizers are represented in a piece attached to the vertical fin, and here again the panels look overscaled. This piece is detailed with a small antenna.
The front well has very faint detail inside. The three doors must be cut from the same piece used to simulate the model in flight. The leg, the folding arm, and the torque links are very small and delicate to handle. The wheels are simply decent and have well-defined rims.
The main gear well is limited by a central bulkhead and two at the front and rear to hide the internal fuselage gap. The complex system for extending and retracting the legs comes in five rather brittle pieces that need great care to align correctly with the floor and also with the covers. The leg clearly shows the wheel braking system. The wheels are simply decent and usable but not extraordinary. The doors are not too thin but could have a pass, showing some internal detail that the faint ejector marks don’t spoil.
The decal sheet shows two sets of registrations, fuselage and tail markings and stencils with a fine, glossy appearance, correct register and adequate color saturation. Decals have no surplus carrier.
The instructions are printed in black and white in a 12-page booklet containing a historical summary about the aircraft, a color list with numbers corresponding to Revell enamel paints, a numbered parts plan, 27 construction steps, and two pages of profiles.
The two paint versions offer aircraft from companies that have extensively used this airliner, such as Lufthansa and the Swiss Crossair. The liveries differ only in the decals. Those who wish to use other liveries have a lot of different decal sets for this kit, as mentioned above.
Conclusion
Apparently, this kit is no different from other airliners Revell have released in the 1/144 scale and one can say it is an overall good rendition of an RJ85. However, it has two drawbacks that make it quite less than ideal for the novice modeler: the strange lack of windows in the fuselage and the delicate construction of the landing gear due to the number and size of the parts. The lack of a cockpit is also very noticeable, but may be less important for some modelers who won’t probably take the time to build one.
These shortcomings, which can be corrected by those with a certain skill, mean that the kit can only be recommended with some reservations to the average modeler.◊
Publicado – Published: 8 / 2025
©www.jmodels.net

Debe estar conectado para enviar un comentario.