
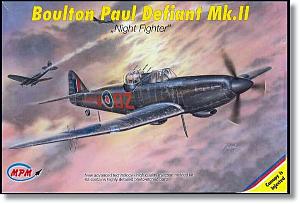
De un vistazo – Quick look
MATERIAL Y PIEZAS
MEDIA & PARTS:
- Plástico inyectado (64 piezas), plástico transparente (5 piezas), fotograbado (7 piezas).
- Injected plastic (64 parts), clear plastic (5 parts), photo-etched (7 parts).
CALCAS – DECALS:
- Escarapelas británicas de tres tipos, matrículas, marcas de cola y estarcidos. Aspecto fino y brillante. Buena saturación de color. Sin exceso de soporte.
- Three types of British roundels, registers, tail markings and some stencils. Thin and glossy appearance. Good color saturation. No excess of carrier film.
OPCIONES – OPTIONS:
- Boulton Paul Defiant Mk.II. AA436. DZ-V. Escuadrilla N.º 151 de la RAF. Mediados de 1941.
- Boulton Paul Defiant Mk.II. AA683. ZJ-M. Wrexham (Reino Unido). Junio de 1942. Pilotado por el Jefe de Escuadrilla R. C. Haine.
- Boulton Paul Defiant Mk.II. AA370. Primer aparato con radar AI (Interceptación Aérea).
- Boulton Paul Defiant Mk.II. AA436. DZ-V. RAF No. 151 Squadron. Mid 1941.
- Boulton Paul Defiant Mk.II. AA683. ZJ-M. Wrexham (UK). June 1942. Pilot Squadron Leader R. C. Haine.
- Boulton Paul Defiant Mk.II. AA370. First production with AI (Airborne Interception) radar.
INSTRUCCIONES – INSTRUCTIONS:
- Folleto de tamaño A5 y 8 páginas impreso en blanco y negro. Muestra una breve nota histórica sobre el avión en varios idiomas, un plano numerado de piezas, 12 secuencias de montaje y 2 páginas de perfiles. Claras en general.
- 8-page A5 booklet printed in black and white. It shows a historical summary about the aircraft in several languages, a numbered parts plan, 12 assembly chapters and 2 pages of profiles. Overall clear.
LO MEJOR – THE BEST:
- Buen detalle externo y decente en el interior.
- Nice external detail and decent interior.
LO PEOR – THE WORST:
- Cubierta de la carlinga de una pieza. Ruedas en mitades.
- One-piece canopy. Wheels in halves.
VALORACIÓN – CONCLUSION:
- Único Defiant Mk. II con radar en la escala hoy, bien detallado en general y sin abrumadoras dificultades de montaje para el modelista con experiencia.
- Only 1/72 Defiant Mk. II with radar today. It is nicely detailed overall and doesn’t have too difficult assembly challenges for the experienced modeller.

La maqueta
El Defiant de MPM es molde propio de la marca, data de principios de siglo y ha tenido varias reediciones, tanto en su versión de caza diurno como nocturno. No es, por tanto, un desconocido para la mayoría de modelistas aficionados a esta escala.
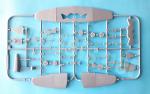
La caja contiene dos bastidores de piezas grises, un bastidor de piezas transparentes, una mínima plancha de fotograbados, las calcas y las instrucciones. Las calcas y fotograbados por un lado y las piezas transparentes por el otro vienen protegidos en bolsas separadas.
A primera vista la maqueta tiene buen aspecto, con el despiece típico de las de serie limitada. El plástico no tiene deformaciones ni marcas, salvo en la carlinga, aunque no afectan al detalle interno. Sólo se aprecian ligeras rebabas fáciles de limpiar en el extremo trasero del timón de dirección y en uno de los estabilizadores. Los paneles del fuselaje y especialmente de las alas y estabilizadores son finos y están bien grabados.
La maqueta representa el modelo Defiant Mk. II, introducido tras el éxito de la variante de caza nocturno NF Mk. IA. El Mk. II recibió varios cambios para intentar mejorarlo, como el motor Merlin XX, mayor capacidad de combustible y un timón más grande, entre otros. Se fabricaron más de 200 unidades, muchas de ellas convertidas en remolcadores de blancos tras la aparición del Bristol Beaufighter en misiones de interceptación nocturna.
Carlinga
MPM ha dejado bastante vacía la saturada carlinga de pilotaje del Defiant, no obstante creo que lo que hay se puede calificar de decente al menos. Sobre el suelo detallado tenemos un buen asiento con el almohadillado del respaldo aparte, la palanca, los pedales de plástico y el mamparo trasero. El panel de instrumentos es excelente y tiene los indicadores en relieve y la brújula separada. Los lados del fuselaje muestran dos paneles con costillaje muy fino y tenue sobre el que van colocados algunos instrumentos, si bien no tantos como en la realidad.
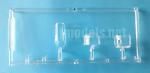
La cubierta transparente es una pieza fina unida al capotaje posterior, que no posee opción para mostrarlo plegado dejando así la torre liberada para girar. La estructura en relieve de la pieza está bien representada, especialmente el parabrisas.
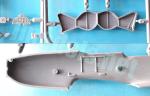
Fuselaje y motor
El fuselaje consta de dos mitades reproducidas con las superficies verticales de cola y la zona dorsal plegable separada. Comparado con las alas, el panelado es bastante ralo y muy fino.
Del motor únicamente hemos de añadir los escapes separados y la hélice, formada por el cono y un anillo posterior sobre el que van pegadas las palas de la hélice, que deben ser posicionadas con cierto cuidado en su orientación.
La toma de refrigeración del aceite bajo el morro se compone de dos mitades y un filtro interior, mientras que los lados del fuselaje delantero llevan las antenas del radar de interceptación. Uno de los dispositivos hay que formarlo pegándole las dos finas antenas de fotograbado al soporte, aunque esta pieza podría haberse incluido completa.
La zona dorsal contiene el carenado situado tras la torre. La torreta está separada en mitades finas y bien moldeadas con el relieve estructural. En su interior hay un asiento para el artillero y varias piezas para formar el afuste de las ametralladoras, cuyos tubos son muy finos y están unidos de dos en dos en una pieza. Esta zona trasera parece delicada de montar porque que hay que evitar dañar la torreta o impedir que quede suelta. Bajo el fuselaje hay dos mástiles, el posterior sólo debe colocarse si deseamos mostrar el avión en vuelo.
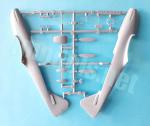
Alas y cola
Las alas están separadas en dos mitades superiores y una inferior. En su interior hay que situar los pozos de las ruedas, que son de una sola pieza y poseen detalle interior. Los paneles, registros y accesos que muestran las alas parecen más convincentes que en el fuselaje, tal vez porque son más abundantes. Las superficies de control y el filete transversal de refuerzo de la estructura del ala muestran un detalle más bien liviano, aunque parecen convincentes para el tamaño. Las luces de las puntas están bien grabadas. Los huecos de los faros están marcados, pero no abiertos. Como alternativa, podemos recortar el hueco para colocar las piezas transparentes que los representan. Esta es una opción más realista, ya que las instrucciones sugieren pintarlos de color plateado en vez de usar los transparentes.
Además del tubo Pitot, el ala de babor lleva dos pares de antenas de fotograbado por ambas caras, en los dos casos difíciles de posicionar porque no hay marcas para situarlas. El borde de ataque del ala opuesta lleva otra antena del radar AI de plástico y detalles de fotograbado. Finalmente, hay que añadir en la zona ventral el carenado del radiador en una pieza con la rejilla interna separada.
Las superficies verticales de cola muestran un buen detalle tanto en la estructura entelada del timón como en las líneas de panel grabadas. La luz de navegación trasera está bien definida. Los estabilizadores no poseen lengüetas y van pegados directamente sobre la cola. Las piezas son finas y muestran los timones adecuadamente grabados y detallados.
Tren de aterrizaje
El tren principal es un poco complejo de montar debido a que las tapas están seccionadas en tres piezas. Las patas tienen los brazos de torsión y de plegado aparte. Las ruedas no tienen gran detalle en las llantas y además vienen separadas en mitades. Para ayudar en el montaje de las tapas, las instrucciones incluyen fotos de referencia, pero las imágenes tienen escasa nitidez y es mejor recurrir a fotos del avión real. El tren auxiliar consta de una pata unida a la rueda.
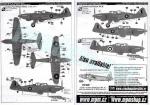
Calcas
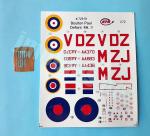
La hoja muestra escarapelas británicas de tres tipos, matrículas, marcas de cola y algunos estarcidos. Las calcas tienen aspecto fino y brillante, una correcta saturación de color y carecen de soporte excesivo.
Instrucciones
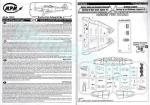
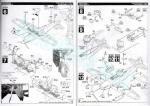
Vienen en un folleto de tamaño A5 y ocho páginas impreso en blanco y negro que muestra una breve introducción histórica sobre el avión, un plano numerado de piezas, doce secuencias de montaje y dos páginas de perfiles. Las vistas explosionadas del montaje son claras en general y, como he mencionado antes, hay algunas imágenes de referencia no muy claras de una parte del interior de la carlinga y del tren de aterrizaje. El folleto no indica la marca de las referencias de color, pero los códigos son los empleados por Humbrol.
La pintura no ofrece variaciones al tratarse de un caza nocturno, pero sí dará oportunidades a los que quieran aplicar desgastes y matices sobre un color tan opaco como el negro. Curiosamente, o quizás no tanto, dos de los aviones que muestran los perfiles (DZ-V y ZJ-M) coinciden con los de la maqueta de Pavla Models (Defiant NF Mk. II/TT Mk. I, referencia 72035) que ya no se fabrica.
Valoración
Considerando que esta maqueta es de tirada limitada y por tanto menos apta para el modelista con poca experiencia, creo que tiene un buen detalle en general y una dificultad media, pero necesita cierto cuidado en la zona dorsal de la torreta, en el montaje de las tapas del tren de aterrizaje y en las pequeñas antena de fotograbado.
Aunque hoy el nuevo molde de Airfix pueda parece preferible para la mayoría, esta edición puede interesar a quienes busquen variantes singulares como este Mk. II con radar, único en la escala 1/72 que nos ha quedado tras la desaparición del fabricante checo Pavla Models.◊


The kit
The MPM Defiant dates back to the beginning of the century and has had several reissues, both in its day and night fighter versions. It is, therefore, not unknown to Defiant fans at this scale.
The box contains two sprues of gray parts, a sprue of clear parts, a tiny PE fret, the decals and the instructions. The decals and photo-etched parts on one side and the clear pieces on the other are protected in separate self-sealing bags.
At first glance the content looks good, with the typical breakdown of the short-run kits. Plastic has no blemishes or pin marks, except on the cockpit walls but they do not spoil the internal detail. Only slight, easy-to-clean flash is present on the vertical rudder and on one of the stabilizers. Panel lines are well engraved on the fuselage wings and stabilizers.
The kit represents a Defiant Mk. II, a variant introduced after the success of the NF Mk. IAI night fighter variant. The Mk. II received several changes for improvement, such as the Merlin XX engine, more fuel capacity and a larger rudder among others. More than 200 examples were manufactured, many of them later converted into target tugs after the appearance of the Bristol Beaufighter on the night interception role.
Cockpit
MPM have left the Defiant’s busy cockpit quite empty, however I think that what is there can be described as decent at least. On the detailed floor we have a nice seat with a separate backrest padding, the lever, the plastic pedals and the rear bulkhead. The instrument panel is excellent and has raised gadgets and a separate compass. The fuselage sides show two panels with very thin and raised ribbing to place some instruments, but not as many as in the real Defiant.
The canopy is thin and includes the dorsal forward fairing, which does not have the option to show it retracted, thus leaving the turret free to rotate. The raised structural detail is well represented, especially the windshield.
Fuselage and engine
The fuselage consists of two halves moulded with the vertical tail surfaces and the retractable rear dorsal fairing separated. Compared to the wings, panel lines are quite sparse and look thinner.
The engine is only detailed with the separate exhausts and the propeller, comprising the spinner and a rear ring to attach the separate blades, which need some care to be positioned.
The lower oil cooling intake consists of two halves and an internal filter, while the forward fuselage sides have the radar aerials, one of them detailed with PE bits that could have been moulded in a single plastic piece.
As said, the dorsal rear fairing is a separate piece. The turret consists of two thin halves molded with nice structural detail. Inside there is a seat for the gunner and several pieces to build the machine guns mount. The guns have very thin barrels and are molded in pairs. The dorsal fuselage looks tricky to assemble because we will need to avoid damaging the turret when attaching the rear fairring and leaving it loose at the same time. Under the fuselage there are two antenna masts, the rear one should only be attached if we want to show the plane in flight.
Wings and tail
The wings are separated into two upper and one lower halves with the wheel wells being attached before joining the halves. The wells are a single piece and are detailed inside. Wing panels, registers and accesses look a bit more convincing than on the fuselage, perhaps because they are more profuse. The control surfaces and the wing joints show a rather light detail, although they seem realistic for the size. The wingtip lights are correctly engraved. The landing lights are also engraved on the leading edges and instructions suggest to paint them silver, but alternatively we can cut out a gap to attach the clear pieces provided as an option.
In addition to the Pitot tube, the port wing has a pair of tiny photo-etched antennas on both sides. They are difficult to position because there are no marks on the surfaces to attach them. The leading edge of the opposite wing has an arrow shaped plastic AI radar antenna with photo-etched details. Under the wings there is also a one-piece radiator fairing provided with an internal grille.
The vertical tail surfaces show good detail in both the tapered rudder structure and the engraved panel lines. The rear navigation light is well defined. The stabilizers do not have tabs and are glued directly on the tail. The pieces are thin and show engraved and detailed rudders.
Landing gear
The main undercarriage is a bit complex to assemble because the covers are moulded in three pieces. The legs have separate torsion and folding arms. The wheels do not have great detail on the rims and they come separated into halves. To help assembling the covers, the instructions include reference photos but the images are not very sharp and it is best to check pictures of a real aircarft. The auxiliary gear consists of a leg attached to the wheel.
Decals
The sheet shows three types of British roundels, registers, tail markings and some stencls. The decals have a thin and shiny appearance, correct color saturation and lack excess carrier film.
Instructions
They come in an 8-page, A5 booklet printed in black and white showing a brief historical introduction to the aircraft, a numbered parts plan, twelve assembly sequences and two pages of profiles. The exploded views are clear, and as mentioned, there are some faint reference images of some of the cockpit interior and the landing gear. The booklet does not refer to any paint manufacturers, but the codes are those used by Humbrol.
Paint finishes do not offer variations as this is a night fighter, but it will give opportunities to those who want to apply some weathering on the black livery. Curiously, or perhaps not so much, two of the aircraft shown in the profiles (DZ-V and ZJ-M) are the same of those included in Pavla Models kit (Defiant NF Mk. II/TT Mk. I, reference 72035) that is no longer in production.
Conclusion
Considering this kit is a short run and therefore less suitable for the modeler with little experience, I think it has good detail in general and an average difficulty, but it needs some care in the dorsal fairing and turret, the landing gear covers and on the photo-etched antennas.
Although today the new Airfix kit may seem preferable to most, this release may interest those looking for unique Defiant variants like this Mk. II with AI radar, the only one in the 1/72 scale that we have left since the Czech manufacturer Pavla Models went out of business.◊
Publicado – Published: 6 / 2024
©www.jmodels.net

Debe estar conectado para enviar un comentario.