
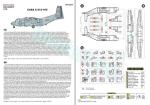
De un vistazo – Quick look
MATERIAL Y PIEZAS
MEDIA & PARTS:
- Plástico inyectado (147 piezas), plástico transparente (40 piezas).
- Injected plastic (147 parts), clear plastic (40 parts).
CALCAS – DECALS:
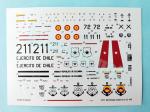
- Impresas por Eduard. Insignias españolas, chilenas y colombianas, paneles de instrumentos, numerales, marcas de cola, insignias de unidad y algunos estarcidos. Aspecto fino y mate, buen registro y saturación de color. Sin exceso de soporte.
- Printed by Eduard. Spanish, Chilean and Colombian markings, instrument panels, codes and registers, unit badges and some stencils. Thin and matte finish, good register and color saturation. No excess of carrier.
OPCIONES – OPTIONS:
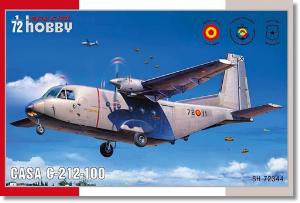
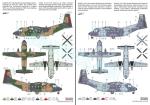
- CASA C-212-100 / T.12B-65. Ejército del Aire. 721º Escuadrón. Escuela Militar de Paracaidismo. Base Aérea de Alcantarilla (Murcia), 2009.
- CASA C-212-100. Ejército de Chile. Aeropuerto Internacional de Santiago de Chile, 2008.
- CASA C-212-100. Armada de Colombia, 2005.
- CASA C-212-100 / T.12B-65. Spanish Air Force. 721st Squadron. Airborne School. Alcantarilla Air Base (Murcia), 2009.
- CASA C-212-100. Chilean Army. Santiago de Chile International Airport, 2008.
- CASA C-212-100. Colombian Navy 2005.
INSTRUCCIONES – INSTRUCTIONS:
- Folleto de 12 páginas impreso en color. Contiene una referencia histórica sobre el avión, un plano numerado de piezas, una lista de colores con pinturas equivalentes de Gunze Sangyo, 19 capítulos de construcción y 3 páginas de perfiles.
- 12-page booklet printed in color. It contains a historical summary about the aircraft, a numbered parts plan, a list of color with matches in Gunze Sangyp paint matches, 19 construction stages and 3 pages of profiles.
LO MEJOR – THE BEST:
- Buen detalle externo. Sencillez de montaje, pero necesita experiencia. Acabados de pintura bien seleccionados en dificultad y atractivo.
- Nice external detail. Ease of assembly, but needs some experience. Paint finishes are well chosen both in appeal and difficulty.
LO PEOR – THE WORST:
- Salvo la carlinga, carece de interior. Rampa trasera moldeada con el fuselaje. Marcas de eyector internas.
- No interior, except for the cockpit. Rear loading ramp molded with the fuselage. Ejector marks inside the fuselage.
VALORACIÓN – CONCLUSION:
- Pese al buen detalle externo, la maqueta flaquea en el interno porque SH no lo redondeó y esto le resta aliciente. Sin resinas ni fotograbados, el montaje no es difícil para quienes tengan cierta experiencia. Tiene alternativas de pintura variadas y bien escogidas.
- Despite the nice external detail, this kit has a bit disappointing internal features as SH did not round it off, and this downgrades it a bit. With no resins and PE parts, assembly is not hard for the modeller with some experience. Paint finishes are varied and well chosen.

La maqueta
Hoy comienzo este artículo con una digresión larga que el lector sabrá perdonarme, pero la historia viene que ni pintada para esta maqueta.
Hace años, con buena intención de querubín, pero también con un candor supino, a SH no se le ocurrió otra cosa que publicar una encuesta en su antigua web para averiguar qué maquetas de aviones, no llevados al plástico hasta entonces, deseaban los modelistas de todo pelaje y jaez que la marca lanzara. No recuerdo exactamente si la pesquisa era abierta a cualquier avión o ceñida a un número concreto de ellos.
Como los modelistas son tan suyos, todo hacía prever que ganarían la elección un avión originario de un país donde los votantes fuesen mayoría, que también en esta afición hay mucha patriotería un tanto infantil. ¿Ganarían los norteamericanos con un avión de su cosecha, o serían los de la Commonwealth, o acaso se llevarían el gato al agua los alemanes?
Por una vez, los modelistas españoles se las ingeniaron para intentar compensar el alud de votos que podían suponerse hacia otras candidaturas e hicieron campaña patria a favor del CASA C-212, o tal vez fuera el C-101 y yo no lo recuerdo bien, pero sin duda era uno de estos dos. Tampoco recuerdo si llegué a votar, lo dudo, porque prefiero estar al margen de la masa, aunque sí se me animó a hacerlo, a ver si veíamos de una vez un avión moderno plenamente español hecho por una marca importante. Los mensajes de exhortación a la participación incluían no sólo el ruego de que se pasase el mensaje a otros posibles votantes para sumar sufragios, sino también la forma en la que cada quisque podía participar más de una vez empleando distintas direcciones IP y colar la engañifa. En una época en la que no estaban tan difundidos los móviles, las tabletas, los portátiles ni otros dispositivos que Dios confunda, uno imagina a los modelistas pidiendo a sus hermanas, primos y compañeros de trabajo que le dejase un momento su ordenador para tan patrio ardid. Naturalmente, el modus operandi era ya muy conocido, así que supongo que también lo emplearían muchos otros votantes repartidos por el globo.
Finalmente, no ganó ningún CASA, pero quiero creer que SH debió de tomar nota del gran número de supuestos votantes interesados y, acaso animado por eso, el fabricante se decidió a lanzar por fin el C-212 de plástico, largamente anhelado por el aficionado hispano porque hasta entonces no existían más que maquetas de resina y vacuformes poco apetecibles.
Ñoñerías nacionales aparte, lo cierto es que este avión, con tantos países operadores y posibilidades modelísticas civiles y militares, habitaba un injusto olvido del plástico hasta que la marca checa lo trajo por vez primera. No han debido ir mal las ventas cuando ya tenemos hasta seis cajas de reediciones con distintas variantes, una de ellas de Azur.
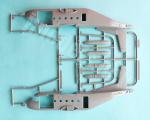
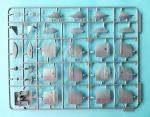
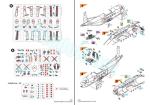
Esta primera edición trae cinco bastidores de piezas, un bastidor transparente, las calcas y las instrucciones. Se conoce que SH no quiso echar la casa por la ventana y no incluyó fotograbados ni resinas como en otras ocasiones. El gran número de piezas, de las que quedarán excluidas en este modelo en torno a un centenar, dos veces más de las necesarias para la construir la maqueta, indica que desde el inicio la marca pensaba compartir el molde entre distintas variantes del avión, lo cual resulta razonable, ya que el C-212 es un avión multifuncional como pocos, pese a su modesto perfil de caja de zapatos con alas y cola.
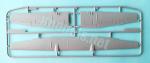
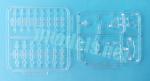
Las piezas tienen un buen moldeado sin deformaciones y están prácticamente limpias de rebabas. Las piezas transparentes muestran cilindros de salida del eyector y los lados internos del fuselaje varias marcas de gran tamaño, aunque no muy profundas.
A diferencia de otras reediciones posteriores, en este caso no es necesario hacer grandes modificaciones en las piezas, salvo la eliminación de las aletas compensadoras de los alerones. Las alternativas de montaje se reducen a varias antenas situadas sobre el fuselaje, pero las de pintura son variadas y se adaptan al nivel de destreza de cada modelista, ya que comprenden desde acabados monocolores a camuflajes en distintos tonos.
Carlinga e interior
Hay marcas de eyector a los lados de la carlinga y en el compartimento de carga que llevará su tiempo eliminar, aunque este último viene vacío y la mayoría de modelistas no se molestará en detallarlo.
La carlinga no está muy saturada que digamos. Contiene el suelo moldeado con los pedales y la consola central, los controles, los asientos y un panel con los instrumentos levemente grabados y tres calcas para reproducirlos. Este panel va pegado a uno de los lados del fuselaje. El mamparo trasero viene separado y tiene grabado el detalle del acolchado y un acceso abierto. Los instrumentos del techo no están representados.
Las dos ventanas laterales a cada lado de la carlinga vienen unidas en una pieza y se añaden desde adentro, mientras que el parabrisas se añade desde afuera, una vez montado el fuselaje. Las piezas tienen un grosor razonable, especialmente el parabrisas. La zona de carga está vacía y lo único que hay que pegar son las ventanillas laterales antes de cerrar el fuselaje.
Fuselaje
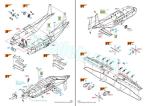
Las superficies están grabadas con líneas de paneles limpias y nítidas. Además de las puertas de acceso al compartimento de carga, hay dos paneles separados tras la carlinga. El del lado izquierdo incluye la puerta de la carlinga cerrada y un estribo separado. La rampa trasera no está bien grabada y no viene separada del fuselaje. Esto le quita mucho aliciente a la maqueta junto con el nulo detalle interior. Sin mucho esfuerzo, SH podría haber incluido al menos algo de la estructura interna, un suelo y la rampa aparte, con esto hubiese aumentado enormemente las posibilidades de presentar el avión en su función principal y darle aún más atractivo.
El morro viene separado para adaptar el molde a diferentes versiones. En la serie 100 es en realidad un capó abisagrado con acceso al sistema hidráulico delantero. La pieza contiene un pozo con las luces de aterrizaje marcadas en su interior y una pieza transparente que simula el panel acristalado. La parte delantera dispone también a cada lado de sendos tubos Pitot. Hay otras dos luces de aterrizaje transparentes justo por detrás del morro, pero las instrucciones indican que deben taparse con la pintura ya que pertenecen a otro modelo del C-212.
La parte superior del fuselaje trae dos antenas ya instaladas y además hay algunas otras separadas dependiendo de la versión que deseemos hacer. Lo mismo ocurre en la zona inferior, donde también hay que añadir las ruedas de la rampa trasera.
Además de las puertas separadas los lados del fuselaje llevan los carenados del tren de aterrizaje separados en dos secciones entre las cuales se pega la pata de cada rueda.
Alas, motores y cola
Las alas están separadas en tres piezas y son coincidentes en las puntas. El panelado de las piezas es fino y me parece aún mejor que el del fuselaje. Tiene los alerones y flaps bien marcados. Como mencioné arriba, las aletas de los alerones deben ser suprimidas en este Serie 100. La mitad superior lleva incluidos los encastres de las góndolas de los motores y las luces de las puntas están marcadas muy tenuemente. Las bisagras de las superficies de control de vuelo vienen separadas.
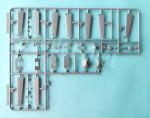
Los motores están compuestos de dos mitades detalladas con algunas pequeñas tomas por fuera y las salidas de los escapes abiertos en la parte trasera. El reverso del encastre de cada góndola lleva una pieza añadida que simula parcialmente el conducto interno del escape. Sobre esta pieza se añade el motor. La cara frontal del motor viene aparte e incluye la toma inferior abierta. Las alas van unidas sin más a los rebajes del fuselaje.
Las hélices comprenden las palas, el cono, la placa trasera y un rodamiento posterior que permite el giro de las palas. Las palas son finas y poseen una torsión realista. Hay mínimas rebabas sencillas de eliminar en las puntas.
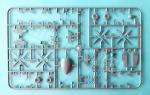
Los estabilizadores están formados por dos mitades más los timones separados. Las líneas poseen un grabado adecuado y las superficies de los timones muestran un corrugado creíble. Las piezas se unen a la cola mediante vástagos demasiado cortos como para darles suficiente firmeza. Hay también dos pequeñas carenas horizontales pegadas al fuselaje por delante de cada superficie.
El timón vertical también es una pieza aparte que tiene la aleta bien grabada y el corrugado de las superficies bien ejecutado.
Tren de aterrizaje
El montaje del tren de aterrizaje es muy sencillo, ya que no tiene más que las patas, detalladas con la amortiguación bien definida, y las ruedas. La pata delantera tiene la horquilla separada por la mitad para conseguir una mayor nitidez en el detalle al pegar la rueda. Las ruedas del tren trasero están reproducidas en mitades con las llantas bien representadas, aunque sencillas, y la banda de los neumáticos lisa.
Calcas
Eduard se encargó de imprimir la hoja, que contiene insignias nacionales, paneles de instrumentos, numerales, marcas de cola, insignias de unidad y algunos estarcidos. Las calcas muestran un aspecto fino y mate. El registro y la saturación de color es apropiado y carecen de soporte sobrante.
Instrucciones
Están impresas en un folleto a color de 12 páginas que muestra una referencia histórica sobre el avión, un plano numerado de piezas, una lista de colores con pinturas equivalentes de Gunze Sangyo, 19 capítulos de construcción y tres páginas de perfiles.
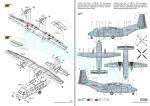
Las propuestas de pintura ofrecen tres acabados diferentes. El avión español va pintado entero de gris claro (H 338 de Gunze Sangyo, equivalente a FS36495), mientras que las alternativas chilena y colombiana llevan camuflaje en la parte superior únicamente. Por tanto, hay donde elegir tanto en variedad como en dificultad.
Valoración
Después de toda la peripecia que narro al principio de este artículo y del tiempo que este avión llevaba relegado por las principales marcas, uno debe congratularse de que haya aparecido por fin en varias series y versiones.
Con todo, creo que la maqueta es claramente mejor por fuera que por dentro, donde SH no llegó a redondearla y esto produce una cierta decepción, que tal vez no hubiese costado mucho evitar con un suelo, una rampa separada y un poco de detalle en el interior de la bodega de carga para que el modelista que lo desee termine de mejorarlo. Estoy seguro que muchos se animarían a hacerlo y le podrían sacar más partido. Tal vez SH se excedió en el número de piezas no usadas al querer meter todas las posibles variantes en cada caja y olvidar lo más esencial.
El montaje no debe ofrecer dificultades particulares al modelista con cierta experiencia y los acabados de pintura brindan posibilidades distintas en dificultad y atractivo. ◊

The kit
Today I’d like to start this article with a long digression. I hope the reader will forgive me for taking a bit more of his time, but the story perfectly matches this kit.
Many years ago, with cherubic good intentions, but also with the highest naivety, SH published a survey on their old website to find out which aircraft kits, not yet released in plastic, modelers of all sorts wished the brand to release next. I don’t quite remember if the survey was open to any aircraft or restricted to a specific number.
An aircraft from a country where voters were in the majority was quite likely to win the survey, as there is a lot of somewhat childish patriotism in this hobby and many modelers are biassed by national concerns. Would the Americans win with an aircraft of their own making, or would it be those from the Commonwealth, or would the Germans eat all the others alive?
For once, Spanish modelers managed to try to offset the expected flood of votes for other candidates and campaigned for the CASA C-212, or perhaps it was the C-101, and I don’t remember exactly, but it was definitely one of those two. I can’t recall if I actually voted; I doubt it, because I prefer to stay away from the crowd, although I was encouraged to do so. Finally we would get the release of a Spanish-built aircraft from a major brand. The messages urging people to participate included not only a plea to pass the message on to other potential voters, but also the way in which each person could vote more than once using different IP addresses and pull the wool over SH’s eyes. At a time when cell phones, tablets, laptops, and other devices God forbid, weren’t so widespread, one can imagine modelers asking their sisters, cousins, and workmates to let them use their computers for such a patriotic ruse. Naturally, the trick was already well-known, so I assume it was also used by many other voters around the globe.
In the end, no CASA won, but I’d like to believe that SH must have taken note of the large number of supposedly interested voters and, perhaps encouraged by that, the manufacturer decided to finally launch a plastic C-212, so long desired by Spanish fans because there had been only unappealing resin and vacuum-formed kits until then.
Nonsensical patriotism aside, the truth is that this aircraft, with so many operating countries and modeling possibilities, had been overlooked in plastic until the Czech brand released it for the first time. Sales must have been good, as we already have six boxings with different variants, one of them from Azur.
This first edition includes five sprues of parts, a clear sprue, the decals, and the instructions. It seems SH didn’t want to go all out as there are no photo-etched parts or resins as in other kits. The large number of parts, around 100 of which are not applicable in this variant —twice as many as needed to build the kit—indicates that the manufacturer planned to share the new tool between different variants of the aircraft from the outset. This is reasonable, since the C-212 is a multipurpose aircraft like few others, despite its modest shoebox appearance.
Parts are well molded and flash-free. Clear parts show ejector pips and several large, though not very deep, marks on the inner fuselage and cockpit sides.
Unlike other later reboxes, the kit does not need major modifications, except for the removal of the aileron trim tabs. Assembly choices are limited to several antennas located on the fuselage, but paint finishes are varied and suitable to match each modeler’s taste and skill level, ranging from single-color finishes to camouflage in different shades.
Cockpit and interior
There are ejector marks on the cockpit and cargo compartment sides that will take some time to remove, although the latter comes empty and most modelers won’t bother scratchbuilding it.
The cockpit is not overly stuffed. It contains the floor molded with the pedals and center console, the control horns, the seats, and a panel with lightly engraved instruments and three decals to reproduce them. This panel is glued to one fuselage side. The rear bulkhead is separate and has engraved padding detail and an open door. The overhead instruments are not included.
The two side windows on each cockpit side are one-piece and attached from the inside, while the windshield is added from the outside, once the fuselage is joined. These pieces show a reasonable thickness, especially the windshield. The cargo area is empty except for the side windows attached before closing the fuselage.
Fuselage
The surfaces are engraved with clean, crisp panel lines. In addition to the fuselage doors, there are two separate panels behind the cockpit. The one on the left side includes a closed cockpit door and a separate foothold. The rear ramp is poorly etched and is molded with the fuselage. This greatly diminishes the kit’s appeal as well as the lack of interior detail. SH could have easily included at least some of the internal structure, a separate floor and a ramp, which would have greatly increased the possibilities of finishing the aircraft in its primary function and made it even more attractive.
The nose is also separate to adapt the kit to different versions. In the 100 series, it is actually a hinged cowl with access to the front hydraulic system. The part contains a well with the landing lights marked inside and a clear part that simulates the glass panel. The nose also has separate Pitot tubes on each side. There are two more clear landing lights just behind the nose, but the instructions indicate that they should be covered with paint as they belong to a different C-212 variant.
The upper fuselage has two antennas molded in place and there are also some separate aerials that are used depending on the version you build. The same applies to the belly, also detailed with the rear ramp wheels.
In addition to the separate doors, the fuselage sides have the landing gear fairings in two sections with the wheel struts attached in between them.
Wings, engines and tail
The wings comprise three pieces. Panel lines are thin and look even better than those on the fuselage. The ailerons and flaps are clearly defined. As mentioned above, the aileron trim tabs are to be removed for this Series 100. The upper half includes the engine nacelle inserts, and the tip lights are very faintly marked. Flap and aileron hinges are provided as separate pieces.
Each engine comprise two halves detailed with some small intakes molded on and a rear exhaust outlet. The exhaust duct is a separate piece added on the nacelle. A third piece with the engine front has an open lower intake. The propellers comprise the blades, the cone, the backplate, and a rear bearing that allows the blades to rotate. The blades are thin and have a realistic twist. Some tips show minimal flash easy to remove. The wings are simply attached onto the fuselage recesses.
The stabilizers are made up of two halves plus the separate rudders. Panel lines are well engraved and the rudder features nice corrugated surfaces. The pieces are attached to the tail by pins, but these are way too short to provide a strong join. There are also two small horizontal fairings glued to the fuselage forward of each stabilizer. The vertical rudder is also a separate piece showing an engraved fin and corrugated surfaces.
Landing gear
The assembly of the landing gear is quite simple, consisting of only the legs, detailed with well-defined torsion arms, and the wheels. The front wheel has its fork split in half to achieve greater definition when attaching the wheel. The rear wheels come in halves, with well-represented, though simple, rims and smooth tire tread.
Decals
The sheet is printed by Eduard. It contains national roundels, instrument panels, registers, tail markings, unit badges, and some stencils. The decals have a thin, matte appearance, with appropriate color registration and saturation and they lack excess carrier.
Instructions
They are printed in color on a 12-page booklet that includes a historical summary about the aircraft, a numbered parts plan, a list of colors with Gunze Sangyo equivalent paints, 19 construction chapters, and three pages of profiles.
Paint schemes offer three different finishes. The Spanish aircraft is painted overall light gray (Gunze Sangyo H 338, equivalent to FS36495), while the Chilean and Colombian aircraft feature camouflage on the upper surfaces only. Therefore, there is plenty to choose from, both in terms of variety and difficulty.
Conclusion
After all the time this aircraft had been neglected by major manufacturers and the events I described at the beginning of this article, one should be pleased that it has finally been released in several series and versions.
All in all, I think the kit is clearly better on the outside than the inside, where SH failed to round it off and this is a bit disappointing. Providing the kit with a floor piece, a separate ramp, and a bit of detail inside the fuselage would have further improved it and modelers would take advantage of it. SH went overboard with the number of unused parts by trying to cram all the variants into each box and forgetting the most essential.
Assembly shouldn’t pose any particular difficulties for the experienced modeler, and paint finishes offer possibilities that vary in difficulty and appeal.◊
Publicado – Published: 7 / 2025
©www.jmodels.net

Debe estar conectado para enviar un comentario.