
De un vistazo – Quick look
MATERIAL Y PIEZAS
MEDIA & PARTS:
- Plástico inyectado (48 piezas), plástico transparente (10 piezas).
- Injected plastic (48 parts), clear plastic (10 parts).
CALCAS – DECALS:
- Cinturones, panel de instrumentos, matrículas, insignias, decoraciones del fuselaje y algunos estarcidos. Apariencia fina. Bien impresas.
- Seat belts, instrument panel, registers, company badges, fuselage lines and a few stencils. Apparently thin. Well printed.
OPCIONES – OPTIONS:
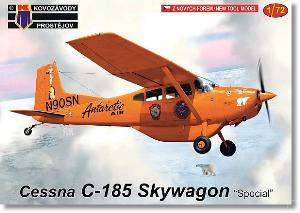
- Cessna C-185. N90SN. Polar Flight 90. Alaska (EE.UU.), 2008.
- Cessna C-185. N9802X. EE.UU., 1990.
- Cessna C-185. ZK-JPM. Canterbury Aviation. Nueva Zelanda, 2006.
INSTRUCCIONES – INSTRUCTIONS:
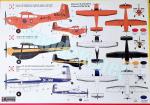
- Folleto de tamaño A5 de 4 páginas. Contiene breve historia del avión, un plano numerado de piezas, 15 secuencias de montaje y perfiles. La cara trasera de la caja muestra perfiles en color con las tres opciones de pintura.
- 4-page A5 brochure containing a short history of the aircraft, a numbered parts plan, 15 assembly sequences and profiles. The back side of the box shows color profiles with the three painting choices.
LO MEJOR – THE BEST:
- Interior decentemente detallado. Buena reproducción de los paneles y superficies de control.
- Decently detailed cockpit. Nice rendition of panels and control surfaces.
LO PEOR – THE WORST:
- Instrucciones (ver texto).
- Instructions (see text).
VALORACIÓN – CONCLUSION:
- Primera maqueta de este avión a cualquier escala. Mejor en detalle que otras del fabricante con atractivas opciones civiles. Para modelistas con cierta experiencia.
- First kit of this aircraft at any scale. Overall better detailed than other kits from this manufacturer and includes atrractive civilian paint finishes. For modellers with some expererience.

La maqueta
La nueva KP no para de darle a la máquina de hacer maquetas y ha vuelto a traer un molde nuevo. Esta vez le ha tocado el turno a la Cessna 180 y 185 Skywagon, un avión empleado durante años en múltiples países tanto en sus versiones militares como civiles, y que aún sigue volando pese a no fabricarse. La diferencia básica entre ambos moldelos está en el fuselaje algo más largo del modelo 185.
Si hacemos caso a la base de datos de Scalemates, es la primera vez que este avión aparece en el modelismo a cualquier escala, y además lo hace en varias versiones que KP ha ido lanzando en los últimos meses. La caja de este “Special”, que se distingue de otras versiones por el mayor espacio de carga situado bajo el fuselaje, que puede albergar hasta 136 kg., contiene un bastidor de piezas grises, un bastidor transparente, la hoja de calcas y las instrucciones.
Como otros de KP, el molde es polivalente y así encontramos piezas para otras versiones del avión. Las instrucciones también son comunes y conviene estudiarlas bien, puesto que no siempre coinciden con el modelo concreto de esta edición, como explicaré más abajo.
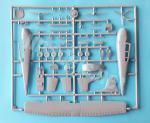
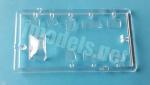
Las piezas vienen en general bastante limpias. Hay ligeras rebabas fáciles de limpiar en algunos filos del fuselaje, alas y palas de las hélices, y sólo una marca positiva de eyector a cada lado de la parte anterior de la carlinga que deberán eliminarse porque pueden estorbar la colocación del panel delantero. Por otro lado, las piezas transparentes no son excesivamente finas. Son mejores las ventanillas que el parabrisas, que es claramente grueso pero no muestra distorsión muy evidente.
En general, el detalle de las piezas muestra mejor definición que en otros moldes actuales. Destacan las líneas de panel, finas y bien grabadas en las alas y el fuselaje, el relieve en las superficies de control y también en los asientos.
Carlinga
El suelo de ambos habitáculos es común y lleva moldeados los pedales de los pilotos, la consola central y las bases de los asientos. Los asientos están bien texturizados y los de los pilotos dispones de cinturones de calca. Hay también un panel trasero y el de instrumentos, que lleva los controles separados. Los instrumentos están representados con calca. Las instrucciones indican que deben lijarse los lados de la cubierta delantera del panel para que encaje al unir el fuselaje. Las ventanillas laterales son piezas separadas y deben añadirse desde adentro. Los lados del fuselaje muestran rebajes para ayudar a pegarlas. El parabrisas va pegado desde afuera.
Los lados internos de la carlinga llevan la estructura básica reproducida en relieve y también los picaportes interiores de las puertas de la carlinga.
Fuselaje
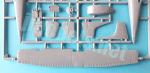
Las mitades no incluyen las superficies de cola ni el frontal del capó del motor. El techo de la carlinga está moldeado con las alas. Como he dicho arriba, las líneas de panel son muy finas y están bien grabadas. Tanto las puertas de acceso como el acceso al compartimento de carga muestran las bisagras y picaportes, aunque no son muy finos ni detallados.
El compartimento ventral de carga viene de una pieza. Le falta el acceso grabado de babor que KP ha omitido. Las instrucciones lo incluyen entre las piezas que no se emplean en esta maqueta, lo cual es un error evidente. Desgraciadamente la panza no tiene marcas para situar la pieza, por ello hay que guiarse por los perfiles de la cara trasera de la caja y por fotos. Siguiendo también estos perfiles, comprobaremos que no vamos a emplear ninguna de las diversas antenas de aleta que emplean otras versiones y que están incluidas en la maqueta.
El frontal del motor muestra las tomas laterales bien definidas y la toma inferior esta provista de rejilla, aunque no tiene demasiada definición. El tubo de escape es una pieza fina sin horadar, colocada por debajo del motor. La maqueta incluye tres tipos de hélices: bipala con y sin buje y tripala con el buje separado. De nuevo los perfiles de la caja son la mejor guía para saber cuál debemos usar en cada caso. Las hélices muestran palas finas con definición pasable y un eje corto pero suficiente para pegar la pieza en el morro.
Alas y cola
Las alas vienen de una pieza unidas en su mitad por el techo de la carlinga. El panelado está bien grabado con finura y limpieza, lo mismo que los pequeños accesos. Los alerones y flaps también aparecen bien marcados y muestran una buena reproducción del relieve. Hay opciones alternativas para las puntas y filetes subalares, e incluso armamento, que en esta edición no emplearemos. El faro de aterrizaje es una pieza transparente y las luces de navegación de las puntas están bien marcadas. El ala de estribor muestra lo que parece un tubo Pitot que no está indicado en las instrucciones ni en los perfiles de la caja.
Los soportes de las alas son piezas aparte bien perfiladas y con puntos de unión correctamente marcados tanto en las alas como en el fuselaje.
La aleta y el timón vienen unidas al filete de cola. En este caso también hay doble opción. Imagino que una de las piezas será para el Cessna 180. Para el 185 debemos usar las superficies verticales más grandes y con filete más largo. La pieza está muy bien panelada y muestra el timón bien marcado y detallado en relieve. La aleta muestra la luz de navegación de cola.
Los estabilizadores vienen separados sin lengüetas de unión o vástagos para unirlos al fuselaje. El grabado de los paneles y timones es igual de bueno que en el caso anterior.
Tren de aterrizaje
Las patas están representadas en piezas bien perfiladas. Las ruedas son opcionales. Hay unas grandes divididas en mitades con bujes bien definidos y el sistema de frenado adecuadamente detallado en las caras internas. En el segundo caso, las ruedas son algo menores y están moldeadas de una pieza, aunque los bujes tienen peor definición. La rueda de cola está bien representada y está unida al largo brazo articulado de cola.
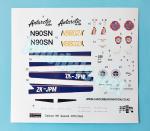
Calcas
La hoja está impresa por el fabricante. Contiene los cinturones de los pilotos, el panel de instrumentos, matrículas, insignias, decoraciones del fuselaje y algunos estarcidos. Las calcas parecen finas y muestran buen contraste y saturación de color. KP no ha olvidado incluir el nombre del fabricante que suele aparecer en los extremos de las puntas de las alas en muchos aparatos.
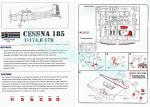
Instrucciones
Están impresas en un folleto de tamaño A5 que consta de cuatro páginas. Contiene una breve historia del avión, un plano numerado de piezas, 15 secuencias de montaje y perfiles en blanco y negro de pequeño tamaño. La cara trasera de la caja muestra perfiles en color con las tres opciones de pintura, que muestran tres aparatos civiles en acabados muy diferentes.
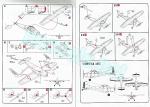
Como señalaba arriba, el folleto debe estudiarse bien y compararlo con los perfiles de la caja ya que es el mismo para diferentes ediciones de la maqueta. El contenedor ventral está señalado como pieza no usable, y las pequeñas antenas de radio que muestran los perfiles para las tres opciones de pintura no están indicadas en los pasos de montaje. Como novedad, KP ha marcado de rojo los lugares o puntos donde hay que pegar cada pieza, o bien aquellas superficies que deben suprimirse, como en el caso de las puntas de las alas o el mamparo delantero de la carlinga. En este sentido las instrucciones son algo mejores que en otras maquetas porque no dejan dudas sobre dónde colocar exactamente algunas piezas. Sin embargo, KP no señala claramente qué piezas son aplicables a cada versión y en esto todavía tiene que mejorar.
Valoración
Es una buena noticia que KP se haya acordado de este avión, tan relegado por los fabricantes hasta ahora y que algunos aficionados tanto a la aviación civil como a la militar habrán echado de menos durante mucho tiempo. Ahora ya no hay excusa para montar una Cessna 180 / 185, y la multitud de acabados posibles son un aliciente más.
En general, la maqueta me parece mejor detallada que otras de este fabricante que he revisado en estas páginas y el mayor inconveniente que un modelista con cierta experiencia puede encontrar tal vez sean las instrucciones por los motivos que he señalado.◊

The kit
It seems the new KP company is not going to stop the machine and they go back with a new tool kit once again. This time it is the turn for the Cessna 180 and 185 Skywagon, an aircraft used for years in many countries in both military and civilian versions. The types still fly in private hands despite they are no longer manufactured. The basic difference between both models is in the longer fuselage of the 185.
If we check the Scalemates database, it is the first time this aircraft is released at any scale. This is just another box of the nine including different variants of both aircraft KP have been releasing in recent months. The box of this “Special”, distinguishable from other versions by a large cargo pod that can carry up to 136 kg. located under the fuselage, contains a sprue of grey parts, a clear sprue, the decal sheet and the instructions.
Like others from KP, the tool is shared by different kits, so we find parts for other versions in the sprue. The instructions are also common and for this reason it is advisable to study them well, since they do not always match the specific variant included in this box, as I will explain below.
Pieces are generally quite clean. There is some easy-to-clean flash on the fuselage, wings and propeller blades, and just one positive ejector mark on each side of the front cockpit that will need to be removed as they may hinder the forward panel attachment. On the other hand, clear pieces are not too thin. The windows are better than the windshield, which is clearly thick but does not show very obvious distortion.
In general, detail of the pieces shows better definition than in other KP kits and it is even very nice in panel lines, which are thin and well engraved on the wings, tail and fuselage, the raised detail on the control surfaces and also on the seats.
Cockpit
The floor is common for the cockpit and cabin and shows the pedals, the central console and the seat bases molded on the piece. The seats are nicely textured and the belts are provided as decals. There is also a rear bulkhead and the instrument panel, which has separate controls. The instruments are rendered in a decal. The instructions point out that the front deck sides molded with the instrument panel are to be sanded to fit the fuselage.
The side windows are separate pieces and are added from the inside. The fuselage sides have recesses to attach them. The windshield is one piece glued from the outside. The internal cockpit sides are molded with a basic raised structure including the cockpit door handles.
Fuselage
The halves do not comprise the tail surfaces or the front cowling. The cockpit roof is molded with the wings. As said above, panel lines are thin and neatly engraved. Both the doors and the access to the load compartment show hinges and handles, although they lack a better definition.
The ventral cargo pod comes in one piece. KP have omitted the left access panel. The instructions include this pod among the parts that are not used in this kit, which is an obvious mistake. Unfortunately, the belly does not have marks to place the piece, so you are only guided by the profiles on the back of the box and by the pics you can find. According to these same box profiles, we will not use any of the fin antennas for other versions included in the kit.
The cowling front shows well-defined side intakes. The lower intake is provided with a grill, although it does not have much definition. The exhaust pipe is a thin, undrilled piece, located below the engine. The kit includes three types of propellers: two-bladed with and without a hub, and a three-bladed one with a separate hub. Once again, the profiles of the box are the best guide to know which one to use in each case. The propellers show thin blades with passable definition and a short shaft, but it is enough to insert the piece into the nose.
Wings and tail
The wings come in one piece joined in the middle by the cockpit roof. Panels are again finely engraved and clean and the same can be said of the small accesses. The ailerons and flaps are also correctly marked and show sharp raised detail. There are alternative pieces for the wingtips, underwing fences and even armament for military versions which we are not used in this box. The landing light is a transparent piece and the navigation lights on the tips are well marked. The starboard wing shows what looks like a Pitot tube which is not indicated in the instructions or the profiles printed on the box.
The wing struts are separate parts showing a correct profile with attachment points clearly marked on both the wings and the fuselage.
The fin and rudder are molded with the tail fillet. We also have a double option here. I suppose one of the pieces must be for the Cessna 180. For the 185 we should use the larger piece provided with a longer fillet. Panels on both sides look nice and the rudder has raised detail. The fin is molded with the tail navigation light at the top.
Stabilizers come separate with no tabs or pins for fuselage attachment. The engraved panels and rudders are just as good as in the vertical surfaces.
Undercarriage
The legs are one piece each with correct profile. The wheels are optional and include a set molded in halves with detailed hubs and brake system. The second choice is for smaller wheels molded in one piece. The hubs are not so nice. The tailwheel is well represented and comes molded with a long tail strut.
Decals
The sheet is printed by the manufacturer. It contains the seat belts, the instrument panel, registers, company badges, fuselage lines and some stencils. Decals look thin and show good contrast and color saturation. KP have not forgotten to include the manufacturer’s name which often appears on the wingtip edges in many aircraft.
Instructions
They are printed in an A5 size brochure consisting of four pages. It contains a short history of the aircraft, a numbered parts plan, 15 assembly chapters as well as black and white profiles. The back of the box shows color profiles of three civilian aircraft in very different finishes.
As said above, the brochure should be studied carefully and compared with the profiles of the box, since it is the same for different kits. The ventral pod is identified as a non-usable part, and the small radio antennas that can be seen on the box are not indicated in the assembly steps. KP have printed in red the spots or points where pieces are glued, or the surfaces that should be sanded off, as the wingtips or the forward cockpit bulkhead. In this sense, the instructions are somewhat better than in other kits. However, the brochure doesn’t clearly identify which parts are applicable to each version and this still something to improve.
Conclusion
It is good news that KP have remembered this aircraft, which has been overlooked by manufacturers. I’m sure some fans of both civil and military aviation will have missed it for a long time. Now there is an excuse for building a Cessna 180 / 185, and the multitude of possible finishes we now have is an extra reason.
In general, the kit seems better detailed than others from this manufacturer that I have reviewed on these pages. The biggest drawback that a modeller with some experience may find are the instructions.◊
Publicado – Published: 4 / 2023
©www.jmodels.net


Debe estar conectado para enviar un comentario.