

De un vistazo – Quick look
MATERIAL Y PIEZAS
MEDIA & PARTS:
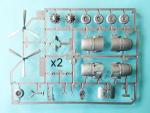
- Plástico inyectado (76 piezas), plástico transparente (23 piezas).
- Injected plastic (76 parts), clear plastic (23 parts).
CALCAS – DECALS:
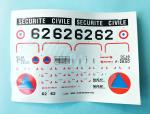
- Insignias de la Seguridad Civil francesa, panel de instrumentos, escarapelas, matrículas y marcas del fuselaje y cola. Aspecto brillante y fino. Sin exceso de transparente. Escarapelas descentradas.
- French Civil Security markings, instrument panel, registers, roundels and fuselage and tail markings. Thin and glossy finish. No excess of carrier film. Roundels printed off-centre.
OPCIONES – OPTIONS:
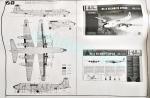
- Douglas DC-6B. Securité Civile. Marignane (Francia), 1983.
INSTRUCCIONES – INSTRUCTIONS:
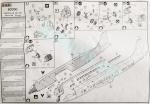
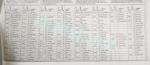
- Folleto grapado de 3 páginas en formato A3 impreso en blanco y negro.. Contiene un sumario histórico sobre el avión, 10 secuencias de montaje, perfiles y una tabla de pinturas de Heller y Humbrol.
- 3-page A3 stapled brochure printed in black and white. It contains a historical summary about the aircraft, 10 assembly stages, profiles and a paint chart showing Heller and Humbrol references.
LO MEJOR – THE BEST:
- Paneles incisos. No muy difícil de armar en apariencia. Versión inusual.
- Engraved panel lines. Apparently not too difficult to build. Unusual version.
LO PEOR – THE WORST:
- Escaso detalle interno. Motores. Ruedas en mitades.
- Scarce interior detail. Engines. Wheels in halves.
VALORACIÓN – CONCLUSION:
- Afortunadamente el molde ha envejecido muy bien y cuenta con el detalle suficiente para el modelista actual. Versión atractiva y poco común. Recomendable a quienes tengan cierta experiencia y espacio en la vitrina.
- Luckily the tool has aged very well and has enough detail for today’s modeler. This attractive and unusual version can be recommended to those who have some experience and enough room on the shelf.

La maqueta
Se trata de una maqueta que viene coleando desde los años 80 con los marbetes de Heller y Heller Humbrol y que ha tenido muchas reediciones con diferentes nombres y aspectos (DC-6A/B Super–Cloudmaster, C-118 Liftmaster, DC-6B Super Cloudmaster), pero ha sido siempre una y la misma. En 2016 Heller la lanzó con esta terminación de la Seguridad Civil francesa donde fue empleado como apagafuegos.
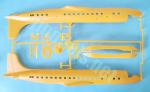
La caja trae cuatro bastidores, dos de color amarillo para facilitar la pintura y otros dos iguales de color plateado al viejo estilo, la hoja de calcas y las instrucciones. Aunque el molde tiene ya sus años, las piezas carecen de rebabas y poseen escasas marcas evidentes. Sorprendentemente los lados de la carlinga están limpios y sólo vamos a encontrar marcas en el panel de instrumentos, detrás de los asientos y las tapas de los pozos. La primera impresión de la maqueta es que resulta un tanto grande para la escala, lo cual se confirma al medir, por ejemplo, la longitud. De los alrededor de 44 cm que debería tener un DC-6 en esta escala, la maqueta llega nada menos que a los 46. Nadie duda que terminar una maqueta de este tamaño necesitará bastante espacio en la vitrina, pero lo cierto es que va a ser algo más de los esperado.
También es insólito que las líneas de paneles estén todas grabadas y además con finura. Es una suerte que los fabricantes empezaran a “darle la vuelta” a los paneles precisamente a partir de los años 80 y que Heller se apuntase de los primeros a esta tendencia. El número de piezas no es crecido y en principio el montaje no aparenta ser complicado, salvo por las dimensiones y el despiece de las alas.
No hay opciones de montaje, el único cambio respecto a otras ediciones es la presencia del depósito ventral para cargar agua.
Carlinga
El interior del fuselaje está vacío salvo la carlinga. El suelo está moldeado con el interior del pozo de la rueda delantera, que no tiene detalle ni marcas. Los lados del pozo son el lugar ideal (y único) para insertar el contrapeso necesario para que el modelo no se asiente de cola. Las instrucciones no indican la cantidad de peso requerido, pero no debe ser poco en una maqueta de estas dimensiones. El suelo contiene las bases de los asientos y la consola frontal con el panel separado y los instrumentos reproducidos en una calca. El panel tiene tres marcas que limpiar, pero por el tamaño de la pieza, tan sobredimensionada como el resto, no costará mucho hacerlo. Los asientos y los controles también vienen aparte, así como el panel trasero sobre el que va pegado el suelo perpendicularmente y que muestra el acceso a la carlinga abierto. Los lados del fuselaje no tienen detalle, aunque están limpios de marcas, como decía antes.
Tanto el techo de la carlinga como el parabrisas están integrados en una pieza transparente que tiene un grosor razonable. Las superficies no transparentes de la pieza se han reproducido con plástico traslúcido.
Antes de cerrar el fuselaje hay que pegar diferentes ventanillas, todas ellas insertadas en rebajes. Las piezas transparentes tienen un grosor inesperadamente fino. Varias de ellas están moldeadas en hileras como cabe esperar en un avión originariamente de línea.
Fuselaje
Está separado en dos mitades que integran tanto las superficies verticales de cola como el extradós de las alas. Como decía antes, los paneles y líneas están grabados con gran finura. Las puertas tienen buena definición y llevan los tiradores incluidos, aunque sin definición.
Tras la carlinga y en la zona ventral delantera hay varias aletas de antenas y una antena del sistema de aterrizaje instrumental (ILS) que es demasiado grande. Tras pegar las alas al fuselaje, se añade el depósito de agua ventral debajo. La pieza está dividida en mitades con un triángulo rebajado en el extremo trasero que imagino será la salida. Para colocar este depósito hay que taladrar sólo un pequeño agujero en la parte interna del tramo central de las alas.
Alas y cola
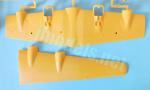
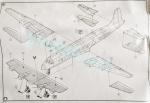
Las alas están despiezadas en cinco partes provistas de pequeños vástagos machihembrados para alinear las piezas. Hay dos superficies superiores y tres inferiores. Los extremos de las alas están cortados a la altura de la articulación del larguero principal (cerca de la mitad de cada ala, para entendernos), mientras que la superficie central contiene una sección del fuselaje y los encastres de los motores. Si hay que ganar finura en las puntas, personalmente me gusta más este despiece que el alternativo de encajar las mitades inferiores en las superiores a la altura de alerones y flaps.
Al igual que en el fuselaje, las líneas y registros están muy bien grabadas en las alas. Los alerones y flaps están marcados con más profundidad y anchura. Además, los carenados de los actuadores tienen buena definición y los bordes de salida son realmente finos. Las puntas tienen las luces marcadas y los faros de aterrizaje bajo las alas tienen lentes transparentes colocadas antes de unir las mitades de las alas.
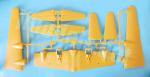
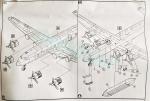
Los cubremotores vienen en mitades que muestran un buen panelado especialmente destacable en las aletas de ventilación, que están representadas con finura. Sin embargo, tanto las tomas de aire como las salidas de los escapes están cegadas por el plástico. De los motores sólo tenemos un disco externo insertado dentro de los capós con un remedo de los cilindros que no tiene nada que ver con la realidad. El único consuelo es que gracias al prominente buje, que muestra formas convincentes, se va a ver poco de ellos y por tanto casi no merece la pena ni buscarles un reemplazo. Las hélices son finas y las palas están bien perfiladas. Están provistas de un eje bastante largo y de un tope en la parte posterior para permitirles el giro. Una vez montados los motores, los ensamblajes se pegan directamente a los encastres de las alas.
Las superficies de cola muestran un buen panelado con los timones bien marcados e idénticos actuadores carenados a los de las alas. Los bordes de salida de todas las piezas son finos. Los estabilizadores están separados en mitades delgadas y provistos de lengüetas para unirlos al puro de cola.
Tren de aterrizaje
De acuerdo con las instrucciones, el tren delantero se monta antes de pegar la carlinga al fuselaje. No es imprescindible realizarlo de esta forma, aunque sí más cómodo. Consta de una pata con los brazos de torsión de tijera aparte, un brazo de plegado y la rueda. La pata acaba en una horquilla para introducir la rueda a presión. La rueda está separada en mitades, sin detalle en los neumáticos, pero a cambio el detalle de la llanta es igual al real. Las puertas del pozo son finas, están detalladas por dentro y unidas a las bisagras en posición abierta.
Los pozos del tren principal está abiertos en las dos góndolas internas de los motores y no tienen detalle dentro. Las patas también llevan los brazos de torsión y los brazos de plegado aparte. De la misma forma, las ruedas vienen en mitades con los neumáticos lisos, el detalle interno de la llanta bien reproducido, aunque el borde externo es muy exagerado y grueso. La cara interna de la llanta muestra el sistema de freno. Las tapas tienen detalles en su interior, aunque hay marcas positivas que limpiar.
Calcas
La hoja muestra insignias de la Seguridad Civil francesa, el panel de instrumentos, escarapelas, matrículas además de marcas situadas en el fuselaje y la cola. Su aspecto es brillante y fino sin mostrar exceso de soporte. Las escarapelas francesas tienen el círculo central ligeramente descentrado y deberían sustituirse.
Instrucciones
Están impresas en blanco y negro en un folleto grapado de tres páginas en formato A3 que contiene un sumario histórico sobre el avión, diez secuencias de montaje bastante claras, perfiles y una tabla de pinturas de acrílicos de Heller y esmaltes de Humbrol. Los colores están identificados por su código a pequeño tamaño en ambas gamas en el montaje en lugar de por el nombre.
Aunque no es imprescindible porque la piezas están numeradas con claridad en los bastidores, se echa de menos un plano, especialmente para las piezas transparentes. El tamaño del folleto hace que sea difícil de manejar, pero Heller lo ha impreso en formato A4 en las últimas ediciones de la maqueta.
Heller propone solamente una versión apagafuegos basada cerca de Marsella en los años 80 con la clásica librea amarilla de este tipo de aviones.
Valoración
En general, Heller hizo un buen trabajo en esta maqueta y se nota porque el paso del tiempo no ha sido inmisericorde con ella. Aunque el montaje es bastante básico, acaso resulte menos difícil de lo que pueda aparentar por el tamaño. Precisamente por sus dimensiones la maqueta me parece más recomendable a modelistas con cierta experiencia y no sólo a nostálgicos de otras épocas del modelismo. Además, esta es una versión atractiva e inusual, motivos suficientes para hacerla aterrizar en una vitrina con el espacio necesario.◊


The kit
This is a kit that has been around since the 1980s with the Heller and Heller Humbrol labels and has had many reissues with different names and liveries (DC-6A/B Super-Cloudmaster, C-118 Liftmaster, DC-6B Super Cloudmaster), but it was always one and the same. For a change, in 2016 Heller released this French Civil Security version which was used as a fire extinguisher.
Inside the box there are four sprues, two of them yellow to ease painting and two others silver as it was common in old-style kits, the decal sheet and the instructions. Although the tool is quite old, pieces are free from flash and have few evident pin marks. Surprisingly, the cockpit sides are clean and we only find marks on the instrument panel, behind the seats and the wheel covers. At first sight the kit looks clearly too large for the scale and this is confirmed when one measures its length, for example. A 1/72 DC-6 should be around 17.32 in long in this scale, but in fact the kit is 18.11 in. Nobody doubts that finishing a model of this size will need a lot of space in the shelf, but the truth is that it will be a bit more than expected.
It is also unusual that panel lines are all engraved with finesse. It is fortunate that manufacturers began to «invert» these lines precisely from the 1980s and Heller was one of the first to join this trend. Part count is quite low for a kit of this size and apparently assembly does not seem too complicated, except for the dimensions and the wing assembly.
There are no assembly choices, the only change with respect to other boxings being the addition of the ventral water tank.
Cockpit
The fuselage interior is empty except for the cockpit. The cockpit floor is molded with the front wheel well, which has no detail or pin marks. The sides of the well are the ideal (and only) place to add the ballast needed to avoid the model to sit on its tail. The instructions do not indicate the amount of weight required, but it should not be small for a kit of this length. The floor contains the seat bases and the front console with the panel separated and the instruments provided in a decal. The panel has three marks to clean up, but due to the size of the piece, as oversized as the rest, this will not be difficult. The seats and controls also come separately, as well as the rear panel, which shows the access open. The fuselage sides have no detail but are also clean from marks, as said.
Both the cockpit roof and the windscreen are molded in a clear piece that looks reasonably thin. The non-transparent surfaces of the part are rendered in translucent plastic.
Before closing the fuselage, the windows are glued on the fuselage sides, all of them inserted into recesses. Clear parts are unexpectedly thin and some of them are molded in rows as you would expect in any aircraft originally designed as an airliner.
Fuselage
It is separated into two halves containing both the vertical tailplanes and the wing extrados. As said before, accesses and lines are very finely engraved. The doors are clearly outlined but the handles have no definition.
Behind the cockpit and below the nose are several antenna fins and an instrument landing system (ILS) antenna that is oversized. After joining the fuselage and wings, assembly continues with the addition of the belly water tank. The piece is molded in halves with a recessed triangle at the rear end that I imagine will be the outlet. To place this tank you only have to drill a small hole inside the center wing piece.
Wings and tail
The wings are provided in five parts, two upper and three lower surfaces, molded with small pins for alignment. The wing tips are cut at the height of the main spar joint (about halfway up each wing, to be clear), while the central surface contains a section of the fuselage belly and the engine nacelles. I personally prefer this parts breakup rather than the alternative of embedding the lower halves into the upper ones along ailerons and flaps.
As with the fuselage, lines and registers are very well engraved on the wings. The lines of ailerons and flaps are a bit deeper and wider. In addition, the actuator fairings have good definition and the trailing edges are really thin. The tips have the lights engraved and the landing lights under the wings are clear pieces added before joining the wing halves.
The engine cowlings come in halves. Panel lines, especially those around the cooling gills, are finely rendered. However, both the air intakes and the exhaust outlets are molded closed. The engines are provided as discs showing bizarre rows of cylinders inserted into the cowlings. Little will be seen of them because of the prominent spinners, which show a nice shape, and therefore it may not be worth looking for alternative resin engines. The propellers are thin and the blades are well profiled. They are provided with a fairly long shaft with a separate piece glued at the end to allow them to turn. Once the engines are built, the assemblies are glued directly to the nacelles.
Tail surfaces show nice engraved panel lines, with the rudders clearly defined and identical faired actuators to those in the wings. All the trailing edges are thin. The stabilizers are separated into thin halves and provided with tabs for attachment.
Undercarriage
According to the instructions, the nose gear is assembled before gluing the cockpit to the fuselage. It is not essential to do it this way, but may be more convenient. Assembly consists of a leg with separate scissor torsion arms, a folding arm and the wheel. The leg has in a fork to snap the wheel in. The wheel is molded in halves, with no detail on the tires, but detail on the hub really looks the part. The thin covers show internal detail and are molded with the hinges in the open position.
The main undercarriage wells are open in the two inboard engine nacelles and have no detail inside. The legs also have the torsion arms and folding arms separately. Likewise, the wheels come in halves with smooth tires and nice hub detail, but the rims are way too raised and thick. The inner sides show the brake gear. The covers are detailed inside, although there have positive marks to clean up.
Decals
The sheet shows French Civil Security markings, the instrument panel, French roundels, registrations, and markings for the fuselage and tail. Decals look thin and glossy without too much carrier film. The French roundels are printed off-centre and should be replaced.
Instructions
The stapled 3-page A3 brochure printed in black and white contains a historical summary of the aircraft, ten fairly clear assembly stages, profiles and a chart with Heller acrylic paints and Humbrol enamels. The colours are identified in the assembly chapters by a small code in both ranges rather than by name.
Although not essential because parts are clearly numbered on the sprues, one misses a parts diagram, especially for the clear parts. The size of the sheets makes the instructions a bit difficult to handle, but Heller has printed a new A4 booklet in the last boxings of the kit.
Heller only proposes a fire-fighting version based near Marseille (France) in the 1980s with the usual yellow livery of this type of aircraft.
Conclusion
Overall, Heller did a good job on this kit because time has not been merciless with it. As in any kit of its age, assembly looks a bit basic but may be less difficult than one could expect from the kit’s size. Precisely because of its dimensions, the kit seems more recommendable to those with some experience and not only to the nostalgic plastic breed. In addition, this is an attractive and unusual version that is worth a place on the shelf, but first make sure you have enough space.◊
Publicado – Published: 12 / 2024
©www.jmodels.net

Debe estar conectado para enviar un comentario.