

De un vistazo – Quick look
MATERIAL Y PIEZAS
MEDIA & PARTS:
- Plástico inyectado (38 piezas), plástico transparente (2 piezas). Incluye 2 figuras.
- Injected plastic (38 parts), clear plastic (2 parts). Two figures included.
CALCAS – DECALS:
- Escarapelas británicas de dos tipos, paneles de instrumentos, matrículas, líneas de no pisado y estarcidos. Finas, brillantes, sin exceso de soporte. Impresas con buen registro y saturación de color.
- Two types of RAF roundels, instrument panels, registers, no-step lines and stencils. Thin, glossy, without too much carrier. Printed with good register and color saturation.
OPCIONES – OPTIONS:
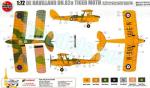
- De Havilland DH.82a Tiger Moth. N-9181. Escuela de Entrenamiento de Vuelo y Reserva Elemental. Aeródromo RAF Yatesbury, Wiltshire (Inglaterra), 1940.
- De Havilland DH.82a Tiger Moth. N-9181. No. 10 Elementary Reserve & Flying Training School. RAF Yatesbury. Wiltshire (England), 1940.
INSTRUCCIONES – INSTRUCTIONS:
- Folleto de 8 páginas con formato A4 impreso mayormente en blanco y negro. Contiene un sumario histórico sobre el avión, 21 secuencias de montaje y una página de perfiles para arriostrar el modelo. La cara trasera de la caja contiene perfiles en color y códigos de esmaltes de Humbrol.
- 8-page A4 brochure mostly printed in black and white. It shows a historical summary about the aircraft, 21 assembly chapters and a page of profiles to rig the model. The back side of the shows profiles in color and Humbrol enamel paints.
LO MEJOR – THE BEST:
- Buen detalle general. Montaje sencillo para un biplano.
- Nice overall detail. Easy assembly for a biplane.
LO PEOR – THE WORST:
- Slats cerrados. Ausencia de luces de navegación. Edición básica con una sola opción de pintura.
- Slats molded closed. Lack of wingtip and tail lights. Basic boxing with only one paint choice.
VALORACIÓN – CONCLUSION:
- Una buena opción para montar este avión en la escala pequeña por su sencillez de construcción, muy notable detalle externo, carlinga más que decente y escaso precio.
- A nice choice to build this aircraft in the small scale due to its ease of assembly, very good external detail, more than decent cockpit and low price.

La maqueta
Es incuestionable la popularidad de este avión en el modelismo, que no lo ha olvidado nunca a cualquier escala desde los años 50 del siglo pasado. Se dice pronto. Sólo en la escala 1/72 tenemos los moldes de AZ Model con copias de Kovozávody Prostějov, los antiguos de Pavla Models, Aeroclub y Airfix (este de 1957 nada menos) y el más nuevo de Red Roo Models, marca australiana de difusión limitada. Desde 2013 contamos con un nuevo molde de Airfix. Esta caja es la segunda edición de dicho molde.
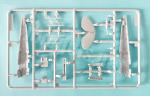
La maqueta tiene tres bastidores, un pequeño bastidor transparente, las calcas y las instrucciones. Ciertamente las piezas están moldeadas con finura y buen detalle general. Hay alguna marca de eyector dentro de la carlinga, pero no será evidente cuando el fuselaje esté cerrado, así como rebabas en los soportes intermedios y también un nódulo de eyector en el asiento trasero, de modo que tenemos variedad de defectos en la maqueta, pero todos leves y reparables.
Esta segunda caja incluye una pequeña variación respecto a la primera. La versión inicial representa un aparato dotado con tracas antigiro en la parte posterior del fuselaje, que hay que cortar para añadir estas piezas. En este caso las superficies no son aplicables al tratarse de un avión fabricado antes de 1942.
La maqueta representa el modelo D.H.82A denominado en la RAF Tiger Moth Mk.II, una versión mejorada del Moth con motor Gipsy Major de 130 hp y contrachapado en la cola del fuselaje en lugar del entelado anterior. Los aparatos fabricados durante los años 30 se emplearon en las Escuelas de Vuelo Elementales y de la Reserva que varias compañías tenían dentro del programa de expansión de la RAF. Por su parte, De Havilland Aircraft de Canadá también produjo 227 unidades antes de la Segunda Guerra Mundial, además de ser exportado a varios países, como Portugal, Noruega y Suecia.
Carlinga
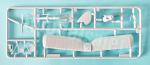
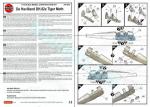
Los lados internos de las carlingas están finamente detallados en relieve con la estructura interna y algunos instrumentos de navegación. Los paneles de acceso en ambos lados están moldeados en posición cerrada, pero se nos ofrece la posibilidad de mostrarlos abiertos cortándolos y reemplazándolos por cualquiera de los cuatro que aparecen en el bastidor B. Estas piezas van pegadas al fuselaje mediante dos pequeños vástagos moldeados en cada pieza e introducidos en agujeros abiertos en el fuselaje. Los agujeros están marcados en los lados internos por eso, al abrirlos, hay que tapar las marcas.
Las piezas de la carlinga incluyen un suelo sin pedales unido al mamparo trasero, dos asientos diferentes, el delantero grueso y con una forma un tanto extraña unido al mamparo intermedio, dos palancas finas, dos paneles idénticos con calcas para los instrumentos y los paragolpes almohadillados muy gruesos. Los paneles incluyen también el giróscopo. Los parabrisas transparentes son bastante finos y realistas.
Como de costumbre, hay dos figuras de pilotos para rellenar la carlinga. Las figuras son de peor calidad que las de algunas maquetas más recientes de Airfix. La del puesto trasero carece de las piernas por debajo de las rodillas para encajarla en su hueco y su compañero tiene un pequeño rechupe a la altura del vientre. Ambas lucen traje de vuelo con paracaídas, casco y gafas.
Fuselaje y motor
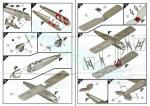
El fuselaje no incluye ninguna superficie de cola ni tampoco el motor. Las mitades muestran las formas de la estructura de cola bien representadas así como el compartimento de equipaje tras la carlinga marcado con finura. También están marcados dos pequeños salientes para pegar los cables de control del timón vertical. La pieza de la mitad izquierda muestra el abultamiento del depósito de combustible de 2 galones. La zona ventral tiene un ligero rebaje para colocar el plano inferior de las alas.
El carenado del motor viene en una sola pieza moldeada con la toma frontal principal de aire abierta y otra toma más pequeña separada en el lado derecho. La parte inferior también tiene el hueco de salida de los escapes, representados en una pieza fina colocada dentro del capó.
La hélice está unida al buje y sus palas son finas. El eje está separado y se pega desde dentro del capó.
Alas y cola
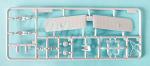
Cada plano de las alas es de una pieza, el superior unido por el depósito central y el inferior por una sección ventral del fuselaje sobre el que va pegado. La reproducción de la estructura interna en las alas y los bordes de ataque me parece muy buena. Los slats automáticos están bien definidos, aunque vienen unidos a las alas, cosa irreal si el avión está en tierra. Los timones están correctamente marcados mediante líneas grabadas con finura y poseen bisagras carenadas en el lado inferior del ala. Las puntas carecen de luces de navegación.
El plano superior contiene la parte superior del depósito principal con la superficie estriada, la válvula de llenado además del testigo del contenido de combustible. La parte inferior del depósito está separada, estriada, y contiene lo que parece la válvula de salida por gravedad.
Los soportes intermedios está unidos en dos piezas extremadamente finas y delicadas de manipular. El montaje se presupone más simple porque van insertados en ranuras en la parte superior, mientras que en los extremos inferiores llevan un pequeño carenado para añadirlo sobre rebajes practicados a los lados del fuselaje. Airfix nos proporciona los soportes externos de cada lado unidos por vástagos en forma de X que conservan ambos soportes paralelos y con el diedro correcto respecto al ala. Una vez pegadas las alas, sólo hay que cortarlos.
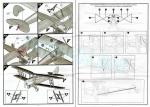
Los planos verticales de cola son de una pieza pegada sobre los planos horizontales. El relieve de la estructura es realmente fino y parece apenas sugerido. La pieza tiene la línea del timón bien grabada y dos pequeños puntos para pegar los cables de control si arriostramos el modelo. No se ha incluido la luz de navegación de cola.
Los estabilizadores son también de una pieza. El timón está marcado con finura y las bisagras del lado superior están reproducidas como dos pequeños vástagos. El relieve estructural muestra superficies sutiles con mejor aspecto que las verticales. Los soportes inferiores vienen aparte.
Tren de aterrizaje
Las patas del tren principal están moldeadas en una pieza con dos soportes separados por delante. Estas tres piezas son finas y están bien perfiladas. Las ruedas poseen las llantas y neumáticos definidos por ambos lados con los neumáticos lisos.
Aunque la maqueta trae una rueda de cola alternativa, en este caso emplearemos un pequeño patín como se aprecia en los perfiles de la parte posterior de la caja.
Calcas
La hoja contiene escarapelas británicas de dos y tres colores, los paneles de instrumentos, matrículas, líneas de no pisado y estarcidos. Las calcas muestran un aspecto fino y brillante sin exceso de soporte. El registro y la saturación de color son correctos.
Instrucciones
El folleto de ocho páginas con formato A4 está impreso en blanco y negro. Contiene un sumario histórico sobre el avión con datos técnicos, 21 capítulos de montaje y una página de perfiles para arriostrar el modelo. La cara trasera de la caja contiene perfiles en color y códigos de esmaltes de Humbrol.
La página de perfiles es bastante clara. Contiene seis secuencias más una vista frontal del modelo para localizar los diferentes tensores, aunque faltan los cables de los timones horizontales de cola.
Al tratarse de una edición básica solo hay una opción de pintura que presenta un aparato con una librea estándar del Mando de Entrenamiento compuesta de Identification Yellow y las superficies superiores camufladas en Dark Earth y Dark Green.
Valoración
Con algunos elementos mínimos por redondear, la maqueta tiene un interior más que decente y un detalle externo en las alas y el fuselaje muy notable. Además, el montaje parece bastante sencillo incluso para un biplano. Por ello, todo indica que esta es una buena opción para construir un Tiger Moth en esta escala, especialmente para los modelistas de nivel básico y medio, a quienes ya no les es forzoso hacer las maquetas alternativas de AZ Model o Kovozávody Prostějov por mucho que tengan más variantes y posibilidades de pintura.◊


The kit
Unquestionably, this is a popular aircraft in modelling and that is the reason why it has never been overlooked at any scale by the market since the 1950s, not a trifle indeed. Only considering the 1/72 scale, we have several different offers, such as the AZ Model tool with reissues from Kovozávody Prostějov, the old tools from Pavla Models, Aeroclub and Airfix (this one from 1957 no less) and the newest one from Red Roo Models, an Australian brand with limited distribution. Since 2013 we have a new Tiger Moth from Airfix and this is the second boxing.
The kit has three sprues, a small clear sprue, the decals and the instructions. Certainly parts are molded with finesse and nice overall detail. There are some ejector marks inside the cockpit, but these will not be evident when the fuselage is closed. Parts also show some flash on the cabane strut pieces and also an ejector nodule on the rear seat, so we have a variety of slight defects in the kit, but all of them easy to mend.
This second boxing includes a small variation from the first. The first release includes an aircraft fitted with anti-spin strakes on the fuselage rear, which needs modifications to attach them. In this case the strakes are not used as the kit is for a RAF aircraft built before 1942.
The kit represents the D.H.82A variant designated Tiger Moth Mk.II in RAF service. This was an improved version of the Moth with a 130hp Gipsy Major engine and plywood construction in the fuselage instead of the previous fabric-covered surfaces. The aircraft built during the 1930s were used in the Elementary and Reserve Flying Schools that several companies set up to improve the RAF expansion programme. De Havilland Aircraft of Canada also produced 227 units before World War II. In addition, the Tiger Moth was exported to several countries in those years, such as Portugal, Norway and Sweden.
Cockpit
The inner cockpit sides are detailed with the raised internal structure and some navigation instruments. The fold-down entry hatches on both sides are molded in the closed position, but we are offered the choice for showing them open by replacing them with any of the four pieces from frame B. These pieces are glued to the fuselage by two small rods molded on each piece and inserted into holes drilled in the fuselage. The holes are marked on the inner sides so when opening them the marks should be filled.
The cockpit parts include a floor without the pedals attached to the rear bulkhead, two different seats, the front one showing an odd shape and attached to the middle bulkhead, two thin levers, two identical panels with decal instruments and very thick padded bumpers. The panels also include the gyroscopic compass. The clear windscreens are quite thin and realistic.
As usual, there are two pilot figures to fill the cockpit. The figures have a lower quality than some included in more recent kits. The pilot in the rear seat lacks the legs below the knees to fit into the cockpit gap and his companion has a small sink on his belly. Both wear a flight suit with parachute, a cap and goggles.
Fuselage and engine
The fuselage is molded without the tail surfaces and the engine cowling. The halves show the shapes of the tail structure well represented as well as the luggage compartment behind the cockpit finely rendered. Two tiny plastic studs are provided on each side to glue the vertical rudder control wires. The left half piece shows the bulge of the 2-gallon fuel tank. The ventral area has a slight recess to fit the lower wing.
The engine cowling comes in a single piece with the main front air intake open and a separate smaller intake on the right side. The underside also has a gap to install the exhaust, represented in a thin piece glued inside the cowling.
The propeller is molded with the hub and the blades are thin. The shaft is separate and is glued from inside the cowling.
Wings and tail
Each wing comes in one piece, the upper wings are joined by the fuel tank and the lower one by a ventral fuselage section. The reproduction of the structural detail in the wings and leading edges looks pretty fine. The automatic slats are well defined, although they are attached to the wings in the closed position, which is unrealistic if the aircraft is on the ground. The rudders are correctly engtaved with very thin lines and have faired hinges on the underside of the wings. The wingtip navigation lights are missing, however.
The upper wing has two pieces for the fuel tank. The upper piece shows a grooved surface, the fuel filler point and the fuel content gauge. The lower one is also grooved and contains what seems to be the fuel outlet valve.
The cabane struts are provided in two extremely thin and delicate pieces. Assembly should be easy as they are inserted into slots open on the upper wing, while the lower ends have a small fairing to be attached to recesses on the fuselage sides. The interplane struts are joined by X-shaped braces that keep both struts parallel and with the correct dihedral with respect to the wing. Once the wings are glued, you only need to cut them to get the struts correctly positioned.
The vertical tail planes are in one piece glued on the horizontal planes. The raised structure is really fine and seems barely suggested. The piece has the rudder line well engraved and two small points to glue the control wires if we wish to rig the model. The tail navigation light is missing.
The stabilizers are also in one piece. The rudder is finely engraved and the hinges on the upper side are reproduced as two small studs. The structural detail shows subtle surfaces with a better appearance than the vertical ones. The lower brace struts come separately.
Undercarriage
The main gear legs are molded in one piece with two independent struts in front. These three pieces are thin and well profiled. The wheels have defined hubs and tyres on both sides and the tires have no detail.
Although the model kit with an alternative tail wheel, in this case we will use a small skid as shown in the profiles on the back of the box.
Decals
Two types of RAF roundels, instrument panels, registers, no-step lines and stencils. The items have a thin and glossy appearance and are printed without too much carrier. Register and color saturation also look fine.
Instructions
The 8-page A4 booklet is printed in black and white. It contains a historical summary of the aircraft with technical data, 21 assembly chapters and a page of profiles for rigging the model. The back of the box contains profiles in colour and Humbrol enamel codes.
The profile page is fairly clear. It contains six sequences plus a front view of the model to locate the different wires, although those for the horizontal tail rudders are missing.
As this is a basic boxing there is only one paint option which features an aircraft in the standard Training Command livery, painted in Identification Yellow with the upper surfaces camouflaged in Dark Earth and Dark Green.
Conclusion
With a few minor details to be rounded off, the kit has a more than decent interior and very nice external detail on the wings and fuselage. In addition, assembly seems quite easy even for a biplane. Therefore, everything indicates that this is a good choice to build a Tiger Moth in this scale, especially for beginners and average modellers, who are no longer forced to choose the alternative kits from AZ Model or Kovozávody Prostějov even though they have more variants and painting possibilities. ◊
Publicado – Published: 12 / 2024
©www.jmodels.net

Debe estar conectado para enviar un comentario.