
De un vistazo – Quick look
MATERIAL Y PIEZAS
MEDIA & PARTS:
- Plástico inyectado (48 piezas), plástico transparente (5 piezas). Incluye dos figuras.
- Injected plastic (48 parts), clear plastic (5 parts). Two figures included.
CALCAS – DECALS:
- Escarapelas británicas, panel de instrumentos, numerales y gran cantidad de estarcidos- Apariencia fina y mate. Buen registro y saturación. Sin exceso de soporte.
- British roundels, instrument panel, registers and plenty of stencils. Thin and matte appearance. Good gegister and color saturation. No excess of carrier.
OPCIONES – OPTIONS:
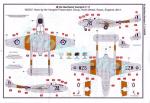
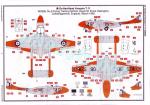
- De Havilland Vampire T.11. WZ507. Vampire Preservation Group. North Weald (Essex, England), 2012.
- De Havilland Vampire T.11. WZ590. No. 5 Flying Training School. RAF Oakington. Cambridgeshire (England). March 1962.
INSTRUCCIONES – INSTRUCTIONS:
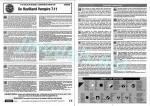
- Folleto A4 doblado de 6 páginas impresas en blanco y negro. Contiene una breve historia del avión con datos técnicos, 17 secuencias de montaje y dos páginas de perfiles en color con referencias de pintura de esmaltes de Humbrol. Claras.
- 6-page A4 brochure printed in black and white. It contains a short history of the aircraft with technical data, 17 assembly chapters and two pages of profiles in color. Paint references belong to Humbrol range. Clear.
LO MEJOR – THE BEST:
- Buen detalle general. Cubierta de la carlinga en tres piezas. Ruedas.
- Nice detail overall. Three-piece canopy. Wheels.
LO PEOR – THE WORST:
- Carlinga decente pero mejorable. Poca variedad en los acabados de pintura.
- Decent but improvable cockpit. Lack of variety in paint finishes.
VALORACIÓN – CONCLUSION:
- Cubre una variante poco representada y tiene un detalle interior decente y por encima de la media en el exterior. Asequible a cualquier modelista excepto novatos absolutos.
- It caters for an infrequent variant and has decent interior detail and above the average outside. Suitable for any modeller except absolute beginners.

La maqueta
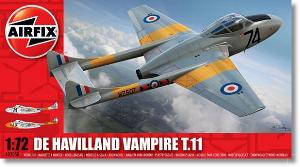
No ha sido muy habitual que las grandes marcas del plástico se hayan fijado en esta versión entrenador del popular caza de Havilland Vampire, del que tenemos decenas de versiones sólo a esta escala. Airfix cubrió el hueco hace ya una década con esta maqueta, primera de su nuevo molde, que ha tenido ya algunas reediciones.
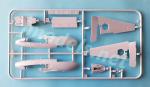
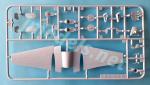
La caja nos presenta tras bastidores de piezas, un bastidor transparente, una amplia hoja de calcas y las instrucciones. El molde está realmente limpio y las piezas muy bien moldeadas, sin marcas visibles y con buen nivel de detalle en las líneas de panel, muchas de ellas finamente remachadas. Las líneas muestran una anchura y profundidad correctas en mi opinión, sin las exageraciones de otras maquetas.
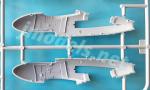
La forma tan peculiar de este avión hace que el despiece, y por tanto el montaje, no sea el usual de otros aviones. Creo que Airfix lo ha resuelto con cierta habilidad, desmembrando el fuselaje en las dos mitades habituales y moldeando las alas de manera que el modelista no tenga que ocuparse de buscar su diedro correcto. El despiece de los brazos de cola y las superficies posteriores es también el que parece más sensato en este caso.
Las opciones de montaje son tres: mostrar el tren de aterrizaje y la cubierta transparente abiertos o cerrados y dos depósitos subalares que en las instrucciones sólo aparecen en el avión conservado por el Vampire Preservation Group en North Weald, aunque es de suponer que se pueden aplicar también a la otra opción de pintura.
Esta caja representa la versión entrenador biplaza específico del Vampire, que fue un proyecto propio de de Havilland (DH.115) y del que se fabricaron más de 500 unidades con motor Goblin 35. Los modelos siguientes de entrenamiento se basaron, con variaciones, en este modelo T.11.
Carlinga
Los lados del fuselaje muestran detalles en relieve suave y la rueda del compensador de la aleta separada. El suelo está moldeado con el mamparo trasero y muestra algunos paneles grabados y remachados en la parte anterior además de algún instrumental (o eso parece) y las bases de los asientos. Los asientos incluyen los reposacabezas y el almohadillado bien definido pero carecen de arneses. Hay dos palancas y el panel de instrumentos resuelto con calca que cuenta también con las dos miras en piezas transparentes. Por detrás de este hay otro mamparo con los pedales moldeados sobre él. También hay una pieza que representa la parte posterior de la carlinga con varios dispositivos encima que representan el reservorio del sistema hidráulico. Como en otras maquetas de la marca, la carlinga es en general decente en detalle pero un poco mejorable ya que en gran parte se podrá apreciar desde el exterior.
La cubierta de la carlinga está dividida en tres secciones y puede mostrarse abierta. Las piezas son finas, muy transparentes y muestran buen detalle en el armazón. La pieza frontal lleva incluso el limpiaparabrisas.
Los pilotillos son dos figuras bastante apañadas en esta ocasión. Desgraciadamente ambas son iguales y muestran la misma posición relajada con los brazos sobre las piernas. El atuendo comprende un casco de aspecto actual y traje de vuelo, que parece mejor definido que en otras figurillas de Airfix. Ambas me parecen usables en esta maqueta, especialmente porque también pueden cubrir la falta de arneses, muy evidente bajo la cubierta tan amplia.
Fuselaje
Está dividido en mitades con la tobera separada en un cilindro sencillo situado entre ellas en la parte posterior. Obviamente, hay que añadir algo de peso en el morro para evitar que el modelo se asiente de cola debido al tren de triciclo.
La parte ventral del morro tiene una sección separada que incluye el pozo de la rueda, detallado en el interior con tapas separadas, y las troneras de los cañones.
La parte posterior del fuselaje tiene un rebaje de cierta anchura para situar los conductos internos de las tomas, que también se han seccionado en mitades con una pieza en la parte posterior que tiene moldeado el ventilador del motor Goblin. La parte externa de las tomas son piezas aparte bien reproducidas que deben situarse en su lugar antes de añadir los conductos.
Alas y cola
Las alas están divididas en tres superficies, pero en este caso es la mitad superior la que viene unida a una sección del fuselaje. La pieza incluye las puntas de las alas, las superficies de control y el detalle en relieve del fondo de los pozos. El ala de babor incluye la luz de aterrizaje, pero no cuenta con pieza transparente. Las líneas de panel están bien grabadas, con mayor anchura en los alerones y aletas. Como ya he señalado, bajo las alas podemos colocar un par de depósitos desechables de 500 litros moldeados con los soportes.
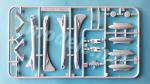
Los brazos de cola vienen en mitades que incluyen las aletas verticales con el tubo Pitot. Los timones están moldeados en las mitades internas. Las piezas muestran accesos y algunos paneles finamente remachados. Los estabilizadores vienen separados de los brazos y cuentan con aletas para pegarlos. La superficie central está bien panelada con el timón marcado y dos compensadores en piezas separadas en la cara inferior.
Antes de unir los brazos a las alas hay que pegar las patas del tren principal. Los brazos van empotrados en rebajes angulados en los bordes de salida de las alas.
Tren de aterrizaje
El tren anterior está reproducido con la pata y la rueda unidas en la misma pieza. Ambas muestran detalle muy nítido. Las patas del tren principal son pasables, pero lo que más destaca son las ruedas. Tanto las llantas, los neumáticos como la banda de rodadura muestran muy buen detalle. Las tapas están divididas en dos secciones, son finas y están detalladas por dentro. La secciones mayores incluyen finos actuadores.
Calcas
La hoja es bastante extensa, sobre todo porque tiene un buen número de estarcidos. También incluye escarapelas británicas, el panel de instrumentos y numerales. Su apariencia es fina y mate. Los motivos tienen buen registro, saturación de color y carecen de exceso de soporte.
Instrucciones
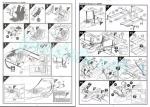
Están impresas en un folleto de tamaño A4 doblado formando seis páginas impresas en blanco y negro. Contiene una breve historia del avión con datos técnicos, 17 secuencias de montaje y dos páginas de perfiles en color con referencias de pintura numeradas en códigos de esmaltes de Humbrol. Las vistas explosionadas son claras.
Las dos opciones de acabado no son muy diferentes y además una de ellas es ya una pieza de museo en lugar de un avión operativo. Las marcas de la segunda opción van destacadas en Fluorescent Fire Orange de Humbrol, color que me parece el más aproximado al real de cuantos he visto, aunque podría haber otras opciones en otras gamas que desconozca.
Valoración
Me parece un acierto que Airfix haya elegido precisamente esta versión de entrenador para cubrir el hueco de una variante que no se ha prodigado casi nada en esta escala.
Salvo que la parte superior de las alas y el ajuste de los brazos de cola dicten lo contrario, la maqueta no debería ser difícil de montar si se tiene un poco de experiencia. Es cierto que la pintura no tiene gran variedad de acabados, pero hay calcas en el mercado para quienes no se conformen con lo que hay en la caja.◊

The kit
Modelling brands have rarely released this trainer version of the popular de Havilland Vampire though we have tens of other versions just in this scale. Airfix filled the gap a decade ago with this kit, the first of their new tooling, which has already had some reboxes.
The box includes three sprues of parts, a clear sprue, a large sheet of decals and the instructions. Pieces are really clean and very well molded, with no visible pin marks and a good level of detail on panel lines, many of them finely riveted. In my view, lines show a correct width and depth without the oversized stuff present in other kits.
The peculiar twin-boom design of the Vampire means that parts breakup, and therefore assembly, is not the one we find in other aircraft kits. Airfix have molded the fuselage in the usual two halves and the wings so that the modeler does not have to care about the correct dihedral. Tail booms and rear surfaces are also molded in an easy and sensible way.
Assembly choices are three: posing the landing gear and canopy open or closed and two underwing drop tanks. Instructions show the tanks only in the aircraft belonging to the Vampire Preservation Group, though presumably they can also be used with the second paint option.
This kit represents the first specific two-seat trainer version of the Vampire, which was a private venture with factory designation DH.115. 500 examples were manufactured with a Goblin 35 engine. Subsequent trainer versions were based, with changes, on the T.11.
Cockpit
The fuselage sides show soft raised details and a separate tailplane trim handwheel. The floor is molded with the rear bulkhead and shows some engraved and riveted panels on the front as well as a few instruments (or so they seem) and seat bases. The seats include headrests and well-defined padding but lack harnesses. There are two control sticks, the instrument panel rendered in decal and two sights in clear pieces. The front bulkhead is separate and has the pedals molded on. There is also a piece for the cockpit rear with the hydraulic system reservoir. As in other Airfix kits, the cockpit is generally decent in detail but could be improved a little since it can largely be seen from the outside.
The canopy is divided into three sections and can be displayed open. Pieces are thin, very clear and show nice detail on the frame. The front piece even includes a tiny windshield wiper.
The pilots figures a nicer in this release but both are identical in the same relaxed pose with the arms lying on their legs. The outfit comprises a modern-looking helmet and flight suit better defined than on other Airfix figures. The figures seem usable, especially since they can hide the lack of seat belts, so evident under the wide canopy.
Fuselage
It is divided in halves with the nozzle rendered in a cylinder attached between them. Obviously, some weight is necessary inside the nose to prevent the model from sitting on the tail due to the tricycle landing gear.
The bottom nose section comes separate and includes the front wheel well, detailed on the inside, and provided with separate covers as well as the gun troughs.
The rear fuselage has a wide recess to attach the internal intake ducts and the wings. The ducts have also been molded iin halves with a piece at the rear showing the Goblin engine fan molded on. The air intakes are rendered open and need to be glued in place before the ducts are added.
Wings and tail
The wings are molded in three pieces, but it is the upper half that is attached to a fuselage section. The piece includes the wingtips, control surfaces, and raised detail inside the wheel wells. The port wing includes a landing light, but there is no clear piece provided. Panel lines are well engraved and wider on ailerons and fins. As said, you have the choice to include a couple of 500 liter drop tanks that are molded with the pylons.
The tail booms come in halves that include the vertical fins with the Pitot tube. The rudders are molded with the inner halves. The pieces show registers and some finely riveted panels. Stabilizers come separate from the booms provided with tabs to attach them. The middle tailplane is well paneled with the rudder neatly engraved and two mass balance weights in separate pieces.
The trailing edges of wings have angled recesses to insert the tail booms but first you need to glue the main undercarriage legs.
Undercarriage
The front undercarriage is rendered with the leg and wheel joined in the same piece. Both show very sharp detail. The main gear legs are passable, but the wheels are outstanding with rims, tires and tread nicely detailed. The covers are divided in two thin pieces detailed on the inner sides. The larger parts include thin actuators.
Decals
The sheet is quite extensive as it has lots of stencils. It shows British roundels, the instrument panel and registers. Decals have a thin and matte appearance with good registration, color density and lack of carrier film.
Instructions
They are printed on an 6-page A4 brochure printed in black and white. It contains a brief history of the aircraft with technical data, 17 assembly chapters and two pages of color profiles with paint references numbered in Humbrol enamel codes. The exploded views are clear.
The two finish options are not very different, one of them being a museum piece instead of an operational aircraft. According to the instructions, Humbrol’s Fluorescent Fire Orange is used on the highlighted surfaces on the wings and fuselage. This is the paint I find closest to the real color but there could be others in different ranges that I am unaware of.
Conclusion
It is nice that Airfix have released this T.11 trainer, as we have had very few kits of this trainer so far, all of them in resin or too old to be readily available today.
Unless the top side of the wings and the fit of the tail booms proves the opposite, this should be an easy build even if you have little experience. Though paint finishes are not very different, there are decals on the market for modelers who may not be happy with those inside the box.◊
Publicado – Published: 12 / 2023
©www.jmodels.net

Debe estar conectado para enviar un comentario.