
De un vistazo – Quick look
MATERIAL Y PIEZAS
MEDIA & PARTS:
- Plástico inyectado (69 piezas), plástico transparente (5 piezas).
- Injected plastic (69 parts), clear plastic (5 parts).
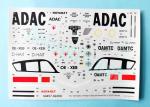
CALCAS – DECALS:
- Marcas de la ADAC, ÖAMTC y sanitarias, panel de instrumentos, matrículas y numerosos estarcidos. Aspecto fino y mate, sin exceso de soporte.
- ADAC, ÖAMTC and sanitary markings, instrument panel and plenty of stencils. Thin and matte finish without too much carrier film.
OPCIONES – OPTIONS:
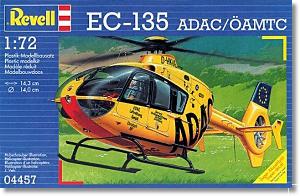
- Eurocopter EC 135. ADAC (Allgemeiner Deutscher Automobil-Club, Automóvil- Club Alemán), Winterberg Krankenhaus Saarbrücken (Hospital de Saarbrücken, Alemania), Agosto de 2001.
- Eurocopter EC 135. ÖAMTC (Österreichische Automobil-, Motorrad- und Touring Club, Automóvil- Club Austriaco), Tirol (Austria). Noviembre de 2000.
- Eurocopter EC 135. ADAC (Allgemeiner Deutscher Automobil-Club, German Automobile Association), Winterberg Krankenhaus Saarbrücken (Saarbrücken Hospital, Germany), August 2001.
- Eurocopter EC 135. ÖAMTC (Österreichische Automobil-, Motorrad- und Touring Club, Austrian Automobile Association), Tirol (Austria). November 2000.
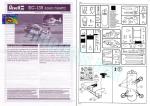
INSTRUCCIONES – INSTRUCTIONS:
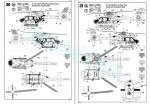
- Folleto de 12 páginas impreso en vertical en blanco y negro. Contiene una breve referencia histórica sobre el helicóptero, una lista de pinturas con códigos de esmaltes de Revell, un plano numerado de piezas, 29 secuencias de armado y 2 páginas de perfiles.
- 12-page leaflet printed vertically in black and white. It contains a short historical summary about the helicopter, a list of paints with codes in Revell enamels, 29 assembly chapters and 2 pages of profiles.
LO MEJOR – THE BEST:
- Carlinga e interior decentes.
- Decent cockpit and interior.
LO PEOR – THE WORST:
- Marcas de eyector. Armado del fuselaje. Puertas cerradas. Errores en diversos elementos. Calcas.
- Pin marks. Fuselage assembly. Doors moulded closed. Mistakes in several pieces. Decals.
VALORACIÓN – CONCLUSION:
- No aparenta ser tan mala como la pintan, pero lo cierto es que además tiene varios errores que no la hacen recomendable sino al modelista con mucho interés en este helicóptero. Novatos abstenerse.
- It doesn’t look as bad as they say, but the truth is it has several mistakes that don’t make it recommendable but to the modeller really interested in this chopper. Beginners should refrain.

La maqueta
No hay duda que a Revell le dio fuerte por el Eurocopter EC-135 y lo ha sacado una y otra vez desde hace más de 20 años en diferentes escalas y formatos. Sólo en la escala 1/72 hay por ahora 10 ediciones del mismo molde con diferentes libreas civiles, militares y policiales. La presente caja inició toda la saga allá por 2001.
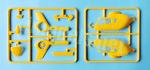
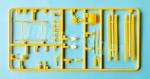
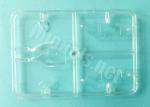
Dentro de la caja hay seis bastidores, uno de ellos transparente, las calcas y las instrucciones. Salvo las piezas transparentes algo más gruesas, el resto tiene un aspecto fino y acorde con la escala. Precisamente la finura de las piezas parece haber tenido consecuencias en las marcas de eyector presentes en el interior de la carlinga a la altura del suelo así como en la pieza del propio suelo, la cara interna de la aleta de cola y hasta en las salidas de las toberas. Salvo en el último caso, las marcas dejan leves abultamientos en el lado opuesto que son evidentes. Las marcas, por otro lado, no son profundas y se pueden rellenar con facilidad. Por no dejar nada en esta primera mirada a la maqueta, añado también los leves rechupes en las palas de la hélice, que son aún más sencillos de restaurar que las marcas. Únicamente hay rebabas en algunas piezas y son mínimas.
Considerando el tamaño de la caja y el despiece de su contenido, incluso el modelista experto podría creer que se trata de una maqueta para principiantes, pero es una ilusión. En Internet he encontrado algunas críticas, severas en ocasiones, al ajuste de las piezas, en especial las transparentes. Ciertamente cada quisque cuenta la feria como le va, pero dejo apuntado que la maqueta puede tener más trabajo de lo que su aparente simpleza parece indicarnos. También las calcas han recibido reproches, no tanto por su calidad sino porque las que cubren mayores superficies están mal diseñadas y no se ajustan bien a los perfiles y ángulos.
Revell propone en esta edición libreas parecidas de asociaciones automovilísticas de Alemania y Austria, pero afortunadamente el modelista tiene bastante calcas alternativas para hacer otras versiones tanto civiles como militares.
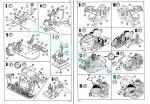
Carlinga e interior
El suelo interno es de una pieza. La zona de la carlinga presenta una textura rugosa para diferencialrla del resto. La parte trasera muestra múltiples abultamientos debido a los agujeros de la cara opuesta, que hay que taladrar para instalar diferentes elementos. La pieza contiene las consolas situadas entre los pilotos y las bases de sus asientos.
La carlinga consta de dos asientos bien representados pero con marcas negativas que arruinan el detalle del acolchado, las palancas de control de vuelo y cabezada más los pedales. También está la consola delantera en dos piezas con el panel de calca. Las instrucciones nos advierten de la adición de un contrapeso de 10 gr dentro de la consola para equilibrar el modelo. Es evidente que esa cantidad resulta excesiva para el espacio disponible, pero en caso necesario el modelista tal vez pueda apañarse más sitio por debajo del suelo a la altura de los soportes delanteros de los patines.
La parte posterior contiene dos asientos, uno con la base separada y otro sin ella, una camilla y un contenedor. Tanto el techo de la zona de carga como los lados del fuselaje interno vienen por separado. Uno de los lados está moldeado con diversos contenedores o acaso aparatos de cuidados médicos. Se me ocurre que tal vez una de las razones del mal encaje del fuselaje que señalan los críticos se deba a los paneles laterales de la zona de carga, que seguramente impedirán ajustar los transparentes en el interior del fuselaje. Es una suposición, no lo he comprobado.
Fuselaje
Las mitades del fuselaje están moldeadas sin la cola. También están exentos los paneles de los escapes y los de la zona dorsal tras el rotor, unidos en una pieza. El detalle externo es adecuado y está reproducido con líneas grabadas de gran finura más algunas salidas de ventilación. Desgraciadamente, las puertas se han reproducido cerradas y no hay posibilidad de mostrar el interior bastante decente que Revell le puso a este helicóptero.
De acuerdo con las instrucciones, lo primero que hay que añadir en el interior son las ventanillas laterales y las de observación de la parte delantera inferior. Las de los lados se proporcionan de una pieza y van encajadas en los marcos desde adentro. La ventanilla auxiliar de las puertas de los pilotos están bien marcadas. Las delanteras, por contra, se pegan desde afuera. En ambos casos no tienen mucho grosor, aunque las de proa tienen cierta distorsión debido a su forma.
Pegadas las ventanillas y el interior del habitáculo, hay que añadir la base del rotor principal, detallada con el eje, provisto de un rodamiento inferior que permite el giro, más las varillas de control unidas en una pieza. La parte trasera de la base se complementa con un panel donde se han reproducido las tomas de aire y el carenado situado entre ellas.
Una vez pegado el fuselaje, se monta el parabrisas delantero, algo grueso y con mal encaje, según afirman quienes han probado ya esta maqueta. La pieza está detallada con un perfil donde hay un único limpiaparabrisas, aunque parece que los modelos más recientes llevan dos en paralelo. También hay que añadir el panel posterior de acceso al motor y los escapes unidos a sus paneles. Los tubos de salida son demasiado planos. Además, los perfiles de las salidas tienen pequeñas marcas de eyector que no será sencillo limpiar.
La parte delantera carece del evidente faro de aterrizaje, pero Revell sí se molestó en reproducir los indicadores de velocidad y una fina antena situada sobre el carenado delantero del techo de la carlinga. Bajo la carlinga hay otra pieza que debe simular algún dispositivo electrónico.
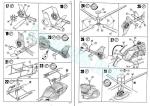
Rotores, hélices y cola
Me salto la base del rotor principal, ya descrito en el apartado anterior. Las palas de la hélice van montadas sobre una pieza que hace las veces de cubo. Pegadas las palas, hay que añadir simplemente la carena del cubo en la parte superior y unirlo todo sobre el eje y las varillas de control. Obviamente, las palas no son en finura como las reales, pero tampoco demasiado gruesas.
La cola está separada en mitades a las que hay que añadir la hélice en el fenestrón, que viene bien representado, y que cuenta con el paragolpes inferior separado. Los estabilizadores son de una pieza y se pegan al brazo de cola mediante una ranura. Las aletas de las puntas son finas y muestran las luces de navegación en la cara externa. Además, el brazo cuenta con varias antenas y dispositivos, posiblemente VHF y VOR. La aleta vertical también lleva la luz de navegación.
Comparando fotos de la maqueta terminada con el helicóptero real se aprecia que Revell dejó el brazo de cola demasiado alto respecto al suelo y sin el ligero ángulo descendente que se nota a simple vista.
Tren de aterrizaje
Infortunadamente, los patines del tren de aterrizaje son incorrectos. La parte delantera es demasiado larga y la barra superior de estribo no se puede pegar más alta porque los travesaños son demasiado planos y cortos. Naturalmente, se puede rehacer todo con varilla de plástico si uno quiere meterse en dibujos.
La parte posterior de los patines tiene dos extensiones opcionales, imagino que para emplearlas en suelo nevado.
Calcas
Como en otras muchas maquetas, Revell encargó estas calcas a un fabricante italiano innombrado cuyo trabajo suele ser muy bueno, pero que en esta maqueta ha sido criticado, como ya he dicho antes.
La hoja contiene marcas de la ADAC, ÖAMTC y sanitarias, el panel de instrumentos, matrículas y numerosos estarcidos, todas ellas con un aspecto fino y mate. El soporte no es excesivo y en general no sobresale indebidamente del contorno de la calca.
Instrucciones
Vienen en un folleto de doce páginas impreso en blanco y negro que contiene una breve referencia histórica sobre el helicóptero, una lista de pinturas con códigos de esmaltes de Revell, un plano numerado de piezas, 29 secuencias de montaje y dos páginas de perfiles. El formato apaisado vertical y doblado es un tanto fastidioso de consultar sobre la mesa de trabajo, pero, al venir sin grapas, las hojas sueltas pueden acomodarse mejor sobre ella.
Las dos versiones que Revell propone en esta caja son idénticas salvo en las calcas y cualquiere de ellas destacará en la vitrina por su color de servicio de emergencias. En otras reediciones el fabricante también ha intentado retratar otras versiones sanitarias, como la del club automovilístico holandés (ANWB) o la del servicio de ambulancia aérea suizo Air Glaciers.
Valoración
No es esta una maqueta para tirar directamente al cubo de la basura, pero lo cierto es que Revell cometió demasiados errores en ella como para recomendarla a cualquier aficionado a los helicópteros de esta escala y menos aún si es novato. Creo que sólo los muy cafeteros dispuestos a trabajársela a conciencia pasarán la prueba con más o menos tino.
Da cierta pena comprobar el fallido intento de Revell en esta maqueta porque resalta la diferencia con el mismo EC-135 de la casa alemana en la escala 1/32, que posee similar despiece y aspecto estupendo, aunque ignoro qué tal se deja armar.◊

The kit
There’s no doubt that Revell is deeply passionate about the Eurocopter EC-135 and has released it time and again for over 20 years in different scales and formats. In 1/72 alone, there are currently 10 reboxes featuring different civil, military, and police liveries. This kit started the entire saga back in 2001.
Inside the box are six sprues, one of them containing the clear pieces, the decals, and the instructions. Except for the somewhat thicker clear parts, the rest have a thin appearance in keeping with the scale. The fineness of parts seems to be the cause of the ejector marks present inside the cockpit sides, the floor itself, the inner side of the tail fin, and even the exhaust nozzles. Except for these last, the marks leave small evident bulges on the opposite side. The marks, on the other hand, are not deep and can be easily filled. There are also tiny sinks on the propeller blades, even easier to restore than the marks and some marginal flash on some parts.
Considering the size of the box and parts breakup, even the keen eye might believe this is a kit for beginners, but that’s an illusion. On the Internet there’s much criticism, sometimes harsh, about parts fitting, especially when it comes to the clear ones. Of course, everyone’s views are colored by their own experience, but I’ll point out that the kit seems to need more work than its apparent simplicity suggests. The decals have also received criticism, not so much for their quality but because those covering larger surfaces are poorly designed and don’t fit the profiles and angles well.
In this first release, Revell offered similar liveries from German and Austrian automobile associations, but fortunately, the modeller has plenty of alternative decals to make other versions, both civil and military.
Cockpit and interior
The internal floor is a single piece. The cockpit area has a rough texture to differentiate it from the rest. The rear part shows multiple bulges due to the holes to be drilled on the opposite side to install various pieces. This piece contains the consoles between the pilots and their seat bases.
The cockpit consists of two seats, well represented but with negative marks that ruin the detail of the padding, the flight and head control sticks, and the pedals. There is also a two-piece front console with a decal panel. The instructions show the addition of a 10g ballast inside the console to balance the model. This amount is obviously excessive for the available space and it would need something really heavy for the console, but if necessary, the modeller can try to find more space below the floor at the height of the front skid supports.
The rear interior contains two seats, one with a separate base and one without, a stretcher, and a container. Both the cargo area roof and the inner fuselage sides are molded separately. One side includes several containers or perhaps medical equipment. Maybe the poor fuselage fitting that critics mention is due to these inner panels, which will surely make windows attachment difficult. This is a guess; I haven’t checked it out.
Fuselage
The fuselage halves are molded without the tail boom. Also missing are the exhausts and the panels on the dorsal area behind the rotor, joined as a single piece. The external detail is quite good and reproduced with very finely engraved lines plus some vents. Unfortunately, the doors are closed, making it impossible to show the fairly decent interior that Revell gave the kit.
According to the instructions, the first thing to add to the interior are the side windows and the forward glazed panels. The side windows are provided as a single piece and fit into the frames from the inside. The small side windows on the pilot doors are well reproduced. The front clear panels, however, are glued from the outside. In both cases, they are not very thick, although the front panels have some distortion due to their shape. Once the windows and cockpit interior are in place, the main rotor base is installed. This is detailed with the shaft, fitted with a lower bearing that allows rotation, and the control rods joined in a single piece. The rotor base is complemented by a panel including the air intakes and the fairing between them.
After the fuselage is attached, construction goes on with the front windshield, which is somewhat thick and has a poor fitting, according to those who have already built this kit. The piece is detailed with a single separate wiper, though it seems more recent variants have two in parallel. Next thing to add is the rear engine access panel and the exhausts. The exhaust nozzles are too flat and also have small ejector marks that will not be that easy to clean up.
The fuselage front lacks the obvious landing light, but Revell did take the trouble to reproduce the speed indicators and a thin antenna on the cockpit roof. Under the cockpit, there’s another piece that must simulate some electronic device.
Rotors, propellers and tail boom
I will skip of the main rotor base, already described in the previous section. The propeller blades are attached to a kind of lower propeller hub. Once in place, you simply add the hub fairing to the top and join everything together over the shaft and control rods. Obviously, the blades aren’t as thin as the real thing, but they’re not too thick either.
The tail is separated into halves, with the propeller attached into the fenestron before you glue the halves together. The propeller is clean from flash and nicely molded. The tail also has a separate lower bumper, one-piece stabilizers glued to the tail boom through a slot, plus several antennas and devices, possibly VHF and VOR. The navigation lights are clearly rendered on the stabilizer and vertical fins.
Comparing photos of the finished model with the real helicopter proves that Revell left the tail boom too high off the ground and without the slight downward angle visible to the naked eye.
Landing gear
Unfortunately, the landing gear is incorrect. The front skids are too long, and the upper bar cannot be attached higher because the crossbars are too flat and short. Naturally, the whole thing can be remade with plastic rods if you want to roll up your sleeves and set to work.
The rear skids has two optional extensions, I imagine for use on snowy ground.
Decals
As with many other kits, the decal sheet came from an unnamed Italian manufacturer whose work is usually very good, but has been criticized on this occasion, as mentioned before.
The sheet contains ADAC, ÖAMTC markings, the instrument panel, registers, and stencils. All of them have a fine, matte appearance without too much carrier.
Instructions
They come in a 12-page leaflet printed in black and white containing a short historical reference to the helicopter, a list of paints with codes of Revell enamels, a numbered parts plan, 29 assembly sequences, and two pages of profiles. The folded, vertical landscape format is somewhat annoying to consult on the workbench, but as it comes without staples, loose sheets can be more easily arranged on it.
The two versions Revell offers in this box are identical except for the decals, and either one will stand out on the shelf in their emergency service color. Revell also has other reboxes with similar medical versions, such as the one from the Dutch Automobile Club (ANWB) or the Swiss air ambulance service Air Glaciers.
Conclusion
This isn’t a kit to be thrown straight into the trash, but the truth is that Revell made too many mistakes to recommend it to any chopper enthusiast, let alone a novice. I think only serious aficionados wishing to enhance the kit will pass the build/paint test with any degree of success.
It’s a bit disappointing to see the difference with the same EC-135 from the German manufacturer in the 1/32 scale, which has a similar parts breakup and excellent appearance, although I don’t know how well it builds.◊
Publicado – Published: 6 / 2025
©www.jmodels.net

Debe estar conectado para enviar un comentario.