
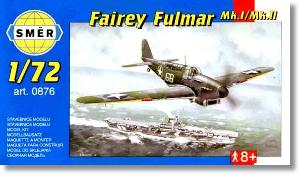
De un vistazo – Quick look
MATERIAL Y PIEZAS
MEDIA & PARTS:
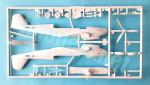
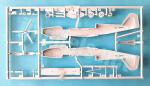
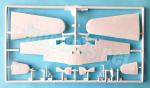
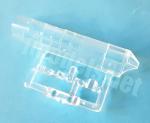
- Plástico inyectado (35 piezas), plástico transparente (3 piezas).
- Injected plastic (35 parts), clear plastic (3 parts).
CALCAS – DECALS:
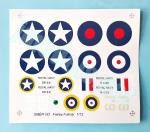
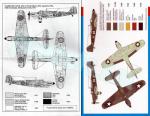
- Marcas británicas y norteamericanas. Insignias de cola y de unidad y numerales. Apariencia fina. Buena saturación de color y registro. Mínimo exceso de soporte.
- British and US roundels, tail markings, unit badges and codes. Apparently thin. Good color saturation and in register. Minimal carrier film.
OPCIONES – OPTIONS:
- Fairey Fulmar Mk.I. N4129. Fleet Air Arm. Escuadrón 803º. HMS Formidable. 1941. Pilotado por el Tte. Donald Gibson.
- Fairey Fulmar Mk.I. DR 641. Fleet Air Arm. Escuadrón 809º. HMS Victorious. Operación Torch. Noviembre 1942.
- Fairey Fulmar Mk.I. N4129. Fleet Air Arm. 803rd Squadron. HMS Formidable. 1941. Lt. Donald Gibson.
- Fairey Fulmar Mk.I. DR 641. Fleet Air Arm. 809th Squadron. HMS Victorious. Operation Torch. November 1942.
INSTRUCCIONES – INSTRUCTIONS:
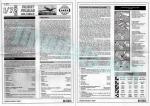
- Folleto doblado de 6 páginas impreso en blanco y negro. Contiene una breve historia del avión con datos técnicos, una tabla de colores con equivalencias de esmaltes de Humbrol, 6 fases de montaje y una página de perfiles. La segunda opción de pintura aparece impresa a color en la cara trasera de la caja. Claras.
- 6-page folded brochure printed in black and white. It shows a short history of the aircraft with technical data, a table of colours with Humbrol enamel matches, 6 assembly steps and a page of profiles. The second paint choice is printed in color on the back side of the box. Clear.
LO MEJOR – THE BEST:
- Molde bastante limpio. Sencillez de montaje. Precio.
- Overall clean tooling. Ease of assembly. Price.
LO PEOR – THE WORST:
- Carlinga poco detallada con cubierta de una pieza. Paneles (ver texto). Detalle en las alas y tren de aterrizaje mejorable.
- Very limited cockpit detail with one-piece canopy. Panel lines (see text). Improvable detail on wing leading edges and landing gear.
VALORACIÓN – CONCLUSION:
- Molde antiguo y muy reeditado por varias marcas. Opción aún válida y factible para modelistas de nivel básico y medio dispuestos a realizar mejoras.
- Old tooling frequently reboxed by other companies. Still a valid and buildable choice for newbies and average modellers if some improvements are made.

La maqueta
El molde original de esta maqueta es de la marca checa Vista, que la sacó por vez primera en los años 90. La hemos conocido también en reediciones posteriores de otras marcas, como Revell, Airfix o, más recientemente, AZ Model. Respecto a la original, parece que Směr sólo le dio mejores instrucciones y unas calcas idénticas pero sin el membrete original de Propagteam.
Los modelistas con más muescas en el cinturón tienen una alternativa en esta escala con el molde de Special Hobby de tirada limitada. Para los que se inician o no desean lidiar con fotograbados y resinas, queda por el momento esta maqueta, más básica y peor reproducida pero en absoluto descartable pues tiene potencial para mejorarla y dar buen resultado.
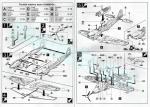
La caja trae dos bastidores de piezas grises, un bastidor transparente, la hoja de calcas y las instrucciones. Las piezas no tienen deformaciones y en su gran mayoría están limpias de rebabas. Hay muy pocas marcas de eyector en las piezas, son leves y sencillas de rellenar. Están muy localizadas en las tapas de las ruedas, uno de los paneles de la carlinga y alguna más medio tapada por el suelo del habitáculo trasero.
Las líneas que representan paneles y otros detalles de las superficies del fuselaje y las alas están grabadas con precisión pero son un poco anchas y profundas para la escala. Esta sensación la refuerza el hecho de que el panelado se ve hecho concienzudamente. Con todo, nada está perdido y hay formas de disimular esta desventaja de la maqueta.
Respecto al panelado, he leído en Hyperscale que las líneas trazadas en el morro son incorrectas porque las verticales no llegan a coincidir en la parte superior y las horizontales no están a la misma altura. Comparando las mitades del fuselaje, que están moldeadas en paralelo dentro del mismo bastidor, se puede apreciar este detalle en ambos casos. También es verdad que las líneas transversales grabadas sobre la toma ventral sí coinciden, sin embargo. Lo único bueno del caso es que las líneas son pocas, pero el hecho de que hará falta lija, masilla y cuchilla parece indiscutible.
El montaje de caja no parece presentar muchas dificultades salvando la unión del fuselaje y las alas, donde parece haber holgura, también según el citado artículo de Stephen Tytko en Hyperscale. Este extremo no lo he comprobado.
El modelo puede terminarse como un Mk.I, o bien un Mk.II. En este último caso la única diferencia consiste en dos tomas añadidas a ambos lados de la entrada ventral del radiador.
Carlinga
Los lados del fuselaje no tienen detalle alguno pero, en cambio, están casi libres de marcas de eyector. En el puesto trasero hay dos muy leves que serán medio tapadas al colocar el suelo. Otra está localizada en el panel intermedio de la carlinga.
El suelo de ambos tripulantes es común y liso. El puesto de pilotaje cuenta con un buen panel con los instrumentos nítidamente grabados y una mira transparente. La palanca de control es fina y el asiento aceptable. Los pedales están unidos a un instrumento con forma de brújula, que parece demasiado grande para serlo. Un panel trasero moldeado con el reposacabezas cierra la carlinga delantera. El puesto trasero está peor detallado porque contiene tan solo el asiento del navegante, que guarda cierto parecido con el original. Es una pena que venga tan vacío porque será evidente a través de la cubierta.
La cubierta transparente es de una pieza de grosor mediano con la estructura bien reproducida y paneles no transparentes plasmados en plástico traslúcido, lo que facilita en cierta medida la pintura. El mástil de la antena es una pieza aparte.
En conjunto, la carlinga presenta escaso detalle y solo destaco en ella el panel de instrumentos del piloto y la cubierta transparente aunque no se pueda mostrar abierta.
Fuselaje y motor
Las mitades del fuselaje incluyen la aleta y el timón vertical en las dos piezas, parte de las raíces alares y de los estabilizadores además de la toma ventral, que es fina y contiene en su interior una pieza sin detalle que debe ser el radiador. El panel que aloja el gancho de apontaje está separado del fuselaje. La pieza es gruesa pero la parte visible está bien definida. El gancho es bastante fino y no tienen detalle en su extremo. La zona ventral del fuselaje también tiene los puntos de anclaje delanteros para la catapulta.
Como he indicado arriba, los paneles están demasiado marcados para este tamaño. Los paneles remachados del morro son convincentes. Los escapes vienen separados. Las formas no son malas e incluso están un poco ahuecados. Las tomas laterales del Mk.II parecen un poco grandes y carecen del filtro en la entrada, consecuencia lógica de las limitaciones del material.
La hélice es una pieza moldeada con el eje. Las palas son finas y carecen de rebabas. El buje separado es algo grueso aunque sus formas parecen correctas. Ambas piezas van unidas a un cilindro que se inserta en el morro, lo que permite pintar las piezas aparte.
Alas y cola
Las alas se componen de tres piezas. Las mitades no coinciden en las puntas, por ello la mitad inferior se encastra en las mitades superiores, que incluyen las puntas y los flaps.
Como en el caso del fuselaje, los paneles están demasiado marcados y el remachado, donde se ha reproducido, es en cambio bastante bueno. Las líneas que delimitan las superficies plegables de las alas están bien marcadas con mayor anchura y profundidad. El problema es que las demás líneas son casi parecidas y no destacan como deberían.
El detalle interno de los pozos es muy flojo y se limita a unas pocas líneas finas en relieve. Las puntas son finas y muestran buena definición en las luces de navegación, aunque las veo un poco grandes. Los bordes de salida están correctamente afinados y el detalle en la superficie de los flaps es sutil y consistente. Los bordes de ataque parecen bien perfilados y cuentan con la lente del faro de aterrizaje en una pieza transparente pero el interior está hueco. Los paneles del armamento están bien grabados pero desgraciadamente de las troneras no hay rastro y ni siquiera están marcadas de alguna forma.
El tubo pitot es lo único que hay bajo las alas. Es lástima que la maqueta no incluya armamento subalar o al menos el depósito ventral para evitarle el aspecto algo desangelado que luce.
El timón vertical está detallado con la aleta, bien marcada, y la luz de navegación de cola. La textura diferente de la superficie aparece bien representada, con formas suaves e iguales en ambos lados. Los estabilizadores también tienen los timones y aletas bien grabados. Las superficies de control son análogas a las verticales.
Tren de aterrizaje
Las patas apenas están detalladas y vienen unidas al brazo de apertura, que es una simple varilla fina y no se parece al dispositivo real. Las tapas son de una pieza y hay que cortarles el extremo inferior para obtener las mitades internas. El detalle interno es nulo y posee marcas de eyector, aunque leves, mientras que el externo consiste apenas en un par de líneas grabadas. Las ruedas tienen buen aspecto, poseen buen detalle en las llantas y los neumáticos están marcados. Las llantas son claramente parecidas, si no idénticas, a las del Fairey Firefly y demasiado grandes. Las bandas de rodadura tiene una ligera línea de molde fácil de eliminar. La rueda de cola está unida a la pata y el neumático tiene buena definición.
Calcas
La hoja parece una copia de la original que Propageam hizo para Vista. Incluye escarapelas británicas y norteamericanas con reborde amarillo, insignias de cola, de unidad y numerales. Los motivos muestran apariencia fina, buena saturación de color y registro correcto. El exceso de película soporte es mínimo donde lo hay.
Instrucciones
Consisten en un folleto doblado de seis páginas impreso en blanco y negro que contiene una breve historia del avión con datos técnicos, una tabla de colores con equivalencias de esmaltes de Humbrol, seis fases de montaje y una página de perfiles. La segunda opción de pintura aparece impresa a color en la cara trasera de la caja. Las vistas explosionadas son claras y fáciles de seguir.
Aunque las marcas son muy diferentes, las dos versiones de pintura de esta caja emplean los mismos colores navales del Fleet Air Arm, por ello no hay demasiada variedad en los acabados.
Valoración
Para el modelista de nivel básico y medio esta maqueta sigue siendo una buena alternativa en esta escala en cualquiera de sus reediciones con varias marcas. El molde es bastante básico en muchos aspectos pero también posee algunos puntos positivos, como la aparente sencillez de montaje o el precio, que no deben descartarse como base para añadir el detalle mínimo que necesita en la carlinga, bordes de ataque o el tren de aterrizaje.◊

The kit
The original tooling of this kit was made by the Czech company Vista, which released the kit for the first time in the 90s. We have also seen it reboxed from other brands, such as Revell, Airfix or, more recently, AZ Model. Compared with the first kit, it seems that Směr only added better instructions and identical decals without the original Propagteam name.
Experienced modelers have an alternative in this scale with the short-run Special Hobby kits. Newbies and those not wishing to cope with photo-etched parts and resins only have this kit for the moment being. It is more basic and detail is restrained but it can still be built into a nice model if some extra detail is added.
The box comes with two sprues of gray parts, a clear sprue, the decal sheet and the instructions. Pieces have no blemishes and most of them are clean from flash. Pin marks are very few, shallow and easy to address. They are located on the wheel covers, one of the cockpit panels and some more half covered by the floor on the rear compartment.
Panel lines and other details on the fuselage and wings are accurately engraved but a little wide and deep for the scale. This is stressed by the fact that panels look methodically done. However, nothing is lost and there are ways to somehow hide this when painting.
Regarding panels I have read on Hyperscale that the lines engraved on the nose are incorrect because the vertical ones do not match at the cowling top and the horizontal ones are not at the same height. Comparing the fuselage halves, which are molded in parallel within the same frame, you can see this detail in both cases. The lines engraved on the ventral intake are correct, however. The only good thing about all this is that the lines are few, but the fact that sandpaper, putty and a sharp blade will be needed still remains.
Building this kit from the box does not seem a headache except for the fuselage-wings attachment, where there seems to be a gap to be filled and sanded. I also read this on the said article by Stephen Tytko on Hyperscale. I have not checked this point.
The kit can be finished as a Fulmar Mk.I, or a Mk.II. In the latter case, the only difference consists of two intakes added to both sides of the ventral radiator fairing.
Cockpit
The fuselage sides are flat and empty but at least they are almost free from marks. In the rear cockpit there are two very slight ones that won’t be very evident after attaching the floor. Another one is located in the middle cockpit bulkhead.
The one-piece floor is flat and shows no detail. The cockpit has a good instrument panel with nicely engraved gadgets and a clear sight. The control lever is thin and the seat is acceptable. The pedals are attached to a compass-shaped instrument, which looks too big. A rear bulkhead molded with the headrest closes the front cockpit. The rear cockpit is much less detailed as it only contains the navigator’s seat, which bears some resemblance to the original. It’s a shame the rear cockpit comes so empty as it will be evident through the canopy.
The clear canopy is a medium-thick piece with a well-reproduced structure and non-transparent panels rendered in translucent plastic, which makes painting somewhat easier. The antenna mast is a separate piece.
As a whole, the cockpit is quite poor and I can only stand out the pilot’s instrument panel and the canopy though it cannot be shown open.
Fuselage and engine
The fuselage halves include the fin and the vertical rudder in both pieces, part of the wing roots as well as the ventral intake, which is thin and detailed with a small flat piece inside that must be the radiator. The panel housing the arrester hook is separate from the fuselage. The piece is thick but the visible part is well defined. The hook is quite thin and there is no detail on the tip. The ventral fuselage also shows the forward attachment points for the catapult.
As said above, the panels in this kit are not my cup of tea but the small rivets molded on the cowling look convincing. The exhausts come separate. The shapes are not bad and the tail pipes are even a little hollowed. The side intakes of the Mk.II seem a bit too long and logically lack the front grille due to the limitations of the media.
The propeller is molded with the shaft. The blades are thin and have no flash. The separate spinner is a bit thick but looks correctly shaped. Both pieces are attached to a cylinder inserted into the fuselage nose, which allows the pieces to be painted separately.
Wings and tail
The wings are made up of three pieces. The halves do not match in the tips, so the one-piece lower half fits into the upper halves, which include the wing tips and flaps.
As in the case of the fuselage, panels are thick and rivets, where rendered, are quite good instead. The lines representing the folding wing panels are engraved with realistic width and depth. The problem is that they do not stand out because the other panel lines are almost similar.
Detail inside the wheel wells is restrained to a few thin raised lines. The tips are fine and show good definition on the navigation lights, although these look too big. The trailing edges are properly shaped and detail on the flaps surface is subtle and consistent. The leading edges seem well profiled and have the landing light lens in a clear piece that is empty inside. The machine-gun panels are engraved but unfortunately there is no trace of the gun ports, which the modeller will have to drill.
The pitot tube is the only thing under the wings. It is a pity that the kit does not include underwing weapons or at least a ventral tank to avoid the somewhat dull appearance the kit shows.
The vertical rudder is detailed with a nicely engraved fin and the tail navigation light. The different texture of the surface is fine, with smooth and the same shapes on both sides. Stabilizers also have well molded rudders and fins. The control surfaces look pretty similar to the vertical ones.
Landing gear
The legs are barely detailed and come attached to the side bracings, which are just thin rods and have no resemblance to the actual device. The covers are one piece and you have to cut the lower ends to get the inboard covers. The pieces have no detail on the inner sides but only a couple of shallow ejector marks while external detail consists of just a few engraved lines. The wheels look good, have nice detail on the rims and the tires are clearly engraved. The rims are clearly similar, if not identical, to those used by the Fairey Firefly. The treads have a slight seam line easy to remove. The tail wheel is attached to the leg and the tire has good definition.
Decals
The sheet looks like a copy of the original that Propageam printed for Vista. It includes British and North American roundels, these with yellow rims, tail markings, unit badges and numerals. The items look thin, have good color saturation and correct register. Excess carrier film is minimal.
Instructions
They come in a 6-page folded booklet printed in black and white containing a short history of the aircraft with technical data, a color chart with Humbrol enamel equivalents, six assembly stages and a page of profiles. The second paint choice is printed in color on the back of the box. Exploded views are clear and easy to follow.
Although the markings are very different, the two paint versions of this box have the same colors of the Fleet Air Arm, so there is not much variety in the finishes.
Conclusion
For the basic and average modeller, this kit continues to be a good alternative in this scale. Though quite basic in some aspects, it also has some positive points, such as the apparent ease of assembly or the price. So, it should not be discarded as a basis for adding the detail needed in the cockpit, leading edges or the landing gear.◊
Publicado – Published: 3 / 2024
©www.jmodels.net

Debe estar conectado para enviar un comentario.