
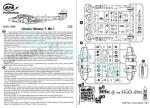
De un vistazo – Quick look
MATERIAL Y PIEZAS
MEDIA & PARTS:
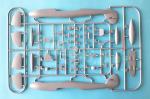
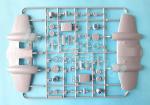
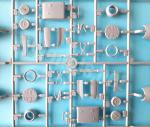
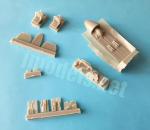
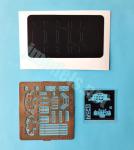
- Plástico inyectado (76 piezas), plástico transparente (2 piezas), resina (19 piezas), fotograbado (48 piezas), acetato (2 piezas), máscara adhesiva (17 piezas).
- Injected plastic (76 parts), clear plastic (2 parts), resin (19 parts), PE (48 parts), acetate (2 parts), adhesive mask (17 parts).
CALCAS – DECALS:
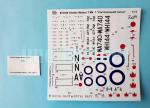
- Impresas por Aviprint. Insignias de la Royal Navy, RAF, RAAF y RCAF, matrículas, numerales, insignias de unidad, líneas de las alas y numerosos estarcidos. Apariencia fina y brillante. Sin exceso de soporte. Bien impresas.
- Printed by Aviprint. Royal Navy, RAF, RAAF and RCAF markings, registers, numbers, unit badges, wing lines and plenty of stencils. Thin and glossy appearance. No excess of carrier film. Well printed.
OPCIONES – OPTIONS:
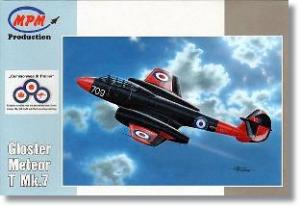
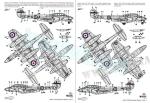
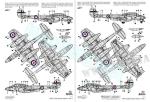
- Gloster Meteor T Mk.7. WS103/VL-709. Escuadrilla de la Estación Naval. Base Yeovilton de la RNAS (Reino Unido). Finales de la década de los años 60.
- Gloster Meteor T Mk.7. WH144/N-A. 215ª Escuela de Vuelo Avanzado. 1953. Avión personal del comandante Miroslav Liškutín.
- Gloster Meteor T Mk.7. A77-702. “Lennie”. 77ª Escuadrilla de la RAAF. Base Kimpo (Corea), 1953.
- Gloster Meteor T Mk.7. A77-702. 77ª Escuadrilla de la RAAF. Australia. Finales de la década de 1950.
- Gloster Meteor T Mk.7. WA740. 421 ª Escuadrilla “Red Indian” de la RCAF. Base Oldham de la RAF (Reino Unido), 1951.
- Gloster Meteor T Mk.7. WS103/VL-709. Station Flight. RNAS Yeovilton airbase (UK). Late 1960s.
- Gloster Meteor T Mk.7. WH144/N-A. RAF 215th Advanced Flying School. 1953. Personal mount of commander S/L Miro Liškutín.
- Gloster Meteor T Mk.7. A77-702. “Lennie”. RAAF 77th Squadron. Kimpo airbase (Korea), 1953.
- Gloster Meteor T Mk.7. A77-702. RAAF 77th Squadron. Australia, late 1950s.
- Gloster Meteor T Mk.7. WA740. RCAF 421st Squadron “Red Indian”. RAF Oldham airbase (UK), 1951.
INSTRUCCIONES – INSTRUCTIONS:
- Folleto de tamaño A5 de 12 páginas impresas en blanco y negro con perfiles en color. Contiene un resumen histórico sobre el avión, un plano de piezas, 21 secuencias de construcción y 5 páginas de perfiles con referencias de pinturas de Gunze Sangyo. Claras.
- 12-page A5 booklet printed in black and white with profiles in color. It shows a historical summary about the aircraft, a parts plan, 21 assembly chapters and 5 pages of profiles with paint references from Gunze Sangyo. Clear.
LO MEJOR – THE BEST:
- Muy buen detalle interior con opciones en diferente material. Incluye mascarillas.
- Nicely detailed cockpit with parts choice in different media. Masks included.
LO PEOR – THE WORST:
- Ruedas y estabilizadores en mitades. Cubierta transparente (ver texto).
- Wheels and stabilizers in halves. Canopy (see text).
VALORACIÓN – CONCLUSION:
- Edición con mejoras respecto a otras marcas que han copiado este molde de MPM. Excelente detalle interno y muy bueno por fuera, aunque con algunas reservas. No parece sólo factible para modelistas avanzados por la duplicidad de piezas de plástico.
- A boxing with goodies making it different fromn the MPM tool other brands have reboxed so far. Excellent cockpit detail and very good on the outside, though with some limitations. It looks feasable not only for the advanced modellers due to the duplicity of plastic parts.

La maqueta
El molde base de esta maqueta es uno de los más prolíficos del Gloster Meteor en la escala 1/72, pero no el único, ya que Airfix cuenta también con un nuevo molde de no muy lejana aparición. Sin embargo, esta versión biplaza T Mk.7 sólo está representada por el molde de MPM, con reediciones de Special Hobby, Xtrakit y Azur. Special Hobby tiene incluso una caja dedicada al menos común T Mk.7,5, de fuselaje algo más alargado. Todas las copias de los mencionados fabricantes incluyen máscaras para la cubierta transparente como añadido, pero no la panoplia de extras que MPM ha metido en esta caja.
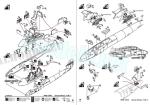
En efecto, esta edición contiene dos bastidores de piezas grises, un bastidor transparente, una plancha de fotograbados, varios bebederos de resina, una lámina de acetato, una hoja de mascarillas, las calcas y las instrucciones. Las piezas de resina y fotograbado complementan o reemplazan a las incluidas en la maqueta, que puede construirse opcionalmente sin ellas, aunque las instrucciones no lo indiquen expresamente.
Las piezas de plástico está bien moldeadas y no presentan deformaciones ni marcas visibles. Tampoco hay rebabas, aunque el suelo de la carlinga de resina las tiene en gran cantidad a los lados e insólitamente también aparecen en la cubierta transparente. Esta pieza, además, está moldeada muy próxima al bastidor en su parte delantera y es fácil de quebrar al extraerla. En todos estos casos que menciono, hay que extremar las precauciones para no dañar las piezas.
Las líneas de panel y especialmente los detalles reproducidos en el fuselaje y las alas están grabados con finura y limpieza. Algunos paneles presentan un delicado remachado en su contorno que los realza.
Las opciones de montaje muestran la apertura de un hueco en el morro para añadir contrapeso y la inclusión de los depósitos subalares y el ventral.
Carlinga
La carlinga está representada sobre una pieza de resina que incluye por la parte inferior el pozo de la rueda delantera, con el hueco del neumático bien definido, y por el lado superior el suelo, detallado con algunos finos paneles y los canales de los pedales, así como la parte interna del morro en una pieza sólida. Las instrucciones parecen sugerir que debemos abrir un hueco en esta parte delantera para agregar un poco de peso y evitar así que el modelo se asiente de cola.
Prácticamente todas las piezas interiores son de resina o fotograbado. Entre ellas tenemos dos asientos, los arneses, las palancas, los pedales, los paneles situados tras los asientos con reposacabezas aparte y las bases de los paneles de instrumentos provistos con miras diferentes y separadas. El puesto delantero cuenta con una mira adicional transparente. Los paneles son de fotograbado y están complementados con indicadores de acetato.
Los lados de la carlinga tienen algunas marcas de eyector que serán cubiertas por los finos paneles de resina que van pegados sobre el suelo, no sobre los lados del fuselaje. Los paneles, dos por puesto, muestran algunos instrumentos con buena definición y están complementados con algunos pequeños fotograbados.
Como he mencionado, la maqueta trae las mismas piezas de la carlinga pero de plástico. Los paneles laterales tienen mucho menos detalle y los paneles de instrumentos, aunque nada malos, muestran los indicadores en relieve. Sin embargo, los asientos de plástico son bastante buenos y no poseen marcas. Si no los usamos, deberían ir derechos a la caja de sobrantes. Resulta extraño que MPM nos proporcione dos palancas de resina diferentes a las de plástico, detalladas con anillo en la empuñadura como las del Spitfire. También hay un pequeño cambio en la consola de la carlinga delantera, ya que la de plástico vienen separada del panel lateral y muestra buen detalle en los dispositivos, mientras que la de resina apenas si se nota.
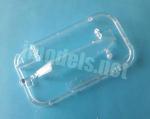
La parte posterior de la carlinga tiene una pieza para tapar el hueco posterior una vez unidas las mitades del fuselaje. La cubierta transparente es de una pieza y no se puede mostrar abierta. Como he dicho más arriba, hay que limpiar algunas rebabas en la parte posterior y cuidar el corte de esta pieza al sacarla del bastidor en la zona delantera. Por lo demás, la pieza no es gruesa y el marco de la estructura tiene un relieve bien marcado pero suave. La maqueta incluye una hoja de mascarillas que nos vendrán al pelo para pintarla. La secuencia correcta para pegar las mascarillas está recogida con claridad en las instrucciones.
Fuselaje
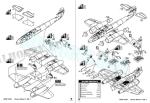
El fuselaje tiene el tradicional despiece en mitades e incluye las superficies verticales de cola. Los paneles grabados presentan buena nitidez, anchura y profundidad para esta escala. La pequeña toma de aire del morro aparece horadada y los lados carecen de las troneras del armamento propias de los aparatos de combate. Las únicas piezas adicionales, además de la cubierta transparente, que han de añadirse son dos antenas, una IFF de plástico y otra por delante de esta que debe fabricar el modelista.
Alas y cola
Las alas vienen despiezadas en mitades de punta a punta. Obviamente, las torres de los motores están integradas en ellas, excepto la zona delantera y trasera separada. Los paneles muestran buena definición y limpieza. Los flaps ranurados son un poco simples y no están horadados. Salvo este detalle, el resto tiene buen aspecto y, por ejemplo, las luces de las puntas aparecen marcadas, así como las superficies de control que incluyen las aletas de los alerones. El tubo Pitot está separado en una pieza. Los depósitos auxiliares comprenden dos mitades con los soportes aparte. El depósito ventral es de una pieza.
Las superficies de cola muestran un buen panelado, con las superficies de control representadas con finura. Los encastres de los estabilizadores están moldeados con el fuselaje y su capotaje posterior incluye la luz de cola. Sin embargo, MPM se ha pasado en el despiece al moldear los estabilizadores en mitades, lo cual le va a dar a las piezas un grosor probablemente inadecuado. La buena noticia es que las piezas están provistas de lengüetas para pegarlas a la cola.
Tren de aterrizaje
El pozo frontal tiene también una alternativa de plástico moldeada en el suelo de la carlinga, pero el detalle deja bastante que desear respecto al de resina. La horquilla, el soporte, el brazo de plegado y el guardabarros del tren auxiliar vienen separados. La rueda es de una pieza y se inserta directamente en la horquilla. Los soportes laterales del guardabarros debe fabricarlos el modelista. Las tapas del pozo carecen de marcas, pero también de detalle interno.
El tren principal tiene un aspecto y despiece parecido, a excepción de las ruedas, que están separadas en mitades. El detalle de las llantas está muy bien representado. El fondo del pozo muestra un detalle fino y delicado pero los lados aparecen vacíos. También en este caso hay que fabricar los soportes de los guardabarros.
Calcas
La hoja está impresa por Aviprint y contiene insignias de la Royal Navy, RAF, RAAF y RCAF, matrículas, numerales, insignias de unidad, líneas de las alas y numerosos estarcidos. Una pequeña hoja suplementaria proporciona el fondo blanco para las escarapelas del fuselaje, que no son aplicables en esta edición. Las calcas muestran apariencia fina y brillante, carecen de soporte excesivo y están bien impresas.
Instrucciones
Vienen en un folleto de doce páginas en formato A5 que está impreso en blanco y negro con perfiles en color. Contiene un resumen histórico sobre el avión, un plano de piezas con la numeración casi ilegible, 21 secuencias de construcción y cinco páginas de perfiles con referencias de color en la gama de pinturas acrílicas y esmaltes de Gunze Sangyo.
En general, las secuencias de montaje son bastante claras, aunque son algo más profusas en la construcción de la carlinga, panel de instrumentos y tren de aterrizaje.
Los acabados no tienen apenas variedad, ya que la mayoría de ellos son de color aluminio y únicamente el aparato del RNAS es claramente diferente. Tal como reza en la caja, todas los aviones pertenecen a fuerzas aéreas de la Commonwealth. Algunas de las versiones de esta edición, como el avión de la 77ª Escuadrilla de la RAAF o el avión personal del as Miroslav Liškutín, han aparecido en otras versiones en diferentes cajas de MPM y Special Hobby anteriormente.
Valoración
MPM ha hecho una edición algo especial respecto a las de otras marcas que han copiado este molde al incluir muchas piezas mejoradas para la carlinga, por ello el detalle interno está por encima de lo que se estila a esta escala. Sin embargo, es un poco decepcionante que no se pueda mostrar plenamente al tener la cubierta de una pieza. Lo mismo ocurre con el detalle exterior, que es muy acertado en general, salvo en la simplificación de los flaps ranurados y, sobre todo, en el caso del despiece de los estabilizadores y las ruedas. Considerándolo todo, creo que en general la maqueta sigue teniendo muchos más aspectos positivos y muy pocas desventajas.
Pese a lo que pueda parecer, esta maqueta no debería echar atrás al modelista no tan experto, puesto que hay piezas de recambio de plástico para las de resina que no se deseen emplear, algunas de ellas bastante buenas, como los asientos o los paneles de instrumentos, y las piezas de fabricación propia son mínimas y no suponen ninguna dificultad.◊


The kit
This kit is based on one of the most prolific toolings of the 1/72 Gloster Meteor, but it is not the only one out there, as Airfix also has a new-tool kit that was launched not too long ago. However, this two-seat T Mk.7 variant is only represented by the MPM boxing, with reissues by Special Hobby, Xtrakit and Azur. Special Hobby even has a box dedicated to the less common T Mk.7.5, with a somewhat longer fuselage. All the reboxes from the said manufacturers have masks for the clear canopy as a bonus, but not the bundle of aftermarkets MPM have included in this box.
Indeed, this release contains two sprues of grey parts, a clear sprue, a photo-etched fret, several resin parts, an acetate sheet, a sheet of masks, the decals and the instructions. The resin and photo-etched parts complement or replace those included in the kit, which can optionally be built without them, although the instructions do not clearly show it.
Plastic parts are well moulded and do not have any visible blemishes or marks. There is also no flash, although the resin cockpit floor has large “wings” of flash on the sides and, unusually, they appear on the clear canopy too. This piece front is also moulded very close to the sprue and it can be easily cracked when taking it out. In all these cases mentioned, extreme care should be taken to avoid damaging the parts.
Panel lines and especially the details reproduced on the fuselage and wings are clean and engraved with finesse. Some panels have delicate riveting on their contours that enhance them.
Assembly choices comprise the opening of a hole in the resin nose to add ballast and the option to use underwing and ventral fuel tanks.
Cockpit
The cockpit is represented on a single resin piece which includes the front wheel well on the underside, with the tyre gap well defined, and the floor on the top side. This is detailed with some fine panels and the pedal rails, as well as the inner part of the nose in one solid piece. The instructions seem to suggest that we should drill a hole in this front section to add some weight to prevent the model from sitting on its tail.
Virtually all the interior parts are resin or photo-etched. These include two seats, the harnesses, the control columns, the pedals, the panels behind the seats with separate headrests and the bases of the instrument panels fitted with separate sights. The forward position has an additional clear sight. The instrument panels are photo-etched with acetate gauges.
The cockpit sides have some ejector marks which will be covered by the thin resin panels that are glued to the floor, not to the fuselage sides. The panels, two per seat, show some instruments with good definition and are complemented by some small photo-etched parts.
As mentioned, the kit comes with the same cockpit parts in plastic. The side panels have much less detail and the instrument panels, although not bad, show raised gauges instead. However, the plastic seats are quite good and have no marks. If not used, they should go straight into the box of spares. It is strange that MPM provides two resin levers different from their plastic counterparts, those being molded with a ring on the grip like those used in the Spitfire. There is also a small change in the forward cockpit console, since the plastic piece comes separate from the side panel and shows good detail in the instruments, while the resin console is barely noticeable.
The cockpit has a piece to cover the rear evident gap once the fuselage halves are joined. The canopy is one-piece and cannot be shown open. As said above, you need to clean up some flash and take care when trimming the piece from the sprue. Otherwise, the piece is not thick and the raised structure frame is well-marked and fine. The kit includes a sheet of masks that will come in handy for painting the canopy. The correct sequence for setting the masks is clearly shown in the instructions.
Fuselage
The fuselage is molded in halves in the usual way and includes the vertical tail surfaces. The engraved panels have a nice width and depth for the scale. The small nose air intake is hollowed out and the nose sides lack the gun ports typical of the fighter variants. The only parts to be added, apart from the clear canopy, are two antennas, a plastic IFF aerial and another forward of it that the modeller should scratchbuild.
Wings and tail
The wings come in halves from tip to tip. Obviously, the engine nacelles are also molded in halves with the wings, but have separated front intake rings and rear nozzles. The panel ines show good definition and are cleanly engraved. The slotted flaps are flat and leave a bit to be desired. Other than this, detail includes defined tip lights and sharp control surfaces molded with include the aileron tabs. The pitot tube is separated in one piece. The auxiliary tanks come in halves with the pylons molded apart. The ventral tank is one piece.
Tail surfaces show nice engraved panels, with the control surfaces finely rendered. The stabilizer inserts are moulded with the fuselage and the rear fairing includes the tail light. However, MPM have gone too far in molding the stabilizers in halves, which will probably make them too thick when attached. The good news is that the parts are provided with tabs for gluing them to the tail.
Landing Gear
The front well also has a plastic alternative moulded below the cockpit floor, but detail leaves much to be desired compared to the resin piece. The fork, strut, folding arm and mudguard come separate. The wheel is one piece inserted right into the fork. The side mudguard supports are provided by the modeller. The well covers are clean from pin marks but also lack internal detail.
The main gear has a similar parts breakdown, except for the wheels, which are separated in halves. The detail on the rims is nicely rendered. The bottom of the well shows thin raised detail but the sides are empty. Here too the mudguard supports need to be scratchbuilt.
Decals
The sheet is printed by Aviprint and contains Royal Navy, RAF, RAAF and RCAF markings and roundels, registers, numbers, unit badges, lines for the wings and numerous stencils. A small supplementary sheet provides a couple of white background roundels for the fuselage, which are not applicable in this boxing. Decals have a thin and glossy appearance, are free from excessive carrier and look nicely printed.
Instructions
They come in a 12-page A5 booklet printed in black and white with colour profiles. It contains a historical summary of the aircraft, a parts plan with almost illegible part numbers, 21 construction sequences and five pages of profiles with colour references given in Gunze Sangyo acrylic and enamel paints.
In general, the assembly sequences are fairly clear, though they are a bit more profuse in the cockpit, instrument panel and landing gear assembly.
Paint finishes have little variety, as most of them are overall aluminium and only the RNAS machine is clearly different. As stated on the box, all the options are for Commonwealth Meteors. Some of the versions in this kit, such as the aircraft of the 77th RAAF Squadron or the personal mount of ace Miroslav Liškutín, have appeared in other MPM and Special Hobby boxings before.
Conclusion
Differently from other brands that have reboxed this MPM tooling, this company made a somewhat special release by including many goodies for the cockpit, so interior detail is quite better than the one we usually see in this scale. However, it is a little disappointing that the canopy cannot be posed open to show all that. The same goes for the external detail, which is quite nice overall, except for the simplification of the slotted flaps and the two-piece stabilizers and wheels. All in all, I think the kit still has many assets and very few disadvantages and will build into a nice replica of this trainer version.
Despite what it may seem, this kit should not discourage the average modeller, since we are provided with plastic parts that can be used if resin is not our cup of tea. Some of them are fortunately quite good, such as the seats or the instrument panels. Scratchbuilt pieces are few and should not pose any difficulty.◊
Publicado – Published: 6 / 2024
©www.jmodels.net

Debe estar conectado para enviar un comentario.