
De un vistazo – Quick look
MATERIAL Y PIEZAS
MEDIA & PARTS:
- Plástico inyectado (243 piezas), plástico transparente (12 piezas).
- Injected plastic (243 parts), clear plastic (12 parts).
CALCAS – DECALS:
- Cruces alemanas, matrículas e insignias de unidad. Aspecto fino y brillante, sin exceso de soporte.
- German crosses, registers and unit markings. Thin and glossy appearance, without too much carrier film.
OPCIONES – OPTIONS:
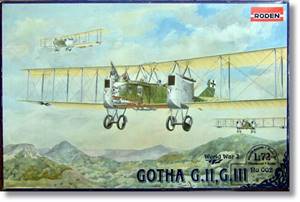
- Gotha G.II. w/n 204/16. Kagohl 4. Staffel 20. Balkan Front. Autumn 1916.
- Gotha G.III. w/n 389/16. Kagohl 2. Staffel 19. Balkan Front. Late 1916.
- Gotha G.III. w/n 388/16. Kagohl 2. Balkan Front. Late 1916.
INSTRUCCIONES – INSTRUCTIONS:
- Folleto A4 de 12 páginas impreso en blanco y negro. Muestra un sumario histórico con datos técnicos sobre el avión, un plano numerado de piezas, 20 capítulos de montaje, guías para arriostrar el modelo y 3 páginas de perfiles. Referencias de pinturas de esmaltes de Humbrol.
- 12-page A4 booklet printed in black and white. It shows a historical summary with technical data about the aircraft, a numbered parts plan, 20 assembly steps, 3 guides for rigging the model and 3 pages of profiles. Paint references from Humbrol enamels.
LO MEJOR – THE BEST:
- Buen detalle general. Interior decente. Ametralladoras. Motores.
- Overall nicely detailed. Decent interior. Machine-guns. Engines.
LO PEOR – THE WORST:
- Marcas gruesas en el interior del fuelaje. Unión de las alas y el fuselaje.
- Thick pin marks on fuselage walls. Fiddly construction of fuselage and wings.
VALORACIÓN – CONCLUSION:
- El detalle es notable y con él se puede sacar un buen modelo, pero necesita habilidad, experiencia y, sobre todo, paciencia.
- This is a nice kit that can be turned into a great model, but it needs modelling skills, experience and, above all, patience.

La maqueta
Roden es sin lugar a dudas el fabricante que ha puesto más empeño en hacer maquetas de diferentes modelos del bombardero bimotor alemán Gotha empleado en la Gran Guerra. Su catálogo contiene los modelos G.II/G.III, G.IV y dos G.V, todos ellos con aire de familia aunque con ciertas diferencias. Estas maquetas no tienen fama de ser sencillas de montar, pero también la tienen, y creo que merecidamente, de estar bien detalladas.
En esta edición Roden incluyó los modelos II y III, diferenciados en los motores y en el puesto ventral abierto del G.III para disparar una ametralladora que protegía la parte inferior de la cola. La caja trae cinco bastidores de piezas, dos de ellos repetidos, un bastidor transparente, las calcas y las instrucciones.
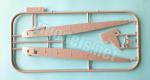
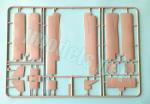
Como en otras maquetas de esta fabricante, las piezas están bien moldeadas y llaman la atención por su nitidez y acierto en la reproducción de pequeños detalles, como los motores y el interior de la carlinga. El despiece es abundante, pero nos sobrarán muchas piezas de los bastidores ya que probablemente pertenecen a la maqueta del Gotha G.IV. La limpieza de las piezas no nos hará dedicar más tiempo del debido, salvo en las rebabas muy evidentes presentes en los bordes de algunas piezas de las alas y la cola, además de algunas marcas positivas muy grandes a los lados del fuselaje.
Al tratarse de un biplano de cierta envergadura para esta escala, se hace necesario planificar bien las etapas de montaje para combinarlas con la pintura si se quiere obtener un buen resultado final. Las instrucciones no señalan diferencias de montaje entre el G.II y el G.III, por eso es también conveniente tener buenas referencias gráficas de ambos aviones.
Carlinga e interior
Salvo por las marcas de eyector (tres a cada lado) que he mencionado arriba y la presencia de algunas líneas en relieve que simulan parte de la estructura, los lados de la carlinga están lisos. El interior está dispuesto en cinco espacios internos separados por mamparos verticales con aberturas de acceso entre ellos.
El puesto de ametrallador de proa está detallado con el anillo giratorio moldeado en mitades con el fuselaje, salvo una pequeña sección separada. El espacio interno tiene un mamparo en la parte trasera, un asiento pegado a él, dos ventanillas simuladas en finas piezas transparentes y una excelente ametralladora Parabellum con cargador y afuste aparte. Esta última pieza tiene una definición extraordinaria para su tamaño.
La carlinga contiene un asiento pegado sobre el suelo, un panel inclinado sobre el que van los pedales y un mamparo trasero con abertura de acceso a la bodega de bombas. El volante de control, bien descentrado hacia la izquierda, va pegado sobre una columna unida perpendicularmente a una barra transversal que hay que colocar a los lados del fuselaje, tarea que no se antoja tan fácil, porque la posición exacta de la barra no está marcada en el fuselaje. Por delante del asiento hay que situar un panel horizontal del fuselaje que lleva una ventanilla para iluminar el habitáculo interior del piloto. En esta pieza hay que añadir el panel de instrumentos, bien detallado con los instrumentos en relieve fino.
La bodega de bombas contiene dos soportes con ocho bombas pequeñas que parecen las de 12,5 kg empleadas por los alemanes. El puesto trasero del ametrallador está limitado por dos paneles, el delantero posee un asiento y el trasero un hueco redondo en su centro y, tras él, un panel abierto en la zona ventral del fuselaje para disparar una ametralladora que sólo llevaba el G.III. Roden no ha incluido este arma. El hueco superior del habitáculo lleva un raíl externo transversal para pegar una ametralladora idéntica a la de proa.
Fuselaje
Las mitades del fuselaje no poseen clavijas para alinearlas. Los agujeros para pegar las superficies de cola son muy tenues y conviene profundizarlos especialmente para sostener los estabilizadores. Los lados del fuselaje están provistos de pequeños soportes para los cables de control de vuelo que hay que eliminar. La zona delantera lleva a cada lado un balancín para controlar los cables de los timones de cola y la parte intermedia dispone de un panel suplementario a los lados para proteger al tripulante trasero de los fogonazos y humos de los escapes.
Según las instrucciones, el fuselaje va pegado directamente encima de la sección central de las alas inferiores. Una alternativa que puede considerar el modelista es pegar los planos inferiores primero para después unir el fuselaje cuando convenga. Aunque la pieza de las alas tiene dos pequeños vástagos para alinearlas, los agujeros no están marcados bajo el fuselaje y es conveniente realizar pruebas antes de pegar las dos piezas.
Motores
Las góndolas está separadas en mitades que muestran aletas de refrigeración a los lados y huecos para situar lo que parecen los radiadores en la parte delantera y las hélices en la trasera. La parte superior también dispone de dos piezas para tapar el hueco y los escapes vienen separados en dos tubos finos sin horadar.
Los motores, como suele ser habitual en Roden, están muy bien detallados. Cada uno de ellos está formado por el bloque en mitades con seis cilindros moldeados en una de ellas. Esto supone que el motor es el del modelo G.III y no el del G.II de ocho cilindros, pero nos va a dar igual porque no se apreciará la diferencia. Los colectores y las válvulas son piezas separadas. Las hélices son finas y están bien perfiladas. El eje dispone de un pivote separado en su interior que permite el giro.
Cada góndola va encastrada entre la sección central y la externa del ala inferior. Los agujeros de las clavijas de unión están bien marcados en las góndolas, pero seguramente resultarán insuficientes para dar firmeza a todo el plano. La alineación correcta de las góndolas y las alas es muy importante si no queremos sorpresas al pegar los soportes y el plano superior.
Alas y cola
Las alas superiores están divididas en tres piezas, la central más pequeña y detallada con un depósito de combustible de gravedad. Las instrucciones indican que debemos darle un diedro de 3º a las puntas. Las superficies muestran un entelado suave y convincente, así como la forma ondulada correcta del borde de salida. Los alerones están bien marcados y su perfil también parece correcto. Las bisagras separadas tienen un grosor decente para la escala. Los puntos de pegado de los soportes están bien marcados en este caso.
Los planos inferiores tienen en realidad cinco tramos si contamos las góndolas encastradas en ellos. El entelado es similar al mencionado antes, aunque parece un poco más tenue en la cara inferior. Los puntos de unión de los soportes están igualmente marcados.
Los soportes intermedios son de tres tipos. Hay seis en cada ala, más dos en forma de V sobre cada góndola y cuatro más cortos sobre la parte central del fuselaje. Las piezas son finas y muestran perfiles adecuados. No darán otro problema que conseguir alinearlos bien.
Bajo el morro y la sección central de las alas podemos incluir soportes dobles y sencillos con bombas de distinto tamaño. Las bombas son de una pieza moldeadas con las aletas. Las medianas parecen las denominadas P.u.W. (Prufanstalt und Werft der Fliergertruppe) de 50 kg y la más grande, similar en la forma, el modelo de 100 kg.
Los planos de cola vienen separados en tres piezas y todas ellas necesitan refuerzo en los vástagos de unión con el fuselaje. Las superficies muestran un suave relieve en el entelado y los timones bien marcados. Los soportes laterales de los estabilizadores están representados por finas varillas de plástico.
Tren de aterrizaje
El tren de cola está compuesto por un patín apoyado en un fino soporte en V. El tren principal es doble y va situado bajo las góndolas. El montaje a cada lado lo forman dos ruedas, dos soportes en V y un eje carenado entre ellos. Los soportes están perfilados y las ruedas son de una pieza con los neumáticos bien definidos.
Calcas
La hoja contiene cruces alemanas, matrículas e insignias de unidad. Los motivos muestran un aspecto fino y brillante, sin exceso de soporte. Aunque parecen bien impresas, el modelista debe estar prevenido, porque las calcas de Roden tienen la mala fama de dar problemas al colocarlas.
Instrucciones
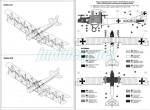
Consisten en un folleto de formato A4 de 12 páginas impresas en blanco y negro que contiene un sumario histórico con datos técnicos sobre el avión, un plano numerado de piezas, veinte capítulos de montaje, dos útiles guías para arriostrar el modelo, con diferencias claras en el modelo G.II y G.III, y tres páginas de perfiles. Como de costumbre en Roden, las referencias de pintura pertenecen a la gama de esmaltes de Humbrol.
Las terminaciones ofrecen cierta variedad en la pintura y nos ofrecen un G.II en el color del entelado y dos G.III con las superficies superiores en verde oscuro, una de ellas con una prominente calavera en el morro.
Valoración
Es innegable que Roden hizo un buen trabajo en general con esta maqueta y que puede convertirse en una réplica bastante aproximada del avión real en esta escala. Tengo para mí que el fabricante, al contrario de lo que les pasa a otros, suele acertar más en lo pequeño que en lo grande, y así vemos un gran detalle en los motores y armamento, por ejemplo, pero no nos da facilidades a la hora de montar firmemente las alas o el empenaje.
La construcción del modelo no parece sencilla, pero puede ser muy gratificante el resultado final si se cuida la alineación y el ensamblaje de las alas y el fuselaje. El montaje de las riostras y cables del fuselaje supondrá un reto algo menor si se tiene cierta pericia. También es esencial planificar bien el proceso de pintura desde el inicio para que vaya paralelo al montaje y no acabe por aburrir a los más impacientes.
Por ello, la maqueta sólo me parece recomendable a quienes, junto con una cierta habilidad y experiencia con aviones biplanos, posean gran paciencia y, sobre todo, no tengan prisas.◊


The kit
Unquestionably, Roden is the manufacturer that has put the most effort into releasing kits of the German twin-engine Gotha bomber. Their catalog contains the G.II/G.III, G.IV and two G.V kits, all of them with a family resemblance though with certain differences. These kits are known for not being easy to assemble, but they also have a deserved reputation for being nicely detailed.
In this boxing Roden combined the II and III variants, which had different engines and an open ventral panel on the G.III to fire a machine gun that protected the lower tail. The box comes with five sprues of pieces, two of them doubled, a clear sprue, the decals and the instructions.
As in other Roden kits, parts are well moulded and detail on the small bits is overall sharp, as it happens on the engines and the cockpit interior. Parts are profuse on the sprues, but many of them are not applicable to the kit as they probably belong to the Gotha G.IV release. Parts are mostly clean, but the trailing edges of some wing and tail pieces show some flash and there are a few positive pin marks on the fuselage sides.
As this is a bulky biplane, planning assembly and painting in advance is a must to get good results. Instructions do not point out differences in assembly between the G.II and the G.III, so it is also advisable to have good images of both variants.
Cockpit and interior
Except for the pin marks (three on each side) just mentioned and the presence of some structural raised detail, the cockpit sides are empty. The interior is arranged in five internal spaces separated by vertical bulkheads with access openings between them.
The forward gun position is detailed with the rotating ring molded in halves with the fuselage, except for a small separate section. The internal space has a bulkhead in the rear, a seat attached to it, four windows simulated in thin clear pieces and an excellent Parabellum machine-gun with a separate magazine and mount. This last looks great considering its size.
The cockpit contains a seat attached to the floor, an inclined panel to add the pedals and a rear bulkhead with an access to the bomb bay. The control wheel, correctly offset to the left, is attached to a column and a cross bar that is glued to the fuselage sides, which should not be that easy because the attachment points are not drilled on the fuselage. In front of the seat is a horizontal fuselage panel wih a small clear window to illuminate the gloomy cockpit front and the instrument panel, which is thin and shows fine raised gadgets.
The bomb bay contains two racks with eight small bombs that look like the 12.5kg bombs used by the Germans in WWI. The rear machine gunner’s position is limited by two panels, the front one has a seat and the rear one has a round gap in the middle. Behind it is an open ventral panel to fire a machine gun that was a feature of the G.III. Roden did not include the weapon. The rear gunner’s station is also provided with a transverse fuselage rail to attach a machine gun identical to that in the nose.
Fuselage
The fuselage halves do not have alignment pins. The holes for gluing the tail surfaces are small and too shallow and should be deepened especially in the case of the stabilizers. The fuselage sides are provided with small fittings for the flight control cables that need to be removed. The front area has a rocking device on each side to control the tail rudder cables and the centre fuselage has additional panels on the sides to protect the rear crew member from flashes and smoke from the exhaust.
According to the instructions, the fuselage is glued directly onto the lower wing center section. An alternative way the modeler can consider is to assemble the lower wings first and then join the fuselage when appropriate. Although the wing piece has two small pins to align it, the holes are not marked under the fuselage and it is advisable to double check fitting before gluing them.
Engines
The engines nacelles are separated in halves that show cooling gilles on the sides, gaps to fit what seem to be the radiators in the front and the propellers in the rear. The top also has two pieces to cover a gap and the exhausts are separated into two thin tubes that are not hollowed out.
The engines, as usual with Roden, have plenty of tiniy bits to enhance detail. Each engine is made up of the block in halves with six cylinders molded on one of them. The six-cylinder engines were used by the G.III, the G.II being fitted with eight-cylinder powerplants, but the difference is irrelevant here as they will not be seen. The manifolds and valves are separate parts. The propellers are thin and well profiled. The shaft has a separate pivot inside that allows turning.
Each nacelle is fitted between the inboard and outboard sections of the lower wing. The holes for the alignment pins are well marked on the nacelles, but they will not be enough to get a strong join in the parts. Correct alignment of the nacelles and wings is crucial if we do not want nasty surprises when attaching the supports and the upper wing.
Wings and tail
The upper wings are divided into three pieces, the central one being smaller and detailed with a gravity fuel tank. The instructions indicate that the wing tips need a 3º dihedral. The tapered surfaces are smooth and convincing and the trailing edges show a correct wavy shape. The ailerons are well engraved and their profile also seems fine. They are provided with thin hinges. The holes to insert the struts are correctly drilled in this case.
The lower wing actually has five sections if we count the engine nacelles. Surface detail is similar to the one mentioned before, though it seems a little thinner on the underside. The attaching points for the struts are also open.
There are six interplane struts on each wing, plus two V-shaped ones on each nacelle and four shorter cabane stuts on the fuselage. The pieces are thin and profiled. They will not cause any problem other than getting them aligned correctly. Rigging, of course will be a test for anyone’s patience.
Under the nose and the mid-wing section we can include double and single racks for bombs of different weight. The bombs are one piece molded with the fins. The smaller ones look like the so-called P.u.W. (Prufanstalt und Werft der Fliergertruppe) weighing 50 kg and the largest, but similar in shape, seems its 100kg elder sister.
The tailplanes come separated into three pieces, all of them needing reinforcement in the connecting pins with the fuselage. The surfaces show soft raised canvas detail and the rudders are nicely engraved. The bracing struts are represented by thin plastic rods.
Landing gear
The tail gear is made up of a skid attached to a thin V-shaped strut. The main gear is double and is glued right under the engine nacelles. Assembly on each side comprises two wheels, two V-shaped struts and a faired axle between them. The struts are profiled and the wheels are one piece with nice hubs and tires.
Decals
The sheet contains German crosses, serial numbers and unit badges. Decals show a thin and shiny appearance, without excess support. Although they seem well printed, the modeler should be warned, because Roden decals have a bad reputation for giving problems when setting them.
Instructions
They consist of an A4 12-page booklet printed in black and white containing a historical summary with technical data about the aircraft, a numbered parts plan, twenty assembly chapters, two useful guides for rigging the model, with clear differences in the G.II and G.III variants, and three pages of profiles. As usual with Roden, paint references belong to Humbrol enamel range.
Paint finishes offer some variety and propose a G.II in overall dope linen and two G.IIIs with the upper surfaces in dark green, one of them with a prominent skull on the nose.
Conclusion
It is undeniable that Roden did a good job with this kit and it can become a fairly close 1/72 replica of the real bomber. I believe the manufacturer, unlike what happens to others, tends to get better results with small pieces than with the larger ones, and so we see great detail in the engines and machine-guns, for example, but it doesn’t give us any facilities to build the wings or empennage.
Assemblying the kit does not seem easy, but the final result can be very rewarding if the modeller gets a careful alignment in the fuselage and wings. Attaching the wing braces and fuselage wires will be a little less challenging if you have some modelling skills. It is also essential to plan the painting process thoroughly from the beginning, so that it runs parallel to assembly.
For this reason, I only recommend the kit to those who, along with a certain skill and experience with biplanes, have great patience and, above all, are not in a hurry.◊
Publicado – Published: 6 / 2024
©www.jmodels.net

Debe estar conectado para enviar un comentario.