
De un vistazo – Quick look
MATERIAL Y PIEZAS
MEDIA & PARTS:
- Plástico inyectado (51 piezas), plástico transparente (5 piezas). Incluye una figura.
- Injected plastic (80 parts), clear plastic (5 parts). One figure included.
CALCAS – DECALS:
- Escarapelas norteamericanas de dos tipos, instrumentos de la carlinga, bandas del timón de cola, marcas de derribos y algunos estarcidos. Apariencia fina y brillante. Buena saturación de color y registro. Sin exceso de soporte.
- US Navy and USMC roundels, cockpit instruments, vertical rudder stripes, kill markings and some stencils. Apparently thin with a glossy finish. Good color saturation and register. No excess of carrier film.
OPCIONES – OPTIONS:
- Grumman F4F-4 Wildcat. Cuerpo de Marines de los EE. UU. Escuadrilla VMF-223. Henderson Field (Guadalcanal), 1942. Aparato del Capitán Marian E. Carl.
- Grumman F4F-4 Wildcat. Marina de los EE. UU. Portaaviones USS Enterprise (CV-6). Escuadrilla VF-6. 1942.
- Grumman F4F-4 Wildcat. US Marine Corps. VMF-223. Henderson Field (Guadalcanal), 1942. Aircraft flown by Captain Marian E. Carl.
- Grumman F4F-4 Wildcat. US Navy. USS Enterprise (CV-6). VF-6. 1942.
INSTRUCCIONES – INSTRUCTIONS:
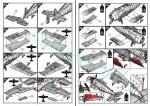
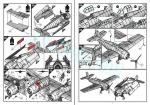
- Folleto A4 de 12 páginas impreso en color. Contiene un sumario histórico sobre el avión, 46 secuencias de construcción y 2 páginas de perfiles con referencias de color en el código de esmaltes de Humbrol.
- 12-page A4 brochure printed in color. It contains a historical summary about the aircraft, 46 construction sequences and 2 pages of profiles with paint references given in Humbrol enamels.
LO MEJOR – THE BEST:
- Buen detalle general. Opciones de montaje.
- Nicely detailed overall. Assembly choices.
LO PEOR – THE WORST:
- Errores en el fuselaje y ruedas.
- Mistakes on the fuselage and wheels.
VALORACIÓN – CONCLUSION:
- Es una alternativa muy interesante respecto a maquetas anteriores, y también más modernas, por la variedad de opciones de montaje, la sencillez de construcción y el precio.
- It’s a very interesting choice compared with previous, and also more modern, 1/72 Wildcat kits due to assembly alternatives, ease of construction and price.

La maqueta
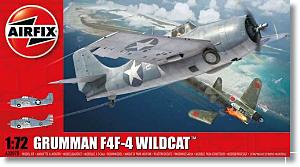
Tras dejar atrás su viejo Wildcat en la escala 1/72, que ya tenía alrededor de 50 años a la cola, Airfix lanzó en 2015 un nuevo molde de la maqueta cuya primera caja es la que describo en esta revisión. Durante este tiempo ha habido varias reediciones en distintos formatos, una de ellos como Martlet Mk.IV.
Hasta la salida de este nuevo molde, las maquetas más populares para hacer un Wildcat en esta escala eran las de Hasegawa, Academy y HobbyBoss, esta última con un despiece muy básico. Actualmente hay otro molde nuevo de Arma Hobby de factura, detalle y precio superior. Sin embargo, en mi opinión, carece de las dos ventajas que Airfix le ha puesto a su producto respecto al del fabricante polaco: las alternativas de montaje y una mayor facilidad de construcción para el modelista medio y novato.
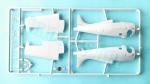
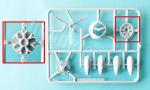
La caja contiene cinco bastidores, uno de ellos transparente, la hoja de calcas y las instrucciones. Las piezas están bien moldeadas y vienen sin rebabas, cilindros ni marcas visibles. El detalle general de la maqueta es muy bueno y fino, especialmente en las alas y el fuselaje. También tiene algunos errores subsanables que indicaré en su lugar conveniente.
La construcción del modelo ofrece variadas alternativas. La verdad es que no recuerdo tantas en una maqueta de Airfix con este formato de caja menor. Además de la posibilidad de poner el tren de aterrizaje extendido o plegado, cabe también colocar las alas plegadas y la cubierta de la carlinga abierta, retraer o alargar el gancho de apontaje o situar los alerones y el timón vertical subidos o bajados. No es poco, desde luego, y no creo que ninguna otra maqueta de esta escala ofrezca tal variedad.
A primera vista, la mayor dificultad que se puede presentar durante el armado está en los engranajes del tren de aterrizaje, que Airfix ha pretendido representar lo más fielmente posible.
Carlinga
El suelo es una pieza que incluye las consolas laterales y un espacio en la parte posterior vacío salvo una bombona de oxígeno moldeada sobre el suelo. Las consolas tienen los instrumentos en relieve, pero hay calcas para detallarlas y también el panel de la radio en el lado derecho.
El mamparo trasero y el panel de instrumentos vienen aparte. El primero lleva el reposacabezas y el segundo los instrumentos de calca, los pedales y la mira en la pieza. Entre ambos están el asiento y la palanca de control. Como de costumbre, Airfix facilita una figura para cubrir la falta de cinturones. Las instrucciones indican su colocación al final del montaje, aunque para ajustarla al espacio hay que cortarla a la altura de las rodillas. Personalmente prefiero no someterla a esta tortura y buscar arneses que la suplan.
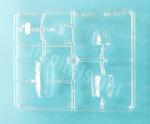
Por debajo del suelo, a los lados del fuselaje, hay dos ventanillas de perfil correcto en piezas transparentes finas. La cubierta tiene opción para colocarla abierta. Las piezas son delgadas y los montantes de los cristales y el parabrisas tienen definición.
Por delante del suelo hay un mamparo unido a dos largos vástagos laterales que se introducen en las mitades del fuselaje a la altura de las alas. El mamparo, un panel cortafuegos que debería llevar también la bancada del motor, muestra algún detalle en relieve para simular el cableado y las molduras internas.
Antes de unir las mitades del fuselaje hay que instalar necesariamente el engranaje de las ruedas. Si deseamos colocarlo plegado, emplearemos solamente tres piezas que comprenden un sección del fuselaje entre las dos aberturas de los pozos, un vástago interno con los ejes de las ruedas pegado sobre la pieza anterior y las tapas inferiores en posición cerrada. Esta disposición permite añadir las ruedas al final de la construcción del modelo.
El tren desplegado comprende hasta cinco piezas finas que son los diferentes brazos y acoplamientos del complejo sistema de retracción y extensión de las ruedas. El conjunto va pegado al mamparo delantero de la carlinga e introducido en el fuselaje como he descrito más arriba. En este caso las tapas inferiores están separadas en dos piezas y las ruedas también se pueden añadir posteriormente. El montaje es sencillo de seguir en las instrucciones.
En ambas alternativas resultará ineludible tener que enmascarar tanto los pozos como los soportes de las ruedas antes de pintar, pero Airfix no tiene la culpa de que a Grumman se le ocurriera este complejo mecanismo, por muy original que fuese.
Fuselaje y motor
Las mitades del fuselaje están moldeadas sin el capó motor y en la cola sólo contienen la aleta vertical. La parte inferior muestra el hueco de los pozos y ventanas. Las alas van encastradas en resaltes laterales y en los vástagos del mamparo interno descrito antes.
Las superficies están muy bien grabadas, sin los paneles verticales exagerados en anchura por detrás de la carlinga de otras maquetas. La zona dorsal muestra las luces en las dos mitades, el mástil de la antena y dos paneles en relieve por delante de la carlinga. También está grabado el estribo y horadados los diminutos agujeros para izar la cola. En la mitad derecha hay un panel erróneo que está representado en relieve en lugar de grabado. Es extraño que a Airfix se le haya escapado este detalle, pero se puede remediar labrando el panel aprovechando su relieve y lijando la zona sobresaliente después. El cono de cola está abierto para pegar el fino gancho de apontaje extendido o no.
El capó del motor es de una pieza. Está finamente grabado y su detalle incluye las aletas en posición cerrada más las tomas del carburador y de refrigeración laterales, todas ellas ahuecadas. El motor está separado en sus dos coronas de cilindros. La interna está pegada a un disco que tapa el hueco del fuselaje y no está tan bien perfilada como la exterior, que tiene un detalle superior. El eje se coloca entre las dos piezas sin aplicar pegamento y, de esta manera, la hélice se puede pegar al final sin que estorbe para pintar.
La hélice es fina y tiene un buje muy bien representado. Los perfiles de las puntas son correctos, pero la pieza tiene algo extraño en la torsión de los manguitos de las palas y esto acaso se debe a que es excesiva.
Tras unir el capó al fuselaje, se pueden añadir los escapes situados sobre la unión de ambos. Para adaptarlos las piezas tienen un pequeño rebaje en la base. Las salidas están ahuecadas.
Alas y cola
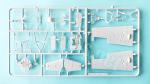
Airfix proporciona piezas diferentes para montar las alas plegadas o desplegadas excepto las de los alerones, que vienen separados, con buen detalle en las superficies y se pueden pegar en cualquier posición. Veamos primero el montaje de las alas extendidas, que es más simple.
El despiece comprende dos mitades y los alerones separados. Sólo las puntas están moldeadas en las mitades superiores y detalladas con las luces de navegación en los extremos. Las superficies tienen un grabado muy fino y también algunos paneles con remaches y múltiples tapas de acceso. Las troneras del armamento están bien definidas y aparecen abiertas.
El detalle en relieve en las dos caras contiene las bisagras de los flaps, un tanto simples, dos tomas abiertas bajo las alas, diversas carenas de las ametralladoras más el tubo pitot aparte. Sin embargo, Airfix olvidó grabar los faros de aterrizaje. Al pegar las mitades, queda un hueco entre ellas para encastrarlas en el fuselaje.
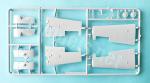
Para montar las alas plegadas tenemos cinco piezas por ala. El detalle grabado y en relieve es idéntico. Las superficies internas de cada ala están separadas en mitades y se encastran en el fuselaje lo mismo que las descritas antes. Las piezas muestran la estructura de travesaños internos no del todo fiel a la realidad, pero tampoco está mal.
El resto de la superficie de cada ala está separada como ya he descrito y se une al borde del tramo fijo en dos puntos. Las instrucciones muestran dos vistas detalladas del montaje de frente y de perfil que ayudan a situar las piezas. Tras esto, sólo queda añadir el fino montante auxiliar situado entre la punta del ala y el estabilizador de cada lado.
La maqueta tiene un depósito auxiliar separado en mitades que puede emplearse, aunque no figura como opción en las instrucciones.
Los estabilizadores son de una pieza y se insertan en la aleta vertical. Las superficies poseen muy buen detalle y tienen el tubo de giro del timón definido, así como buena nitidez en los timones entelados, las bisagras más el grabado de los timones y la aleta.
El timón vertical también es una pieza aparte y muestra el entelado algo más sutil, el pequeño mástil de la antena y, curiosamente, la aleta girada a la izquierda.
Tren de aterrizaje
Ya he descrito el tren principal, pero me queda mencionar las ruedas, cuyos neumáticos están bien marcados y son lisos sin líneas de molde visibles. El lado interno de las llantas tiene muy buena definición y la cara externa está cubierta por un tapacubos cuyas tuercas están moldeadas en relieve en lugar de horadadas. Por suerte de nuevo la solución es fácil: tan solo hay que lijarlas y horadarlas en su lugar.
La rueda de cola está moldeada con su pata y carenado en la mitad izquierda del fuselaje.
Calcas
La hoja está bien impresa. Trae escarapelas norteamericanas de dos tipos, una de ellas con el círculo rojo en el centro empleada hasta mayo de 1942, instrumentos de la carlinga, bandas del timón de cola, marcas de derribos y algunos estarcidos. Las calcas poseen un aspecto fino y brillante, buena saturación de color y registro adecuado. No muestran exceso de soporte.
Instrucciones
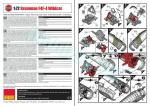
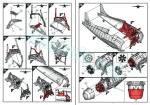
El folleto está impreso a color en un formato A4 y tiene doce páginas que contienen un sumario histórico sobre el avión, 46 etapas de montaje más dos páginas de perfiles con referencias de color pertenecientes a la gama de esmaltes de Humbrol.
Las alternativas de construcción están bien identificadas con símbolos y en algunos casos se proporcionan útiles ilustraciones en detalle que ayudan en la colocación de las piezas.
Los dos aviones propuestos como opciones de acabado llevan el esquema de camuflaje naval empleado al inicio de la Guerra del Pacífico: gris azulado en la parte superior y gris claro en la inferior. El primer avión, perteneciente al Cuerpo de Marines, lo pilotaba el Capitán Marian E. Carl, segundo as con más victorias en la campaña de Guadalcanal.
Valoración
Es innegable que Airfix ha hecho un buen trabajo en este molde nuevo. La maqueta ofrece tal cantidad de alternativas que debe ser una opción a tener en cuenta por quien desee armar este famoso avión en la escala 1/72. En especial, cabe destacar la posibilidad de colocar las alas plegadas, único caso que yo conozca en esta escala. Ya iba siendo hora que algún fabricante la considerase.
Afortunadamente, los errores, bastante evidentes por otra parte, que Airfix ha cometido son reparables con un mínimo esfuerzo. Como otras veces, tanto el modelista básico como el avanzado encontrarán que la maqueta se adapta bien a su nivel de exigencia en el detalle, sobre todo en la carlinga.◊


The kit
After leaving behind their aging 1/72 Wildcat, which had been around for some 50 years, Airfix released a new tool kit in 2015, the first box of which is the one I describe in this review. During this time, there have been several reissues in different boxings, a Martlet Mk. IV among them.
Until the release of this new tool, the most popular Wildcat kits in this scale were those from Hasegawa, Academy, and HobbyBoss, the latter with a very basic parts breakdown. Currently, there is another new kit from Arma Hobby that looks nicer and more expensive. However, in my opinion, it lacks the two advantages that Airfix have given this kit: assembly options and greater ease of construction for the average and novice modeller.
The box contains five sprues, one of which is clear, the decal sheet, and the instructions. Parts are well molded and come without flash, ejector pips or visible marks. Overall detail is very good and nicely rendered, especially on the wings and fuselage. It also has some mistakes, which I will refer to below.
The kit’s construction offers a variety of options. Honestly, I can’t recall so many in an Airfix kit in this smaller box format. In addition to the possibility of extending or folding the landing gear, you can also build the wings folded and pose the canopy open, retract or extend the landing hook, or position the ailerons and vertical rudder up or down. This means a lot of finishing possibilities to display the kit and I don’t think any other in this scale offers so many alternatives.
At first glance, the greatest difficulty during assembly may be in the landing gear, which Airfix have tried to represent faithfully.
Cockpit
The floor is a single piece including the side consoles and an empty space in the rear, except for an oxygen cylinder molded on. The consoles have raised instruments, but decals are included to detail them, as is the radio on the right side.
The rear bulkhead and instrument panel come separately. The former includes the headrest, and the latter the decal instruments, pedals, and sight. Between the two are the seat and control stick. As usual, Airfix provide a figure to fill the lack of seatbelts. The instructions show the pilot added at the end of assembly, and to fit it inside the cockpit you need to trim the legs below the knees. Personally, I dislike this torture and instead prefer to look for harnesses as replacement.
Below the floor, there are two correctly profiled windows in thin clear pieces on the fuselage sides. As said the canopy has alternative pieces to show it open or closed. The pieces are thin, and the frame and windshield are well defined.
In front of the floor is a bulkhead molded with two long side rods that insert into the fuselage halves to install the wings. The bulkhead, a firewall panel that should also contain the engine mount, shows some raised detail to simulate the wiring and internal moldings.
You need to build the landing gear assembly before joining the fuselage halves. If your pick is for folded wheels, you use only three pieces comprising a section of the fuselage attached between the two well openings, the wheel axles glued to the that piece, and the one-piece covers in the closed position. This arrangement allows the wheels to be added at the end of the construction.
The unfolded undercarriage comprises five thin pieces to represent several gears and links of the complex retraction system. The subassembly is glued to the forward cockpit bulkhead and inserted into the fuselage as described above. In this case, the lower covers are separated in two pieces, and the wheels can also be added later. Assembly is clear and easy to follow in the instructions.
Obviously, in both alternatives you need to mask the wells before painting, but Airfix is not to blame for Grumman’s design of this complex mechanism, however original it may have been.
Fuselage and engine
The fuselage halves are molded without the engine cowling and the tail only has the vertical fin. The underside shows the gaps for the wells and windows. The wings are fitted into side raised panels and the struts of the internal bulkhead described above.
Surfaces are very well engraved, without the wide vertical lines behind the cockpit found in other kits. The dorsal fuselage shows the lights on both halves, the antenna mast, and two raised panels forward of the cockpit. The foothold is also engraved, and the tiny holes for lifting the tail are open. On the right half, there is an incorrect panel molded raised rather than engraved. It is strange that Airfix overlooked this detail, but it can be corrected by using the panel to engrave the contour and then sanding the raised detail. The tail cone is open for attaching a thin landing hook, which can be installed extended or not.
The engine cowling is a single piece. It is finely engraved, and detail includes the fins in the closed position, plus the carburetor and side cooling intakes, all of which are hollowed out. The engine is separated into the two cylinder rows. The inner one is glued to a disc that covers the fuselage gap and is not as nicely detailed as the outer one, which looks quite better. The shaft is placed between the two pieces without applying glue, allowing the propeller to be added later without hindering painting.
The propeller is thin and has a very well-represented hub. The tip profiles are correct, but the piece seems to have too much twist in the blade cuffs.
Once the cowling is in place, the exhausts are attached. These are glued on the fuselage and cowling seam and the pieces have a small recess at the base. The outlets are hollowed out.
Wings and tail
Airfix provides different parts for assembling the folded or unfolded wings, except for the ailerons, which come separately, with good surface detail and can positioned raised or lowered. Let’s first look at the assembly of the extended wings, which is simpler.
The exploded view comprises two halves with the ailerons separated. Only the tips are molded into the upper halves and detailed with the navigation lights. Surfaces are finely engraved and also show riveted panels and multiple access covers. The armament ports are well-defined and open.
Raised detail on both sides includes the rather simple flap hinges, two open intakes under the wings, several machine gun fairings, and a separate pitot tube. However, Airfix forgot to represent the landing lights. When gluing the halves together, the gap in between helps fit them into the fuselage.
To assemble the folded wings, we have five parts per wing. The engraved and raised detail is identical. The inner surfaces of each wing are separated into halves and fit into the fuselage just as described above. Parts show the internal cross-member structure, which is not entirely accurate, but not bad either.
The outboard wing surface is separated and is attached to the edge of the fixed inboard wing section. The instructions show two detailed views of the assembly, front and side, to help attach the parts. Finally, you need to glue the thin wing-fold strut between the wingtip and the stabilizer on each side.
The kit includes a two-piece auxiliary fuel tank below the fuselage, but this does not appear as an option in the brochure.
The stabilizers are one piece and fit into the vertical fin. Surfaces are very detailed, with the elevator torque tube defined as well as the fabric-covered detail and the hinges. The rudders and tabs are well engraved.
The vertical rudder is also a separate piece and shows a subtle fabric, the small antenna mast and, curiously, the tab turned to the left.
Undercarriage
I’ve already described the main gear, but it remains to mention the wheels. These show neatly engraved tires with smooth treads and no visible seam lines. The inner side of the rims is very well defined, and the outer side is covered by a hubcap with the lugs molded raised rather than drilled. Fortunately, the solution is easy: just sand them and drill them in place.
The tailwheel is molded with its leg and fairing into the fuselage left half.
Decals
The sheet is well printed. It includes two types of American roundels, one with the red circle in the middle used until May 1942, cockpit instruments, tail rudder stripes, kill marks, and some stencils. The decals have a thin, glossy appearance, good color saturation, and adequate registration. They do not show excess support.
Instructions
The brochure is printed in color in A4 format and has twelve pages containing a historical summary of the aircraft, 46 assembly stages, plus two pages of profiles with color references from the Humbrol enamel range.
Construction alternatives are well identified with symbols, and in some cases, useful detailed illustrations are provided to assist in part placement.
The two aircraft proposed as finish options feature the naval camouflage scheme used at the beginning of the Pacific War: blue-gray over light gray. The first aircraft, belonging to the Marine Corps, was flown by Captain Marian E. Carl, the second most successful ace in the Guadalcanal campaign.
Conclusion
It’s undeniable that Airfix has done a good job with this new tool kit. It has so many assembly choices that it should be an offer worth considering for anyone wishing to build this famous aircraft in the 1/72 scale. Particularly outstanding is the possibility to show the wings folded, the only such option that I know of in this scale. It was about time some manufacturer considered it.
Fortunately, the obvious mistakes that Airfix overlooked are fixable with minimal effort. As on other occassions, both beginner and advanced modellers will find that the kit adapts well to their detail needs, especially in the cockpit.◊
Publicado – Published: 6 / 2025
©www.jmodels.net

Debe estar conectado para enviar un comentario.