

De un vistazo – Quick look
MATERIAL Y PIEZAS
MEDIA & PARTS:
- Plástico inyectado (33 piezas), plástico transparente (4 piezas).
- Injected plastic (33 parts), clear plastic (4 parts).
CALCAS – DECALS:
- Insignias norteamericanas, panel de instrumentos y consolas, registros, códigos y marcas de unidad más varios estarcidos. Finas con aspecto brillante, bien impresas y sin excesivo soporte.
- US Navy markings, instrument panel and consoles, registers, codes and unit markings plus some stencils. Thin with a glossy finish, well printed without surplus carrier film.
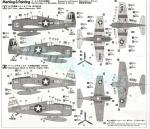
OPCIONES – OPTIONS:
- Grumman F6F-5K. Utility Squadron 1 (VU-1). Naval Air Station Barbers Point, Oahu (Hawaii). September 1959.
- Grumman F6F-5K. Chincoteague Naval Air Station (Virginia). 1949.
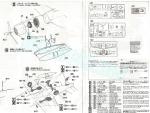
INSTRUCCIONES – INSTRUCTIONS:
- Folleto doblado de 8 páginas impreso en blanco y negro. Contiene una introducción histórica sobre el avión, un plano de piezas numerado, una tabla de colores con equivalencias de pinturas de Gunze Sangyo, 8 pasos de montaje y dos páginas de perfiles.
- 8-page folded leaflet printed in black and white. It contains a historical introduction to the aircraft, a numbered parts plan, a chart of colors with Gunze Sangyo paint matches, 8 assembly steps and 2 pages of profiles.
LO MEJOR – THE BEST:
- Fácil montaje. Decoraciones atractivas.
- Easy assembly. Attractive paint choices.
LO PEOR – THE WORST:
- Carlinga poco detallada. Paneles en relieve en el fuselaje y alas. Marcas de eyector en los neumáticos.
- Poor cockpit detail. Raised panel lines on fuselage and wings. Pin marks on the tires.
VALORACIÓN – CONCLUSION:
- No es la mejor para hacer un Hellcat a 1/72 hoy, pero puede merecer la pena a quienes busquen un montaje sin complicaciones y versiones de pintura poco comunes.
- It is not the best 1/72 Hellcat today, but still can be worth giving a try for those looking for ease of assembly and uncommon paint choices.

La maqueta
Esta es una vieja maqueta de Hasegawa que viene siendo reeditada desde los años 80 en múltiples versiones, incluidas la de caza nocturno, caza de la Royal Navy y hasta en combinación con otros aviones de la Marina norteamericana de la Guerra en el Pacífico. Esta quizá sea la versión menos conocida, un remolcador de blancos empleado en la posguerra.
Salvo las calcas, la versión difiere poco de todas las anteriores, obviamente. La caja contiene cuatro bastidores de piezas, uno de ellos transparente, la hoja de calcas y las instrucciones. Es ya muy conocida la limpieza de los moldes de Hasegawa, incluso los antiguos como este, y por ello no creo necesario insistir más en este punto. En este caso sólo tenemos ligeros restos de plástico en las puntas de las palas de la hélice y el asiento, marcas de eyector positivas, pero sencillas de limpiar, sobre los lados internos de la carlinga, otras más recónditas situadas sobre el suelo y también en la cara interna de los neumáticos de las ruedas que darán más trabajo sin duda.
Como hija de su tiempo, la maqueta presenta un panelado que combina líneas en relieve con otras grabadas. El grosor y relieve de las líneas es muy fino y coherente en toda la maqueta, por lo que, si este detalle no es una línea roja (como se dice ahora) para el modelista, la maqueta es aún perfectamente factible y sencilla de montar hasta para el menos habilidoso debido a la escasa treintena de piezas que la forman.
Las instrucciones no indican opciones de montaje como tales, pero Hasegawa incluyó un depósito ventral que podemos descartar si queremos. El bastidor transparente contiene dos cubiertas que no son alternativas.
Carlinga
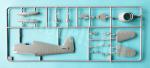
La cabina viene bastante escasa de piezas. Los lados de la carlinga carecen de detalles y las piezas comprenden un suelo moldeado con los pedales y las consolas laterales, la palanca de control y el panel de instrumentos. Tanto el panel como las consolas están detallados con calcas. La mira está unida a una de las mitades del fuselaje. La parte trasera del habitáculo lleva un mamparo separado con el reposacabezas. El asiento y la palanca tienen buenas formas y el resto es simplemente convencional.
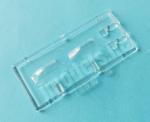
La cubierta transparente es de una sola pieza, fina y con el panel blindado del parabrisas bien marcado. El resto de la estructura está finamente grabada en la pieza.
Fuselaje y motor
Las dos mitades del fuselaje están moldeadas con las superficies verticales de cola, incluyendo el mástil de la antena, y carecen del capó del motor. Las piezas poseen un fino y bien trazado relieve en los paneles, nada realista, es cierto, pero al menos está realizado con coherencia. Los huecos de las salidas de los escapes no están mal de profundidad, pero son demasiado rectos y carecen del perfil redondeado en su parte inferior. En la zona dorsal hay que añadir el mástil de la radio y eliminar dos pequeñas luces y sustituirlas por dos antenas de aleta fabricadas a partir de las que proporcionan las instrucciones a tamaño real. La zona ventral bajo la carlinga está moldeada con la mitad inferior de las alas y tiene la salida de aire abierta.
El cubremotor es de una pieza moldeada con las tomas inferiores frontales. En este caso las líneas de panel y las de las aletas están grabadas con mucha finura, a diferencia del resto del fuselaje. El motor está separado en dos coronas de cilindros. La más interna va pegada sobre un panel que cierra el morro por detrás y el detalle de los cilindros es pobre. La corona delantera muestra algo más de detalle sin dejar de ser pasable. El engranaje de la hélice no está detallado y contiene el eje. La hélice viene de una pieza con buen detalle en el buje. Las palas son finas y parecen bien perfiladas. Las puntas muestran pequeñas líneas transversales en relieve para ayudar a pintarlas.
Alas y cola
Las alas están separadas en tres superficies. La mitad inferior, que viene de una pieza unida a un parte de la zona ventral del fuselaje e incluye los alerones y flaps, va encajada en las dos mitades superiores para ganar finura en las puntas. Los paneles y accesos muestran también una combinación de líneas en relieve fino y grabado. Por lo general, los paneles y los accesos vienen en relieve, pero otras líneas de mayor anchura, como las de las superficies de control están grabadas con precisión.
Las luces de las puntas están marcadas y los bordes de ataque muestran el armamento y las troneras bien definidos, aunque en el caso de este remolcador hay que eliminarlos. La única pieza exenta es el tubo Pitot, que tiene buena definición. Los alerones poseen los huecos de las bisagras en el lado inferior y la correspondiente aleta. Tanto los flaps como los alerones muestran un costillaje muy marcado.
Los pozos de las ruedas son muy poco profundos y tienen reproducida una supuesta estructura en relieve para no dejarlos vacíos.
La única carga es un depósito desechable separado en mitades con los soportes aparte. Como digo arriba, el depósito es opcional aunque no lo muestren las instrucciones.
Los estabilizadores son de una pieza y poseen lengüetas para insertarlos en la cola. Los timones están bien marcados, pero las aletas están delimitadas por finas líneas en relieve. La textura de estas superficies es menos lisa y más mate que la del resto de la pieza lo que, unido al detalle del relieve estructural, le da cierto realismo.
Tren de aterrizaje
Las patas del tren principal están detalladas con brazos de torsión, de plegado y los engranajes de giro, aunque los amortiguadores no son tan perceptibles. Las tapas son finas y poseen el estampado central bien hecho. Las piezas muestran ligeras marcas en su interior que serán casi inapreciables al pegar las patas, pero se pueden limpiar con facilidad.
Las ruedas son una verdadera pena. Los bujes están correctamente reproducidos y los neumáticos aparecen marcados y con la banda de rodadura texturizada con un patrón de diamante algo tenue. Sin embargo, hay un par de marcas negativas en cada neumático que arruina el detalle y no son tan sencillas de rellenar. La rueda de cola es de una pieza y está unida tanto a la pata como a la cubierta del pozo.
Calcas
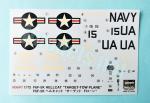
La hoja muestra insignias norteamericanas, el panel de instrumentos y las consolas, numerales, códigos y marcas de unidad además de varios estarcidos. Los motivos tienen aspecto brillante y fino, están bien impresos y el soporte no es excesivo.
Instrucciones
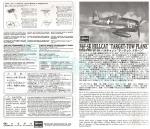
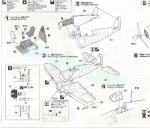
Están impresas en un folleto doblado de 8 páginas en blanco y negro que contiene una introducción histórica sobre el avión, un plano de piezas numerado, una tabla de colores con equivalencias de pinturas de Gunze Sangyo, 8 pasos de montaje y dos páginas de perfiles.
La primera versión de pintura ofrece un aparato del integrado en el Utility Squadron 1 (VU-1) basado en Hawái en la posguerra. Los aparatos de esta unidad llevaban el código UA en la cola, como lo reproduce con acierto Hasegawa, con las alas y estabilizadores pintados de amarillo con bandas anaranjadas y el timón vertical de naranja o de naranja y amarillo, como en el caso de nuestro Hellcat.
La segunda alternativa nos presenta un avión sin bandas ni colores llamativos perteneciente, por lo poco que he averiguado, a un destacamento del Utility Squadron 4 (VU-4) operativo en la pequeña Estación Naval de Chincoteague (Virginia), pero basado en la Estación Naval de Jacksonville (Florida).
Valoración
Dejando a un lado a los másteres de la cosa (Marte es para marcianos), para el modelista del común está claro que esta no es hoy la mejor maqueta para representar un Hellcat en esta escala, teniendo, por ejemplo, las de Eduard, más detalladas, accesibles y a buen precio. Sin embargo, aún ofrece posibilidades si alguien busca una maqueta decente, sencilla de armar y con la calidad habitual de Hasegawa. Ciertamente no conseguirá un Hellcat tan realista como otros, pero sí más fuera de lo común en esta versión de remolcaje de blancos.◊

The kit
This is an old Hasegawa kit that has been reissued since the 1980s in multiple versions, including night fighter, Royal Navy fighter and even in combination with other US Navy aircraft of the Pacific War. This boxing is dedicated to the least known version of this popuar US Navy fighter, a target tug used in the postwar period.
Except for the decals, the kit differs little from all the previous ones, obviously. The box contains four sprues of parts, one of them containing the clear parts, the decal sheet and the instructions. Hasegawa has always been praised for their clean toolings and this is just another one in the list, so I do not see necessary to insist further on this point. In this case we only have slight flash on the tips of the propeller blades and the seat, positive ejector marks, but easy to clean, on the inner cockpit sides, a few more more on the floor and also on the wheel tires that will be more evident.
As a product of its time, the kit features a combination of raised and engraved lines. They are very thin and consistent throughout the kit, so, if this is not a red line for the modeller, the kit is still easily buildable even for the least experienced with only around thirty pieces in the parts count.
Instructions do not indicate assembly choices as such, but Hasegawa included a ventral tank that we can discard if we wish. The clear sprue contains two canopies that are not alternative.
Cockpit
The cockpit is fairly sparse. The cockpit sides have no detail and pieces comprise a floor molded with the pedals and side consoles, the control stick and the instrument panel. Both the panel and the consoles are detailed with decals. The gunsight is molded with one of the fuselage halves. The rear of the cockpit has a separate bulkhead with a headrest. The seat and stick are well shaped and the rest is simply average.
The clear canopy is a single piece, fine and with the armoured windscreen panel well marked. The rest of the structure is finely engraved on the piece.
Fuselage and engine
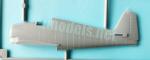
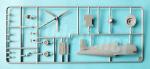
The two fuselage halves are molded with the vertical tail surfaces, including the antenna mast, and lack the engine cowling. Parts show fine, raised panels, not very realistic but at least they are consistent. The holes for the exhaust outlet scoops are not bad in depth, but they are too straight and lack the rounded profile on the lower edge. The dorsal fuselage has a separate radio mast and you need to remove two small lights to replace them with two fin antennas that you can build from a full-size template shown on the instructions. The ventral section under the canopy is molded with the lower half of the wings and has an open air outlet.
The engine cowling is in one piece including the lower front intakes. In this case the panels and the cooling gills are very thinly engraved, unlike the rest of the fuselage. The engine is separated in two cylinder rows. The inner row is glued on a bulkhead that fills the nose gap. Detail on the cylinders is poor. The front row shows little more detail but is still passable. The propeller gear housing is not detailed and contains the shaft. The propeller comes in one piece with good detail on the hub. The blades are thin and seem well profiled. The tips show small raised transverse lines to help painting.
Wings and tail
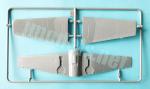
The wings are separated into three surfaces. The lower half, which is a single piece attached to a section of the ventral fuselage and includes the ailerons and flaps, is fitted into the two upper halves. Panels and accesses also show a combination of thin raised and engraved lines. The panels and accesses are raised, but those on the control surfaces are nicely engraved.
The wingtip lights are marked and the leading edges show the armament and gun ports well defined, though they have to be removed in this version. The only separate part is the pitot tube, which has good definition. The ailerons show both the hinge gaps and the tabs. Both the flaps and ailerons show raised structural detail.
The wheel wells are very shallow and molded with a raised structure so as not to leave them empty.
The only load is a jettinosable tank, separated in halves with the attachment arms separate but molded solid. As said above, the tank is optional even though it is not shown in the instructions.
The stabilizers are one piece and have tabs to insert them into the tail. The rudders are well marked, but the fins are defined with thin raised lines. The texture of these surfaces is a bit rougher and more matte than that on the rest of the piece, which gives it a realistic look together with the structural detail.
Undercarriage
The main gear legs are detailed with torsion arms, actuating struts and pivot points, though the oleo struts are a bit faint. The covers are thin and have nice stamped surfaces. They have light marks on the inside that will be almost invisible when attaching the wheel struts but can also be easily cleaned up.
The wheels are a real shame. The hubs are correctly reproduced and the tires show a diamond-patterned tread. However, there are a couple of negative marks on each tire that ruin the detail and are not so easy to fill. The tail wheel is one piece molded with the leg and the well cover.
Decals
The sheet includes US Navy markings, the instrument panel and consoles, registers, codes and unit markings plus some stencils. They are thin with a glossy finish and do not contain surplus carrier film. They should not cause any problems.
Instructions
They come in an 8-page folded leaflet printed in black and white that contains a historical introduction to the aircraft, a numbered parts plan, a color chart with Gunze Sangyo paint matches, 8 assembly steps and 2 pages of profiles.
The first painting version shows an aircraft from Utility Squadron 1 (VU-1) based on Hawaii in the postwar years. Aircraft from this unit carried an UA code on the tail, which is accurately provided by Hasegawa, with the wings and stabilizers painted yellow with orange stripes and the vertical rudder in orange or orange and yellow, as in the case of this Hellcat.
The second alternative is an aircraft without stripes or striking colors belonging, it seems, to a detachment of Utility Squadron 4 (VU-4) operating at NAS Chincoteague (Virginia). The unit had its home Naval Air Station in Jacksonville (Florida), according to what I found on the Internet.
Conclusion
For the average modeller this is not the best kit to build a 1/72 Hellcat today, having, for example, Eduard’s kits, which are clearly better detailed, available and a real good value for money. However, it still offers possibilities if the modeller is looking for a decent, easy-to-build kit with the usual Hasegawa quality. Certainly you will not finish the best Hellcat model around, but will be quite uncommon in this target tow version.◊
Publicado – Published: 11 / 2024
©www.jmodels.net

Debe estar conectado para enviar un comentario.