
De un vistazo – Quick look
MATERIAL Y PIEZAS
MEDIA & PARTS:
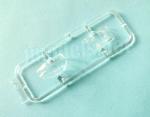
- Plástico inyectado (69 piezas), plástico transparente (2 piezas).
- Injected plastic (69 parts), clear plastic (2 parts).
CALCAS – DECALS:
- Cruces alemanas de tres tipos, panel de instrumentos, matrículas, esvásticas, insignias de unidad y líneas de pisado de las alas. Aspecto no demasiado fino y brillante. Nítidas, con buen registro aparente buena saturación de color. Mínimo exceso de soporte.
- German crosses, instrument panel, registers, swastikas, unit insignia and wing walk lines. Not too thin but glossy finish. Sharp, with good register. Apparently color-saturated. Minimal surplus carrier.
OPCIONES – OPTIONS:
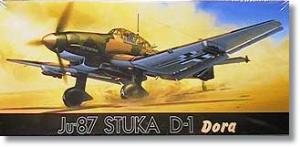
- Junkers Ju-87. Luftwaffe. S7 + AA. Sturzkampfgeschwader 3 (StG 3). Geschwader Stab.
- Junkers Ju-87. Luftwaffe. T6 + BK. II / Sturzkampfgeschwader 2 (StG 2) “Immelmann”.
INSTRUCCIONES – INSTRUCTIONS:
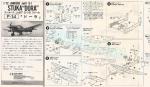
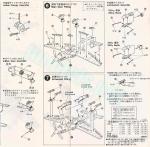
- Folleto doblado formando 8 páginas impreso en blanco y negro. Contiene un breve sumario histórico sobre el avión con datos técnicos, un plano numerado de piezas, una tabla de colores con pinturas equivalentes de Gunze Sangyo, 7 secuencias de montaje y perfiles.
- 8-page folded leaflet printed in black and white. It shows a historical summary with technical specifications, a numbered parts plan, a color chart with Gunze Sangyo paint matches, 7 construction steps and profiles.
LO MEJOR – THE BEST:
- Molde bastante limpio con buen panelado. Montaje sencillo con salvedades (ver texto). Selección de armamento.
- Clean tool with nice engraved panel lines. Ease of assembly with exceptions (see text). Armament choice.
LO PEOR – THE WORST:
- Detalle de la carlinga. Calcas (posible mala adherencia).
- Cockpit detail. Decals (may not have good adherence).
VALORACIÓN – CONCLUSION:
- Pobre interior con un exterior que aguanta bien el paso del tiempo. Hoy se puede encontrar en reediciones de Hobby 2000, que traen cuenta por las mascarillas.
- Poor cockpit with a decent exterior detail still in shape. The same kit is found today in Hobby 2000 reissues, which include a bonus of paint masks.

La maqueta
El Dora de Fujimi salió al mercado a mitad de los años 80 junto con otras cuatro cajas con las versiones Ju-87B/R, G-1, D-5 y G-2. Esta serie fue reeditada de nuevo entre finales de los 90 hasta 2007. Desde entonces, lo único que hay de ella actualmente son las ediciones de Hobby 2000 del año 2020.
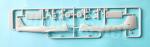
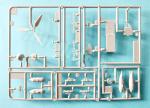
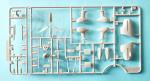
La maqueta comprende cuatro bastidores de piezas grises, un bastidor transparente, la hoja de calcas y las instrucciones. No hay defectos evidentes en las piezas y el molde muestra una limpieza notable. Se aprecian rebabas y líneas de molde muy leves en pocas piezas. Las marcas que importa limpiar en la carlinga se ciñen al suelo, ya que las de los lados no parecen evidentes. Los paneles están grabados con finura y nitidez, pero no juzgo si faltan o sobran.
Esta caja contiene piezas comunes para las maquetas del Ju-87D-1, D-3 y D-7. Las instrucciones distinguen las necesarias en cada caso, lo único malo es que sólo están en japonés. Sin embargo, cualquier traductor de imágenes nos resolverá el problema en segundos. Las opciones de montaje específicas para este D-1 comprenden los escapes sin apagallamas, carenas en las salidas de las ametralladoras de las alas, sirenas opcionales, un cono más puntiagudo y una selección de bombas de 50, 500 y 1.000 kg.
Las alternativas de pintura ofrecen dos libreas diferentes. Una de ellas es la estándar empleada en suelo europeo y la otra fue común en el Norte de África.
Revisión
La carlinga viene bastante pelada de elementos. No hay detalle a los lados del fuselaje y las marcas de eyector están en los extremos de las zonas visibles. No parece que sean evidentes ni por su situación ni por el acristalamiento profuso de la cubierta. El suelo es común a los dos puestos y tiene unos pedales gruesos en la pieza. Por separado tenemos el panel de instrumentos, el asiento del piloto y el banco del segundo ocupante, un panel intermedio tras el asiento del piloto y una ametralladora doble MG 181Z posterior bastante mala porque ni siquiera reproduce el afuste. El panel lleva los instrumentos en relieve fino con calca para realzarlos. Puede que la calca no se adapte bien porque no es tan fina como debiera.
La cubierta de la carlinga está separada en dos secciones sin posibilidad de mostrarla abierta. Las piezas no son gruesas y presentan el marco de la estructura fino y bien reproducido. La pieza trasera lleva un pequeño hueco para pegar las ametralladoras y la delantera un mástil de antena. He leído alguna revisión donde se asegura que estas dos piezas no encajan del todo bien en el fuselaje, así que el modelista debe tomar las cautelas oportunas.
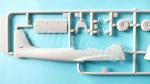
Las mitades del fuselaje están cortadas a la altura del morro y una de ellas incluye la rueda de cola y el timón vertical completo. El morro también está separado en mitades con la toma de aire en el interior así como el eje de la placa base de la hélice. Por fuera hay que añadir los escapes moldeados en hilera y pegados en dos ranuras. Las piezas no están del todo mal, pero les falta más nitidez. La hélice está separada del cono. La pieza tiene bastante finura y realismo, aunque no sé si la anchura de las palas es la correcta. El morro también parece dar problemas al pegarlo al fuselaje por ser demasiado estrecho, aunque a mí me parece más bien al contrario. Sin pruebas es imposible saberlo, pero queda la advertencia.
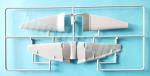
Las alas están repartidas en tres piezas. Las líneas de los paneles y la representación de los accesos está bien conseguida, lo mismo que las cubiertas de las juntas de las alas. Los flaps y alerones están unidos a la pieza inferior de las alas con sus bisagras. Tienen buen aspecto gracias a que Fujimi logró separarlos mínimamente de la superficie del ala, lo que les da mayor realismo. Los contrapesos y el tubo Pitot vienen separados. Las puntas poseen las luces de navegación, pero son demasiado estrechas y prominentes. Las ametralladoras se representan en su carenado separado para pegarlo en el borde de ataque. Creo que merece la pena sustituir el pequeño tubo de salida del arma por algo más convincente. Al pegar las alas al fuselaje se añaden las cubiertas de los radiadores en la parte inferior, el panel trasero de la toma situada bajo el morro y también los estribos del fuselaje. Los estabilizadores tienen una definición adecuada en los timones, bisagras y los contrapesos de las puntas. Los refuerzos de ambos planos son piezas aparte.
La selección de bombas comprende una bomba de 500 y otra de 1.000 kg con las aletas y el trapecio separados más dos bombas de 50 kg bajo cada ala. Estas últimas vienen unidas a un soporte individual que hay que eliminar para colocarlas sobre un soporte carenado.
El carenado de las ruedas consta de dos mitades. La amortiguación se representa con líneas finas grabadas, pero no es nada extraordinario. Las piezas incluyen las sirenas con las puntas por separado. Uno de los aviones de esta caja no las llevaba y hay que cortarlas. Lo que más destaca aquí son las ruedas, ambas de una pieza y con un detalle muy bueno tanto en el dibujo de los neumáticos como en las llantas, aunque presentan finas líneas de molde en las bandas de rodadura.
Las calcas proporcionan cruces alemanas de tres tipos, el panel de instrumentos, matrículas, esvásticas (recortadas en mi hoja), insignias de unidad y líneas de pisado de las alas. Su aspecto no es demasiado fino pero sí brillante. Los motivos son nítidos y poseen buen registro y una saturación de color suficiente en apariencia. El exceso de soporte es mínimo. Con todo, algo hay en la hoja que no acaba de gustarme, y es su posible falta de adherencia. Tal vez porque me recuerden a otras de Huma que resultaron casi infumables.
Las instrucciones están impresas en blanco y negro en el ya clásico folleto doblado de marcas japonesas. Contiene un breve sumario histórico sobre el avión con algunos datos técnicos, un plano numerado de piezas, una tabla de colores con pinturas de Gunze Sangyo, siete secuencias de montaje y perfiles. Para pintar la maqueta hay alternativas en el clásico camuflaje astillado: una es RLM 70 y 71 sobre RLM 65, y la otra luce colores norteafricanos, añadiendo el RLM 79 a la parte superior de la librea mencionada.
Valoración
Comparada con las que tenemos actualmente de este avión, a la maqueta se le notan los años en el detalle interior, pero el externo todavía aguanta el tipo. Además del mercado de segunda mano, para encontrarla hoy debemos recurrir a las reediciones de Hobby 2000, que además tienen la gran ventaja de incluir las mascarillas de la cubierta transparente y también las ruedas.
Salvo las prevenciones del montaje y las calcas que he descrito, la maqueta no debe suponer un reto para modelistas de nivel medio. Con algunas mejoras, creo que todavía es susceptible de dar un resultado al menos decente.◊


The kit
The kit was released in the mid-1980s along with four other boxes containing the Ju-87B/R, G-1, D-5, and G-2 versions. This series was reissued from the late 1990s until 2007. Since then, the only recent kits are those reboxed by Hobby 2000 in 2020. The box comes with four sprues of grey parts, a clear sprue, a decal sheet, and the instructions. There are no obvious blemishes on parts, and the mold looks quite clean. Very slight seam lines and flash are visible on a few parts. The marks that need cleaning on the cockpit are limited to the floor, as those on the sides don’t seem visible. Panel lines are finely and clearly engraved, but I can’t judge whether any are missing or superfluous.
This set contains common parts for the Ju-87D-1, D-3, and D-7 kits. The instructions clearly outline the necessary modifications for each variant; the only drawback is that they are written in Japanese. However, any image translator will solve this problem in seconds today. Specific assembly options for this D-1 include exhausts without flame dampers, fairings over the wing-mounted machine guns, optional sirens, a more pointed nose cone, and a selection of 50, 500, and 1,000kg bombs.
Paint choices offer two different liveries. One is the standard livery used in Europe, and the other was common in North Africa.
Review
The cockpit is quite sparse. There’s no detail on the fuselage sides, and the ejector marks are at the very edges of the visible areas. They don’t seem to be noticeable as the canopy is full of glazed panels. The floor is shared by both cockpits and has thick pedals molded in. Separately, we have the instrument panel, the pilot’s seat and the co-pilot’s bench seat, a bulkhead behind the pilot’s seat, and a rather poor twin MG 181Z machine gun at the rear, as it doesn’t even reproduce the mount. The instrument panel has finely raised instruments with decals to highlight them. The decal may not adhere well because it’s not as thin as it should be.
The cockpit canopy is separated into two sections and cannot be displayed open. Parts are not thick and have a thin, well-reproduced frame. The rear piece has a small recess for attaching the machine guns, and the front piece is provided with an antenna mast. I’ve read somewhere that these two pieces don’t fit the fuselage perfectly, so the modeler should take the necessary precautions.
The fuselage halves are molded without the cowling, and one of them includes the tailwheel and the complete vertical stabilizer. The nose is also separated into halves, with the air intake inside, as well as the propeller base plate and shaft. The exhausts are provided in rows and are glued into two cowling slots. They aren’t bad, but lack a bit of sharpness. The propeller is separate from the spinner. The piece is quite refined and realistic, although I’m not sure if the blade width is correct. The nose also seems to cause problems when gluing it to the fuselage because it’s too narrow, they say, although it seems more like the opposite to me. Without testing, it’s impossible to know for sure, but consider this a warning.
The wings are divided into three pieces. Panel lines and the representation of the access points and covers are nicely done, as are the wing joint covers. The flaps and ailerons are attached to the lower wing piece with their hinges. They look good thanks to Fujimi’s ability to separate them from the wing surface, which gives them greater realism. The mass balances and Pitot tube are separate. The wingtips show small navigation lights, but they are too narrow and prominent. The machine guns are represented in separate fairings attached to the wing leading edges. I think it’s worth replacing the small gun barrel with something more convincing. After the wings are attached to the fuselage, the radiators on the underside, the rear panel of the air intake under the nose, and the fuselage entry steps are added. The stabilizers have adequate definition in the rudders, hinges, and elevator balances. The bracing struts are the solid type and come apart.
The bomb choice comprises a 500kg bomb and a 1,000kg bomb with separate fins and bomb crutch, plus two 50kg bombs under each wing. These latter bombs come molded with individual racks that are removed to attach them on faired double racks.
The wheel spats consists of two halves. The suspension is represented in fine engraved lines, but detail is not remarkable. They include the sirens with separate tips. One of the aircraft in this box didn’t have them and they need to be cut off. The nicest feature here is the wheels, both one-piece with very good detail in both the tire treads and the rims. Slight seam lines are visible on the treads.
The decals provide three types of German crosses, the instrument panel, registers, swastikas (cut out on my sheet), unit insignia, and wing walk markings. They don’t look too thin, but are glossy. Printing is sharp, have good registration, and color saturation looks fine. There’s minimal excess of carrier. However, there’s something about the sheet that I don’t quite like, and that’s its potential lack of adhesion. Perhaps it’s because they remind me of other Huma decals that were almost unusable.
The instructions are printed in black and white in the now-classic folded leaflet typical of Japanese brands time ago. It contains a brief historical summary of the aircraft with some technical data, a numbered parts diagram, a color chart with Gunze Sangyo paints, seven assembly steps, and profiles. There are two alternatives for painting the model in the Stuka standard camouflage: one is RLM 70 and 71 over RLM 65, and the other features North African colors, adding RLM 79 to the top surfaces of the said livery.
Conclusion
Compared to the kits we currently have of this aircraft, interior details show their age, but the exterior still holds up well. Besides the secondhand market, finding it today needs resorting to the Hobby 2000 reissues, which have the significant advantage of including clear canopy masks and the wheels.
Apart from the assembly and decal precautions I’ve mentioned, the kit shouldn’t pose a challenge for low-intermediate modelers. With a few improvements, I believe it can still give at least a decent result.◊
Publicado – Published: 3 / 2026
©www.jmodels.net

Debe estar conectado para enviar un comentario.