

De un vistazo – Quick look
MATERIAL Y PIEZAS
MEDIA & PARTS:
- Plástico inyectado (53 piezas), plástico transparente (2 piezas).
- Injected plastic (53 parts), clear plastic (2 parts).
CALCAS – DECALS:
- Impresas por Zanchetti. Insignias italianas de dos tipos, banderas, registros, banda del fuselaje, panel de instrumentos, insignias de unidad y algunos estarcidos. Aspecto mate y fino, con buen registro y colores saturados. Sin demasiado soporte.
- Printed by Zanchetti. Two types of Italian markings, flags, registers, fuselage stripe, instrument panel, unit badges and some stencils. Thin and matte finish, with good register and color saturation. No excess of carrier film.
OPCIONES – OPTIONS:
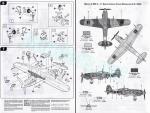
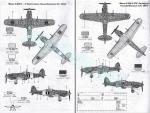
- Macchi C.205 V. Italian Republican Air Force. 1º Gruppo Caccia. 1944.
- Macchi C.205 V. Italian Republican Air Force. 6º Stormo. 1º Squadriglia. 1944.
- Macchi C.205 V. Italian Co-Belligerant Air Force. 378º Squadriglia. 1944.
INSTRUCCIONES – INSTRUCTIONS:
- Folleto doblado de 10 páginas impreso en blanco y negro. Contiene una breve introducción histórica sobre el avión, un plano numerado de piezas, una lista de pinturas de Model Master, 7 capítulos de montaje y tres páginas de perfiles. La cara posterior de la caja muestra 2 perfiles con una relación de pinturas acrílicas de Model Master.
- 10-page folded leaflet printed in black and white. It contains a short historical introduction to the aircraft, a numbered parts plan, a list of Model Master paints, 7 assembly steps and 3 pages of profiles. The back side of the box shows 2 profiles and a chart with Model Master acrylic paints.
LO MEJOR – THE BEST:
- Sencilla de montar. Paneles en todas las superficies. Carlinga decente que puede mostrarse abierta.
- Easy build. Engraved panels on all the surfaces. Decent cockpit that can be posed open.
LO PEOR – THE WORST:
- Escapes. Hélice. Detalles del tren de aterrizaje (ver texto).
- Exhausts. Propeller. Some detail on the main landing gear (see text).
VALORACIÓN – CONCLUSION:
- Tiene un detalle decente en general y no es difícil de montar, pero necesita algunas mejoras muy evidentes. Terminaciones de pintura con la suficiente variación que no serán tan secillas para los novatos.
- It is decently detailed overall and assembly is suitable for any modeller, but needs some evident improvements. Paint finishes, not that easy for the inexperienced, offer enough variation.

La maqueta
Este Veltro lleva un par de décadas rodando el mundo adelante y lo cierto es que Italeri sólo lo ha prodigado en tres ocasiones en este tiempo. En la edición más reciente la maqueta acompañaba a un MC. 202 Folgore en una caja que Italeri denominó MC. 202/MC. 205 Aces (referencia 1345). Por otro lado, es una suerte que Italeri no copiase el viejo y peor molde de Supermodel y decidiese hacer uno nuevo, que es el mejor que tenemos en esta escala aún hoy, en mi opinión.
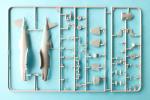
La maqueta está integrada por dos bastidores de piezas, un bastidor transparente, las calcas y las instrucciones. Las piezas están libres de rebabas y deformaciones. Sólo hay tenues marcas de eyector fácilmente eliminables en el lado interno de las tapas de las ruedas y en el interior de los pozos, pero tal vez no lleguen a apreciarse. El detalle externo muestra finura y en general está bien conseguido. Las líneas de paneles son finas, están bien grabadas y se complementan en ciertos lugares por un diminuto remachado muy convincente para esta escala.
Sin excesivas piezas, la maqueta debe ser fácil de montar. Las instrucciones no muestran alternativas de montaje ni tampoco piezas que no se empleen durante el armado, aunque parece que tanto el tubo Venturi como la antena ventral pueden ser opcionales porque hay que abrir un agujero en el fuselaje para instalarlos y al menos la antena no aparece en muchas fotos de este avión.
Carlinga
Los lados internos del fuselaje están detallados con finura en el detalle estructural y algunos instrumentos realizados en relieve. La carlinga comprende un suelo con pedales moldeados en la pieza, la palanca de control y un asiento con los arneses en el respaldo. Este último y los pedales son bastante parecidos a los reales, aunque los arneses no están completos, pues les faltan la parte inferior que consistía en un atalaje formado por cadenas. También hay un panel de instrumentos con la parte inferior separada. Los instrumentos de las dos piezas del panel son de calca. El panel inferior se muestra totalmente vertical, aunque en la realidad la parte inferior estaba inclinada hacia delante. Una vez pegado el fuselaje, hay que colocar un panel blindado tras el asiento.
La cubierta de la carlinga la forman dos partes. El parabrisas posee los montantes en un suave relieve, mientras que la sección abatible tiene los marcos grabados con mucha finura. En este punto conviene recordar que esta sección se abría hacia la derecha del piloto y era una pieza indeformable.
En conjunto, la carlinga parece bastante decente, aunque Italeri se ha comido la mira y el retrovisor, por ejemplo.
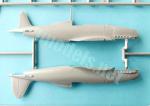
Fuselaje y motor
Las mitades del fuselaje tienen un par de pequeños puntos de alineación situados en la parte superior e inferior respectivamente. El panelado es fino y consistente en todas las superficies. Una de las mitades incluye el prominente mástil de la antena y las piezas están moldeadas con las raíces alares y las superficies verticales de cola, pero sin la cubierta ni la zona inferior del motor, así como la parte inferior del puro de cola a la altura de la rueda.
Antes de pegar las mitades hay que abrir un par de agujeros para situar el tubo Venturi lateral y lo que parece una antena en la parte trasera ventral que he mencionado antes.
El capó del motor tiene dos piezas separadas, una cubierta superior que muestra las troneras de las ametralladoras y otra inferior que contiene los filtros del radiador de aceite. Estas piezas vienen en mitades, ahuecadas y muestran el filtro en su interior. El filtro de aire de babor es de una pieza que no está mal, aunque parece un poco corta respecto a las que se aprecian en los Veltro conservados en museos italianos. Sin duda los escapes y la manera de resolverlos es de lo peor de esta maqueta porque carecen de aletas de salida y son apenas un par de filas de huecos a los lados del morro. Al igual que el filtro mencionado, estas piezas podrían haber venido separadas para lograr mejor definición.
La hélice es de una pieza moldeada con el eje. La palas son demasiado planas y los ángulos no parecen correctos. La pieza está limpia de rebabas y su montaje es convencional, insertada sobre una placa trasera con el buje separado. Un anillo en el extremo del eje permite el giro.
Para terminar el fuselaje sólo queda añadir una diminuta toma por delante del parabrisas y la carena del radiador, formada por la cubierta y dos filtros internos detallados.
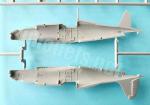
Alas y cola
Las alas están separadas en tres superficies con el tubo Pitot incluido en una de ellas. Los paneles y accesos están muy bien grabados y, como señalé arriba, algunas líneas están finamente remachadas. Las luces de las puntas están bien marcadas y lo mismo sucede con las superficies de control, aunque el relieve de la estructura puede eliminarse porque es ficticio.
Los pozos sólo están parcialmente abiertos ya que las superficies del fondo que corresponden a las ruedas vienen moldeados con la mitad inferior de las alas y detallados con algunas líneas en relieve. Además de poco convincente, la profundidad del pozo es escasa.
Los cañones vienen separados y la base del carenado se emplea para pegarlos directamente sobre los bordes de ataque.
La aleta vertical está separada en las mitades del fuselaje, pero su timón viene completo en una de ellas. El grabado de las superficies es pasable y el timón está detallado con el costillaje interno, pero debería ser plano. Los estabilizadores vienen separados provistos de lengüetas para unirlos al puro de cola. El detalle de los timones es aún más marcado que en las alas.
Tren de aterrizaje
Las patas del tren principal están detalladas con la amortiguación y la horquilla separada en dos piezas para introducir la rueda entre ellas. Los brazos de plegado vienen separados en piezas finas. Las tapas son finas, carecen de detalle interno y están extrañamente horadadas para pegar la horquilla de la pata, un detalle simplón. Las secciones de las tapas situadas en los bordes de los pozos son finas, simples y las interiores carecen de los actuadores. Las ruedas son, por decirlo así, convencionales, sin detalle en los bujes ni en las bandas de rodadura y el neumático pasablemente marcado.
La rueda de cola está moldeada con la pata y su horquilla. Las pequeñas tapas vienen aparte y el pozo de la rueda lo forman dos mitades del puro de cola separadas del fuselaje.
Calcas
La hoja está impresa por Zanchetti para Italeri. Contiene insignias italianas de dos tipos, banderas, registros, una banda del fuselaje, el panel de instrumentos, insignias de unidad y algunos estarcidos. Los motivos tienen aspecto mate y fino, buen registro y colores saturados. Carecen de excesiva película de soporte.
Instrucciones
Vienen en un folleto doblado de diez páginas impreso en blanco y negro que contiene una breve introducción histórica sobre el avión, un plano numerado de piezas, una lista de pinturas de Model Master, siete capítulos de montaje y tres páginas de perfiles. La cara posterior de la caja muestra dos perfiles con una relación de pinturas acrílicas de Model Master.
Dos de las terminaciones de pintura son idénticas, tan solo diferenciadas por las calcas, y muestran un esquema de anillos irregulares verdes sobre color arena sobre zonas inferiores en gris azul claro empleado en el Norte de África. La otra alternativa presenta más variedad y se compone de un camuflaje moteado en el fuselaje y de dos grises en los planos horizontales sobre el gris claro. Los acabados de pintura tienen cierta variedad, aunque no serán tan sencillos de reproducir si no se tiene cierta experiencia.
Valoración
La maqueta es sencilla de montar y en general tiene un detalle bastante decente en la carlinga y hasta muy bueno en el grabado de los paneles de las alas y el fuselaje. Sin embargo, para sacarle todo el partido que puede dar deberían enmendarse algunos errores que Italeri se dejó por el camino centrados básicamente en los escapes, la hélice y el tren de aterrizaje. Los dos primeros serán posiblemente insalvables, pero mejorar el último mencionado no parece complicado a priori.
Este molde es lo mejor que tenemos en la escala 1/72 hoy y parece llegado el momento de actualizarlo a los estándares de hoy. No confío en que Italeri lo haga, así que veremos si alguna otra marca llega a decidirse.◊


The kit
This Veltro has been around for a couple of decades and Italeri has only relesed it three times so far. In the most recent reissue, the kit was accompanied by an MC. 202 Folgore in a box called MC. 202/MC. 205 Aces (reference 1345). On the other hand, it is fortunate that Italeri did not copy the old and worse Supermodel kit and decided to make a new one, which is the best we have in this scale even today, in my opinion.
The kit is made up of two sprues of parts, a clear sprue, the decals and the instructions. Parts are free from flash and blemishes. There are only shallow ejector marks that can be easily cleaned up on the inside of the wheel covers and inside the wells, but they may not be noticeable. External detail shows finesse on the fuselage and wings and is generally well done. Panel lines are thin, well engraved and complemented in places by tiny rivets that are very convincing for this scale.
Without too many parts, the kit should be easy to build. The instructions do not show assembly alternatives or parts that are not used, although it seems that both the Venturi tube and the ventral antenna may be optional because you need to drill holes in the fuselage to install them and at least the antenna does not appear in most pictures photos of the real aircraft.
Cockpit
The inner fuselage sides are finely detailed with part of the frame and raised instruments. The cockpit comprises a floor including the pedals, the control lever and a seat with harnesses on the backrest. The latter and the pedals are quite similar to the real ones, although the harnesses are not complete, as they are missing the lower part which consisted of two lengths of chains. There is also an instrument panel in two pieces with the lower one apart. The instruments on the two pieces are decals. The lower panel is shown vertical, although in fact it was inclined forwards. Once the fuselage is glued, an armoured panel is attached behind the seat.
The canopy is made up of two parts. The windscreen has a softly raised frame, while the rear section shows a finely engraved frame. At this point it is worth remembering that this section opened to the right of the pilot and was a non-deformable piece. Overall, the cockpit looks pretty decent, although Italeri did not include parts for the rearview mirror and sight, for example.
Fuselage and engine
The fuselage halves have a pair of small alignment points on the top and lower rims. Panel lines are fine and consistent on all surfaces. One half includes the prominent antenna mast and the pieces are molded with the wing roots and vertical tail surfaces, but without the deck and the lower nose under the engine, as well as the lower tail cigar.
Before gluing the halves together a couple of holes are drilled to install the Venturi tube and what looks like an antenna on the ventral rear that I mentioned before.
As said, the engine cowling has two separate pieces, an upper deck showing the machine gun troughs and a lower piece containing the oil cooler filters. These pieces come in halves, hollowed out and show the filter inside. The port air filter is one piece which is not bad, although it seems a little short compared to those seen on the Veltros preserved in Italian museums. The exhausts are undoubtedly the worst part of this kit as they lack the outlet fins and are just rows of holes on the nose sides. These pieces could have come as separate pieces for a better definition.
The propeller is one piece moulded with the shaft. The blades are too flat and the profiles do not seem correct. The piece is free from flash and assembly is conventional, with the backplate with hub apart. A ring inserted into the shaft allows the propeller rotation.
The fuselage is finished with the addition of a tiny air intake in front of the windscreen and the radiator fairing, comprising the cover and two detailed internal filters.
Wings and tail
The wings are separated in three pieces with the pitot tube molded on one of them. The panels and accesses are very well engraved and, as said above, some lines are finely riveted. The wingtip lights are well marked and the same goes for the control surfaces, although the raised structural detail can be sanded off because it is fictitious.
The wells are only partially open since the bottom surfaces matching the wheels are molded with the lower wing half and detailed with some lines. Besides being unrealistic, the wells are too shallow.
The guns come separate and the base of the fairing is used to glue them directly on the leading edges.
The vertical fin is separated in the fuselage halves with the rudder molded on one of them. The engraving of the surfaces is passable and the rudder is detailed with the internal ribbing but it should be flat. The stabilizers come separate provided with tabs to attach them to the tail fin. The detail on the rudders is even more visible than on the wings.
Undercarriage
The main gear legs are detailed with the shock absorbers and the fork separated into two pieces to install the wheel between them. The folding arms come separated in thin pieces. The covers are thin without internal detail and are oddly drilled to attach the fork to the leg, which looks a rather simplistic detail. The sections of the covers closing the edges of the wells are thin and simple. The inboard covers lack the actuators. The wheels are, so to say, conventional, with no detail on the hubs or treads and the tire being fairly marked.
The tail wheel is molded with the leg and the fork. The small covers come separately and the wheel well is made up of two halves separated from the fuselage.
Decals
The sheet is printed for Italeri by Zanchetti. It shows two types of Italian markings, flags, registers, a fuselage stripe, the instrument panel, unit badges and some stencils. The items have a thin and matte finish, with good register and color saturation. They have no surplus carrier film.
Instructions
They are provided in a 10-page folded leaflet printed in black and white. It contains a short historical introduction to the aircraft, a numbered parts plan, a list of Model Master paints, seven assembly steps and three pages of profiles. The back side of the box shows two profiles and a chart with Model Master acrylic paints.
Two of the paint finishes are identical, only different in the decals, and show the scheme of irregular green rings over sand with light blue-grey undersides used in North Africa. The other alternative shows more variety and consists of a mottled camouflage on the fuselage and two greys on the horizontal planes over the light grey. Paint finishes have some variety, although they will not be so easy to reproduce without some experience.
Conclusion
This kit is easy to assemble, has a fairly decent detail in the cockpit and really nice engraved panels on the wings and fuselage. However, to get the most out of it, some of the mistakes Italeri left behind should be corrected, such as the exhausts, the propeller and the landing gear. The first two will probably be hard to fix, but improving the last one mentioned does not seem complicated at first sight.
This is the best kit we have in the 1/72 scale today but it seems the time has come to update it to today’s standards. I don’t think Italeri will do it in the short term, so let’s hope any other brand takes the plunge.◊
Publicado – Published: 11 / 2024
©www.jmodels.net

Debe estar conectado para enviar un comentario.