
De un vistazo – Quick look
MATERIAL Y PIEZAS
MEDIA & PARTS:
- Plástico inyectado (44 piezas), plástico transparente (1 pieza). Incluye una figura.
- Injected plastic (44 parts), clear plastic (1 part). One figure included.
CALCAS – DECALS:
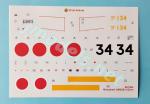
- Impresas por Cartograf. La hoja incluye el panel de instrumentos, hinomarus, numerales, bandas del borde de ataque y numerosos estarcidos. Finas y bien impresas, con buena saturación de color.
- Printed by Cartograf. The sheet includes the instrument panel, hinomarus, leading edge bands and plenty of stencils. Thin and well printed with good color saturation.
OPCIONES – OPTIONS:
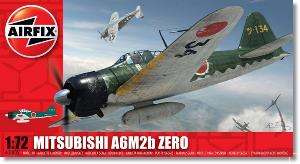
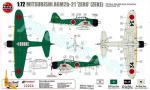
- Mitsubishi A6M2b Modelo21. Marina Imperial Japonesa. 201º Kokutai. Aeródromo Tobera. Keravat (Nueva Bretaña Oriental, Papúa Nueva Guinea), 1944.
- Mitsubishi A6M2b Model21). Imperial Japanese Navy. 201st Kokutai. Tobera Airfield. Keravat (East New Britain, Papua Nueva Guinea), 1944.
INSTRUCCIONES – INSTRUCTIONS:
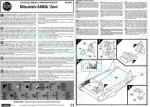
- Folleto A4 de 4 páginas impresas en blanco y negro. Muestra un sumario histórico y técnico sobre el avión en varios idiomas y 17 secuencias de montaje. La cara trasera de la caja contiene perfiles en color y códigos de pintura de Humbrol esmaltes. Muy claras.
- 4-page A4 brochure printed in black and white. It shows a historical and technical summary about the aircraft in several languages and 17 assembly sequences. The back of the box shows color profiles and paint codes from Humbrol enamels. Very clear.
LO MEJOR – THE BEST:
- Buen detalle en la carlinga. Opciones de montaje.
- Detailed cockpit. Assembly options.
LO PEOR – THE WORST:
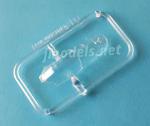
- Cubierta transparente de una pieza.
- One-piece canopy.
VALORACIÓN – CONCLUSION:
- Es notable pero tal vez no sea la maqueta más puntera del Reisen Modelo 21. Posee buen detalle general, permite colocar las puntas plegadas y es más asequible que otras. Con todo, una opción que considerar a esta escala para cualquier modelista.
- This is a nice kit but maybe it’s not a top notch for a Reisen Model 21. Still has overall good detail, can be showed with wingtips folded and is more affordable than other competitors. All in all, a choice to be considered by 1/72 scale modellers.

La maqueta
Con esta maqueta Airfix mandó al baúl de los recuerdos su Reisen de toda la vida y actualizó un molde que se hacía ya más que añejo. Esta caja tiene ya su decena pasada de años y ha sido reeditada en varias presentaciones, la última este mismo año.
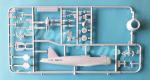
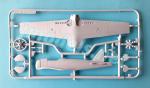
La caja contiene tres bastidores de piezas grises, un bastidor transparente, la hoja de calcas y las instrucciones. Las piezas poseen buen moldeado y están libres de rebabas. No así de marcas, como las que hay en el suelo de la carlinga, las tapas del tren de aterrizaje y el mamparo trasero del piloto, pero la buena noticia es que son tenues, excepto las del suelo, y que no habrá necesidad de taparlas porque no serán evidentes, aunque las del mamparo no estoy tan seguro. Las mitades internas del fuselaje también tienen marcas, pero no afectan a la zona visible de la carlinga al quedar por detrás del mamparo trasero.
Los paneles de alas y fuselaje están bien grabados, sin exceso de anchura y con la profundidad suficiente para no perderlos tras pintar. Como esto va en gustos, algunos los verán un punto excesivos, pero no es mi caso. Desde luego no son las líneas de otras maquetas de la marca.
Además de la opción clásica de poder mostrar el modelo en vuelo con el tren plegado, Airfix ha incluido en este molde la posibilidad de plegar las puntas de las alas y la de añadir o no el depósito auxiliar ventral. Curiosamente, la opción de montar las puntas de las alas plegadas no ha sido muy popular entre los fabricantes. He hecho una pequeña cata entre las maquetas más populares de este avión para comprobar que Hasegawa, Tamiya (incluido el nuevo molde), Academy o Airfix (molde anterior) no la tienen. Sin embargo, LS y Arii sí la ofrecen.
En esta edición sólo hay una opción de pintura al estar catalogada por el fabricante en su nivel más bajo de dificultad.
Carlinga
Se compone de un suelo bien detallado con los pedales moldeados in situ y algunos instrumentos situados en el lado izquierdo, el panel con tres calcas para simular los instrumentos, la palanca, el asiento y el mamparo trasero moldeado con el reposacabezas. El asiento no está mal, pero no lleva los característicos agujeros abiertos sino marcados. Va unido al mamparo trasero mediante pequeños vástagos que lo elevan sobre el nivel del suelo. Una pieza que parece simular el extremo trasero de las ametralladoras del capó va pegada por debajo de la cubierta del fuselaje, que también incorpora la mira.
Los lados del fuselaje aparecen bien detallados con la estructura interna y algunos instrumentos, lo que le dará a toda la carlinga aún mejor aspecto al cerrar el fuselaje. La cubierta viene en una sola pieza que resulta algo gruesa aunque no parece distorsionar mucho lo poco que va a dejar ver del interior. La estructura está bien marcada y hay un pequeño hueco para introducir el mástil de la antena.
Como en otras maquetas, Airfix nos ofrece la figura del clásico piloto patilargo en un atuendo que tiene bastante poco de japonés y cuya única utilidad para quienes deseen usarla es tapar la ausencia de cinturones en el asiento.
Fuselaje y motor
Las mitades del fuselaje no incorporan el capó, la cubierta situada por delante de la carlinga ni el timón vertical. En cambio, sí llevan las raíces de las alas y los estabilizadores. El panelado me parece bueno, como he mencionado. A cola, la luz de navegación no viene marcada. A proa, en cambio, las rejillas laterales de ventilación del motor están bien reproducidas. La cubierta del fuselaje delantero viene en una pieza un tanto extraña, ya que abarca desde la mira hasta las ametralladoras y una sección de las aspilleras. La pieza muestra la tapa del depósito de combustible del fuselaje y unas ametralladoras pasables.
El capó vienen también en una pieza, con lo que nos ahorramos lineas de unión. El detalle exterior es notable y nos muestra las aspilleras del armamento, los cierres laterales bien grabados y una toma frontal convincente. Lo que menos me gusta, sin embargo, son las aletas de ventilación. Están bien grabadas pero la sección inferior se ha moldeado junto con los escapes en las superficies inferiores de las alas. Las aletas también pueden refinarse un poco en su lado trasero para darles más realismo. La toma del refrigerador del aceite también está colocada con las alas y su perfil es claramente demasiado grande y bajo. Los escapes no están mal de tamaño y forma.
El motor Sakae está reproducido en dos coronas de cilindros superpuestas con el eje de la hélice colocado entre ellas. La corona interior apenas tiene detalle y la externa lleva los cilindros y alzaválvulas algo mejor detallados. También incorpora la caja de engranajes de la hélice. La hélice es fina y está bien perfilada sin rastro de rebabas. El buje tiene su cara trasera aparte y horadada para pegar la hélice al eje que sobresale del motor. Una vez terminado, el motor va unido al fuselaje mediante un resalte en forma de anillo que permite orientarlo correctamente. Posteriormente, debemos añadir el capó. El capó no es grueso, así que el motor no debe, en principio tener problemas de ajuste.
Alas y cola
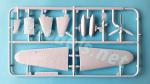
Las alas están separadas en una superficie inferior y dos superiores. Airfix ha conseguido hacer las alas muy finas, especialmente en las puntas, moldeando estas, los alerones y los flaps con las superficies superiores. Si deseamos pegar las puntas plegadas, debemos cortar las de las alas y reemplazarlas por otras puntas dotadas de bisagras en posición vertical. El corte de las puntas se hace más sencillo al aprovechar la línea de unión con la mitad inferior de las alas. Al pegar las puntas debería verse la costilla del final del ala. A esta escala parece pedir demasiado que la incluya el fabricante, pero los más atrevidos pueden intentar simularla.
Las superficies de las alas muestran diversos accesos y paneles bien grabados. Hay algunos en la parte inferior con un remachado de buena factura. Los alerones y flaps simulan decentemente el entelado, pero los alerones carecen de sus aletas. Airfix se ha molestado en representar los contrapesos de los alerones en pequeñas piezas aparte. Las luces de navegación de las puntas están marcadas como un panel más y resultan demasiado grandes y un poquito retrasadas respecto a las reales. Las troneras del armamento están grabadas y abiertas en los bordes de ataque, aunque parecen un poco pequeñas. El tubo Pitot viene separado, pero la pieza es sólo una varilla de igual diámetro en toda su longitud, sin la parte anterior más afinada que debería tener.
La mitad inferior muestra los pozos detallados en su interior, aunque parecen poco profundos para contener las ruedas. También están reproducidos las salidas de los casquillos del armamento que son un poco largos. Antes de pegar las alas al fuselaje, o incluso antes de esto, hay que decidir si emplearemos el depósito auxiliar para abrir su emplazamiento ya marcado en la parte interna del ala inferior. Esta pieza viene en dos mitades que muestran perfiles más o menos correctos pero los anillos de refuerzo deberían tener menos relieve.
Las superficies verticales de cola están separadas y por tanto podemos pegar el timón en posición no neutra. El relieve de la estructura entelada no es malo, pero de nuevo Airfix ha olvidado la aleta. Los estabilizadores vienen de una pieza con lengüetas para unirlos al fuselaje, como es habitual. El detalle en los paneles, el entelado de los timones y la definición de las bisagras están bien conseguidos.
Tren de aterrizaje
Las piezas para mostrar el tren plegado comprenden las dos tapas del tren principal y la rueda de cola en posición plegada sin más cambios.
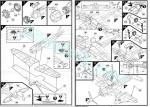
Para mostrar el tren principal desplegado tenemos dos patas de muy buena definición, dos tapas un poco gruesas con la sección superior e inferior separadas. La sección interna está moldeada con el mecanismo de plegado. Las instrucciones contienen vistas de detalle para pegar estas secciones con el ángulo adecuado respecto a la superficie del ala y también los ángulos del tren principal respecto al fuselaje. Las ruedas son de una pieza con neumáticos lisos y bujes con nulo detalle exterior y cuatro pequeños tornillos en el interior.
El tren secundario consiste en una rueda moldeada con la pata y su carena. Por delante de ellas hay un hueco en el fuselaje para insertar el gancho de apontaje.
Calcas
La hoja ha sido realizada por Cartograf e incluye el panel de instrumentos, hinomarus, numerales, bandas del borde de ataque y numerosos estarcidos. Como es de esperar en el fabricante, los motivos son finos, poseen buena saturación de color y no les sobra soporte.
Instrucciones
Se presentan en un folleto de tamaño A4 con cuatro páginas impresas en blanco y negro. Muestra un sumario histórico y técnico sobre el avión en varios idiomas y 17 secuencias de montaje. La cara trasera de la caja contiene perfiles en color y códigos de pintura de Humbrol esmaltes. El folleto es sencillo de seguir y las vistas de detalle resultan bastante útiles durante el montaje de ciertas piezas, como he mencionado antes.
Los colores del avión del 201º Kokutai representado en la caja son de los clásicos de la Marina japonesa: verde oscuro en las superficies superiores y verde grisáceo claro por abajo.
Valoración
Tal vez esta no sea la maqueta más redonda de un Reisen Modelo 21 pero aún con sus pequeñas omisiones y pequeñas carencias, representa un gran esfuerzo de la marca por actualizar un viejo molde con demasiadas décadas a cuestas.
Airfix ofrece aquí un producto con buen detalle general y fácil montaje a los menos exigentes, pero también el modelista avanzado puede lograr un gran resultado sólo con añadirle algunas mejoras en forma de arneses, cubierta de la carlinga y detalles externos menores. Un cambio de calcas permitirá mostrarlo con las puntas de las alas plegadas sobre la cubierta de cualquier portaaviones japonés o incluso hacer otras versiones con camuflajes más atractivos.
No creo que Airfix llegue a fabricar otros modelos del Reisen, al menos a medio plazo, y es una lástima. A mi modo de ver, deberían complementar esta maqueta con un Modelo 32 o 52 como hacen otros fabricantes. En cualquier caso, lo que tenemos por ahora no es poco. Además, la maqueta es una opción competitiva y más asequible que sus alternativas en marcas diferentes.◊

The kit
With this release Airfix left their aging Reisen behind updating a tooling that was clearly going to seed. This box is now over ten years old and has been reissued several times, the last one this year.
Inside the box are three frames of gray parts, a clear frame, the decal sheet and the instructions. Pieces are well molded and free from flash or blemishes. Ejector pin marks are only present on the cockpit floor, the landing gear covers and the pilot’s rear bulkhead, but the good news is that they are faint, except for those on the floor, and there will be no need to fill them up because they won’t be obvious, although I’m not so sure about the ones on the bulkhead. The inner fuselage halves also have marks, but they do not affect the visible area of the cockpit as they are behind the rear bulkhead.
The wing and fuselage panels are well engraved, with accurate width and deep enough not to lose them after painting. As this depends on taste, some modellers will see them a bit excessive, but that is not my case. They are certainly not the lines we have seen in other Airfix kits.
In addition to showing the model in flight with the undercarriage closed, Airfix have included the choice for folded wing tips and the ventral auxiliary tank. Interestingly, the option to build the wing tips folded has not been very successful among manufacturers. I have checked some of the most popular Reisen kits just to verify that Hasegawa, Tamiya (including the new tool), Academy or Airfix (previous tool) do not have this choice. However, the Japanese brands LS and Arii do offer it.
In this edition there is only one paint option as the kit range has the lowest level of difficulty in Airfix scale.
Cockpit
It comprises a well detailed floor with the pedals molded on it and some instruments located on the left side, the panel with three decals to simulate the instruments, a control stick, a seat and the rear bulkhead molded with the headrest. The seat is not bad, but the characteristic holes are not open but simply recessed. It is attached to the rear bulkhead by small rods that raise it above floor level. A piece that looks the rear of the machine guns is attached below the fuselage deck, which also shows the sight.
The fuselage sides are provided with the internal structure and some raised instruments, which will add a better appearance to the cockpit after closing the fuselage. The one-piece canopy is a bit thick although it won’t distort the interior as not much of it will be evident. The canopy structure is rendered with raised detail and there is a small gap to insert the antenna mast.
As in other kits, Airfix offers the figure of their classic long-legged pilot in an outfit that can be anything but Japanese. The only use I see for the pilot is to hide the lack of seat belts.
Fuselage and engine
The fuselage halves do not include the cowling, the deck forward of the cockpit or the vertical rudder, but the wing and stabilizers roots are there. The rear fuselage tip does not show the navigation light, however, the side engine ventilation grilles are well reproduced. The front fuselage deck comes in a rather strange piece, as it extends from the sight to the machine guns and a section of the troughs. The piece shows the fuselage fuel filling cap and passable machine guns.
The cowling also comes in one piece, which saves seam lines. Exterior detail is quite good and shows the gun troughs, engraved side latches and a convincing front intake. What I like least, however, are the engine cooling gills. They are accurately engraved except for a section molded with the exhausts on the lower wing surfaces. The gills can also be refined a little for a more realistic look. The oil cooler intake is also made with the wings and the profile is clearly too large and low. The exhausts are not bad in size and shape.
The Sakae engine is reproduced in two cylinder rows with the propeller shaft attached between them. The inner row shows hardly any detail but the external one is a bit better, with cylinders and tappets better defined in the piece, which also comprises the propeller gearbox. The propeller is thin and well profiled without flash. The spinner has a separated rear side drilled to insert the propeller shaft protruding from the engine. Once finished, the engine is attached to the fuselage by means of a ring molded on the back side that matches a counterpart on the fuselage front. The cowling is added with the engine in place. The cowling is not thick, so there should not be fitting issues.
Wings and tail
The wings are broken up in a lower and two upper surfaces. Airfix have managed to make the wings very thin, especially the tips, by molding these, ailerons and flaps with the upper surfaces. If we want to use the folded tips, we must cut the wing tips and replace them with alternative pieces provided with vertical hinges. Trimming the tips is easier if we just follow the seam line where both wing surfaces match. When you glue the new tips you should see the rib at the end of the wing. At this scale it seems too much to ask the manufacturer to include it, but the daring veteran can try to simulate it.
Wing surfaces show well-engraved accesses and panels. There are some on the lower side that have nice rivetted lines. Ailerons and flaps decently simulate the canvas, but the ailerons lack the fins. Airfix have taken the trouble to represent the aileron counterweights in small separate pieces. The navigation lights at the tips are marked as just another panel and seem too large and a little set back from the real ones. The gun ports are drilled and open on the leading edges, although they look a bit small. The Pitot tube comes separately, but this is just a rod with the same thickness all along the piece, without the thinner front section it should have.
The lower half shows detailed wells, although they seem shallow for the wheels. The ammo chutes, which are a bit long, are also rendered. Before gluing the wings to the fuselage, or even before this, we should decide whether we will use the auxiliary tank to open a recessed slot on the lower wing. This piece comes in two halves having more or less accurate profiles but the reinforcing rings are too thick and raised.
The vertical tail surfaces are separated and therefore we can attach the rudder in a non-neutral position. The raised structural detail is not bad, but again Airfix have forgotten the fin. Stabilizers come in one piece with tabs for fuselage attachment as usual. Detail is nice on the panels, the canvas-covered elevators and the definition of the hinges.
Undercarriage
Pieces to show the folded gear include two main gear covers and the tail wheel in the folded position with no further changes.
To show the main gear unfolded we have two legs with very good definition, two slightly thick covers with the upper and lower section separated. The internal section is molded with the folding gear. The instructions contain inset diagrams for positioning these sections correctly in relation to the wing surface and the angles of the main gear to the fuselage. The wheels are one piece with smooth tires and hubs with no detail except four small screws inside.
The tail gear consists of a leg molded with a faired leg. In front of them there is a slot on the fuselage to insert the arrester hook.
Decals
The sheet has been printed by Cartograf and includes the instrument panel, hinomarus, numbers, leading edge stripes and numerous stencils. As expected from the manufacturer, decals are thin, have good color density and carrier film is minimal.
Instructions
They come in a 4-page A4 brochure printed in black and white. It shows a historical and technical summary about the fighter in several languages and 17 construction sequences. The back of the box shows color profiles and paint codes from Humbrol enamels. The brochure is easy to follow and detail views are quite useful when assembling some parts, as I mentioned before.
The 201st Kokutai aircraft depicted on the box sports the classic Japanese Navy colors: dark green on the upper surfaces and light grayish green below.
Conclusion
Perhaps this is not the most rounded kit of a Reisen Model 21 but even with small omissions and shortcomings, it is a great effort to improve a really outdated tool.
Airfix offer a product with good overall detail and easy assembly for the less demanding, but also the advanced modeller can achieve great results just by adding some improvements in the form of harnesses, cockpit canopy and a few other external bits. A change of decals will allow the kit to be posed with the wing tips folded on the deck of any Japanese carrier or even paint it in more attractive color schemes.
I don’t think Airfix will release different Reisens, at least in the short term, and it’s a shame. In my opinion, they should complement this kit with a Model 32 or 52 like other manufacturers do. In any case, what we have is not little. The offer is a competitive and more affordable choice than the alternatives in other brands.◊
Publicado – Published: 9 / 2023
©www.jmodels.net

Debe estar conectado para enviar un comentario.