

De un vistazo – Quick look
MATERIAL Y PIEZAS
MEDIA & PARTS:
- Plástico inyectado (67 piezas), plástico transparente (7 piezas).
- Injected plastic (67 parts), clear plastic (7 parts).
CALCAS – DECALS:
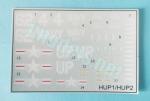
- Insignias y marcas de la Marina norteamericana, numerales y estarcidos. Aspecto brillante y fino sin soporte superfluo.
- US Navy markings, numbers and stencils. Thin and shiny appearance without too much carrier film.
OPCIONES – OPTIONS:
- Piasecki HUP-2 Retriever. U.S. Navy. HU-1 Squadron. White 4. 1950s.
- Piasecki HUP-1 Retriever. U.S. Navy. HU-1 Squadron. White 62. 1950s.
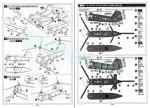
INSTRUCCIONES – INSTRUCTIONS:
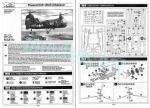
- Folleto de 4 páginas en formato A4 impreso en blanco y negro. Contiene un sumario histórico sobre el helicóptero, un plano numerado de piezas, 7 pasos de montaje y perfiles. Las referencias de color pertenecen a la gama esmalte de Humbrol.
- 4-page A4 brochure printed in black and white. It shows a historical summary about the helicopter, a numbered parts plan, 7 assembly steps and profiles. Color references belong to Humbrol enamel range.
LO MEJOR – THE BEST:
- Molde limpio en general. Con ciertas dificultades, es factible de caja.
- Overall clean tooling. With some difficulties, the kit is buildable out of the box.
LO PEOR – THE WORST:
- Múltiples omisiones y errores de formas y dimensiones (Ver texto).
- Lots of mistakes in dimensions, shapes as well as some omissions (See text).
VALORACIÓN – CONCLUSION:
- Está plagada de errores y necesita ciertas modificaciones. Interior muy pobre y exterior poco más aseado. Para modelistas expertos muy motivados por este helicóptero.
- It is full of mistakes and needs some modifications. Poor interior and external detail just a bit better. For experienced modellers really interested in this helo.

La maqueta
No lo tiene fácil el modelista que pretenda hacer este helicóptero en la escala 1/72 porque, aún no hay una maqueta de plástico que lo represente decentemente, por mucho que cualquier maqueta, por fiel que pretenda ser, sea tan sólo una copia muy alejada de su referente real. A esto se añade la dificultad de encontrar buena documentación, ya que los Retriever conservados en museos suelen ser una fuente dudosa de información al no haberse empleado siempre piezas originales para restaurarlos. Aún nos quedan las imágenes de época, aunque estas en ocasiones no nos muestran el detalle preciso que buscamos, sobre todo si se encuentra en el interior.
Obviamente, no pretendo desanimar a nadie que realmente quiera tener un Retriever en su vitrina, pero lo cierto es que debe tener claro que tendrá que trabajar esta maqueta y enmendar de su cosecha la gran cantidad de desaciertos en forma de omisiones, formas y dimensiones incorrectas así como detalles directamente inventados o muy mal reproducidos.
Junto con el de la marca francesa Mach 2, el de Amodel es el molde más conocido en esta escala pequeña y tiene ya aproximadamente unas dos décadas. El fabricante ha producido hasta ahora tres cajas. Las otras dos contienen un HUP-2/HUP-3 (referencia 72137) y un H-25A “Army Mule” (referencia 72147). Aunque no constan reediciones en la web de Scalemates, me parece haber visto alguna con el mismo formato y contenido posteriormente, pero puedo estar confundido.
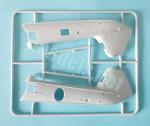
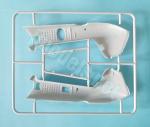
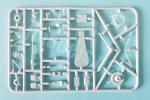
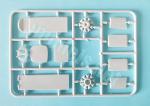
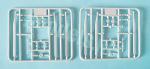
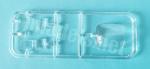
La caja tiene cinco bastidores de piezas, dos de ellos repetidos y otro con piezas transparentes, la hoja de calcas y las instrucciones. El plástico es más bien rígido y muestra pequeñas rebabas en los bordes de algunas piezas así como finas líneas de molde que no deben ser difíciles de limpiar. En cambio, las piezas no presentan deformaciones, excepto en un caso que menciono en su apartado, y además no hay marcas de eyector en lugares indeseables, ni siquiera en el interior del fuselaje o los elementos de la carlinga. Las piezas transparentes son más bien gruesas, aunque no desproporcionadamente. Son mejores las ventanillas que la pieza del acristalamiento frontal en este aspecto.
El montaje es idéntico para el HUP-1 y 2 con la única diferencia de los estabilizadores y aletas presentes en el primero. También son casi semejantes, excepto en las calcas, las dos versiones de pintura que representan aparatos incluso de la misma unidad de la Marina norteamericana.
Carlinga e interior
Los lados de la carlinga no tienen detalle salvo un pequeño extintor a un lado y lo que podría ser el contenedor de primeros auxilios al otro. La carlinga dispone de un suelo compartido con la zona de carga, dos asientos diferentes con sus soportes y respaldos separados, la palanca de control más el panel de instrumentos y su soporte. El panel tiene una extraña doble consola sin calcas ni detalle “agraciada” con dos pequeños rechupes. Comparadas estas piezas con un HUP real se puede comprobar fácilmente que Amodel se inventó la carlinga. Ni los asientos se parecen a los reales ni tampoco el panel de instrumentos tenía la forma, extravagante cuando menos, que se le ha dado. Faltan los pedales y las palancas de control de cabezada. La consola central bajo el panel tampoco está detallada. Cito sólo los elementos que me parecen indispensables, pero se podrían añadir otros que no enumero por no cansar.
El parabrisas frontal es una pieza transparente defectuosamente moldeada. Las superficie exterior aparenta tener formas curvas, pero la interna tiene zonas planas que causan bastante distorsión y no dejará ver el interior con mucha claridad. Además, la parte inferior tiene el mismo perfil demasiado plano e incorrecto que las mitades del fuselaje. El montante de refuerzo vertical está grabado en la pieza en lugar der estar moldeado en relieve y el refuerzo horizontal ni existe.
El interior está limitado por un mamparo trasero sobre el que va pegado otra pieza que simula el techo de la carlinga y de la zona de carga. Las dos piezas no tienen detalle. Los lados internos de la zona de carga están grabados con lo que pretende ser el acolchado aislante que resulta bastante burdo. Más allá de esto, el interior está vacío porque Amodel no se molestó en ponerle asientos ni añadir nada más.
Tras el compartimento de carga, el del motor contiene un mamparo vertical con un soporte rectangular para el motor. Extrañamente, el motor está formado por dos coronas de cilindros en lugar de una sola. Ambas vienen separadas y podrían tener un pase, aunque hay que limpiar restos de plástico en las cabezas de los cilindros. También hay un soporte en forma de estrella que semeja una bancada pegada al panel delantero y el colector de escape aparte unido a la salida del tubo en la parte trasera del fuselaje izquierdo. El eje de transmisión del motor al rotor trasero es un único tubo con tramos de diferente grosor pegado sobre un panel trasero que tiene el perfil interno de la cola. También se ha incluido parte del eje de transmisión del rotor delantero. El detalle de estas piezas es mínimo y alguna incluso muestra un ligero rechupe, pero esto no debería preocuparnos demasiado, considerando que apenas se van a apreciar a través de las tomas de aire situadas en la base de la cola.
Fuselaje
Desgraciadamente, también el fuselaje muestra múltiples errores. Para empezar la sección de las mitades del fuselaje carece de la forma oval del helicóptero real, siendo la inferior plana y la superior muy poco curvada. Las mitades son gruesas en consonancia con las piezas transparentes que cubren la abertura frontal, las ventanillas a ambos lados de la carlinga y la ventanilla del lado derecho, que tiene forma rectangular en lugar de octogonal. En este lado una pieza transparente simula una ventanilla que era en realidad un receptáculo de aprovisionamiento de combustible.
Las superficies verticales de cola tienen un perfil incorrecto, demasiado bajo e inclinado respecto a lo que puede apreciarse en las fotos del HUP. Además, la cola muestra sólo dos tomas de aire abiertas, aunque los aparatos operativos llevaban dos más por debajo de estas. Curiosamente, estas dos tomas inferiores están grabadas en su lugar, aunque no vienen abiertas. Sin embargo, los estribos de acceso al rotor de cola me parecen bien reproducidos por ambos lados y las superficies del borde de salida de la cola están bien representadas con formas curvadas muy suaves reproduciendo la estructura interna.
La única opción de montaje son los estabilizadores y timones verticales aplicables sólo al HUP-1 porque no llevaba el piloto automático del HUP-2 que le permitía a este una mejor suspensión en el aire. Las piezas son finas y están bien perfiladas, pero no tienen vástagos de unión con la cola. Afortunadamente, las caras internas del fuselaje tienen marcados los puntos para taladrar los apoyos e introducir dos varillas, que deberán ser muy finas a tenor del grosor de los estabilizadores.
La puerta lateral de acceso no tiene la forma oval bien recortada en el plástico y resulta más bien estrecha. Está provista de dos pequeñas ventanillas, gruesas como las demás, y de las bisagras.
La zona ventral trae el tubo Pitot y algunos dispositivos en forma de aletas y carenados, pero carece de la escotilla del cabrestante de rescate. Así mismo, la escotilla de refrigeración situada casi justo por debajo del motor muestra una forma incorrecta que debería ser heptagonal con lados desiguales y no circular como en la maqueta.
Para acabar las omisiones del fuselaje, sólo queda reseñar la ausencia de todas las luces de navegación y aterrizaje.
Rotores y hélices
Después de la relación de defectos anteriores parece menos importante indicar que las formas de los carenados de los rotores son incorrectas. El carenado del rotor delantero es muy alto y carece las formas suaves del original, mientras que el del trasero debería tener un poco más de altura.
Los rotores están formados por tres anillos superpuestos con un vástago introducido en su centro y un tope en la parte inferior que permite el giro. El espacio necesario para introducir las palas entre dos de los anillos es muy escaso y seguramente dará problemas al montarlas. Cada rotor va introducido en el hueco de su respectivo carenado.
Las palas son demasiado gruesas y poco flexibles, por ello reproducir la curvatura al estar en reposo no va a resultar fácil. Además, las puntas tienen una extraña forma redondeada en vez de recta.
Tren de aterrizaje
Está formado por tres piezas muy finas y delicadas unidas a la panza y los lados del fuselaje. Las patas no están bien ubicadas en el fuselaje y son demasiado largas para representar el aparato posado en el suelo. Su lugar correcto no es tan retrasado como se aprecia en las instrucciones, sino justo por detrás de la puerta de acceso de babor y de la ventana lateral del lado derecho. Con un poco de habilidad se pueden solucionar estos dos defectos, lo que no siempre es posible en esta maqueta como el lector habrá comprendido a estas alturas sin que yo insista.
Las ruedas no son tampoco nada del otro jueves y, además de tener pequeñas líneas de molde en los neumáticos, las llantas externas son bastante malas.
Calcas
Las calcas poseen un aspecto brillante y fino, su registro es correcto y no contienen soporte superfluo. La hoja contiene insignias y marcas de la Marina norteamericana, numerales y estarcidos.
Instrucciones
El folleto de instrucciones tiene cuatro páginas en formato A4 impresas en blanco y negro y contiene un sumario histórico sobre el helicóptero, un plano numerado de piezas, siete capítulos de montaje y perfiles del modelo para pintarlo y colocar las calcas. En la misma hoja hay una lista de colores con referencias a la gama esmalte de Humbrol.
Los acabados de pintura no muestran diferencia. Proponen un HUP-2, curiosamente el mismo 4 Blanco que aparece en la caja de la maqueta del fabricante Mach 2, de la unidad de helicópteros HU-1 en la década de los años 1950 pintado en el clásico Sea Blue (FS15042) de la Marina norteamericana. La segunda opción es un HU-1, 62 Blanco, de la misma unidad, fecha y color.
Valoración
Sinceramente, me hubiese gustado poder describir más aciertos es este artículo para contrapesar la caterva de dislates que Amodel le puso a esta maqueta, pero, siendo justos, poco bueno se puede decir de ella en cuanto a semejanza con el original.
Con algunas dificultades que he intentado indicar, la maqueta es factible de caja, aunque necesita tantas mejoras que sólo el modelista experto y muy interesado en este helicóptero querrá remangarse y poner manos a la obra.
Acaso lo peor de todo sea que no se vislumbra un molde mejor que los actuales en un futuro próximo. Es una pena que este icónico helicóptero de la Guerra de Corea no posea aún una réplica decente, al menos en esta escala.◊

The kit
The modeller who wants to build this helicopter in 1/72 scale will not have an easy task, because there is still no plastic kit to render it decently, even considering any kit, no matter how good it may be, is just a rough copy of its real matter. Added to this is the difficulty of finding good documentation. Retrievers kept in museums are usually a dubious source of information, as original parts have not always been used to restore them. We still have images of operational machines, although these sometimes do not show the precise detail we are looking for, especially of the cockpit.
Obviously, I do not intend to discourage anyone who really wants to have a Retriever on his shelf, but the truth is that they will have to improve this kit and correct the large number of mistakes in the form of omissions, incorrect shapes and dimensions, as well as other detail that is simply fictional or very poorly reproduced. Along with the French Mach 2, the Amodel tool is the best known in this small scale and is already around two decades old. The manufacturer has released three boxes so far. The other two are a HUP-2/HUP-3 (reference 72137) and an H-25A “Army Mule” (reference 72147). Although there are no reissues listed on the Scalemates website, I can recall to have seen another boxing with the same content released later, but I may be mistaken.
The box has five sprues of parts, two of them doubled, a sprue with clear parts, the decal sheet and the instructions. The plastic is rather stiff and shows small flash on some parts as well as small seam lines that are not apparently difficult to clean up. On the other hand, parts do not show blemishes, except in a few of them that I mention below, and there are also no ejector marks in visible places, not even inside the fuselage or the cockpit floor. Clear parts are rather thick, especially the front glazing.
Assembly is identical for the HUP-1 and 2 with the only difference being the stabilizers and fins present in the first. Paint finishes also look quite the same with only different markings and represent machines from the same US Navy unit.
Cockpit and interior
The cockpit sides have no detail except for a small fire extinguisher on one side and what could be the first aid kit on the other. The cockpit has a floor shared with the cargo area, two different seats with their supports and separate backrests, the control column as well as the instrument panel. The panel has a strange double console without detail or decals for the instruments. The flat surfaces have small sinks. Comparing these pieces with a real HUP, it is clear that Amodel rendered the cockpit as they pleased. Neither the seats look like the real ones nor did the instrument panel have the shape, extravagant to say the least, that they show. The pedals and the collective pitch levers are missing. The central console under the panel is not detailed either. This is only a short list of the essential elements that I think should be provided or improved by the modeller.
The front windshield is a clear piece defectively molded. The outer surface appears to have curved shapes, but the inner side has flat surfaces that cause distortion and will not allow to see the interior very clearly. In addition, the lower section has the same flat and incorrect cross-section profile as the fuselage halves. The vertical frame is engraved into the piece instead of being raised and the horizontal frame is missing.
The interior includes a rear bulkhead plus the cockpit and cabin roof. The two pieces have no detail. The cabin walls are engraved with what looks like a rather crude insulation. Beyond this, the interior is empty because Amodel did not bother to include the seats or anything else.
Behind the cabin, the engine compartment contains a vertical bulkhead with a rectangular support for the engine. Strangely, the engine is made up of two cylinder rows instead of just one. Both come separate and are not too bad, although the cylinder heads need some cleanup. There is also a star-shaped engine bearer glued to the front panel and the separate exhaust manifold attached to the exhaust pipe on the left fuselage side. The drive shaft running from the engine to the aft rotor is a single piece with sections of varying thickness attached to a rear panel. Part of the transmission to the forward rotor has also been included in a piece. Detail on these parts is minimal and some even show small sinks, but this should not be too worrying considering that they will barely be visible through the aft pylon air inlets.
Fuselage
Unfortunately, the fuselage is also quite wrong. To begin with, the fuselage cross-section lacks the oval shape of the real helicopter, the lower profile being flat and the upper one very slightly curved. The halves are thick in keeping with the glazed windshield covering the front opening, the windows on both cockpit sides and the stardboard window, which is rectangular instead of octagonal. On the right side a clear piece simulates a window that was actually a refueling receptacle.
The top profile of the aft pylon have an incorrect shape, too low and inclined compared to what can be seen in the HUP pics. In addition, the pylon shows only two open air inlets, although operational aircraft had two more below these. Curiously, the two lower inlets are engraved in place, although they are not open. However, the aft pylon footholds look nice on both sides and the surfaces of the pylon trailing edge are well represented with very smooth curved shapes reproducing the internal structure.
The only assembly choice are the vertical stabilizers and rudders applicable to the HUP-1 because this did not have the HUP-2 autopilot that allowed it to have better hover in the air. The pieces are thin and well profiled, but they do not have attachment pins. Fortunately, the internal fuselage sides have marks for drilling and inserting two thin plastic or metallic rods.
The cabin door does not have the oval shape neatly cut in the plastic and is rather narrow. It is provided with two small windows, thick like the rest, and the hinges.
The fuselage belly has the Pitot tube and some sensors in the form of fins and fairings, but lacks the hatch for the rescue hoist. The cooling hole located almost below the engine is also incorrect. It should be an heptagon with uneven sides, not a circle as in the kit.
To finish off the omissions in the fuselage, I will only add the absence of all the navigation and landing lights.
Rotors and propellers
After the list above, it seems less important to point out that the shapes of the rotor fairings are incorrect. The forward rotor fairing is very tall and lacks the smooth shapes of the original, while the aft rotor base should be a little higher.
The rotor heads have nothing to do with the real ones being made up of three rings plus a shaft and an end adapter to allow propeller rotation. The space needed to insert the blades between two of the rings is very small and will surely cause problems. The rotor heads are attached inside the openings moulded on top of each pylon.
The propeller blades are too thick and not very flexible, so simulating the sag with the helicopter on the ground will not be easy. In addition, the tips have a rounded shape instead of straight.
Landing gear
It is made up of three very thin and delicate pieces attached to the belly and fuselage sides. The legs have attachment points too far aft the fuselage and look too long to represent a machine on the ground. They should be attached just behind the port cabin door and the stardboard window. With a little skill these two issues can be improved, something which is not always possible on this kit as the reader will have understood by now.
The wheels are not anything special either and, in addition to showing small seam lines on the tyres, the external hubs are quite bad.
Decals
The decals have a bright and thin appearance, are in correct register and have no surplus carrier. The sheet provides US Navy markings, numbers and stencils.
Instructions
The instruction leaflet has four A4 pages printed in black and white showing a historical summary of the helicopter, a numbered parts plan, seven assembly chapters and profiles of the model for painting and applying the decals. A list of colours includes references from Humbrol enamel range.
Paint finishes are almost identical. They show a HUP-2, curiously the same 4 White included in the Mach 2 kit, from the HU-1 helicopter unit in the 1950s painted in the classic US Navy Sea Blue (FS15042). The second choice is for a HUP-1, 62 White, from the same unit, date and sporting the said livery.
Conclusion
Honestly, one would like to say something good about this kit to balance the host of mistakes that Amodel moulded in this kit, but, to be fair, there is little good I can add in terms of its resemblance to the original helicopter.
This said, it is also true that the kit looks buildable from the box with a few difficulties during assembly, but it clearly needs so many improvements that only the very interested modeler will want to roll up his sleeves and get to work.
As there seems to be no new-tool kit in sight at least in the near future, it is a shame that this iconic helicopter of the Korean War does not yet have a decent replica at least in the 1/72 scale.◊
Publicado – Published: 2 / 2025
©www.jmodels.net

Debe estar conectado para enviar un comentario.