
De un vistazo – Quick look
MATERIAL Y PIEZAS
MEDIA & PARTS:
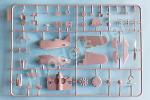
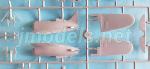
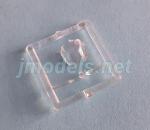
- Plástico inyectado (52 piezas), plástico transparente (2 piezas).
- Injected plastic (52 pieces), clear plastic (2 pieces).
CALCAS – DECALS:
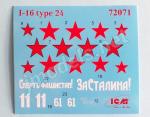
- Estrellas rusas de varios tipos y tamaños, lemas y números. Bien impresas.
- Red stars in several types and sizes, slogans and numbers. Correctly ptinted.
OPCIONES – OPTIONS:
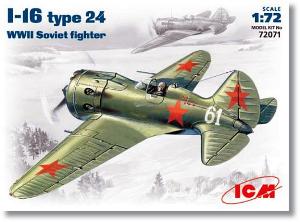
- Polikarpov I-16 Tipo 24. 286º IAP, aparato 61 blanco pilotado por A. G. Tatarchuk. Frente de Leningrado, 1942.
- Polikarpov I-16 Tipo 24. 72º SAP, aparato 11 blanco pilotado por B. Safonov, 1941.
- Polikarpov I-16 Type 24. 286th IAP, white 61 piloted by A. G. Tatarchuk. Leningrad Front, 1942.
- Polikarpov I-16 Type 24. 72nd SAP, white 11 piloted by B. Safonov, 1941.
INSTRUCCIONES – INSTRUCTIONS:
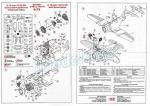
- Una hoja de tamaño A4 impresa en blanco, negro y rojo. Contiene un plano de piezas, 5 secuencias de montaje y una lista de colores con pinturas de Model Master. Claras. No se muestran opciones de pintura.
- A4 sheet printed in blak, white and red. Shows a parts plan, 5 assembly steps and a list of colors with corresponding Model Master paints. Clear. Paint choices are not included.
LO MEJOR – THE BEST:
- Molde muy limpio. Buen detalle en general, especialmente interior. Timón y elevadores orientables.
- Clean tool. Overall nicely detailed, especially inside. Positionable rudder and elevators.
LO PEOR – THE WORST:
- Instrucciones (ausencia de perfiles). Poca variedad de pintura.
- Instructions (lack of profiles). Painting versions are not varied.
VALORACIÓN – CONCLUSION:
- Aunque ya veterana, por calidad y precio aún merece mucho la pena. De montaje algo delicado por el tamaño de muchas piezas.
- Though not a new kid in town, detail and price are still worth. A bit tricky assembly due to parts size.

La maqueta
Este es un viejo conocido de la afición que lleva décadas con los mismos marbetes de Tipo 18, 24 y 28, pero en realidad se trata de la misma maqueta con ligeros cambios. Pienso que los aviones muy pequeños, y el I-16 en particular, resultan difíciles de copiar a partir de cierto tamaño. Algunas piezas llegan a ser tan minúsculas que, por más detalle que se les quiera dar, el esfuerzo es casi vano. Apenas si se llega a intuir lo que representan, y así un cañón puede vales para un tubo pitot, o un pequeño tapón de depósito pasa por un colimador. Por eso la mayoría de modelistas atraídos por este feo avión, toda bestia tiene su erotismo, lo suelen buscar en escalas mayores.
Algo de esto debe pasar con el I-16 a esta escala, y aún más en esta maqueta de ICM, cuya dura caja a prueba de aplastamiento contiene un único bastidor gris, un pequeño bastidor transparente, las calcas y las instrucciones. ICM intentó no dejar nada al albur en cuestión de detalle y el despiece es numeroso para este avión y su escala. Como todo, esto tiene sus seguidores y detractores, según las manías de cada quisque.
El plástico es fino y las piezas no presentan prácticamente rebabas ni marcas visibles. Dado que el modelista va a manipular piezas muy pequeñas, esto ya es un buen punto de partida. Las líneas de panel en las superficies que las requieren son muy finas y están bien trazadas.
La maqueta representa un Tipo 24, diferenciado por fuera respecto a modelos anteriores por llevar rueda de cola en lugar de patín y el armamento de 4 ametralladoras. Como la maqueta es la misma para los modelos 18 y 28, se pueden montar también estas variantes con el oportuno recambio de armamento y rueda.
Carlinga
Los lados de la carlinga vienen pelados de detalle, pero a cambio las puertas de acceso laterales pueden mostrase abiertas cortando las piezas por el contorno rebajado. El interior es ciertamente realista, con el suelo moldeado con el respaldo del asiento y este unido a su vez al reposacabezas. Esta pieza va apoyada en el filo de los pozos y en un resalte moldeado con la sección inferior del fuselaje. La palanca de control aparece a través de un hueco del suelo y va unida a su engranaje de control. Hay piezas para la parte inferior del asiento y el panel de instrumentos, este muy bueno y con indicadores grabados. El parabrisas es fino, aunque no demasiado transparente, pero no debe quitarnos el sueño debido a su tamaño. Hay colimadores alternativos, opaco y transparente, situados tras el parabrisas. El tamaño no permite apreciar mucho la diferencia.
Fuselaje y motor
Las mitades del fuselaje están moldeadas con parte de las alas y la deriva sin el timón. Parte de la zona ventral viene separada e integrada en las alas. Con este despiece, ICM simplifica y mejora el detalle de las complejas curvas de los encastres. A cambio, se paga el precio de tapar líneas al pegar las alas, eso sí, en lugares diferentes a los habituales. El puro de cola también viene aparte, pero de él se habla en su sitio.
El motor es muy bueno. El panel cortafuegos está detallado en su cara externa y hay piezas para la bancada, el depósito y el colector de escape con una toma separada encima. El motor propiamente dicho lo componen una corona de cilindros con definición aceptable, la caja de engranajes de la hélice y otra corona de alzaválvulas, además del eje que servirá para pegar la hélice.
El capó viene dividido en 5 secciones, lo que tentará a algunos a mostrar parte del motor. De acuerdo con las instrucciones, hay que pegar los diminutos escapes al motor con la precisión suficiente para que coincidan con las salidas del capó. La misión se antoja, cuando menos, peliculesca. Las secciones inferiores del capó están hechas con un tramo del borde de ataque de las alas. La parte superior del capó va pegada a dos rebajes sobre el fuselaje y muestra las carenas del armamento y la tapa del depósito.
La pieza frontal del capó está muy bien representada. Contiene las persianas de ventilación abiertas, las salidas de las ametralladoras y las dos tomas, superior e inferior, todas bien definidas.
Alas y empenaje
El despiece de las alas resulta bastante singular. Ambas son de una pieza y van medio encastradas en la sección moldeada con el fuselaje. El detalle de las superficies compuestas de madera, tela y metal, me parece muy bien conseguido para las dimensiones de esta maqueta. Aparecen los paneles remachados de acceso a la munición, las microscópicas bisagras de los alerones y la superficie entelada hecha sin exageraciones. También están las luces de las puntas, pero apenas se aprecian. Las ametralladoras son apenas un par de tubitos, pero poco más puede ponerse a ese tamaño. Como decía, hay piezas para colocar cañones en su lugar, pero estaríamos tornando el modelo en un Tipo 28. El tubo pitot también es minúsculo y viene aparte.
Los estabilizadores y el timón vertical están diseñados para colocarlos en cualquier posición, lo cual es otra ventaja de esta maqueta. El timón vertical muestra los huecos de las bisagras y está provisto de un eje vertical que permite insertarlo en los estabilizadores. Los timones de profundidad están unidos por un eje que tapa el puro de cola, cuya sección viene cortada del fuselaje. El detalle del entelado en los timones no es igual de bueno que en las alas, quedando las superficies casi planas.
Tren de aterrizaje
Los pozos están realmente bien reproducidos con la profundidad suficiente y llevan el punto de salida del cable de plegado del tren, que no se muestra en las instrucciones. Las patas y los soportes presentan buen perfil y son finos. Las tapas vienen lisas por dentro, pero muestran buen detalle externo. La sección inferior ha de cortarse para situarla en posición perpendicular a la tapa. Las ruedas también me parecen excelentes, mostrando buena definición en los neumáticos.
Calcas
La hoja contiene estrellas rusas con y sin línea de contorno negra, eslóganes, numerales blancos y pequeñas marcas de derribos. La impresión parece buena, al igual que la finura de los motivos.
Los eslóganes patrióticos del avión de Safonov iban pintados a ambos lados del fuselaje, como se aprecia en el dibujo impreso en uno de los lados de la cubierta de la caja. Respecto al avión de Tatarchuk hay que señalar que las marcas de victorias iban todas en una sola hilera y no en dos como en la hoja. Esto se puede comprobar en las fotos del piloto y su avión que tomó la propaganda soviética.
Instrucciones
Están impresas en una sola hoja de tamaño A4. Contiene un plano de piezas, una lista de colores con coincidencias de pinturas de Model Master y 5 pasos de montaje muy claros. Con el tiempo las instrucciones de ICM han ido menguando y ya no incluyen los perfiles con las indicaciones de colores y calcas que llevaban las cajas primitivas. También se echan en falta una lista de pinturas actualizada con otros fabricantes y referencias a la posibilidad de poder simular los cables de plegado del tren, como en otras maquetas de aviones las instrucciones hacen referencia al arriostrado del modelo.
Valoración
Ya que se molestó en hacer un molde con tanto despiece y detalle en su momento, es lástima que ICM haya sido tan conservadora todo este tiempo y no haya editado un avión tan versátil en otros modelos y nacionalidades con diferentes esquemas de pintura. Como al camarón que se duerme, ya se sabe lo que le ocurre, ahí está la marca Clear Prop! con su I-16, que es ahora mismo la referencia a seguir para hacer una versión anterior a la guerra mundial. La misma Hasegawa, que no se distingue precisamente por su audacia, le ha puesto más colores diferentes a sus maquetas que los que lleva ICM en todo este tiempo.
Aunque la maqueta sigue siendo una buena opción para cualquiera de los tres modelos que se pueden representar con ella, adolece de unas instrucciones mermadas y de escasa variedad en las opciones de pintura.◊

The kit
This is an old and well-known kit that has been bearing the same labels of Type 18, 24 and 28 for decades, all of them the same kit with little changes. I think very small aircraft, and the I-16 in particular, are difficult to render below a certain scale. Some pieces become so tiny that, no matter how much detail you want to give them, the effort is almost in vain. You can barely guess what they represent, and so a cannon can look like a pitot tube, or a small tank cap can be mistaken with a collimator. That is why most modelers attracted by this ugly plane, every beast has its appeal, usually want it at larger scales.
Something like that must happen with any 1/72 I-16, even more so in this kit, which comes in the usual crush-proof box containing a single gray sprue, a small clear sprue, the decals and the instructions. ICM tried to leave nothing to chance in terms of detail and parts count is high for this aircraft and scale. As everything, this has its supporters and haters depending on taste.
Plastic is fine and pieces have almost no blemishes or visible marks. Since the modeller will be handling very small parts, this is already a good starting point. Panel lines are very thin and well engraved where appropiate.
The kit represents a Type 24, different from earlier variants by having a tailwheel instead of a skid and an armament of 4 machine guns. As the kit is the same for the Type 18 and 28, these variants can also be built with the corresponding replacement of weapons and tail wheel.
Cockpit
The interior fuselage sides are flat without detail, however the side access hatches can be shown open by cutting the pieces along the engraved contour. The interior is certainly realistic, with the floor molded with the backrest and the headrest. This piece is attached on the edge of the wells and a raised strip molded with the lower section of the fuselage. The control stick is attached through a hole in the floor and is molded with the control gear. There are pieces for the seat and the instrument panel, which looks great and has engraved gauges. The windshield is thin, though not very transparent, but this shouldn’t make anyone unhappy because of its size. There are alternative collimators, opaque and clear, located behind the windshield. Their size does not allow to see the difference between them.
Fuselage and engine
The fuselage halves are molded with a section of the wings and the fin without the rudder. Part of the ventral area is separated and molded with a length of the wings. This way, ICM simplifies and improves the detail of the complex curves in the wing roots. In return, you have to fill seam lines but in different places than usual. The tail cone also comes separately to build the tailplanes.
The engine is very good. The firewall panel is detailed on the external side and there are pieces for the engine bearer, the tank and the exhaust manifold with a separate intake on top. The engine itself is made up of a cylinder row showing acceptable definition, the propeller gearbox and a row of tappets, in addition to the shaft that will be used to glue the propeller.
The cowling is divided into 5 panels, which will tempt some to show part of the engine. According to the instructions, you have to glue the tiny exhausts to the engine precisely enough to match the exhaust exit ports. The task seems tricky, to say the least. The lower cowling panels are molded with a section of the wing leading edge. The upper cowling panel is glued to recesses on the fuselage and shows the armament fairings and the tank filler cap.
The front cowling is very nicely rendered. It contains open ventilation shutters, the machine gun muzzles and the top and bottom intakes.
Wings and empennage
The breakdown of wings is quite unique. Each wing is in one piece half embedded in the section molded with the fuselage. The detail of the surfaces made of wood, fabric and metal seems nice for the scale. There are the riveted ammo access panels, the microscopic aileron hinges, and a realistic canvas surface. There are also position lights on the wingtips, but they are barely noticeable. The machine guns are just a couple of little tubes, but not much else can be add to that size. As said, there are pieces for the wing cannons of the Type 28. The pitot tube is also a tiny rod and comes separately.
Stabilizers and the vertical rudder are designed to be positionable, which is another advantage of this kit. The vertical rudder shows the hinge gaps and is provided with a post to be inserted into the stabilizers. The elevators are joined by a shaft that covers the tail cone, which is a separate fuselage section. Tapered surfaces on the tailplanes are not as as good as on the wings and they look almost flat.
Undercarriage
The wells are really well rendered, being deep enough and showing the attachment points of the retraction lines, which are not shown in the instructions. The legs and struts are well profiled and thin. The covers are plain on the inside, but show good detail on the outside. The lower section must be cut to place it perpendicular to the cover. The wheels also look excellent, showing good definition in the tires.
Decals
The sheet contains Russian stars with and without a black contour line, slogans, white numerals and small victory marks. The sheet looks good and decals are apparently thin.
The patriotic slogans on Safonov’s plane were painted on both fuselage sides, as can be seen in the drawing printed on the box cover. As regards Tatarchuk’s aircraft, it should be noted that the victory markings were all in a single row and not in two as on the sheet. This can be seen in the photos of the pilot and his plane taken by Soviet propaganda.
Instructions
They are printed on a single A4 sheet. It contains a parts plan, a list of color with Model Master paint matches, and 5 very clear assembly steps. Over time ICM instructions for this kit have been falling short and no longer include the profiles with color and decals callouts present in the first boxes. Also missing is an updated list of paints including other manufacturers and a reference to simulate the undercarriage retracting lines.
Conclusion
Since ICM bothered to make such detailed kit, it’s a shame it has been so conservative all this time and hasn’t released such a versatile aircraft in earlier variants and nationalities in different paint schemes. Someone will soon fill the gap if you wait till the cows come home, and now Clear Prop! is the brand to follow for an early 1/72 I-16. Even Hasegawa, not exactly the boldest of companies, has released more colourful and different variants than ICM in all this time.
Although the kit is still a good choice for any of the three types that can be built from the box, it is handicapped by the incomplete instructions and little variety in painting options.◊
Publicado – Published: 8 / 2022
©www.jmodels.net


Debe estar conectado para enviar un comentario.