

De un vistazo – Quick look
MATERIAL Y PIEZAS
MEDIA & PARTS:
- Plástico inyectado (41 piezas), plástico transparente (5 piezas).
- Injected plastic (41 parts), clear plastic (5 parts).
CALCAS – DECALS:
- Hinomarus, marcas de la Cruz Roja, numerales y rótulos. Aparentemente finas y saturadas de color. Sin exceso de soporte.
- Hinomarus, Red Cross markings, registers and identifications signs in Japanese. Apparently thin and color-saturated. No excess of carrier film.
OPCIONES – OPTIONS:
- Tachikawa KKY-1. Aikoku 97. Osaka Yakushi Seiyaku (Aparato donado por las asociaciones de fabricantes y minoristas de medicamentos de Osaka el 22 de abril de 1934).
- Tachikawa KKY-1. Aikoku 125. Sakai.
- Tachikawa KKY-1. Tachikawa KKY-1. Aikoku 97. Osaka Yakushi Seiyaku (Aircraft donated by Osaka drug manufacturers and retailers on 22 April 1934).
- Tachikawa KKY-1. Aikoku 125. Sakai.
INSTRUCCIONES – INSTRUCTIONS:
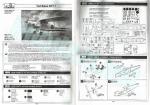
- Folleto de tamaño A4 de 4 páginas impreso en blanco y negro. Contiene una breve reseña histórica sobre el avión, una lista de colores con equivalencias de pinturas esmaltes de Humbrol, un plano de piezas numerado, 7 capítulos de construcción y una página de perfiles. Claras.
- 4-page A4 brochure printed in black and white. It shows a short historical summary about the aircraft, a list of colors with matches in Humbrol enamel paints, 7 assembly stages and a page of profiles. Clear.
LO MEJOR – THE BEST:
- Avión inusual. Carlinga decente. Piezas transparentes mejores de lo esperable.
- Unusual aircraft. Decent cockpit detail. Clear parts are better than could be expected.
LO PEOR – THE WORST:
- Moldeado irregular en algunas piezas. Unión de las alas al fuselaje.
- Irregular molding on some parts. Fuselage-wings assembly.
VALORACIÓN – CONCLUSION:
- Avión muy singular, sin representación en el modelismo, salvo por este molde de Amodel. No es sencillo de montar y algunas piezas necesitan ser refinadas. Maqueta sólo apta para modelistas con experiencia y ganas.
- Very uncommon aircraft, with no other kits available, apart from the Amodel tooling. It is only suitable for the experienced and willing modeller.

La maqueta
Es innegable que el Tachikawa KKY es un modelo infrecuente en la aviación japonesa de la década de los años 30 y 40, por eso no resulta muy extraño que las tres maquetas que Amodel lanzó en 2012 sean las únicas disponibles a cualquier escala hasta ahora. Este trío de maquetas se inició con el modelo KS y continuó con las variantes KKY-1 y 2. Obviamente, todas ellas comparten el mismo molde y tienen algunas piezas alternativas según el modelo.
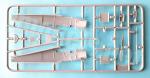
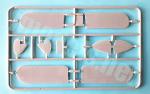
La caja de este KKY-1 contiene tres pequeños bastidores de plástico gris, un bastidor transparente, la hoja de calcas y las instrucciones. Las piezas no son gruesas en general y no muestran rebabas muy evidentes. El moldeado a escasa presión que emplea Amodel deja que desear en la mayoría de las piezas, que necesitan cierto refinamiento para mejorarlas, básicamente un lijado suave o rellenar algunos ligeros hundimientos en la superficie del plástico. Contra lo que se podría esperar, no hay marcas de eyector y las piezas transparentes no están distorsionadas ni son demasiado gruesas para lo que en ocasiones uno se encuentra en otras maquetas de este fabricante.
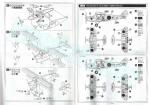
Las opciones de montaje de las instrucciones se refieren a las ruedas, unas más grandes con buje plano y otras menores con el buje detallado con el eje. Amodel ha plasmado correctamente en el paso de montaje correspondiente qué par de ruedas es aplicable en cada caso: el Aikoku 125 tenía ruedas de neumáticos grandes y llanta plana, mientras que el Aikoku 97 llevaba las de menor diámetro, como reflejan las fotos de estos dos aviones. También es alternativo (acristalado o no) el panel situado sobre la carlinga. Sin embargo, las hélices también eran distintas en cada uno de estos aparatos. Las imágenes nos muestran una hélice de metal en el Aikoku 97 y otra de madera en el 125. Ambas hélices eran claramente diferentes en el tamaño, las palas y particularmente en la forma del buje. Por suerte, Amodel ha incluido los dos tipos de palas en la maqueta, aunque las instrucciones señalan solamente la de metal como la única opción válida para ambos aviones.
La maqueta representa un KKY-1 (Kogata Kei Kanja Yusoki, “Avión sanitario de tipo pequeño”) con motor en línea Cirrus Hermes Mk IV, que se cambió por el radial Gasuden Jimpu Modelo 3 en el KKY-2 debido a problemas de vibración. El avión fue empleado en China como aparato sanitario con capacidad de despegue y aterrizajes en pistas cortas no preparadas próximas al frente. Podía llevar dos camillas, un asistente médico y material sanitario. Aunque los KKY fabricados fueron empleados por el Ejército, el avión nunca tuvo registro militar al no haber sido pedidos formalmente por este.
Carlinga e interior
Los lados internos del fuselaje muestran el relieve de la estructura de forma diferente en los dos lados. Esto se debe a que el lado izquierdo contiene el refuerzo estructural de la puerta de acceso a la carlinga. Parte del suelo está separado en una pieza detallada con líneas en relieve sobre la que hay que pegar los asientos y los controles. Estos elementos van colocados sobre un soporte en forma de T que lleva los asientos, la fina palanca de control y unos pedales que poseen buena nitidez. Los asientos tienen ligeros hundimientos en la base que serán sencillos de rellenar. El panel de instrumentos está separado y sus diales están bien grabados. No hay calcas para representarlos. La cabina se completa con el panel del techo, que puede ser opaco en el caso del Aikoku 97, o bien acristalado, reproducido en una pieza transparente fina, para el Aikoku 125.
La parte posterior del habitáculo contiene un mamparo trasero abierto en uno de los lados y dos camillas plegadas en el lado de estribor. El panel es algo grueso y necesita lija, mientras que la pieza que simula las camillas es de mediana calidad, pero se puede dar por buena.
El parabrisas y las ventanillas laterales son finos y poseen transparencia adecuada. Las ventanillas tienen un ligero reborde para encajarlas en los marcos y, con un poco de cuidado, su cara interna no sobresaldrá de la superficie interna al pegarlas. El parabrisas está detallado con los soportes de la estructura. No he cotejado su ajuste en el fuselaje.
Fuselaje
Los lados del fuselaje no contienen la cola ni los paneles sobre la carlinga ya mencionados en el apartado anterior. Hay otro pequeño panel separado bajo la cubierta del motor. Las superficies externas tienen cierta irregularidad no muy apreciable debido a la inyección lenta del molde, sin embargo la puerta de la carlinga y la del compartimento trasero aparecen grabadas nítidamente.
La cara frontal del motor está separada en una pieza delgada y bien definida que tiene la toma de aire del motor abierta. El motor también está en parte reproducido y cubre parcialmente el hueco de la toma. El tubo de escape, una pieza que incluye el silenciador, es bastante largo y fino. Las instrucciones no enseñan bien dónde pegarlo al motor y al fuselaje, pero todo indica que la pieza va unida a la salida moldeada en el panel separado bajo el motor. Como he mencionado antes, la maqueta trae las dos hélices distintas que se aprecian en las fotos de los aviones plasmados en las instrucciones. Ambas piezas son finas, carecen de rebabas y están bien perfiladas.
Alas y cola
Tanto las superficies superiores como las inferiores están moldeadas de una pieza. En todas ellas la reproducción del relieve estructural es algo mejor en las caras superiores que en las inferiores, donde las líneas en relieve no son uniformes, y además las superficies muestran ligeras irregularidades a causa de la inyección. Los planos superiores muestran las tomas de combustible en relieve y los flaps y alerones bien grabados en ambas caras.
Todos los planos cuentan con vástagos muy cortos para unirlos al fuselaje. Los planos inferiores no tienen mucho problema, sin embargo los superiores van pegados a las piezas laterales transparentes que contienen las ventanillas, cuyo plástico es mucho más quebradizo que el plástico normal. Sin duda, la unión de las alas al fuselaje necesitarán refuerzos para lograr firmeza.
Los soportes de las alas hay que sacarlos a partir de las piezas en forma de N que Amodel proporciona. El recorte debe hacerse con cuidado porque las piezas son finas. Las superficies de los soportes también muestran una irregularidad que se puede corregir con lija suave.
Las superficies verticales y horizontales de cola están separadas en sendas piezas. La aleta y el timón vertical tienen una alternativa para el modelo KKY-2 identificable por el perfil de la pieza y la forma de la parte inferior del timón. El detalle de esta pieza es mejor que el de las alas y el timón está bien marcado. Lo mismo ocurre en los planos horizontales. Estos últimos van insertados en el puro de cola y detallados con finos soportes inferiores.
Tren de aterrizaje
Además de las ruedas opcionales, el tren principal consta de cuatro piezas muy finas y quebradizas que deben manipularse con cuidado. Las patas incluyen los amortiguadores, reforzados por dos piezas que simulan cordones con resortes que también contienen las ruedas. El par de ruedas más pequeño tiene los neumáticos marcados y las llantas bien definidas. Los neumáticos también están correctamente reproducidos en las ruedas de mayor tamaño, aunque una de las llantas muestra un ligero hundimiento en mi maqueta. El tren posterior consiste sólo en un pequeño patín delgado.
Calcas
La hoja está bien impresa y los motivos tienen apariencia fina y correcto relleno de color sin exceso de soporte. Amodel ha incluido hinomarus, marcas de la Cruz Roja, numerales y rótulos.
Instrucciones
Se proporcionan en un folleto de tamaño A4 de 4 páginas impreso en blanco y negro que contiene una breve reseña histórica sobre el avión, una lista de colores con equivalencias de pinturas esmaltes de Humbrol, un plano de piezas numerado, 7 capítulos de construcción y una página de perfiles. En conjunto, los pasos de montaje son bastante claros y muestran correctamente las alternativas de montaje.
Los dos aparatos propuestos no tienen diferencias de color, ya que ambos están completamente pintados de gris claro y únicamente contrastan en las calcas. Como la mayoría de los KKY fabricados, las dos alternativas representan aviones donados al Ejército Imperial mediante cuestación (Aikoku). Estas recogidas de fondos solían realizarse por motivos patrióticos entre los miembros de diferentes empresas, gremios y otros grupos sociales. Con la ayuda del blog Arawasi y de los modernos traductores de imágenes, he podido saber por quién y cuándo fue donado el Aikoku 97. Con el 125 no he tenido tanta suerte, y sólo sé que el paréntesis tras el número dice “Sakai”.
Valoración
Aunque el KKY es un avión casi desconocido en el modelismo, no puede negarse que Amodel lo ha representado decentemente al menos. Naturalmente, lo ha hecho como de costumbre, con ese moldeado flojo que suele dar como resultado piezas con poca nitidez general en el detalle. Con todo, la cabina me parece decente y las piezas transparentes son bastante mejores de lo que cabría esperar.
La construcción de la maqueta no parece sencilla, ni tampoco la pintura nos va a motivar mucho, por ello es recomendable tener una cierta experiencia para afrontarla. Imagino que sólo los aficionados a la aviación japonesa o los que busquen una esquiva rara avis (nunca mejor dicho) la encuentren atractiva de armar.◊


The kit
It is undeniable the Tachikawa KKY was a rare bird in Japanese aviation of the 1930s and 1940s, so it is not very strange that the three kits Amodel released in 2012 are the only ones available in any scale for the moment being. This trio of kits started with the KS and continued with the KKY-1 and 2 variants. Obviously, they all share the same tooling and have some alternative parts depending on the variant.
The box of this KKY-1 contains three small gray plastic sprues, a clear sprue, the decal sheet, and the instructions. Pieces are not thick in general and do not show much evident flash. The low-pressure molding that Amodel use leaves something to be desired in most parts, which need some refinement, basically soft sanding or filling in some slight sinks present on a few parts. Contrary to what might be expected, there are no ejector marks and clear parts are neither distorted nor thick as one often finds in oher kits from this manufacturer.
Assembly choices in the instructions refer to the wheels, which are provided in two sets: a larger pair with flat hubs and a smaller one with raised hubs. The brochure correctly shows which pair of wheels is applicable in each case. The Aikoku 125 had wheels with large tires and a flat hub, while the Aikoku 97 had the smaller diameter hubs, as seen in the photos of these two planes. The panel located above the cockpit is also alternative (glazed or not). However, the propellers were also different in these machines. Images show a metal propeller on the Aikoku 97 and a wooden one on the 125. Both propellers were clearly different in size, blades and particularly in the shape of the hub. Luckily, Amodel included both types of propellers in the kit, although the instructions indicate only the metal propeller as the valid option for both aircraft.
The kit represents a KKY-1 (Kogata Kei Kanja Yusoki, “small type patient transportation machine”) with a Cirrus Hermes Mk IV inline engine, which was changed to the Gasuden Jimpu Model 3 radial in the KKY-2 due to vibration problems. The plane was used in China as a medical transport with the ability to take off and land on short, unprepared airstrips near the front. It could carry two stretchers, a medical assistant and medical supplies. Although most of the KKYs delivered (around 24 machines) were used by the Japanese Army, the aircraft never had any military registration as it was not formally ordered by the service.
Cockpit and interior
The inner fuselage sides show the raised structure differently on both sides. This is because the left side contains the structural frame for the cockpit access door. Part of the floor is separated in a piece detailed with raised lines to attach the seats and controls. These pieces are placed on a T-shaped base carrying the seats, the fine control lever and the pedals, which are nicely defined. The seats have slight sinks on the bases that will be easy to fill. The instrument panel is separate and the gadgets are sharply engraved. There are no decals to represent them. The cockpit includes an overhead panel, which is provided as an opaque piece in the case of the Aikoku 97, or as a thin clear piece in the Aikoku 125.
The rear cockpit contains a bulkhead open on one side and two folded stretchers on the starboard fuselage. The panel is somewhat thick and needs some sanding, while the stretchers are just passable.
The windshield and side windows are thin and have adequate transparency. The windows have slight recesses to fit them into the fuselage frames. With a little care, their inner faces will not protrude from the fuselage surface when glued. The windshield is detailed with the raised structural detail. I have not checked the fit on the fuselage.
Fuselage
The fuselage halves are molded without the tailplanes and the cockpit panels mentioned in the previous section. There is another small separate panel under the cowling. External surfaces have some irregularity that is not very noticeable due to the tooling slow injection, however the cockpit door and the rear compartment door are well engraved.
The engine front face is separated into a thin, well-defined piece showing the air intake open. The engine is also partly reproduced and covers the intake gap. The exhaust pipe, which is molded with the muffler, is quite long and thin. Instructions do not clearly show where to attach it to the engine and fuselage, but everything indicates that the piece is glued to the raised outlet molded on the separate panel under the cowling. As mentioned, the kit provides the two different propellers that can be seen in pics of the Aikoku 97 and 125. Both pieces are thin, flash-free and well profiled.
Wings and tail
Both the top and bottom surfaces are molded in one piece. All of them show a better defined structural detail on the upper sides than on the lower ones, where the raised lines are not consistent, and the surfaces are also rough due to molding process. The upper wings show raised fuel filler caps and appropiately engraved flaps and ailerons on both sides.
All the four wings show very short pins for fuselage attachment. The lower planes will not be as difficult to attach as the upper ones because these are glued to the clear side pieces containing the windows, where plastic is much more fragile. Unquestionably, the fuselage-wings attachment will need strengthening.
The wing struts are provided in N-shaped pieces that are trimmed to get the pieces. Cutting should be careful because the pieces are thin. The struts show irregular surfaces that need some soft sanding.
The tailplanes come separately. The fin and the vertical rudder have an alternative for the KKY-2 variant noticeable by the profile of the piece and the shape of the lower rudder end. Detail on this piece is better than on the wings and the rudder is well marked. The same happens with the stabilizers. These are inserted into the tail cone slots and are detailed with thin bracing struts.
Landing gear
In addition to the optional wheel sets, the main gear consists of four very thin and brittle pieces that should be handled with care. The legs include the shock absorbers, complemented with two pieces that simulate springs that also contain the wheel axles. The smaller pair of wheels has nicely engraved tires and well-defined rims. The tires are also correctly reproduced on the larger wheels, although one of the rims shows a slight sink in my kit. The tail is only provided with a small thin skid.
Decals
The sheet is correctly printed and the items have a fine appearance and correct color saturation without too much carrier film. Amodel have included hinomarus, Red Cross markings, numbers and labels.
Instructions
They are provided in a 4-page A4 size brochure printed in black and white containing a brief historical background on the aircraft, a list of colors with matches in Humbrol enamel paints, a numbered parts plan, 7 construction chapters and a page of profiles. Overall, assembly steps are quite clear and correctly show the alternatives along the build.
The two proposed machines have no color divergence, since both are completely painted in light gray with only different decals. Like most KKYs produced, the two alternatives represent aircraft donated to the Imperial Army through charity collections (Aikoku). These fundraisings were carried out among members of different companies, guilds and other social groups. With the help of Arawasi blog and modern image translators, I have been able to find out by whom and when Aikoku 97 was donated, but I have not been so lucky with 125, and I only know that the parenthesis after the number reads “Sakai”.
Conclusion
Although the KKY is an almost unknown aircraft in modeling, it is also true that at least Amodel rendered it decently. Naturally, they did it as usual, with that soft molding that often brings about pieces with little sharpness in detail. All in all, I find the cockpit decent and the clear parts are quite better than expected.
The kit assembly does not seem easy, nor painting is what I would call inspiring either, so it seems advisable to have a certain experience with short runs. I suppose that only fans of Japanese aviation or those looking for an elusive rare bird (pun intended) will find this KKY attractive to build.◊
Publicado – Published: 2 / 2024
©www.jmodels.net

Debe estar conectado para enviar un comentario.